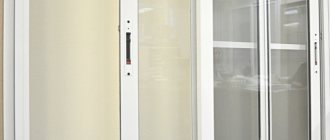
The balconies in our houses are not that big - the average area of such a slab is about 320x80 cm and that includes the fencing, so you can’t walk around much. Now, given the increased noise and dust on the streets, many people resort to glazing their balconies, but the opening sash practically blocks the entire passage. The easiest way out of this situation is to install aluminum sliding windows, which will allow you to save useful space. It would not be amiss to mention that such designs are acceptable not only for balconies, but also for loggias.
Briefly about the stages of work.
- Preparatory - exactly what was mentioned above; it is better to take measurements of the balcony several times so that you don’t have to redo anything in the future.
- Installation of the visor . It is mounted on the top slab of the balcony and serves to drain water so that moisture does not get inside. The length of the structure must strictly coincide with the length of the remote structure.
- Installation of window frame . Perhaps this is the most critical stage, on which the strength of the entire structure will depend. It is at this moment that, as a rule, all the errors made during measurements come to the surface. The profiles that will make up the frame are fastened with anchor bolts, all cracks and gaps are carefully foamed.
- Fastening window sashes . Here, everything is simple, the main thing is to check the structure for level.
- Sealing . Generously fill all joints and crevices with silicone. In the case of an aluminum profile, this is the only protection against moisture and dust.
And if you live on the top floor, installing an aluminum frame may pose some difficulties. As a rule, such balconies do not have a top slab and, most likely, the roof will need to be slightly rebuilt. As a rule, a metal frame is constructed, and roofing material is already laid on it. It will serve as a roof for your balcony. But keep in mind that in this situation you will need an individual project and competent drawings, taking into account many nuances, such as the slope of the main roof, the width to which the roof needs to be extended and much more. In addition, working at height is completely unsafe; it is necessary to provide insurance, and a competent assistant will not hurt. Therefore, in the absence of the necessary experience, in this case it is better to entrust the glazing of the balcony to professionals, and only observe the process from the outside.
Installation technology for sills, window sills and slopes
For this stage you will need:
- self-tapping screws or self-tapping screws;
- polyurethane foam;
- regular or stationery knife;
- silicone sealant.
The main task of ebb tides is to prevent water from entering the room during rainy weather.
Using self-tapping screws (screws), the aluminum ebb is attached to the outer lower part of the frame (stand profile). After that, using polyurethane foam, all formed cracks are removed. After hardening, the residues are cut off, and silicone sealant is applied along the seam line.
Installation of an aluminum window sill is carried out using the following tools:
- silicone sealant;
- plasters or putties;
- spatula.
The technology for installing an aluminum window sill is similar to installing its plastic counterpart. It is mounted under the frame, in a special groove. But it can also be pressed against the stand profile or against the frame itself. Such nuances must be corrected at the measurement stage.
The installation of the window sill itself is carried out on foam, and a strip of silicone is applied to the place of contact with the frame. Again, the connecting side seams are “hidden” using plaster or putty. This also allows you to level out all surface differences. After installing the window sill, its seam must be sealed with silicone sealant.
Finishing of slopes is carried out using the following materials and tools:
- sandwich panels;
- sealant or additional profile;
- plasterboard sheets;
- self-tapping screws;
- putty/plaster;
- putty knife.
Slopes are the last and final element of the integrity of the window structure. Work on them is carried out last. Experts most often use and recommend sandwich panels for aluminum windows. They allow you to give a more aesthetic appearance to the window. To attach the slopes to the window, a sealant is used, and in some cases an additional profile is used. This nuance depends on how this question was posed during the measurements.
For a more economical option, you can use drywall. Then it must be secured using self-tapping screws directly to the wall itself. And the seams between the slabs and the frame are covered with plaster or putty. After such installation, the surface of the drywall is exposed with a primer and can be easily painted or varnished.
Practical tips for insulating an aluminum balcony
In large cities, capitals of regional centers and even in small populated centers built on the basis of a master plan, new buildings are increasingly appearing, and more often entire microdistricts with new multi-storey buildings whose balconies and loggias have a complex semicircular contour and glazing. Glazing made in the same style and color scheme gives an attractive appearance and relieves owners who have purchased apartments in such buildings from the hassle of glazing their balconies themselves.
When designing glazing, architects proceed from the fact that a balcony (loggia) is not a heated structure. Therefore, the glazing provided for by the project is always laid as single, capable of protecting the balcony from wind, dust and precipitation, but not from low temperatures. More than 50% of Russians do not want to understand the simple truth - a balcony is not a sauna or a greenhouse.
Having received a glazed loggia as a gift from the developer, they immediately begin to be tormented by the question of how an aluminum balcony is insulated. In this article we will look at various aspects of this problem.
In what cases is ventilation required on the balcony?
Initially, the balcony and loggia were an open structure used for growing plants or drying clothes. The glazing trend came later, but since the windows had wooden frames, the structure of the material allowed natural ventilation.
The situation changed with the advent of plastic double-glazed windows, which ensure almost complete tightness of the room.
Lack of ventilation leads to increased humidity in the room and the development of fungus and mold, which can become a threat to the health of people and animals
The benefits of such windows are obvious:
- High thermal insulation properties;
- High sound insulation properties;
- Tightness;
- Long service life.
But along with a number of advantages, the problem of condensation arises, which inevitably has to be solved. Partially, the problem of excess moisture can be solved with high-quality insulation, but even this effective work does not eliminate the need for a ventilation system.
Causes of condensation
Warm humid air on a balcony or loggia, when it comes into contact with the cold surfaces of partitions or double-glazed windows, quickly reaches the dew point. As a result, the resulting steam settles on the walls and glass.
Warm humid air on a balcony or loggia, when in contact with cold glass of double-glazed windows, due to the lack of high-quality exhaust ventilation, is deposited in the form of condensation
First of all, condensation forms on insufficiently insulated surfaces. But there is no escape from excess moisture even with high-quality insulation. Moisture will still continue to accumulate, albeit not as quickly. To eliminate it, you will need a ventilation system.
Signs indicating the need for ventilation
Any closed balcony or loggia (if high-quality glazing is installed) needs a ventilation device.
The main signs indicating the need to improve air exchange:
- Increased humidity, condensation formation;
- Formation of fungal black mold;
- Perceptible mustiness and stuffiness in the air;
- Rotting of wooden structures or natural fabric materials.
The absence of the problems described is not yet a reason to refuse ventilation on the balcony.
A ventilation system is necessary if:
- The balcony or loggia is glazed using modern double-glazed windows.
- The glazed unheated space is located on the top or first floor, which increases the risk of dampness.
- The room is used for drying things or storing food.
- Things that deteriorate when exposed to moisture are stored indoors.
- Lack of regular ventilation by opening windows.
Other troubles may also arise - when mold appears, through drying clothes or objects it can get into other rooms of the apartment.
"Cold" aluminum window profile
Typically, when glazing balconies or loggias, the developer uses the so-called “cold” aluminum window profile with single glazing for glazing. The choice in favor of such glazing is made for economic and technological reasons. This option is the cheapest and does not increase the cost of square meters in a new building. It allows you to easily glaze a semicircular or complex balcony contour.
The design of the aluminum window profile does not provide for the installation of 2-3-layer double-glazed windows.
Even a 3-chamber double-glazed window will not reduce heat loss from freezing of aluminum, which has excellent thermal conductivity.
Therefore, the developer, by installing such glazing, prevents the owners’ initiative in insulating balconies and increasing energy costs due to the high consumption of heat energy used to heat the street.
But restless citizens, no matter what, want to have “warm” balconies. The inability to physically insulate the cold aluminum profile of a balcony window forces them to look for all sorts of ways and resort to various tricks.
We carry out installation work ourselves
Glazing a loggia with an aluminum profile can be done without the help of specialists who will require you to pay properly for their work. There is no particular difficulty in installation, you should adhere to the basic rules and the work will be done with five points.
Let's look at what stages the entire installation process can be roughly divided into:
- Preparing for installation
- Do-it-yourself installation of double-glazed windows
Preparatory stage
Like any other window frame, aluminum profiles require careful preparation. The final result will depend on the quality of the prepared surface. It seems that this is not at all related to glazing and one could treat such work obscenely, but no.
You should approach the work very seriously and carry out the necessary actions with due attention and perseverance. https://www.youtube.com/watch?v=LQdN2yYRsVo
The first step is to dismantle the old frame, but do not put too much force on it. Otherwise, you may damage the base, which is obviously bad.
If there are parts from the old frame, pieces of chipping concrete or old fasteners left on the railing, be sure to remove them. If the surface of the base is too damaged, it should be restored; in this case, glazing with an aluminum profile is postponed for several days until the concrete has completely dried.
To improve the quality of installation, a wooden beam measuring fifty by fifty millimeters can be attached to the top of the railing. Our aluminum window frame will be attached to it. After the preparation has been completed, you can proceed to the next stage, installing double-glazed windows on your balcony or loggia.
Installation of aluminum structure
First you need to remove all opening parts, this will lighten the frame and make it easier to install. If there are blind areas of the window, the double-glazed windows should be removed from them so as not to damage them and to further facilitate the structure.
Mounting plates or brackets are then attached to the frame. The optimal step between them is fifty to seventy centimeters, depending on the total weight of the window and the thickness of the plates. They are fixed directly into the profile using metal screws.
The frame is installed in its place and secured with wedges. They also need to adjust the level we need, measuring it with a special device. The wedges must fit very tightly in order to calmly hold the entire frame together with the double-glazed windows.
Tips for working with glazing
The foam on the outside must be sealed, as under the influence of sunlight it will dry out and crumble. It is best to cover the seam with any mortar and then cover it with the material you like.
Remember to constantly check the level of the frame during installation. Especially after returning all the glass units and moving elements to their place. Under weight, the level may shift and it will need to be corrected. After foaming, such a procedure will be very problematic.
Legal aspect of changing the facade of a building
Any changes made to the enclosing structures of the building's facade (and these include balcony parapets), as well as glazing that does not correspond to the general architectural concept, require permission from local executive authorities.
Relevant regulations have been adopted at the level of each subject of the Federation.
In Moscow, this is Government Decree No. 508 of October 25, 2011 “On the organization of reconstruction and (or) redevelopment of residential and non-residential premises in apartment buildings.” One of the points of this Resolution provides for the mandatory obtaining of permission if “the shape of window and door openings in external enclosing structures changes;).
The procedure for obtaining such permission consists of five successive stages and the approval of about 40 documents.
The cost of services of law firms (in Moscow) providing services for coordinating changes to facades for a full package is about 1,000,000 rubles. There is something to think about.
What tools are needed?
The set of tools will depend on the installation technology and the types of work required - with or without dismantling the old balcony glass block.
In the most common cases, the following tools will be required :
- A crowbar is used to dismantle the old window block.
- Hammer for making dowel fasteners, knot fitting, for dismantling operations on old frames.
- Chisel for dismantling work on the frame, as well as removing old ebb and window sill structures.
- A wood hacksaw for cutting an old wooden frame to simplify dismantling.
- Measuring tools: tape measure, ruler, angle and level.
- Screwdriver for tightening screws and other fasteners.
- Screwdriver with bits.
- Electric drill with concrete drills for making mounting holes in walls.
- A set of hex keys for assembling and adjusting the operation of the window unit.
- Gun for silicone sealant and construction foam.
Methods of insulation from “traditional craftsmen”
The simplest way to try to solve the problem of insulating a cold aluminum window profile on a balcony is to paste over its frame with a thermal insulating material - penoizol or penofol. The efficiency of such “insulation” tends to 0. This is understandable. Even using the thickest 10 mm penofol, it is impossible to provide sufficient thermal insulation. Such “insulated” aluminum windows lose heat not so much due to freezing of the metal frame, but due to heat loss through the single window glass.
Pasting a single window glass with a high-quality heat-insulating (energy-saving) film can reduce heat loss in winter by up to 30%. But, of course, it cannot completely replace the second or third glazing contour with film. Some craftsmen completely remove window frames made of aluminum profiles, leaving only crossbars-guides, and in their place they install windows made of PVC profiles with double or triple glazing. In this case, the appearance of the building facade immediately suffers. Since the PVC profile is thicker and visually very different from the aluminum window profile. Such a replacement is not acceptable if the balcony is semicircular.
Another trick to insulate a balcony is to install a second glazing loop made of PVC profiles with double glazing behind the existing glazing. This significantly reduces the area of the balcony and makes it impossible to wash the window glass between window blocks located close to each other.
All these “guerrilla” methods of insulating cold aluminum profiles of balcony windows are either ineffective and still do not allow its use in the cold season, or lead to a critical loss of appearance and functionality.
Difficulties in the glazing process
Sliding aluminum windows on loggias and balconies must be installed as accurately as possible, otherwise the shutters may not open. If installation technology is violated, the following difficulties usually arise :
- The sashes move with force along the guides; to eliminate this malfunction, you will need to adjust the operation of the rollers.
- The latch does not close tightly; in other words, the tongue does not fit behind the strike plate. This is a locking mechanism so that the window cannot be opened from the outside.
- When window sashes sag, the integrity of the structure is compromised and the reliability of the frame is sharply reduced.
Replacing with a “warm” aluminum profile
More radical is to replace the existing glazing with a “warm” aluminum profile - a structure with disconnecting elements made of PVC or other plastic with a low thermal conductivity coefficient. Thanks to this, the aluminum window profile does not freeze, since cold bridges do not form. “The warm aluminum profile used for balcony windows can have 2nd or 3rd glazing or double glazing like PVC windows.
For southern and middle latitudes, such a replacement can be an excellent way out, since choosing an aluminum profile that matches the width and color is not a particular problem. Externally, from the side of the building's façade, such a window will not stand out among its kind. Perhaps a different shine from the glass.
But for northern latitudes, even a “warm” aluminum profile is not suitable for insulation. He's still freezing. If there is heating on the balcony, then ice and icicles form very quickly on the windows and frames.
This is due to the fact that the dew point is shifted towards the balcony and condensation of water vapor and its freezing occurs inside the balcony.
The low thermal insulation properties of aluminum windows are inherent in the very design of the manufacturer of the most popular window systems in Russia: Provedal Sistemas, Spain.
Installation of aluminum and plastic frames. Instructions
The PVC frame is more massive than aluminum, so the installation process will take longer. Both frames are installed on wooden beams.
A hole is drilled in the concrete structure into which the anchor is screwed. Then lay the board horizontally, checking the evenness with a building level. The bars on which the board rests can be moved until the board assumes a strictly horizontal position. Then it is fixed with self-tapping screws. The next stage is the installation of galvanized ebbs, one of which is placed on the board, and the second - directly below it, in the upper part of the balcony.
The tides are fixed with dowels. When glazing long balconies, it may be necessary to install a sill in several parts. To securely connect them, metal screws are used.
The most difficult part of the work is installing the frame and adjusting its position. First, the frame is fixed with wedges, checking the evenness of the position with a level. Then the sashes are hung. They can have single- or double-glazed windows. The work uses a hammer and a level.
Now you can install the spacers. The windows are completely closed, using a mounting tool, the frame is raised slightly and wedges are placed under it. When the evenness of the structure is adjusted, they begin to drill holes for long screws, thanks to which the lower and side profiles of the window will be fixed.
Silicone sealant is used to seal the holes. The cracks and gaps between the frame and the wall are sealed with polyurethane foam. Cement is used to finish slopes.
Wood-aluminum windows
The best option to fully insulate a balcony and make it suitable for use in winter as a warm room are wood-aluminum windows. They come in two types:
- Aluminum profile with decorative wooden trims on the inner (room) side of the window.
- Wooden frames decorated with aluminum overlays on the street side.
The first option for windows is absolutely unacceptable, since its thermal insulation properties are no different from a “cold” aluminum window.
The second option is of interest - wooden frames, glazed with 2-3 double-glazed windows and having aluminum linings on the outside, on the street side, which not only give the window a “techno” style, but protect the wood from the effects of precipitation.
The profile width of such windows will differ from the usual cold profile with single glazing. But you can precisely select the color of powder enamel, which is usually used to paint aluminum windows on the outside, and thereby minimize the visual difference of your balcony window from other balcony windows along the facade of the building.
Installation of sliding windows
How to install aluminum windows? Do-it-yourself installation of aluminum windows is carried out directly on an already fixed frame. The first is the installation of the guide in the profile. To do this, lower and upper guides are installed in its grooves.
After this, the following work is performed:
- the guides after insertion are fixed with screws;
- double-glazed windows and rollers are inserted into the sashes;
- then install the Schlegel;
- after the guides are installed, first we put the top on, and then the bottom and put it on the rollers;
- adjust the roller and rollback clamps;
- We configure the fittings.
Therefore, installing aluminum sliding windows with the right approach is not so difficult, so everyone can install them with their own hands.
Aluminum balconies: the right choice of design
Cold glazing of balcony rooms of any size is best made from aluminum profiles. These days, the market offers an abundance of high-quality aluminum alloy profiles. The main advantage of such structures is that the product is quite light in weight when compared with other profiles. The service life of aluminum structures is 50 years or more. This is very important and should be taken into account when drawing up an estimate of financial investments when planning to glaze a balcony/loggia. The second advantage is that the structure is much cheaper than a PVC profile.
To what has been said above we can add:
- Aesthetics;
- Fire resistance;
- Strength;
- Environmentally friendly.
The negative aspects of aluminum glazing include the high thermal conductivity of the material. When arranging a loggia/balcony, this nuance is important. There is an opinion among professionals that aluminum structures are used when cold glazing is planned.
To compensate for the high thermal conductivity, profile manufacturers began to produce structures with an air gap from the inside.
In order to better conserve heat, this cavity is filled with a special material. Additionally, instead of ordinary glass, reliable double-glazed windows are installed. Thanks to a simple calculation, it became clear that this approach to creating a profile brings aluminum structures to a leading position in the market. The appearance of aluminum profiles on the market makes it possible to glaze a balcony with an extension.
The mounting technology makes it possible to install aluminum structures with offset and not add serious weight to the load on the balcony/loggia fencing, since their weight is minimal. If the balcony room is small, then it is better to install a sliding window opening system, this will save space. It is possible to assemble and install such a system using aluminum guides yourself.
Have you thought about expanding your balcony? The remote design is one of the backup options for expanding the living space. Process technologies, calculations, as well as installation options can be found in the material: https://homeli.ru/komnaty/balkon/balkon-s-vynosom.
Advantages and disadvantages of double-glazed windows
There are varieties that are made using new technology and they are able to create the necessary atmosphere and maintain a comfortable temperature. This became possible thanks to the installation of special thermal insulation inserts in the frame. But such designs are quite expensive and are not yet gaining much popularity.
A significant advantage over plastic and wooden counterparts is the ability to install double-glazed windows with a sliding frame. Thus, the window sash moves to the side along the guides, which significantly saves space. With their help, you can install a window in very narrow places without wasting valuable space for free movement.
Aluminum glazing is very light in weight, which makes it superior to its counterparts, which can be much heavier. Due to their low weight, they can be installed on any balcony or loggia; they do not require a reinforced base and can be installed very easily with your own hands, without outside help.
Manufacturers use powder paint for aluminum, which comes in any shade. It is of very high quality, durable, does not fade and has a rich color. Thanks to the wide palette, it is possible to choose aluminum glazing for any design based on your preferences and needs.
Glazing of balconies with aluminum profiles: installation sequence
Before glazing a loggia or balcony room with aluminum, it is necessary to complete a competent set of building materials and fasteners. If a home craftsman decides to do all the work on constructing the structure himself, then it is necessary to perform a preliminary calculation of the glazing area. This indicator affects the type of profile that will be selected.
According to their functionality, aluminum frames can be divided into 3 main types:
The hinged profile will be the ideal solution for a wide, voluminous balcony room. If the balcony is medium-sized or the loggia is narrow, then it is better to give preference to a sliding mechanism. In order to ensure highly efficient ventilation of the apartment, it is necessary to install 2 opening structures on 4 blind frames.
Glazing with roof
An excellent solution if the balcony does not have a roof. Tree leaves, snow, and raindrops constantly fall. If aluminum frames are installed, then it is reasonable to install a dependent roof, attaching it to the wall of the house and a block of frames.
The design is lightweight and reliable. Although it is only suitable for a narrow balcony.
If you decide to build an independent roof, then a wooden or metal frame is made without connection to the glazing. You can insert the glass later if you wish.
Glazing a loggia and roof is a dangerous task. It’s better not to do it yourself and entrust it to the experts.
Also, in order to avoid the structure being torn down by the wind, it is important to make the most accurate calculations for the frame and brackets
Cold glazing of a balcony with aluminum profile
If there are already wooden frames on the loggia, then they need to be carefully removed using a special tool. In this case, the area of the balcony room must be cleared of any things and objects. It is imperative to check the strength and reliability of the balcony slab.
In older homes, concrete or brick foundations may lose their original strength over the years.
The old vertical surface must be reinforced with metal strapping. The constructed metal frame must take on the entire load from the glazed frames. Perhaps we can go the other way. Make a cement-sand base by pouring. A small formwork is installed at the top of the parapet. After pouring the solution, the surface must be made strictly horizontal. It is imperative to wait until the solution has completely dried. Only then is it possible to continue the glazing repairs.
In some cases, the parapet may be leveled by strengthening timber beams on top. This option is well suited for glazing loggias. The canopy is placed on top immediately after cleaning. This must be done before installing the frames. The canopy must be installed regardless of what kind of glazing - cold or warm - is done on a particular balcony room. This will ensure the drainage of rainwater from the glass unit. Before installation, you must remove the glazing from the frame. This is done so that the glass does not break during the fastening process.
Since the canopy has already been made, the next step is to strengthen the ebb from below. The void that has formed between the parapet and the ebb must be filled with sealant. The next step is to attach the mounting plates to the aluminum profile. It must be fastened with construction screws. The distance between the mounting plates should be about 7 cm. After this, the frame must be placed in the opening.
Have you thought about tinting your balcony? We offer you detailed material on this topic: https://homeli.ru/komnaty/balkon/tonirovka-balkona.
The design is necessary:
- Put;
- Secure with wood wedges;
- Align.
Leveling is a very important step and must be done carefully and carefully. The frame must be leveled horizontally, vertically and in the plane of the balcony/loggia. This is done in order to mark the places in vertical surfaces and the ceiling where holes will be drilled for fasteners. Having strengthened the frame, it is necessary to once again check its orientation in space. Vertical and horizontal deviations cannot be more than 3 mm.
Once the rigid structure is in place, it is necessary to install solid and movable frames.
Sliding doors should simply be removed and put back. When moving, the doors should open easily. If these conditions are not met, it means that the metal structure is skewed. We need to inspect it and do it all over again.
Assembly of aluminum windows
To begin assembly, you need to prepare a wooden mallet and a set of chisels. The glass unit must be cleaned of dust. Rubber seals and external fixing strips are also cleaned of dust.
To prevent the seals from cracking from extreme cold and heat, it is recommended to additionally lubricate them with silicone grease.
Algorithm of actions:
- remove wooden spacers;
- remove the protective film and check the valves;
- remove dust from the outer bead;
- the double-glazed window is inserted into the lower opening and fixed with wedges;
- then install the top bead;
- install the lower glazing bead;
- then we insert the side strips;
- Using a wooden mallet, we place these planks in place.
After this, the entire structure is secured, adjusted and lubricated to extend the life of the mechanisms.
Adjustment is made using a hexagon or an asterisk wrench.
The procedure for glazing a balcony with your own hands - choosing a design, preparing and installing windows
How difficult is it to independently glaze a standard balcony in a multi-storey building? This procedure does not pose any particular difficulties for professionals - specialized companies can carry out measurement, production and installation within 3-5 days. But sometimes the cost of this work can be prohibitively high. For those who can and like to do the work with their own hands, it is proposed to glaze the balcony themselves.
Selection of construction material
Just 20 years ago, wooden windows were the only alternative option for glazing a balcony. But, thanks to the development of technology, it is now possible to choose different materials for making windows. The most popular and in demand are:
- PVC windows. They are characterized by an optimal price/quality ratio. The plastic profile has good energy-saving characteristics; thanks to the versatility of the design, PVC windows can be equipped with both single glass and double-glazed windows. An important factor is the fittings system, which ensures reliable clamping of the sash to the frame (we already know how to adjust it). The disadvantage of using PVC windows as structural elements for a balcony is their weight. For windows with double-glazed windows it is 60-70 kg/m². This requires fulfilling the conditions of rigidity and reliability of the balcony structure.
- Aluminum profile. In terms of thermophysical parameters, it is significantly inferior to PVC windows, but has a lower specific gravity and low cost. If the operating conditions of the balcony do not require maintaining room temperature in winter, then aluminum profile windows will be an ideal glazing option. An important factor is the presence of parallel sliding sashes in aluminum systems.
- Wooden windows are divided into structures made from homogeneous wood (cheap) and from laminated veneer lumber (Euro-windows). The cost of the latter exceeds the price of similar PVC windows by 60-80%.
Balcony preparation and installation
To carry out the work professionally, it is necessary to carry out a number of preparatory measures. To do this, the entire area of the balcony is cleared of foreign objects. Floor and wall coverings are dismantled.
It is recommended to pre-order window structures from a specialized company. To do this, you should call a measurer who will calculate the dimensions of future window structures. This applies to the case of glazing with PVC windows or aluminum structures.
If you decide to glaze wooden windows yourself, then the following materials and tools will be needed for the work:
- Wooden beam (50*50). The quantity is calculated based on the dimensions of the balcony.
- Window frames ordered in advance.
- Glass, the size of which corresponds to the size of the window frames.
- Varnish or window paint.
- Polyurethane foam, silicone
- Fastening material – nails, dowels
- Drill, hammer.
- Measuring tool – tape measure, level.
At the first stage, a wooden structure made of timber is installed around the perimeter of the balcony. Installation is done using mounting dowels. It is recommended to treat the mounting surface of the timber with sealant.
Having installed the frame, we proceed to installing the windows. Frames are installed without glass, as it may be damaged during installation. First, install the front structures, check their dimensions and level. Then the side elements are installed. As a corner adapter, you can use a beam whose dimensions correspond to the thickness of the frames.
Before installing the glass, it is recommended to treat the grooves with silicone sealant to reduce heat loss. The glass is fixed using glazing beads, which should press it tightly against the frame.
It should be noted that when glazing a balcony with PVC or aluminum structures, the installation price rarely exceeds 10% of the cost of the structure. In this case, you can get a professionally glazed balcony that will meet modern requirements for noise and heat insulation.
As for further insulation of the balcony, this process is described here in sufficient detail.
Disadvantages of panoramic glazing
This type of glazing, despite the abundance of advantages, has some disadvantages.
Design disadvantages:
- the need for a fairly long period of time to restore order, which should be organized on a regular basis;
- difficulties with the ability to reach every outer corner of the structure;
- the influence of climatic conditions, when, under the influence of outside temperature, the room becomes too hot or cold;
- the high cost of creating a design project;
- increased visibility of the interior space from the street.
Systematic care of loggia windows
The panorama fills the entire space from floor to ceiling. This creates difficulties for cleaning the glass surface from contaminants that invariably arise under the influence of dust, precipitation, and wind.
If cleaning is not carried out regularly, there is a high probability that the visibility from such a window, as well as its aesthetic qualities, will deteriorate. This is especially obvious when the house is located close to industrial enterprises, which often produce harmful emissions.
It will be difficult to cope with cleaning the surface on your own. It is much more efficient and safer (especially for residents of the upper floors) to hire special cleaning companies for these purposes. Unfortunately, this will entail additional financial expenses.
Lack of access to the outer surface
The loggia is fenced with panoramic glazing, practically denying access to its external surfaces. This interferes with the safety of the owners, and also creates difficulties in caring for the glass.
An accidental hit by a sharp object can break the glass or damage its integrity, reducing the safety of the entire structure. Falling debris can be quite dangerous, both for the interior and the area around the house.
Important! Installing a single panorama completely eliminates the possibility of ventilating rooms
Summer heat
Panoramic glazing of a loggia, in addition to the advantage of the constant presence of daylight, can also create problems of the same nature. In winter, additional light is beneficial, but in summer, it is accompanied by strong heating of the room. This problem especially often occurs in rooms whose windows face south or east, when the sun shines directly on the loggia in the morning.
In extreme heat it becomes simply impossible to stay there. Thick curtains, blinds, and special blackout designs will help improve the situation a little. They will protect the space from sun penetration, but will visually narrow the space.
Important! To protect the room from heating by the sun, but at the same time not clutter up the space, experts recommend using translucent fabrics and curtains with lifting mechanisms
Winter cold
The winter period can also create some problems. Despite the fact that the problem of cold penetration can be solved by installing energy-saving double-glazed windows, the cold floor will not go away.
When the cold season begins, window openings will fog up due to the temperature difference between inside and outside. To prevent the situation, warm converters are installed and electrically heated floors are installed. For these purposes, you will have to spend a lot of financial resources, but the expenses will be paid off by the comfort of being on such a balcony.
High cost of design and construction
When assessing the pros and cons of a panoramic window mounted on a balcony, we must not forget about the price factor.
The cost of such devices consists of:
- design complexity;
- use of complex technologies;
- use of a special tool;
- the need to equip this room with insulating equipment.
View of the premises from the street
One of the disadvantages of such equipment is that the panorama creates a complete opening of the internal space to prying eyes. That is, all people passing by the house, or neighbors living in the building located opposite, will know what is happening inside the apartment.
To get rid of this problem, curtains are suitable, but they will also prevent daylight from penetrating inside. As you can see, this device will negate all the efforts of the owners who installed such a structure to save energy.
Important! It is mandatory to install ventilation devices that require financial investments.
Glazing a balcony with your own hands - step-by-step instructions
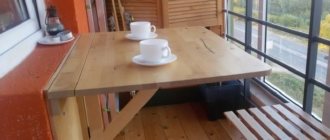
A couple of years ago I decided to glaze my balcony. I wanted to give it a cozy look, put an armchair and a coffee table. But without glazing this was impossible. I decided right away that I would carry out all the installation work myself, because I have little experience, and glazing a balcony with my own hands is a labor-intensive process, but quite realistic. Just a couple of decades ago, all apartments had only wooden windows, but nowadays in the modern world there are several options for glazing residential premises. They have different characteristics, composition, and each has its own pricing policy. Therefore, everyone can choose the most suitable option.
DIY balcony glazing
Dismantling the old frame, preparing the opening
Before installing the window, you need to remove the old frame and prepare the window opening.
Wooden frames are sawn in several places. For this, it is most convenient to use an electric jigsaw, but an ordinary carpenter's saw will also work. The frame elements are removed using a small crowbar. Using a chisel and hammer, remove the window sill slab.
The opening must be cleared of concrete fragments and old fasteners. If it is severely damaged or distorted, leveling with cement mortar will be required. You can proceed to the next stage only after the leveling mixture has completely hardened.
Before installation, carefully check the completeness of the product and carefully read the attached instructions. In most cases, the delivery package separately includes frames, double-glazed windows and fittings.
Choosing material
Since I wanted to give my balcony a cozy feel, the main task for me was thermal insulation. Therefore, I immediately chose the “warm” glazing option. But I’ll write more precisely about each one.
So, there are three types of glazing for balconies:
- Cold - does not retain heat in the room, used for glazing balconies where maintaining room temperature is not required
- Warm – maintains room temperature at any time of the year, does not allow cold to pass through. It differs from the cold look in the set of materials used and their characteristics.
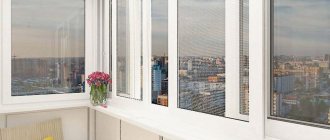
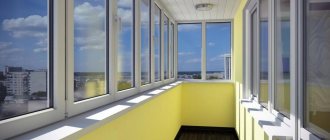
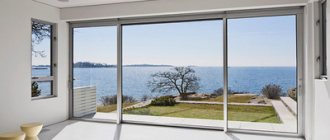
- French - the balcony is glazed along the entire perimeter and height. High-strength and tinted glass is used
French glazing of the balcony using transparent mirror windows.
All that remained was to choose the glazing option for your balcony. The most popular option today is glazing with PVC windows, but there are also:
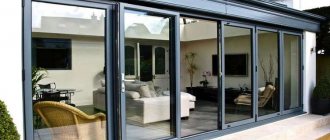
- Aluminum profile
- Wooden windows
Aluminum profile glazing refers to cold balconies
The option of glazing with an aluminum profile immediately became impossible for me. This type of glazing refers to cold balconies. The material is not thermal insulating - it is used on those balconies that do not need to maintain room temperature. The aluminum profile serves to protect the room from wind, rain and snow. However, this form also has its advantages:
- Low weight of materials used
- Low cost
- Parallel sliding sashes
Balcony glazing - wooden frames
Wooden windows are made from two types of materials. If homogeneous wood is used, then the cost of windows is relatively low. If the material is laminated veneer lumber, then the price automatically increases and is already on average 60-80% higher than the cost of similar PVC windows. For me, the option with wooden windows was not suitable due to the price. Although this is beautiful, the financial side of the issue interested me no less. My choice settled on PVC windows. Good price/quality ratio, warmth and sound insulation properties have brought this material to the forefront in demand.
Advantages of sliding windows
Sliding system is the second name for sliding openings. Its opening occurs due to the movement of rollers that are located in the structure.
One profile can contain many guides, so you can install 5 sashes at once.
Sliding windows have the following advantages:
- the frame structure itself is made of aluminum, so it is light in weight;
- the window sashes are made narrow due to the strength of the material, so they let in a lot of light;
- the full profile and double-glazed windows perfectly improve the sound insulation and thermal insulation of the room;
- the window is quite durable due to aluminum, as it is considered very durable;
- opening the window does not take up much space, due to the roller system, so there is a lot of free space in the room;
- the coating of an aluminum window makes it beautiful and unique;
- the lightest possible design, which is very easy to repair and disassemble;
- They guarantee the protection of your home if you additionally use locking devices such as latches or locks.
Siding
In addition to glazing the balcony, I was interested in the option of external cladding of the balcony. And for this I chose siding. This material is the most optimal, it is durable, consists of PVC and is not afraid of sunlight and precipitation. In addition, it enhances thermal insulation on the balcony. The siding has a wide range of colors, and the manufacturer claims a service life of no less than 50 years.
DIY balcony siding
Advice! For those who decide to carry out all the work on glazing the balcony themselves, you need to know that it is better to complete the outer cladding of the balcony before glazing. This will save time and money. After all, after glazing the balcony, it is not so convenient to carry out external cladding, and calling craftsmen who will do all the work with the help of climbing equipment will cost a lot of money.
It is quite possible to do siding work yourself, but only if you are confident in your abilities and have skills in such work. Otherwise, it is better to entrust all work on covering balconies with siding in apartments to qualified specialists who have professional equipment.
Finishing the balcony with siding
I have described the sheathing instructions below:
- First you need to build fastening belts from wooden beams - upper and lower. In the future, siding will be attached to them
- We attach the beams to the wall using liquid nails. They are connected to each other using iron corners
- Let's start installing the siding - you should start from the sides. We do not overtighten the screws; they should be left in the middle of the hole.
- Upon completion of the siding installation, we hide all the screw heads using platbands
Balcony siding
Aluminum balcony frame
The debate about which profile frame is best suited for balcony glazing can go on for quite a long time, and each manufacturer has its own weighty arguments. Let's try to briefly figure out which material to choose.
So, if you plan to insulate your balcony in the future, then you will definitely need warm glazing, which involves the use of single-chamber (at least) or double-glazed windows.
A plastic frame made of a 3- or even 5-chamber profile will cost much less than an aluminum warm profile of the EK-57 or EK-69 series. But plastic is inferior to aluminum in many respects (aesthetic and technical), especially when it comes to glazing a large balcony.
If insulation of the balcony is not planned, then it is cheaper to use a sliding aluminum balcony frame from the “cold” profile “Tatprof”, “KramZ”, “Provedal”, etc. They have a low price, are convenient to transport and easy to install. Here is one example of how to assemble a frame with your own hands.
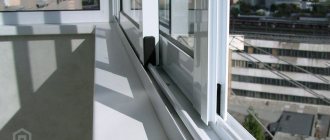
We glue a sealant (included in the kit) to the ends of the upper and lower profiles. Lower (photo 1)
and top (photo 2)
profiles differ in the presence of side walls (do not be confused). First, we take the lower profile and attach the side profile to it (photo 3).
Pay attention to the location of the side profile partitions. In this case (version with four doors), the profiles are arranged “mirror-like”. When changing the number of sashes, the side profiles may not be positioned in a “mirror” manner.
We secure the profiles with self-tapping screws (photo 4).
Before installing the top profile, we insert the lock strike plate (photo 5).
Once assembled, it will be impossible to insert it. After the doors and locks are installed, we will secure it with a hex key at the required height (photo 6).
Install the top profile (photo 7).
The sash is first inserted into the upper one (photo 8),
then into the lower profiles (photo 9).
Adjustment of the sash level, if necessary, is done with a hex key on the removed sash (photo 10).
We insert the lock by pressing the “tongue” at the bottom with your finger (photo 11).
The frame is ready (photo 15).
You can rearrange the “tongue” and also adjust it using the same hex key (photo 12, 13, 14).
Interior decoration
Finishing includes installation of wiring, as well as installation of lighting fixtures, sockets and switches. After which you can work on the walls of the external balcony - decorate them with liquid wallpaper, cover them with natural stone tiles, ceramic tiles or cover them with wooden clapboard. There can be a great many options.
External glazing of balconies, like loggias, only at first glance seems complicated and time-consuming, but by preparing for it in advance and following all the steps, you will definitely be satisfied with your extended balcony. If the process is carried out correctly and efficiently, then the owner receives a huge advantage - a significant increase in usable area, which is often lacking in balconies in houses built in the last century.
- Author: Mikhail Malofeev
Rate this article:
- 5
- 4
- 3
- 2
- 1
(1 vote, average: 5 out of 5)
Share with your friends!
Features and Recommendations
Before starting the installation of glazing, it is necessary to carefully consider the entire system and variations in the opening of the sashes of the structure. This step becomes necessary, since if you neglect it, you risk later encountering problems when caring for the system and its operation.
For many years, the most popular option has been the arrangement of opening sashes through one with blind ones.
Also important is hiding the joints of the window system and the parapet. This is done through additional fittings that need to be purchased (since they are not included in the kit for the windows).
Also, upon completion of the work, all gaps must be sealed with mounting foam and sealant to protect yourself from the passage of moisture and cold. And only when all the work is completed, and nothing else is planned, it is necessary to remove the protective film from the frames and double-glazed windows.