Living room decoration
If in country houses and cottage construction wooden siding is widely used for interior decoration, then in urban apartments the choice of material should be taken very carefully.
Typically in homes, vinyl siding panels are mounted on walls, aluminum siding is used for ceilings, and wood siding panels look great on small areas or walls. Particularly popular are suspended ceilings covered with polished aluminum siding.
In order for the interior siding decoration of a room to meet all safety criteria, be durable and aesthetically pleasing, you must correctly select the material for wall cladding. Siding panels indoors must perform not only aesthetic, but also practical functions, and also combine:
- high reliability;
- absence of occurrence and development of putrefactive processes;
- preservation of color and structure;
- a wide range of shades and colors, allowing you to choose the optimal design.
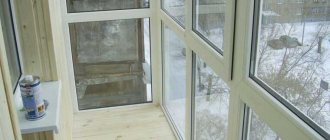
Types of finishing work when landscaping a loggia
A loggia is a room built into a building (as opposed to a hanging balcony) and has walls on two or three sides, depending on the design. Finishing is one of the most important processes during renovation work. The main types of finishing work are:
- Construction of a welded structure, if required - installation of a canopy, roof, support, railings, gratings;
- Glazing of the loggia - sound insulation, prevention of precipitation, dust, insulation;
- External cladding - for an aesthetic appearance from the facade, sound insulation and thermal insulation;
- Indoor cladding is done for the comfort and aesthetics of those living in the apartment.
Ceramic tile
The most popular way to finish the floor on a balcony is ceramic tiles. The material can also be clinker tiles and porcelain stoneware. A more complex type are concrete and stone tiles, which are durable, but, unfortunately, expensive. The greatest advantage of tiles is aesthetics and the ability to freely choose patterns or sizes that match the location of the balcony. In addition, the tiles are easy to maintain and do not require special treatment. Unfortunately, they are uncomfortably cold in winter and too hot in summer.
When choosing this form of finishing, you should also pay attention to their technical parameters. The material must be frost-resistant, hard, non-slip and abrasion resistant
Drywall
The preference for using moisture-resistant plasterboard is that it is an excellent alternative to plastering walls. It is non-toxic, non-flammable, gives the walls absolute smoothness, does not allow mold to form, and has increased sound and heat insulation. It can be painted, wallpapered, or decorated with ceramic tiles. Since drywall bends well, you can use a wide variety of design options for shapes in the interior.
Finishing the walls on the balcony with plasterboard
Drywall should not be used for finishing unglazed loggias, and direct contact with moisture should be avoided.
Lining and eurolining
Floor and parapet cladding with wood.
The walls, floor and ceiling in the home office on the loggia are lined with wooden lining.
Eurolining is a dry planed board, and lining has natural moisture. Due to the main difference, eurolining cladding is considered a higher quality option.
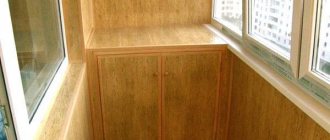
The spacious loggia is lined with wooden beams and has plastic panels on the ceiling.
The room is completely covered with wood. The cabinet is made of laminated chipboard.
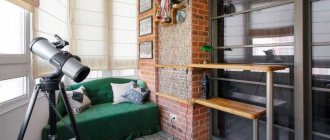
Combination of decorative brick and painted wood in room design.
In modern loggias design, natural textures are often combined: stone and painted wooden paneling.
The main advantages of lining and eurolining:
- Environmentally friendly (harmless for use in residential premises);
- Long service life, subject to proper care (about 15-20 years);
- Good heat and sound insulators;
- Installation work using lining does not create any particular difficulty.
Large boards, laconic furniture and neutral shades - all this allows you to decorate the room in a Scandinavian style.
Wooden board in the interior of the room. The boards on the floor are impregnated with a special protective compound.
Painted wood and light-colored wallpaper in the interior.
Scandinavian style in interior design. Straight, strict shapes, light colors and natural textures.
Wooden lining. Varnish was used as a protective layer.
Precautionary measures
Replacing the outer cladding of a balcony is always associated with a certain amount of risk.
Not everyone can afford long-term rental of an aerial platform.
It is important to know that it is forbidden to carry out work at height alone - an assistant must be present on the ground. In addition, the territory will have to be fenced off, warning signs posted, and in the case of an apartment building, such actions will also have to be coordinated with the municipal organization servicing the building
Safety measures when carrying out work at height include:
- scaffolding;
- use of winches and climbing equipment;
- strengthening the parapet;
- production of a fenced platform.
It is better to arrange delivery of construction and finishing materials from the apartment. In this case, the risks of their fall will be significantly reduced.
It is very important to securely fasten all the tools used, make sure that when fastening the cladding parts they are immediately fixed to the base
Recommendations
When decorating the interior of a balcony, you must consider the following:
- If you want to visually increase the area of the room, use materials, furniture and decorations in light colors.
- The best furniture for a balcony is compact. Therefore, use folding or transformable furniture. The theme will include pull-out or built-in cabinets, tables and chairs.
- Flowers will add grace and comfort to any balcony. You can place them in elegant flower pots or on special shelves. Plants need maximum sunlight to grow and bloom, and therefore a balcony is an ideal place for them.
- If your balcony is very small, do not clutter it with massive chandeliers and lamps. Spot ceiling lights will be more relevant here.
- Blinds, Roman blinds in light colors or nice roller shutters would be very appropriate on the balcony.
- Glossy surface design also visually expands the space due to its reflective ability.
How to decorate the walls of an uninsulated balcony?
The first task is to select a material for cladding that is not affected by humidity and temperature. Then you should critically evaluate the parameters of the walls, floor and ceiling of the balcony for their possible curvature. When painting, plastering or covering walls with liquid wallpaper, leveling the surfaces of the supporting structures of the balcony will most likely be necessary due to the requirements for the aesthetic component of the final result.
The range of modern materials for surface finishing can only be limited by the financial capabilities of the owners of the premises being renovated. Here are the most popular:
- PVC panels;
- MDF panels;
- liquid wallpaper;
- wooden slats "block house";
- flexible decorative tiles;
- modern plaster.
Each of these types of balcony surface decoration deserves attention when choosing options for its implementation - you just need to evaluate the external conditions that may affect the durability of the cladding.
Polyvinyl chloride
Advantages of PVC - it allows you to inexpensively and quickly decorate a balcony with your own hands, even for a person completely unfamiliar with this process. The PVC assortment is distinguished by a variety of colors and sizes - you can choose any decorative solution.
Medium Density Fiberboard
In everyday life, this type of material is called MDF (finely dispersed fraction). In terms of its protective and aesthetic properties, MDF is not much different from PVC. MDF panels also come in different shades. They are easy to install and require minimal skills in handling tools.
Liquid wallpaper
Their composition is dry shavings of paper and cardboard mixed in glue. The liquid mass is evenly applied with a plastic spatula onto the surface to be coated.
During the decorating process, you can experiment with the color of the finish, creating textures and color transitions on pre-lined (or plasterboard-covered) walls.
Wooden slats "block house"
Loggias are often lined with wooden slats - clapboard. Errors made during its installation are hardly noticeable compared to the results of PVC cladding.
Decorative tiles
An interesting material for a non-standard balcony finishing design. Tiles that bend in all directions can be used for cladding either on their own or in combination with other materials.
Flexible tiles are multi-layered. It consists of the following materials:
- polyvinyl chloride;
- fiberglass;
- plasticized stone chips.
Its decorative layer is protected from abrasion by polyurethane.
Cork
Environmentally friendly, light, warm and “quiet” material. The disadvantages of cork include:
- small variety of color palette;
- high cost.
Roll and tile cork can be easily installed even on uneven surfaces.
Modern decorative plaster
A plastic and easy-to-use material that can only be applied to flat surfaces. Easily combined with the previously listed materials:
- tiles;
- clapboard;
- plastic panels.
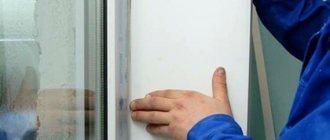
We attach the siding to the sheathing
On average, finishing the inside of a balcony with siding is completed in a couple of hours, since you just need to screw the finished panels to the finished sheathing. You should get a screwdriver for comfortable work, since you will need to twist a lot. Let's look at the installation process step by step.
STEP 1: screw the first lamella. This is the most important step because how smoothly you install it will determine the beauty of the entire wall. It must be set clearly in level and measured several times.
STEP 2: install the first lamella on another wall and create an even angle from the first one. Measure everything with a level in the horizontal plane. To connect, use a special internal corner for siding.
STEP 3: Attach the following siding slats in an overlapping manner. Each lamella has a “lock” on one side, in which holes are made for screwing to wooden joists. It is in them that the screws need to be screwed. Each subsequent lamella will hide the fastening of the previous one.
Advice: do not try to screw the sections tightly, as the PVC material may “lead”. Do not tighten the lamellas during installation, everything should be done with minimal force, only then the wall will be perfectly flat during operation and will not deform at the first load.
The interior finishing of the balcony with siding is completed. If you follow everything according to the instructions, then in just a few hours you can become the happy owner of a beautiful and insulated balcony that will always delight you.
Related article: Panoramic glazing of a loggia: pros and cons
MDF panels for the balcony
The finishing material is dense panels made of crushed wood fibers. They are glued together with ligin and molded using a press. The shape is fixed by temperature and subsequent drying. The advantages of panels include:
- design;
- density;
- resistance to temperature changes;
- wet cleaning;
- ease of processing;
- locking system.
The front side of the panels for finishing the balcony is decorated with veneer, lamination or painted. Veneering is gluing a layer of solid wood over MDF. It is impossible to distinguish panels from natural lining at first glance. The cost of finishing with this design is higher than the other two. Lamination is a printed and pasted design that is covered with a layer of plastic to protect it from abrasion. The pattern imitates the structure of solid wood of the selected species. The film can be glossy, matte or embossed to replicate the texture of the material. Painted panels for finishing balconies are cheaper because the surface is coated with UV- and mechanical-resistant paint.
Interesting! The panels are decorated with a 3D effect, in which the surface imitates leather, stone and silk.
The size of the slab varies in width and length. Standard - 2.6 meters, can be increased to 2.7. To finish the balcony, panels with a width of 12 to 120 cm are used. The latter create a single plane, increasing aesthetics, since the seams are invisible. Thickness ranges from 3 to 60 mm, which affects the bending strength of the panel. If you plan to finish curved surfaces on the balcony, then purchase panels with a smaller thickness.
Disadvantages of MDF panels for finishing balconies:
- strength;
- color;
- reduction of usable space;
- flammability;
- moisture resistance.
Cork panels
One of the most unique materials for finishing a balcony is cork wall covering, which is made from crushed and compressed oak bark.
Cork panels on the balcony as finishing
This is truly an unsurpassed, environmentally friendly, antibacterial material that does not rot and mold, does not absorb odors, is resistant to atmospheric influences, and is not subject to deformation. Therefore, cork covering is used not only in an insulated room, but also in an unglazed balcony.
Cork panels are very easy to use and can be easily cleaned with a vacuum cleaner and a damp cloth. One drawback is the high cost.
How to sheathe it yourself?
You can do it yourself by covering the gable with siding. A simple step-by-step instruction will help you with this.
Preparation
Before starting work, you need to build reliable scaffolding. You can use ready-made prefabricated structures. But if this is not possible, they can be replaced with ordinary boards. Next you need to start preparing the base.
All protruding elements must be removed from the pediment. Then the base needs to be put in order. If it is wooden, it must be well treated with impregnation against fungus and rot. All existing cracks on the stone pediment must be repaired. The finished surface must be smooth, dry and clean. After this, you can begin marking and attaching the sheathing. The first step is to determine the bottom horizontal line. For this purpose, you can use a regular building level. Metal profiles or wooden blocks can be used as lathing. If the choice fell towards wood, it must be thoroughly treated with an antiseptic. The metal profile does not require additional processing. But it is worth remembering that it is more expensive and more difficult to install. The distance between the bars that are attached to the pediment should be no more than 40 cm. They must be fastened evenly so that after finishing the work everything looks beautiful and neat. It is very easy to control this process. It is enough to periodically check with a building level whether the bars are positioned correctly. After this, you need to take care of insulating the pediment. The space between the profiles must be filled with basalt mineral wool. Next, the pediment must be sheathed with a special film to provide waterproofing and wind protection
You can fasten it with regular staples using a stapler, paying special attention to the joints. Instead of waterproofing film, you can also use special protective membranes.
Cladding technology
The work begins with setting the starting bar.
- The screws do not need to be tightened completely. If you screw them in all the way, they will not be able to move when the panels expand, which will lead to deformation of the siding. The starting bar must be secured perfectly level. The result of the work largely depends on this. The fact that the starting bar is installed correctly will be indicated by a click that is heard at the moment when it is combined with the profile spike.
- Then you can proceed to installing the remaining panels. The space between the fastening shoulder and the profile should be about 2 mm.
- The finishing strip is installed before installing the outermost row of siding.
- Next, the joint of the panels must be closed with a special plastic corner.
- Having dealt with the gable cladding, you can begin to design the overhang or install windbreaks.
Covering the balcony with siding from the inside
- Installation of sheathing. The first thing you have to start working on finishing your balcony with siding is installing the sheathing. It is thanks to it that each of the siding panels will be positioned as evenly as possible. The frame is installed perpendicular to the direction of the cladding. The distance between the slats should be approximately 40-50 cm. You can check whether you have installed the sheathing evenly using a specialized level. If the walls on your balcony were already level from the very beginning, then installing a frame in this case is not necessary.
- Insulation layer. After you have completely completed the work associated with installing the frame under the siding, you need to lay insulation in the resulting voids. It can be mineral wool or polystyrene foam. In addition to the insulation layer, you can also lay a film that will protect the panels from moisture and wind. If you use the above insulation method, the balcony can subsequently be used as a full-fledged room.
- Siding installation. The whole process begins with the installation of auxiliary profiles. After this, the siding is cut. For these purposes, you will need an electric jigsaw or metal cutting scissors. The first panel is installed from the very corner of the sheathing. The first and all subsequent panels must be checked for evenness using a level. In order to secure the siding panel to the frame, you will need self-tapping screws. An alternative in this situation could be a furniture stapler. All subsequent panels are attached in the same way. The last panel snaps into place.
Balcony finishing with stone
Stone is a very durable natural material that blends well with its surroundings, it is timeless and elegant. Unfortunately, it is heavy, requires impregnation at least once a year, is quite expensive, and gets very hot in the summer. As with wood, not all types of stone are suitable for outdoor use. The safest way is to install granite on balconies. Sandstones, travertines and alabasters will be worse, as they can be destroyed by atmospheric factors.
Stone intended for a balcony comes in the form of ready-made tiles or larger elements made to size. It should not be polished because it will be very slippery, so it is advisable to use rough surfaces. Unpolished stone has a less intense color, but special preparations can be used to deepen the color. There is no need to soak granite, although it will be less dirty after this treatment. When cleaning daily, do not overdo it with detergents; it is best to rinse the floor with cool water. If the stone becomes heavily soiled, then every few years it is necessary to carry out crystallization treatment, that is, machine cleaning, which is usually combined with subsequent impregnation of the surface.
The process of finishing a balcony with stone
Stone slabs are laid on cement mortar less and less often, although this is a cheaper method; glue is more often used. As with ceramic tiles, it is applied to both the underside of the panel and the backing. Flexible joint masses with the addition of silicone are used for cementation. The edge of the balcony can be finished with a stone quarter or half shaft. If you decide to cut the tiles, you can polish the edge - this is a very popular solution: stone elements are usually 10-20 mm thick. If you apply stone with glue, the floor will have a thickness of 20-40 mm, depending on whether the concrete foundation is level, and if on cement mortar - 40-50 mm. The sizes that exist in stone tiles are: 45 x 45, 30 x 60, 40 x 60 cm or irregularly shaped elements.
Glazing methods
As a rule, before finishing such premises, they should be repaired, glazed, and also insulated, which is very important, otherwise you won’t get a good rest. Glazing can be cold or warm, depending on the functionality and purpose of these rooms. Cold glazing is unlikely to be able to retain heat on a balcony or loggia, but it can protect against precipitation. As for warm glazing, its task is also to maintain the microclimate, as well as to isolate from extraneous sounds.
Naturally, the cost of warm glazing is much higher, but the functionality of the room is also higher. If it is cold on the balcony in winter, then its main purpose is to store various things that are more used in winter. Having a warm balcony is like having another living room where you can set up a study, a small greenhouse, for example, or a gym - whatever you want.
Cold glazing
Cold glazing of a balcony will cost much less, but it makes no sense to talk about the level of comfort and functionality. Glazing is carried out due to:
- Single wooden swing frames, which are not durable and require constant maintenance, which increases the service life of such frames. A wooden frame is exposed to the sun, as well as under the influence of other negative natural factors, so there is no need to talk about durability.
Single swing frames made of wood - the most inexpensive type of glazing - Metal frames that are comparable to “tram windows”, which is what people compare them to. The frame of such a frame is made on the basis of metal corners connected to each other using electric welding. Glass is mounted using rubber seals. Such frames are more durable, but they practically do not retain heat due to their high thermal conductivity. Therefore, in the warm season it is too hot on the balcony or loggia, and in the cold season it is too cold.
A more modern version of the metal glazing of the baklon - Aluminum profile, which is characterized by the greatest durability and the highest price. The best option is a frame based on sliding doors, but not hinged ones, which helps save useful space. Such frames are not highly airtight, but with cold glazing this does not play a special role, although it is equally important to protect the balcony from various types of precipitation or from simple dust. Aluminum profile is coated with polymer of any color
Recently, it is becoming less and less common to find frames made of wood, since people prefer aluminum or PVC plastic profiles, which have high functional and technical characteristics. Metal-plastic frames allow for both cold and warm glazing.
Warm glazing
After the appearance of metal-plastic windows on our market, the possibility of warm glazing of balconies arose, although there was an option with double wooden frames. Unfortunately, these frames are not widely used due to the complex technical solution, especially when installed on balconies or loggias. In addition, they differ significantly from metal-plastic ones, for the worse in terms of sealing, sound insulation, and heat retention. There are many advantages to fiberglass windows. The main advantages are high functionality, tightness, low thermal conductivity, as well as durability, which lasts for decades.
The use of PVC profiles is the most popular type of warm glazing
The main disadvantage is the significant weight, and the cost of such glazing is quite impressive, so their installation is fraught with some difficulties, especially on balconies. Often balconies have to be reinforced with metal structures, especially considering how irresponsibly they built them in Soviet times.
The latest fashion is panoramic glazing using double-glazed windows made using a special technology. Their installation is carried out in such a way that a minimum of fastening material is required. Such a balcony looks very futuristic and interesting, but such pleasure costs a lot of money.
Panoramic glazing can be warm: energy-saving double-glazed windows allow you to maintain the temperature without much effort
Turnkey balcony finishing: decoration in different styles
Each balcony is a blank canvas that can be designed to suit the personal desires and needs of the property owner. Like any interior space in your home, the decor of your balcony will determine its purpose. One of the main differences between a terrace and a balcony is size. The terrace has a large area for entertaining guests, while the balcony allows for more private time.
Eclectic Design
If your home has a more eclectic style, Moroccan themed balconies are popular. Create a space filled with bright colors such as pink, yellow and green. Deep tones are also popular for this design style. Use large cushions as seating and gold accents in the form of baskets and lamps to create an exotic feel on your balcony. Natural wood tones are the perfect backdrop to support rich colors.
Urban charm
If your balcony is somewhere between quaint charm and industrial style, then decorating the room in a bistro style is the perfect choice. This is a great solution for a home that has a brick exterior and wrought iron railings. The table and chairs can be wrought iron or imitate steel products. This creates a space that is a beautiful place to spend time with friends while enjoying the good weather.
Modern design
If you want a modern balcony, choose simplicity. Color schemes are usually black and white, with one or two pops of bright color. The furniture is defined by uncomplicated forms and tends to the minimum. A characteristic of modern design and minimalism is open space.
Features of covering a balcony with siding
So, now you have an idea of the benefits of vinyl siding. What difficulties will you encounter during the installation process?
Covering a balcony implies some danger. This is due to the fact that the installation process takes place at altitude. If your balcony does not have a reliable fence, but, for example, only a concrete floor, then you should not bend over or climb over the fence. To implement your plans, it is best to seek the help of specialists.
In order not to spend extra money when purchasing material, you must first calculate everything. To do this, you need to know the height, perimeter of the fence, and the width of the siding. After this, you can calculate how many panels will be needed. It is necessary to purchase material in reserve.
Covering a balcony with siding is a very labor-intensive process. But with proper organization of work, you will be pleasantly surprised by the resulting result.
In addition to siding, you will need to purchase sheathing components, a drill, screws, self-tapping screws, etc.
As for the drill, this tool must have a magnetic attachment. This is due to the fact that attaching fasteners to a canopy will be impossible.
In addition to all of the above, you will need some kind of insurance. It's quite simple to do. To do this, you will need 2 pieces of fishing line (or more) and hooks tied to their ends. Those ends that do not have hooks on them will be tied to the top of the batten, and the others will be inserted into the hole to be secured to each plank.
Siding fastening
It's time to talk about fixing the siding. It is not for nothing that the mounting slots in it are made oblong. Siding strips “ride” on the fasteners during thermal deformations. Therefore, you cannot pull the siding tightly, otherwise the cladding will then swell or even come off.
The siding is fastened with self-tapping screws as follows: attach the self-tapping screw to the magnetic attachment of the drill, and wrap it exactly in the middle of the slot. Unlike driving nails with a hammer, you can do this with one hand while holding the part being attached with the other. For convenience (after all, you will have to work crouched or suspended), you can use a metal scriber to make a hole in the wood for the self-tapping screw in advance.
Having screwed in the self-tapping screw, use a screwdriver to unscrew it a quarter turn. This will give a backlash of about 0.3-0.5 mm. For reference: when installing siding, it is recommended not to add 1-1.5 mm to the nails. It is clear that with such a gap in a strong wind the lining will sway. And for thermal displacement in the transverse direction, a gap of half a millimeter is quite enough.
Important nuances when installing vinyl siding
If you are lining your balcony with metal siding, you can skip this point. But finishing the balcony with vinyl siding suggests that the panels will expand in hot weather and contract in cold weather. Therefore it is important:
- Leave a gap of 5-8 mm between the panels and slats in winter, 4-5 mm in summer.
- Do not tighten the screws all the way. You can screw them all the way in and make a half turn back, or insert a coin between the panel and the screw head. It should hold tightly, but be removed without effort. There is no need to tighten the screw any more.
Life hack: use a coin to properly install self-tapping screws. (photo No. 8)
Covering the floor and ceiling of loggias
The floors in the loggias initially have a cement base. Before finishing the floors, you need to make sure that the screed is not broken. In case of integrity violation, it needs to be updated. Floor insulation is carried out if a warm loggia is planned. You can heat the room by installing heated floors.
It makes sense to decorate the ceilings on the loggia with the same materials as the walls, but you can also consider suspended ceilings or aluminum panels that are gradually coming into fashion.
Ceiling decoration with aluminum panelsSource obustroeno.com
If you haven’t decided on your own what is the best way to sheathe the inside of the loggia, expert advice will come in handy:
- For the loggia floor, it is better to choose ceramic anti-slip coatings with a rough surface. Porcelain stoneware or clinker tiles are perfect.
- In the case of creating a warm room, you can cover the floor with wooden materials, including laminate.
- The ceiling in the loggia almost always repeats the material of the walls, but combined cladding options are increasingly finding their use. Ceilings can be sheathed with clapboard and MDF panels, plasterboard and siding, plaster or paint.
Myth about the dangers of the material
There is an opinion about the negative impact of siding used to cover premises on the human body. Such judgments are associated with the artificial origin of the material. And this is despite the fact that the safety of PVC, which is the base material in the manufacture of panels, has been proven from a scientific point of view.
Yes, vinyl siding contains a number of chemicals. But 80% of their total mass is polyvinyl chloride, a substance that is absolutely environmentally friendly. PVC microparticles act as a binder between other elements, securely holding them in themselves. Moreover, Canada is considered the birthplace of vinyl siding, and Americans are a nation that is too sensitive to its health. They would never live for decades in houses with dangerous finishes.
Sheathing with MDF boards
Interestingly, MDF panels were created by accident. They were first received by inventor William Mason due to his own forgetfulness and a malfunction of the steam press. The abbreviation stands for simply: medium translated from English - “average”, density - “density”, fiberboard - “slab”.
The panels have good resistance to high humidity conditions. When compared with a similar chipboard board, MDF is smoother, stronger and more durable due to the use of surface lamination technology. In the manufacture of panels, emphasis is placed on the characteristics of resistance to water, fire and biological factors.
For many years, “jack of all trades” have chosen MDF for interior decoration because of the best price-quality ratio. You can find very inexpensive types in stores.
You can sheathe MDF boards indoors using the same technology as when using lining. It is necessary to create wooden guides that will hide uneven walls, as well as lay materials for thermal insulation. For installation it is worth purchasing special brackets.
Advantages of the material
MDF panels are characterized by increased moisture resistance. They can be washed using soap solutions. The material is also as durable as solid wood. It has low thermal conductivity and is frost-resistant. Fungus and insects do not damage its surface.
MDF can be installed without any special preparation. The high density of the material provides a variety of created relief. In addition, they are significantly cheaper than vinyl and wood lining.
Disadvantages of MDF
To line the walls of a balcony with MDF panels, considerable strength will be required due to the heavy weight of the material. It is also worth understanding that more dust will accumulate on such a surface. And before creating the necessary fasteners, you should always drill holes for screws and nails
It is also important to know that the composition of the stove often contains harmful substances, for example, formaldehyde
Before decorating a balcony or loggia with special panels, it is necessary to draw up an approximate list of the most significant factors. For some owners, the most important thing is the practicality of the material and its naturalness. For others, the main thing is the financial issue. Well, for still others, the decorative component comes first.
Parapet finishing
The balcony parapet is a fence that runs along the perimeter of the area protruding beyond the wall. This part of the structure is important for the safety of the residents of the house, and also performs a practical and aesthetic function.
What is important to know about the balcony parapet, its finishing and strengthening?
Plastic structures are quite heavy. Therefore, before installing such structures, it is imperative that the condition of the parapet is assessed, and if necessary, the parapet is strengthened.
In order to strengthen the parapet, it can be laid out with foam blocks, the thickness of which is 70 mm. You can also strengthen the parapet using welded strapping and tying it to the walls of the building.
Finishing and strengthening of the parapet may also be necessary for insulating balconies and loggias. Insulation is often done using polystyrene foam, the thickness of which is 20 mm, as well as penofol, the thickness of which is 4-10 mm.
Insulation of balconies and loggias is carried out by insulating the parapet itself, as well as the side parts of the balcony, ceiling and floor. The insulation of the balcony parapet is carried out with polystyrene foam, penoplex or mineral wool.
Wind protection in the form of a screen or siding is also installed. On the street side, to decorate and protect the parapet, in addition to siding, corrugated sheeting, galvanized steel, and plastic lining are also used. These materials protect the balcony parapet well from moisture.
Balcony siding
Siding is a universal material for covering a balcony. Installation of siding is quite simple, and covering a balcony with this material will take very little time from an experienced specialist, and the difference in appearance will be significant. In addition, a balcony covered with siding is protected from damage and the adverse effects of weather conditions and temperature changes.
Siding can be installed on any base; this material is very durable, but quite lightweight
Another important advantage is that siding protects against noise
Covering a balcony with siding is inexpensive. This material is durable and easy to use; for care, just use a damp cloth or sponge. Vinyl or metal siding is usually used to cover balconies.
Balcony siding can be done both inside and outside. Vinyl siding is often used for interior decoration.
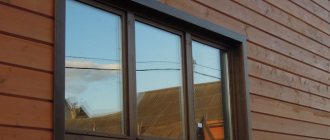
Covering the balcony with siding from the outside
The outer cladding of the balcony gives the entire structure strength and aesthetic appeal. Siding is very often used for exterior cladding because it combines an attractive appearance, strength and an affordable price.
Covering a balcony with siding from the outside is done fairly quickly, but installation requires special tools, and it is also important to follow the sequence of work. Self-tapping screws are used for fastening
Before covering, it is necessary to carry out preparatory work and, if necessary, secure the parapet.
Siding is installed on a sheathing; in cold climates, thermal insulation is required.
Despite the apparent simplicity of execution, work on covering balconies with siding should be carried out by experienced specialists; during installation there are quite a few nuances that need to be taken into account.
Covering the balcony with plastic panels
Plastic panels are made of PVC and are equipped with plastic stiffeners. Plastic panels can be suture or seamless. When covering a balcony with plastic panels with seams, the effect of increasing the height of the room is obtained.
Typically, plastic panels with a width of 25-40 cm are used for finishing. The so-called plastic lining has a smaller width - 10-20 cm.
Today, for cladding a balcony, you can choose plastic panels of any color and texture.
Covering a balcony with plastic panels requires the installation of sheathing.
Plastic panels can be used to cover not only the walls of the balcony, but also the ceiling.
You can order balconies with siding and plastic panels. Our managers and measurers will help with the choice of materials, and installers will complete all the necessary work efficiently and on time.
Order parapet finishing by phone. Experienced specialists will perform finishing, insulation of the parapet, wind protection, covering the balcony with siding and plastic panels. The work is guaranteed.
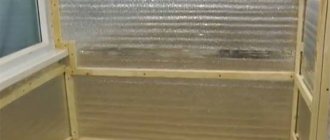
Installing the sheathing
Finishing a balcony with siding yourself is not as scary as installing sheathing. 90% of all mistakes that beginners make are made at this stage. In fact, there is nothing complicated about the sheathing, you just need to know a few tricks that will help you not “mess up” and do everything the first time.
STEP 1: install vertical joists. Indoors, they are made of wood (wooden beams 45x45 mm) - it is much easier to attach siding to it, it is easier to work with the material and process it. There are many ways to attach wood to concrete, but it is best to use anchors or liquid nails if it is not possible to attach it to an anchor or dowels. The width between the joists is 60-70 cm. At the same time, you can also install joists under the insulation on the floor to make everything comprehensive.
STEP 2: level everything. This must be done not only in the vertical, but also in the horizontal plane. It is best to measure each wooden beam at the time of its installation, since it will be difficult to change anything later.
STEP 3: open the sheathing with anti-corrosion material. Take 2 liters of wood impregnation, 300 grams of a paint product (mostly transparent varnish), apply 1 layer of impregnation with a brush, wait 8 hours, then apply a second layer, wait 12 hours. The last layer of varnish is applied. The tree will be reliably protected from corrosion and pests and will be able to withstand even constantly increased moisture.
Important: finishing the balcony with siding yourself will be much easier if you first make all the sheathing and install all the logs. Do not try to build one wall first, then finish it with siding and install sheathing on the other wall - there will be large gaps and braces in the corners. The first panel should go along the entire perimeter.
Even with this amount of work, finishing the interior with siding will be much cheaper than natural wood, ceramics or any other material. The average cost of 1 m 2 of siding is 180 rubles. Minimum price – 165 rubles per 1 m2.
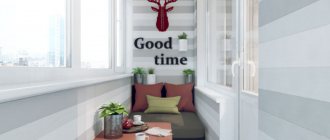
Balcony design ideas
Designers offer different interior ideas for decorating a balcony
It is important that the finishing option matches the interior design of the apartment. Such a room is decorated in the following ways:
- Combining a balcony with a living room, kitchen or bedroom. This is an opportunity to expand the free space and add the necessary furniture.
- A small space allows you to organize a place to relax and sleep.
- If there is no possibility of organizing a separate office in the living space, you can set up a workplace on the balcony.
- A balcony with panoramic views creates the illusion of open space. This option is suitable for both wide balconies and small compact ones.
- For a studio apartment with a balcony, you can use non-standard ideas and use the room as a dressing room.
The use of any interior design of balconies is appropriate in a city apartment. The main condition for a comfortable stay in the room is reliable insulation and neat finishing. To do this, you should think through all the options and choose the one that is suitable in terms of cost and labor costs.
Material selection
Each façade finishing material must meet certain requirements. It must be resistant to external influences, ultraviolet radiation, and also be moisture resistant. Such characteristics are inherent in vinyl and metal siding. Many craftsmen prefer the vinyl option.
Features of metal type material:
- when in contact with sharp objects, scratches may remain on the coating; they cause corrosion processes after getting wet;
- due to the large weight of the products, the load on the structure may increase;
- capable of fading in the sun;
- The panels may become wrinkled during transportation.
Compared to the previous type of siding, the vinyl version has the following advantages:
- when scratches appear on the material, the quality characteristics do not change;
- the panels are light in weight;
- painted products are practically not affected by sunlight;
- If deformed, the siding can quickly return to its original shape.
In addition to a large number of advantages, experts also note disadvantages. Thus, vinyl panels cannot be painted. At the time of melting, such siding releases toxic substances that have a detrimental effect on human health, which cannot be said about the metal version. Therefore, the latter in this case is preferable to vinyl.
If you want to cover the loggia with siding, the master must choose the right color.
In addition, when purchasing vinyl products, it is worth looking at how uniform the thickness of the panels is. Experts advise bending the panel a little to check its plasticity.
Requirements and standards
The materials used to decorate the balcony must meet certain requirements. They must be resistant to ultraviolet radiation, have low thermal conductivity, and be safe for the human body.
When choosing a color scheme, preference should be given to natural shades. Dark colors allow the sun's rays to heat up a room faster, but they can only be used for flooring. Therefore, types of materials that reflect rays are often used for walls.
Interior finishing technology
You can cover the inside of the room yourself with decorative panels or clapboard. Under such coverings, a lathing is formed on the surface of the walls. When insulating, the cladding can be even more varied. In this case, a layer of thermal insulating mats or panels is covered with plywood, moisture-resistant plasterboard, and chipboard. You can put liquid wallpaper on top or apply plaster.
Installation of the decor is carried out indoors after the floors have been prepared and leveled. It would be best to leave the insulation of the ceiling for the final stage of finishing. Laying decorative cladding yourself is done in stages. You can cover the inside of the wall with slabs that resemble wood or have a pattern.
You can decorate the inside of the balcony walls with different materials.
PVC panels. They are available for both walls and ceiling structures, and have different thicknesses and formats. The most popular are PVC sheet materials fastened with self-tapping screws, produced in sizes up to 203x405 cm. They are also produced in the form of “sandwiches” with a ready-made thermal insulation layer and also in the format of plastic lining.
Features of fastening finishing materials
Let's look at the basic materials for installation.
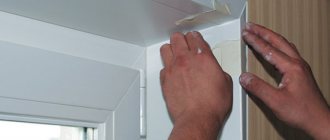
- Installation of plastic panels
Fastening plastic panels is not difficult. Starting from the corner of the wall, the first panel should be leveled and secured using F-shaped strips and a pneumatic stapler. These panels have a tongue-and-groove system, thanks to which the lamellas are simply inserted into each other. In this case, each inserted element must be fixed with a stapler to the sheathing at all points of contact. For optimal correct fastening of plastic panels, the lathing is packed in increments of 400-500 mm.
Important! In a similar way, plastic panels are attached to the ceiling. And for a complete picture, plastic corners are fixed at the joints of the walls and ceiling with glue.
- Drywall installation
Experts note that finishing walls with plasterboard is carried out only at temperatures from +5º and above. The process itself will not create any special problems. You just need to pre-treat the walls with a primer (preferably with antiseptic additives), and the next day you can begin installation.
Drywall is also attached to the sheathing, which differs only in the larger pitch between the beams (600 mm). Each slab of plasterboard is fixed to the sheathing using self-tapping screws in increments of 400 mm.
After installing the plasterboard slabs, it is time for finishing, which consists of puttying and sanding the walls, followed by painting, wallpapering or laying decorative stone.
- Installation of lining
Covering a balcony with clapboard is essentially no different from installing plastic panels. Here you also cannot do without the formation of sheathing, insulation and laying of vapor barrier material.
The distinctive features of the lining lie in its attachment to the sheathing. To make this finishing material pleasing to the eye, it is worth investing in hidden fasteners. Such fasteners will slightly increase your costs for finishing the balcony, but in the future you will not see rusty streaks on the wooden panels.
Concrete balcony
If you have a concrete balcony and want to add an interesting touch to the dull material, use the artificial stone method. Concrete can be given the appearance of stone in two ways:
- reactive;
- not reactive.
A reactive finishing method is an acid-based treatment of concrete, creating a marble effect on the surface. Colors will be limited to natural earth tones such as brown and green. Some of these reagents contain metal salts that will catch sunlight, illuminating your balcony. A non-reactive method of exposure is water-based acrylic substances, which are more like paint. They come in a much wider range of colors and are easier to apply. The surface will not be as unique as a reactive stain, but will remain no less beautiful.