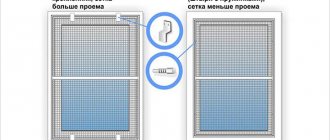
repairs mosquito nets of various designs and shapes in 1 visit in Moscow and the region!
- We provide services at facilities in Moscow and the region;
- Own production;
- There are always 7 types of canvases and various fittings available;
- The period from order to repair is 1 business day;
- Warranty for work under the contract is 1 year; for components - up to 3 years.
Repair of mosquito nets
Master video: Repairing mosquitoes
Mosquito nets are indispensable in the summer for comfortable ventilation of rooms and preventing the entry of insects, dust, pollen, poplar fluff and other street debris. But like any product, they can break, tear or become unusable simply due to natural wear and tear.
Of course, you can simply replace the old product with a new one of the same type. But if you need to do this with 3 or more mosquitoes, there is an opportunity to save your budget and repair a mosquito net that has served faithfully! With less you won't notice much savings, so we recommend just ordering a new one.
Our craftsmen have a mobile workshop at their disposal, so they can repair mosquito control structures that require repair on site.
Mosquito net service life
The guaranteed service life of mosquito nets is 1 year, but they last 5-8 times longer. It is worth considering that the service life will decrease if:
- the mesh is used on the sunny side of the house;
- there are strong sources of pollution nearby - roads, industries, sand pits;
- During operation, the required care was not provided.
Attention! You can extend the life of your mosquito net by removing it for the winter.
Frequent breakdowns:
- exposure to temperature leads to breakage of plastic fasteners - the technician will replace the old plastic ones with metal ones;
- the handle of the screen or mosquito door breaks off - the specialist will offer silicone or metal analogues with increased strength;
- cracking of plastic corners when the product falls - we will replace the corners and drag the mesh in place, if necessary;
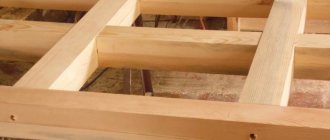
- the profile bends, the mesh becomes crooked - the master has a repair kit in the car;
- The fabric may break or the cord holding the mesh may lose its elasticity - the technician will re-upholster the product or replace components.
Upholstery with another fabric
In addition to replacing a worn standard blade with the same one, it is possible to replace it with more “advanced” options!
- If you have cats or other small pets in your home, we recommend Anti-Cat;
- For allergy sufferers, the Anti-Pollen or Filter will be an indispensable help;
- For those with a beautiful view outside the window, we recommend Ultraview;
- If the canvas fell victim to street birds. And especially if this is not the first time this has happened, take the Antibird! You will not regret!
Liquid patch
The paste-like mass, which is sold under the “Liquid Patch” brand, contains molten PVC, or polyvinyl chloride. The substance has a high degree of strength and moisture resistance, so even boats and awnings can be sealed with it. To repair a mosquito net, you need to buy a patch of a suitable size and then proceed as follows:
- remove the screen from the window, place it on the table or floor;
- degrease the area around the damaged area using any solvent on both sides, allow the material to dry;
- take a piece of paper tape and temporarily glue the hole on the wrong side with it for the convenience of further work;
- apply a liquid patch of the selected shade to the area of “injury”, firmly grasping the edges, leave the glue to dry for 24 hours;
- then remove the adhesive tape and leave the mesh for another 7-10 days before installing it on the window (this is how long is required for the final polymerization of the product).
If necessary, the anti-mosquito cloth can be placed in its proper place immediately, but it is important to shade it so that the service life of the liquid patch remains maximum. The glue perfectly seals holes up to 3 cm in diameter. Larger damage should first be tightened with thread.
Prices for repairing mosquito nets
| Name | Work time, min | Price from, RUB/sq.m (RUB/pcs) |
| Re-upholstery of mosquito nets | ||
| Fiberglass | 20 | 600 |
| Anti-cat | 20 | 1200 |
| Anti-dust | 20 | 1700 |
| Antimoshka | 20 | 1200 |
| Ultravue | 20 | 1000 |
| Antibird | 25 | 750 |
| Replacement of components and fittings | ||
| Corners | 10 | 100 |
| Handles (plastic) | 5 | 75 |
| Handles (metal) | 5 | 150 |
| Fasteners (Z-brackets, plungers, wings, etc. Metal) | 15 | 300 (per set) |
| Seaming cord | 10 | 25 (per linear meter) |
| Aluminum profile | 15 | 250 (per linear meter) |
| Impost | 15 | 200 |
| Brush seal (felt) | 15 | 150 (per linear meter) |
| Other | ||
| Profile painting | 40 | 300 |
| Repair of structures, except frame ones (rolled, pleated) | individually | negotiable |
How to repair or change the handle on a plastic window?
As a rule, fittings and other components for plastic windows are of high quality, and many manufacturers of structures can reduce the cost of their products due to other factors, but preferring not to skimp on working mechanisms.
But sometimes problems happen and, for example, a window handle can become loose over time. Repair in this case comes down to:
- First you need to get to the screws that secure the handle, and they are located under the decorative strip. And it is this that, with some effort, but carefully, needs to be turned 90° and pulled back;
- after access to the screws is open, they should be tightened if the handle is loose, or unscrewed if it is necessary to change the mechanism;
- Then everything is done in the reverse order: first the screws are tightened, then the protective element is fixed.
In the event that it is necessary to install a comb - a special mechanism for controlling the restriction of the opening of the sash in the folding position - this element is first mounted, then the handle is installed and screwed on.
It is important to take into account one more important point: the cause of a malfunction of the handle can be, for example, sagging of the sash. Therefore, you must first eliminate this problem, and only then proceed to adjust or replace the handle
Other problems with the plastic window handle
Another problem with window handles can be their blocking, that is, in the “open” position, the mechanism does not turn, and the window, accordingly, does not close.
In this case, the culprit should most likely be assigned to a blocker - a special mechanism on the handle that does not allow it to be switched to another mode: if the window is open in the folding version, then it will not be possible to open it.
In principle, the function is very useful, but it should be used carefully, avoiding abrupt switching of the sash to another mode, at which point the handle can jam.
Therefore, before making a decision about a malfunction of the mechanism and thinking about how to remove the handle from a plastic window, you need to make sure that the problem is in the lock, and then, being careful, begin to eliminate the cause. You can unlock such a handle, but you must take into account the features of the installed fittings:
You can unlock such a handle, but you must take into account the features of the installed fittings:
1. If products from AUBI are used, the sash must be in a rotating position. In the area of the handle you should find a small metal plate with a spring that needs to be pressed against the seal. In this case, it is necessary to simultaneously move the handle to the desired position.
2. If fittings from Roto, Maco, GU or Winkhaus are installed, then everything is much simpler. You need to find a small mechanism in the form of a tongue located under the handle, and press on it until it takes a position parallel to the sash, and then turn the handle.
In some cases, it may be necessary to adjust the position of the response mechanism mounted on the frame.
Sometimes the blocker simply cannot cling to it, for example, due to thermal expansion of the metal. The problem can be corrected by installing a thin plastic or metal lining under the response mechanism, thereby bringing it closer to the blocker.
In some cases, the problem with the handle may be caused by lack of lubrication or drying out of the lubricant. The problem can be solved by servicing all moving mechanisms (you shouldn’t limit yourself solely to the handle), for which you can use both universal products, for example, “WD-40”, and buy a special lubricant for these purposes, intended for plastic windows.
Question answer
Do I need to remove mosquito nets for the winter?
If you want it to serve you faithfully for many years, yes. The fiberglass of the canvas can be deformed due to ice, as well as the plastic parts of the frame.
Can you repair mosquito nets at home?
Yes! In 90% of cases, standard frame mosquito nets can be repaired directly on site.
How long does it take to repair a mosquito net?
On average, reupholstering takes no more than 20 minutes, replacing handles – 5 minutes, replacing fasteners – 15 minutes, replacing corners – 10 minutes.
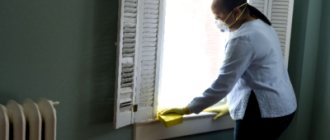
How to care for mosquito nets?
- At the end of the operational (spring-summer) period, they must be removed and cleaned with a soft brush.
- It is acceptable (especially when heavily soiled) to use a vacuum cleaner.
- Rinse in the bathroom using soapy water.
- It is better to store the product in a horizontal position to prevent geometry violations.
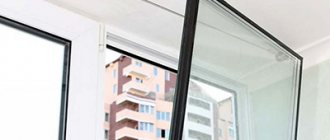
Replacing glass in a double glazing unit
Sometimes repairing plastic windows also includes replacing glass. This is much more complicated. First of all, you will need glass cut strictly to size. You can, of course, cut it yourself, and then process the edge so as not to get hurt. You can also order glass from a workshop and ask them to polish the edges.
Then the glass unit is removed from the plastic window frame and laid on a flat surface. It’s more convenient to place it on a table, but you can also use it on stools. If you work on a table, cover it with something.
Then use a sharp knife (or a wallpaper knife) to trim the silicone around the perimeter. Then the damaged glass is finally separated from the glass unit and removed. A new one, washed to a shine, is placed in its place and leveled. It should be the same size to the nearest millimeter.
Next, seal the glass with silicone sealant (not acrylic). We insert the tube with sealant into the construction gun, go around the perimeter of the glass, making sure that the seam is filled evenly. We wait until the silicone dries, then we take 40 mm wide tape and seal the glass unit around the perimeter. The glass in the double glazed unit has been replaced and can be replaced.
Reviews from our clients
Marina Cheremushkina 04/17/2021
The mosquito net was torn by a cat, I thought about ordering a new one, but it turned out that it could be repaired! Moreover, they changed the fastenings to metal ones and inserted the mesh itself into a special frame - an anti-cat. Now I’m ready for summer, I can ventilate and my Matilda’s claws are not scary for the mosquito! And it turned out cheaper than ordering a new one! I'm very pleased with the result!
Maxim 03/27/2021
It was necessary to service all the mosquitoes in the house (that's 8 windows). On 2 the canvas was torn, on one the profile was bent for a long time, I couldn’t get around to it. 3 had broken handles. Plus, everyone’s old plastic fasteners are dying. For everything about everything, the master charged 5800, which is much more profitable than buying so many new mosquito repellents! Happy as an elephant!
Sergey I. 04/03/2021
I ordered anti-mosquito nets to be rolled here onto anti-midge fabric, because last year I got a lot of mosquitoes! Now I'm calm! I recommend the company! Professionals, they got it done quickly, everything was clear, confident, and knowledgeable!
Main window adjustment points
To understand how to repair a plastic window, you need to know how it works. Almost any plastic window installed in an average apartment has three levels (or planes) of adjustment. This, first of all, makes it possible for the window part itself to be in an optimal (tightly pressed and not skewed) position to the frame, plus it ensures a reliable connection to the seal. All the “magic” is in the loops. The lower hinge is responsible for the vertical position of the sash and the lower vertical angle; the upper part of the sash is responsible for adjusting the upper hinge; The clamping force directly depends on the eccentrics. That's all the tricks.
Plastic window
The main problem here is the well-known displacement of the mechanism, which does not allow the sash to open and close correctly, or to do so at the desired angle. This is the so-called “sagging”, due to which the window touches the frame and may eventually simply stop closing at all.
In this case, we are interested in window awnings. We do not take the lower one into account; it does not play any role here. You need to open the window and at the very top of the window find two screws that are adjustable using a hexagon. We loosen the lower one slightly, and work with the upper one: using a hexagon, we turn it back and forth until it is in the desired position.
How to order
Installation is carried out the next day after the measurement. To order the installation of mosquito nets you need to contact:
- by phone +7 (495) 773-00-93,
- by WhatsApp +7 (985) 773-00-93,
- requesting a call back,
- by email The email address is protected from spambots. Javascript must be enabled in your browser to view the address.
When concluding a contract, the measurement is free. Our masters are ready to travel anywhere in Moscow and the Moscow region.
Damaged double-glazed windows - no problem, step-by-step guide to action
In more complex cases, a complete replacement of the double-glazed window or glass will be required. It is advisable to invite professional specialists for such work. If desired, all manipulations can be performed at home yourself.
Complete glass replacement
A double-glazed window is a sealed structure that consists of several sheets of glass. Sometimes there is a need to replace it. This may happen in the following cases:
- glass is broken or cracked, respectively, depressurization of one chamber has occurred;
- condensation appears on the glass surfaces, and the desiccant rolls down in the form of yellow resin;
- street noise can be heard in the room, it became necessary to install a noise-absorbing double-glazed window;
- drafts have appeared that are not regulated by any of the above methods. Accordingly, heat is not retained in the room;
- the structure has lost its tightness, or it is necessary to install a double-glazed window with a large number of chambers.
Depressurization of a double-glazed window
To replace a double-glazed window, you must perform the following manipulations.
- Determine the marking of the glass unit, which is printed on the aluminum frame, and order a similar one from the manufacturer.
- First, remove the bead from the vertical side of the glass unit, then the closest one from the free corner. After dismantling all beads, remove the glass unit. It is advisable to use a spatula and mallet when working.
- Install a new double-glazed window, having previously laid the straightening plates.
- Secure the beads until you hear a characteristic click.
Glass unit marking
The procedure for dismantling a double-glazed window
How to replace glass in a double-glazed window with your own hands
Replacing glass in a double-glazed window requires certain knowledge and skills. Let's look at the whole process in more detail.
| Illustration | Description of action |
| Remove the beads around the perimeter of the glass unit. | |
| Remove the glass unit and place it on a horizontal surface with the broken glass facing up. Using a utility knife, cut through the sealant around the perimeter to the spacer frame. | |
| Remove the broken glass from the glass unit. | |
| Cut off the sealant layer at a slight angle, wipe the new glass with a cleaning agent, remove all dirt and place the washed side inward on the glass unit. | |
| Thoroughly treat all connections with plumbing grade silicone. Acrylic sealant cannot be used in this case. Wait until it dries completely, cover the edges of the structure with tape, insert it into the frame, and install glazing beads. |
You can watch the entire process in more detail in the video: