Home craftsmen will be interested in the idea of equipping their own workshop. Despite the fact that for residents of city apartments it would be an unacceptable luxury to allocate a separate room for this, it is quite possible to adapt a balcony or loggia for such needs. Our article will tell you in detail the main stages of work, after which the workshop on the balcony will be equipped as soon as possible and what needs to be done for this.
Stage 1: glazing and interior decoration of the balcony
To use the balcony space, you must first take care of its insulation. Nowadays, a popular option is to glaze balconies using metal-plastic blocks, which can be successfully mounted at any height. After glazing, it is also necessary to take care of internal or external insulation. Most often, insulation is installed on the side walls and parapet of the balcony. If a loggia is converted into a workshop, the cost of insulation will be lower.
Internal insulation is carried out using mineral wool, polystyrene foam or extruded polystyrene foam. The sheets are sheathed on the outside with clapboard or moisture-resistant plasterboard. When planning shelves and hanging furniture, it is advisable to provide wooden sheathing. When decorating a room, you should definitely use moisture-resistant materials that are insensitive to ultraviolet rays and temperature changes.
In addition to arranging the walls, due attention should be paid to insulating the ceiling. To reduce heat loss, the surface must be insulated and sheathed with moisture-resistant material. The range of modern finishing materials will allow you to choose the appropriate option from plastic or wood chips. Plastering walls and ceilings is no longer in such demand, but when choosing this option it is worth using universal, moisture-resistant compounds of increased strength.
Creating comfortable conditions
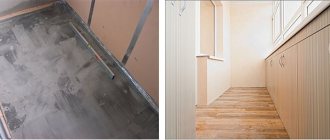
Any building structure, especially in a new building, has a number of flaws that have to be eliminated. We must try to seal the cracks in the seams of the loggia with foam, inspect the glazing and frames, and foam the cracks here too. If there is open space under the loggia or balcony, the floor will freeze in winter. The floor needs to be insulated. The simplest and most effective option is polyurethane foam yoga mats. If this is a carpentry workshop on the balcony, then linoleum should be laid on top of the rugs for ease of cleaning.
In areas with long and cold winters, such as Siberia and the Far East, there is a need for an electric heater. Nowadays many economical and compact models are produced. The choice of model is up to the owner, but it is better to place the heater on the wall of the loggia, so you need to choose a model with the possibility of such mounting. The location of the loggia on the street wall is more rational, heating occurs more quickly and the influence of street temperatures is immediately cut off, and the apartment wall is warm by default.
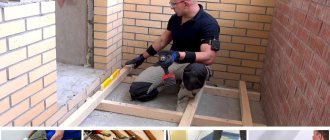
Stage 2: arrangement of flooring
Concrete floor slabs used in the construction of balconies do not have heat-saving properties, so the option of insulating the floor covering also needs to be thought out in advance.
All work is performed in the following sequence:
- Dismantling the old coating, cleaning the base and removing construction debris.
- Installation of waterproofing. For this purpose, building mixtures are used, as well as cut-off waterproofing material (thick film, for example).
- Make a floor sheathing from wooden blocks. The cross-section of the bars must be at least 60 mm. The frequency of laying floor joists depends on the thermal insulation material used, but should not exceed 50-60 centimeters. This will provide sufficient support to support the weight of the furniture and other physical stress.
- Place thermal insulation material in the remaining voids. This can be polystyrene foam or basalt mineral wool. For optimal thermal conductivity, the thickness of the thermal insulation material must be at least 50 mm.
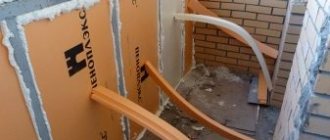
Stage 3: supplying electricity
Ensuring the operation of a power tool must be thought out in advance. For this purpose, a separate power cable is installed, the installation of which is often done on your own.
Recommendations for carrying out work:
- It is best to use NYM 3x2.5 mm² three-core copper cable. It can be replaced with a similar one produced domestically VVG 3×2.5 mm².
- The connection is made through a residual current device or a separate differentiated circuit breaker. This is necessary to ensure operational safety.
- The protective function for the connection cables used is performed by a plastic corrugation. When installing hidden wiring, the casing is placed behind the outer cladding of the walls and ceiling (when sheathed with plasterboard or plywood sheets). The method of masking in the finished floor covering is often used.
- The number of electricity consumers is calculated in advance. Usually these are lighting fixtures, as well as three to four electrical outlets. Electrical equipment must have sufficient protection from dust and moisture of a level not lower than IP 65. The sockets are additionally equipped with working grounding contacts.
- For particularly powerful appliances, such as a heater, an outlet with appropriate characteristics should be located.
Important: work on laying hidden electrical wiring should be completed before finishing work begins.
In addition to lighting on the balcony, it is necessary to provide several sockets located in close proximity to the workplace.
Stage 4: installation of heating and ventilation system
Comfortable work is impossible without suitable “climatic” conditions. The choice of suitable heaters is quite wide, so it is worth focusing on the simplest and most frequently used options.
What heating options are suitable for a balcony:
- Piping from the main system. It is designed even before repair work is carried out; it is a costly, but pays for itself option.
- Use of stationary heating sources. These are oil heaters, convectors and heat fans. An excellent option, the only drawback of which is the large amount of power consumed. If the room is used infrequently, it will be the most preferable solution.
- Infrared heaters do not dry out the air and have good performance. The disadvantages of such a purchase will be the cost, as well as the design feature, which heats objects located in the access field, and not the room as a whole.
- It makes sense to install air conditioning on balconies facing south. Thus, you can control the air temperature in summer, as well as heat the room in autumn and spring. Using an air conditioner at negative temperatures is prohibited, so for winter it is worth looking at an additional heating option.
The ventilation system, as a rule, is conventional ventilation. Of course, you can use ventilation systems or install an air conditioner with suitable climate settings. However, this option is quite expensive and not practical for small spaces.
Passion for a carpenter's workbench, or - a shoemaker without boots
Time flies - it's scary! For a long time I have been gnashing my teeth about the new, spacious workshop, which will definitely have two departments: wood and iron. I’m really very sick of this matter, but, as usual, life itself dots the i’s and says, to hell with you, Dima, the workshop is so quick: first, pay off the debt for the Dagestan stone, then build a summer kitchen, tomorrow, build something else... something, well, we’ll see, maybe you’ll have a workshop. So, in between times, on the quiet, sometimes I’ll grab an old machine, so that I can acquire a tool, and, between household chores, get carried away with the hobby of restoration. In short!
A couple of years ago I saw a video of an interesting friend, here it is:
And do you know what happens at such moments? I just fell in love with this workbench! Yes yes - at first sight! Perhaps it is not the most advanced, I admit that it is not the most convenient, but damn - it has beauty, grace and brevity, which for me is just like sour cream for a cat: what is needed.
I think: we need drawings so that it will be available when it comes. I opened the author’s website - and he asks for money for the drawings: the amount seems small, and supporting a good maker is never a sin, but - there is always a “but!” Firstly, it was winter, and there was almost nothing to do during the long evenings. And, secondly - purely sporting interest - can I do it? Am I crazy? Mongolia? Oh, I remembered - magnolia! In the sense of whether I can give birth to this wonderful flower, especially considering the fact that my acquaintance with Solid Works at that time could be called superficial. And even now, strictly speaking, I’m on good terms. In short, the challenge was accepted.
I don’t see much point in describing the entire development process here; I’ll give a link to the topic in the comments if anyone is interested. Link to models/drawings - here you go, no complaints, as is: https://drive.google.com/open?id=0Bzb96ijbjcmkQzQ4Zi16VEtzQU.
What's all this for? Two years have passed since the opening of that topic, I am still moving towards a new workshop (the foundation has already been poured, two-thirds of the blocks have been purchased), and today I found out that one good person began to make this workbench using my models. This is what he came up with:
So, I thought, it’s not in vain. Perhaps it will be useful for someone on a pickup truck. And I will be very happy if by the time I get around to making a workbench, I will already be the tenth of those who will bring the drawings to life.
In fact, the idea, of course, is not mine, I provided a link to the author’s video. All I did was, based on the video, I tried to recreate the general appearance. At the same time, the dimensions, the appearance of individual parts, the relative position of some parts are definitely different, because all I could start from were estimates regarding a spherical horse in a vacuum, i.e. everything according to the original video, on the wormy eye squinting to the left.
Stage 5: installation of light sources
Even a balcony with panoramic glazing and located on the sunny side requires the installation of additional lighting. This will allow you to carry out any work without hindrance and use the workshop in the evening and at night. Similar parameters can be easily achieved by installing at least two artificial light sources.
Basic moments:
- The main overhead lighting is calculated according to the area of the room. Standard quadrature allows you to get by with a luminaire with a fluorescent lamp with a power of 63 W. When using LED lamps, preference should be given to lamps of 6 - 10 W.
- To carry out small work at the table, the workshop should also have a mobile directional light lamp. Standard office equipment with toggle joints or clamps can be used. These luminaires are easy to install in any convenient location.
Important: on sunny days, natural light can create difficulties in working. To prevent such situations, it is better to take care of possible shading of the balcony room in advance. Adjustment of the light flux is ensured using conventional horizontal blinds, which also need to be equipped on the balcony.
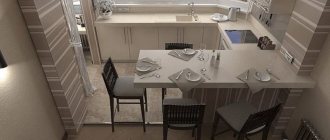
How to make a folding table
Compact folding tables visually expand the living space and give the interior a stylish look. They can be used for snacking outdoors or relaxing with friends.
You can make a folding table on the balcony with your own hands, since this activity does not require special skills and includes the following steps:
- room layout;
- search for materials and tools;
- assembly of the structure.
First of all, you need to think about the interior design. A homemade folding table should fit well into its surroundings and justify its presence.
At the preparatory stage, you need to decide on the working material. Wood is best. However, it is worth considering in advance that heavy natural wood costs more than light, durable plywood and chipboard. Then comes the choice of model, color and size.
In addition to the material for making the countertop, you will need the following tools:
- Jigsaw,
- Drill and hammer drill,
- Connecting fasteners, dowels and screws;
- Screwdriver;
- Metal corners;
- Loops;
- Wood paint;
- Sandpaper;
- Antifungal impregnation;
- Varnish.
Carpentry work includes three stages:
- Making blanks with your own hands: a) cutting out the tabletop of the required size; b) cutting out a rectangle 8-12 cm wide and reaching the base of the tabletop; c) rounding corners; d) cleaning the cut sides of the tabletop and rectangular support with sandpaper or an emery machine; e) impregnation of workpieces with an antifungal mixture; e) varnishing on wood.
- Assembly of the structure, which includes: a) central and folding panels; b) top beam; c) ties and racks; d) stand legs and support leg; e) dowels and panels.
- Attaching a folding table to the wall on the balcony includes: a) marking and installing sleeves for attaching the metal corner; b) horizontal installation of the corner to the wall with screws in 3-4 places; c) attaching hinges to the tabletop; d) fixing the table when unfolded using a support leg made of a metal pipe; e) fixing the table support in the raised state by making a small groove on the inside of the table top.
Stage 6: workplace equipment and storage systems for tools
An important issue that needs to be partially considered at the planning stage of construction work. A sheathing is installed under hanging furniture and shelves. The workbench on the balcony is mounted on a pre-reinforced floor area. There are plenty of options for arranging a comfortable and practical workplace; just look at the photos of successful projects.
Some nuances of setting up a workshop on the balcony of a city apartment:
- It is most practical to place a table or workbench at the end of the far wall. The corner option would be preferable, because in this case the usable area increases.
- For fairly large balconies, you can use a table arrangement parallel to the length side.
- Storage systems for tools and materials involve the use of open shelving and cabinets with sliding doors. In this case, conventional swing doors will take up too much space.
- When performing work, you can use a folding tabletop, as well as transformable furniture. Suitable options are available, but it’s easier and more affordable to use homemade devices adapted to the size of your room.
- To store small tools and materials, it is advisable to use compact systems. These can be hanging shelves and hooks, lockable containers and organizers. For a small room, the issue of rational use of space is very important, so all boxes and jars should be labeled and laid out according to a system that is convenient and understandable to the master.
- Professional and energy-intensive equipment cannot be placed on the balcony. When performing work, noise and vibration may disturb neighbors, so it is better not to consider this option for arranging a balcony.
How to make a workbench with your own hands
For a standard table, a certain number of parts are prepared. Vertical racks are cut into two sizes: 90 and 150 cm. The difference arises from the need to equip a screen for storing tools, which is higher than the rack-legs.
- stands for legs - 4 pcs.;
- cross supports - 5 pcs. 60 cm each;
- horizontal purlins - 2 pcs. 2 m for the top of the frame;
- connecting beams - 2 pcs. 60 cm for the bottom.
Horizontal elements connect the support posts at the top and serve as the base for the tabletop. At the bottom, the legs are connected by beams on both sides, and spacers are attached. Steel elements are joined by welding; bolted connections with nuts can be used. For the tool shield, thick plywood is taken, into the body of which hooks are inserted for hanging, and removable and stationary containers are attached to the surface.
The workbench is connected to a common ground loop. The upper shelves and the shield with accessories are firmly fixed to the walls and floor. They use metal anchors, and screws and self-tapping screws will not withstand the force. Electrics are hidden in PVC wire channels or special corrugated hoses. Lighting is done from above and on the left side.
Basic equipment
The metal frame (frame) is a load-bearing structure that can withstand a weight of up to 350 kg, depending on the structure and configuration. The workbench includes various modules and reinforcing parts. Tables for servicing large car parts, such as units or wheels, are reinforced with an additional pair of diagonals.
The tabletop is made according to the type of work. Depending on this, the material of the slab and the type of coating on the working plane are selected. A vice is installed to hold workpieces and parts during metalworking and assembly. The size of the jaws, gripping depth and working range are taken into account, and the dimensions of the device and its weight are taken into account. There are stationary and rotary vices.
Assembly steps
Initially, the frame is welded. To do this, make a base platform for the table top.
Step-by-step diagram for assembling and arranging a garage workbench:
- The support platform is turned over, the frame of the bedside table and the legs are welded to it. All supports are connected by struts, longitudinal and diagonal (rear) reinforcements.
- To level and clean the seams, use a grinder, remove burrs on the edges, and smooth out sharp edges from cutting iron.
- The workbench is turned over into its usual position and fixed in the chosen place. The tabletop is made of wood or metal. The boards are fixed to the support with bolts, and the steel cover is welded.
- The back wall is installed and secured, and the internal filling of the side cabinets and shelving is designed.
The basic steps are listed, but additional processes may be added depending on the design.
Installation location
The choice of location is determined by the size of the workbench. If you need to do certain work from time to time, a small table will do; it will be more convenient to choose a place for it. The need for constant work leads to an increase in size; a significant area in the garage space is allocated for this.
Criteria for choosing a workplace:
- a sufficient amount of free space to keep even a folding workbench in a ready-to-work position, and not remove it after finishing work;
- the structure is placed perpendicular to the light source or window opening;
- it is possible to tighten the iron safety mesh during grinding, milling, turning;
- on the front side of the table there is a strip 50 cm wide or more for free movement of a person when working.
When choosing, take into account that a connection to a source of electricity is required.
Photo ideas
A workshop on a loggia or balcony is a great idea for rational use of additional space. Even such a small room can be turned into a functional work area if you think through all the main aspects of the arrangement in advance. The sequence of work and important nuances of placing a workshop on the balcony are covered in the information provided.
What tools will you need?
If you decide to assemble and install furniture on the balcony with your own hands, you cannot do without special tools. You will need:
- drill/driver or powerful cordless screwdriver;
- drills for wood and iron;
- tape measure – necessary for measuring diagonals;
- pencil - to indicate markings;
- hexagons - necessary for manually tightening confirms;
- square - needed to create straight lines with right angles;
- mallet - a rubber hammer, useful when installing shelves and wooden dowels;
- jigsaw – necessary when adjusting parts to size;
- building level and plumb line.