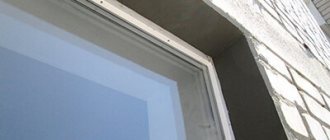
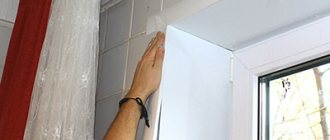
How to putty the external slopes of windows?
There is a need to repair the external slopes of the windows of the house.
Over the past 25 years, the slopes have cracked in places and cracks have appeared under the window frames. Since my hands grow from the right place and I have a tool, I will try to do this work myself. Masters, please tell me how to putty the external slopes of windows? It is best to putty external slopes with cement putties, that is, it is necessary to abandon gypsum putties.
Gypsum putties are most often used indoors, and not in wet rooms (rooms with high humidity).
As for specifics, there are a lot of cement putties, I can recommend cement putty from Volma,
There are cement putties (as in the photo above), for the base layer, and there are finishing ones, that is, for finishing.
For example, finishing cement putty from Volma.
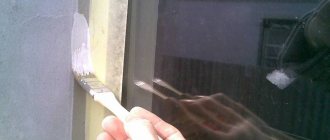
But before you putty the slope, it must be dust-free and primed.
The primer must dry.
It is better to use a primer with deep penetration, it will tighten and strengthen your old plaster, plus it will improve adhesion (adhesion of the putty to the surface).
Sometimes it makes sense to prime in two layers.
You write about cracks, tap the slopes with your knuckles, if the sound is empty, then most likely your old plaster has moved away from the base, it is better to knock it off completely.
After puttying with cement putties, it makes sense to paint the slope with façade paint.
Facade paint will protect the slope for years.
But do not forget to prime and dry the surface before painting.
If the old plaster is knocked down, it will no longer have to be puttied, but plastered.
You can get by with cement + sand, proportions 1 to 3, and then putty, after drying the plaster.
Or paint over plaster, see for yourself.
The building materials market is replete with various plaster mixtures, but are they all suitable for finishing external slopes? Of course not. The fact is that there are a number of requirements for finishing external slopes. We will talk about them further.
To solve this problem we have the following plaster mixtures:
- on a cement-sand base. Such mixtures are characterized by strength and, what is important for us, moisture resistance. But when drying, such compositions are prone to cracking, and this in our case can lead to drafts and noise penetrating from the outside;
- homogeneous and complex gypsum mixtures. Great option. Such mixtures are easy to use and durable. And yet, there is one big BUT - the influence of excess humidity is detrimental to them;
- polymer mixtures. They have excellent qualities, namely, they are not prone to cracking, are not afraid of moisture, and are durable. Of course, you have to pay for quality; such mixtures are much more expensive than those we reviewed earlier;
You can also make the mixture yourself. To do this we need to mix one part cement and three parts sand. In this case, the brand of cement does not play a big role, but the sand must be fine-grained. Use only clean, sifted sand.
Take a dry container and pour the components into it. Mix them (necessarily dry) using a drill with a stirrer attachment.
Next, when the components have become a homogeneous mass, add water. We do this by eye so that in the end we get a solution that is not too liquid, but not too dry. When you put the resulting mass on the trowel, it should come off it gradually, but under no circumstances should it fall off or run off.
Among the factory mixtures I can note the following:
1 Cement-lime plaster TiM No. 25,
2 Polymer plaster Ceresit CT29 (plaster and repair putty)
Before starting work, be sure to prime the surface.
Insulation
There are several ways to reduce heat loss from windows, using:
- paper for covering windows;
- silicone sealants;
- fabric strips;
- tubular profiles;
- seals in frame sashes;
- heat-saving film.
The last two methods are the most effective and aesthetically pleasing.
First, we treat the junction of the glass and sashes with silicone sealant.
Silicone sealant is excellent for insulating wooden windows
Then, along the perimeter of the sash, using a milling cutter at an angle of 45° in the direction of the flashing, we cut out a groove 5 mm deep and remove the chips from the channel. We consistently press the PVC seal into the resulting groove along its entire length, without stretching it.
To facilitate installation of the seal in the groove, you can use a special roller
The seal, in addition to protecting against drafts, provides additional sound insulation.
Recently, energy-saving film has been used to insulate windows. It is transparent, does not impair visibility and has a self-adhesive backing.
Energy-saving film not only saves heat, but also protects the room from excessive sunlight
Its functional features are as follows: the film allows daylight to pass through, but prevents heat transfer from the room, which allows you to save up to 60% of the heat escaping through the windows. The method of applying each specific film is described in detail in the instructions supplied with it.
How to putty slopes on windows: finishing features and step-by-step instructions
Any repair work is not a simple matter, which requires serious financial investments, as well as time. While you can still find time in your busy schedule, money is not so easy for everyone. And the prices for such work are steep.
That is why, in order to save money, you can put some work on your shoulders, especially such as puttingtying window slopes with your own hands. Today, many people are interested in the question of how to properly putty the slopes on the windows so that they come out smooth and beautiful? But, it’s not so important how you putty them, but how the old window block was dismantled.
That is, a positive result largely depends on the condition of the opening. Of course, the whole problem here is who will dismantle the windows. But, as a rule, dismantling is carried out immediately before installation by the same craftsmen, so they must approach the issue with full responsibility. Next, we will talk about the most common problems and also tell you how to get rid of them.
Preparation of materials and tools
To understand how to putty the slopes on windows with your own hands correctly, you must first fulfill some conditions:
- Make the right choice of putty.
- Prepare the surface.
- Equip your workplace with everything you need.
Tool for puttying window slopes
So what kind of putty should I use to putty the slopes on windows?
- Putty for external window slopes should be selected according to the application and scope of work.
- The outer slope should be puttied only with frost- and water-resistant compounds. Any façade putty is perfect for outdoor work.
- To seal the slopes on the inside of the house, you need to take into account the microclimate of the room. If there is always a high level of humidity in the room, then it is better to putty with a polymer or cement composition. If the finishing will be done in an ordinary living room under normal conditions, it is permissible to use putties on a lime-gypsum basis.
- If the slopes are not level enough, they will need to be leveled first. To do this, it is better to choose a finishing and starting putty, or purchase a universal composition.
Varieties
Putties, like plasters, are classified primarily by the type of binder. The following binders are fully compatible with concrete:
Facade putty on white cement.
Acrylic putties are sold completely ready for use.
Two-component epoxy putty. There is a hardener in a small jar.
How to prepare the surface before work?
Before plastering and puttingtying the slopes, you need to prepare the surface and the necessary materials. Better not buy ready-made mixtures! Each master is accustomed to working with his own solution consistency, so a purchased product may turn out to be too liquid or vice versa, which will negatively affect the result of the work performed.
Both external and internal slopes require preparation. To do this, you need to remove old finishing materials, as well as surface fragments that do not adhere well. Only after this can the walls be primed. Both plastic and wooden window blocks require such preparation. Then it won’t hurt to cover the glass and window frame with tape and protective film to avoid contamination.
Which windows make sense to restore?
It would seem that a completely damaged window frame is still quite subject to restoration
To assess the feasibility of restoration, you need to take into account the material from which the frames are made. Larch and pine have a “life” limit of 25–35 years, beech and oak have a lifespan of more than 50 years .
Restoration will not meet your expectations if:
- there is complete loosening of the window frames in the openings;
- the wood of the windows has dried out;
- the structure of the wood looks loose, when pressed, dents remain;
- dark spots appear under the paint (underneath them, as a rule, is rot and rot);
- windows are seriously damaged (frames are split, etc.);
- a visual inspection shows that the frames are bent or severely deformed during operation.
Before restoration, also pay attention to the fact that the wood must be dry.
Photo gallery: materials needed to repair old wooden frames
Slope leveling
Now the time has come to tell you how to putty the upper slope of a window, as well as the opening at the door or window block. The most popular material for leveling slopes is plasterboard. To level the slope, it is enough to screw an L-shaped profile onto the window frame and adjust the inner side, which can be hidden under the finishing putty.
The outer part of the drywall sheet is set vertically using a level. But, it’s even easier to glue a perforated corner in advance and use it as a guide along which to adjust the gypsum board. Between the window and the drywall you need to lay mineral wool, which will act as insulation, and outside you can use Knauf Perlfix drywall.
Geometry straightening
The appearance of drafts when the window is closed, increased audibility of street noise, as well as squeaks and significant physical effort required to open or close the window are typical signs of broken window geometry. Check the geometry of the valves, adjust them if necessary and secure the result by installing metal corners.
Please note that window geometry does not always have to obey the “right angle” rule. If, for example, the window frame itself is somewhat skewed, then it makes no sense to check the geometry of the window using a square. It is better to pay attention to how the window closes and opens.
The geometry is adjusted by adjusting the tension of the screws located in the window hinges. If, when closing, the window sash catches the frame, adjustment of the upper hinge is required. The lower hinge is responsible for moving the sash to the right/left.
Installation of corners
The corners can be screwed in with a regular screwdriver, but it’s faster and easier to do this with a screwdriver
Metal corners are attached to the joints of frame parts and have both decorative and fixing purposes. The correct location for the corners is on the inside of the window. Quantity: four pieces per frame. To install, first prepare the grooves of the required size using a chisel. We insert the corners into the grooves. We check the accuracy of the installation: we check the length of the frame diagonals.
Starting putty
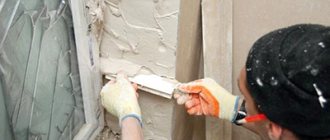
And so, it came directly to the puttying process. To do this, you need to take a tool of a suitable size and apply the solution to the surface. If it was not possible to plaster the surface efficiently, you will have to putty the slopes in 2 approaches: the first layer is the starting mixture, the top layer is the finishing one. As a rule, slopes need to be sealed with putty to a depth of 5-7mm so that all defects are hidden. It is best to work with a spatula with a wide working blade.
After the mixture is applied, the spatula is pressed tightly to the surface and moved in the direction “you”. If the wall is severely damaged and needs to be leveled with a large amount of mortar, reinforcement will be required to better fix the building mixture.
To work in slope corners, you can choose a special corner spatula, which will simplify the work and improve the final result. If you need to re-treat the slope with starting putty, this can be done no earlier than 24 hours after the first layer has completely dried.
Features of finishing
If home owners plan to cover the slopes with ceramics or hide them under wallpaper, finishing is not required. But, if in the future you decide to paint the walls, you will have to carefully plaster and putty them. We talked about how to putty a brick or block slope with starting putty, now we’ll tell you in more detail about the finishing design. The finishing putty can be used even when the starting putty has not dried, but only if gypsum was used as the starting mixture.
To complete the finishing, you will need 2 spatulas with different widths of the working blade. Using a small spatula, apply the mass onto a large one, which is used to directly pull the putty along the slope. Please note that it is recommended to take a wide spatula wider than the slope itself. This will allow you to avoid scarring, resulting in a much faster resurfacing process.
Decor
No matter how carefully you work with putty, you will still have to sand the surface after drying. To treat the surface with paint, it is better to get a wool or mohair roller. Basically, for painting slopes, water-dispersed or water-based paints are selected, which are used to cover the wall in 2-3 layers. This is what allows you to achieve the most suitable shade.
If the interior of your house or apartment allows it, the slopes can not only be painted in one color, but also decorated with stucco molding and other decorative elements. Today, thanks to the Internet, you can watch many video lessons from experienced finishers, as well as get acquainted with design solutions. This is very appropriate if you do the work yourself and are trying to save on the services of professional designers.
OK it's all over Now! I would like to believe that our article has given you confidence in your own abilities and that you will cope with the task not only without difficulty, but also with high quality.
general information
Exterior plastic trim
In order to make external slopes with your own hands, you need to immediately opt for plaster.
Drywall will not work here in any way; it is a material that is afraid of water, and although it has moisture-resistant analogues, they are suitable for bathrooms, but not for the street.
Plastic is the same, although it is more resistant than gypsum board, however, it does not guarantee the quality needed for outdoor conditions.
So, your choice is plaster and subsequent puttying and painting. Let's start making external window slopes with our own hands!
Plaster
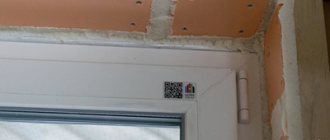
Repairing a cracked slope
Before you start plastering the external slopes with your own hands, let's prepare all the tools and materials that may be useful to you:
- Mixture for plaster
- Drill with stirring attachment
- Container for plaster
- Mesh for reinforcement (if you insulated the slope)
- Glue for mesh
- Cover bucket
- Planks to frame
- Plaster corners
- Level
- Rule
- Primer
- Masking tape
- Maklowitz
So, is everything there? Great, let's get started!
To begin with, set up the corners for the plaster.
Important! You need to set it according to the level! And one more thing - if there are 2 windows on this side of the house and you have not yet made the facade, then the corners are installed first on:
Left window left;
On the right - right.
And all the rest will already be exposed in this plane, thus you will ensure that the wall and the exposed slopes are harmonious.
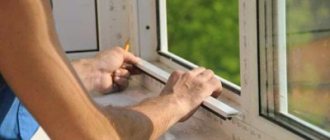
Next, attach the bar to the frame. This plank has two shelves, the outermost one, closest to the slope, will eventually be buried under the mortar, and the one closer to the window will be the starting point for placing the rule, and then you will remove it too.
Attach masking tape to the frame and cover the glass with either plastic wrap or wet newspaper.
Now you can add the solution, immediately leveling it using the rule.
What's the catch - you put on one layer, stop. Then you will be able to work only when it has completely set. So, layer by layer, you plaster the outer slope with your own hands.
putty
If you have qualitatively plastered the external window slopes with your own hands, then you will only need a finishing layer of putty, but if not, or if you are doing a small repair, then you will have to putty, starting with the starting layer.
So, you will need:
- Putty (starting and finishing)
- Spatula
- Primer
So, prime the surface - this is important!
Next, wait for the time indicated on the package when you can start puttingtying the external slopes with your own hands after priming.
Then, take the mixture on a spatula and walk along the indentations that are visible even to the eye. Then you wait until the layer dries.
Again, take the spatula in your hands and walk along the entire slope, now checking the level to see if everything is perfect. Have you checked? Fine? Great!
Next, you need to apply the finishing putty, the layer can be small, the mixture is finely dispersed, a layer larger than 7 mm is not recommended. However, if you carefully and carefully putty the outer slopes with your own hands while still using the starting mixture, there is no need to worry.
So, did you putty? Now we will figure out how to paint the outer window slope with our own hands
Painting
For painting you will need:
- Primer
- Roller
- Brush
- Drawer for paint
Apply primer to the entire slope. Once it dries, you can start working.
To do this, first dip a small brush into the paint and carefully paint hard-to-reach places.
And then, you take the paint into the ditch, lower the roller into it, then pass it along the ribbed bottom of the ditch a couple of times, removing excess, and move on to the slope.
You should move along the slope in such a way that you cover the entire area evenly, that is, do not roll the roller several times in one place - in order to carefully and completely paint over these “bald patches” you will need two or three layers of paint.
Apply one layer, wait until it dries, then apply the next one, and so on for about 2-3 layers or even 4, depending on how high-quality the paint you purchased. By the way, you can paint a plastic window, and not just the slope.
Important! To paint external window slopes, use only paint that is intended for outdoor use!
So, that’s all that can be said about do-it-yourself external slopes!
Acrylate sealants
"Stiz B"
When choosing a sealant, you need to take into account the characteristics of the room or sealing conditions.
Suitable for sealing seams on the street side:
- thiokol or polyurethane solutions, if cracks are sealed in the cold season or in rainy weather;
- acrylate composition "Stiz A".
The influence of the external environment on the sealant indoors is much less, and the requirements for the aesthetics of the seam are higher. For interior work the following are most often used:
- white silicone sealant (it is better to prefer a neutral type);
- liquid plastic;
- polyurethane sealant;
- acrylate composition "Stiz B".
Butyl sealant is suitable for sealing the window blocks themselves and sealing cracks in double-glazed windows.
Mr. Build recommends: when choosing, focus on products from well-known brands. There are a lot of low-quality compounds on the market from unscrupulous manufacturers.
High-quality sealed seams will ensure comfort in the room and will not spoil the appearance of the window opening. To achieve this result, it is enough to choose the right sealing composition and carefully apply it.
When choosing ready-made putty for windows in a store, you should know that it must have the following qualities:
- elasticity;
- strength;
- long service life;
- compatibility with other materials;
- is good at resisting aggressive environments, temperature changes and being resistant to UV rays;
- holds well not only on the frame, but also on the glass;
- be harmless to human health.
In addition, experts advise adhering to the following rules:
- Since silicone paste cannot be painted, to seal a white plastic window you need to immediately buy white sealant. If the window frame is a different color, then you need to buy transparent silicone sealant.
- If you have difficulties in choosing a sealant or the temperature outside is low, to seal the joints of plastic and wooden structures you should buy universal sealing compounds, for example, Stiz A; you can work with such a sealant at a temperature of -20.
- Silicone sealant protects best from fungus and mold.
- When purchasing new silicone synthetic sealants, you should be aware that they shrink a lot when they dry.
Important! When purchasing silicone sealant, be careful not to confuse “liquid plastic” and silicone. “Liquid plastic” is not used for working with PVC windows.
In the old days, each owner made their own putty for windows. And now it’s not difficult to do this. A simple process will save money, and you can make the sealant at any convenient time. It is only important that the putty you make for windows yourself is plastic, dries quickly, adheres well to the surface being treated and lasts for at least a year.
In order to make putty for windows at home, you should familiarize yourself with some recipes.
This recipe is used for working with wooden windows. The composition includes chalk and flax oil. Sequence of work:
- Grind the chalk with a grater or hammer to a powder;
- mix linseed oil with chalk in proportions of 1/4 (to one part oil, 4 parts chalk);
- knead the “dough”, if it can be rolled into a ball, then this consistency is suitable for work, if the mixture does not retain its shape, then chalk flour should be added;
- if a white putty color is required, then leave the mixture without adding dyes (it will have a milky tint), but if you want to achieve a different color scheme, you should add dye at the chalk crushing stage.
The mass is ready for use.
Important! If flax oil is not on hand, you can replace it with drying oil. In this case, the putty will have a certain smell.
- mix flour and very fine sand in equal quantities;
- dilute the dry mixture with water until the mixture holds its shape;
- start work.
Important! This putty is used in the most extreme situations; it is very fragile and must be replaced with a better one at the first opportunity.
This putty can not be used immediately; it can be made for future use and stored in the refrigerator.
- Melt lard in a frying pan and take 1 tsp. product;
- grind the rosin to a powder, add 2 tsp. in lard;
- 10 tsp is added there. chalk, crushed into powder;
- A thick mass is mixed and you can start working.
Important! If stored, this putty should be tightly closed.
This homemade putty is very strong and durable.
- tar is boiled over low heat for 2 hours;
- after the tar has boiled and cooled to a warm state, sifted ash is added;
- ash is mixed with tar until the mixture loses its stickiness;
- after that you can start working.
We invite you to read: How to make a floor on a pile foundation
Important! This mixture is used immediately after preparation. Otherwise, it becomes unusable.
You can make window putty from available materials such as unrefined oil and talc:
- carefully separate the sediment from unrefined vegetable oil and use it in your work;
- Talc is gradually poured into the sediment to the consistency required for work;
- Stir until smooth and start working immediately.
Important! Talc can be replaced with decorative or regular cement. In this case, the putty must be prepared very quickly, since the cement sets immediately.
In order to prepare old windows for the new season, it is not enough just to make window putty with your own hands. It is very important to apply it correctly. And to do this you need to get rid of the old putty.
You can remove old putty using a narrow spatula; a knife with a wide blade will also work here. The putty is lifted with a spatula and carefully removed from the surface of the frame. If difficulties arise, you can heat the putty with a hair dryer, then the frame will clean much faster.
After the unnecessary material has been removed, you should carefully remove the glass and clean the frame from dirt, and then clean the surface of the frame with sandpaper.
Only after this can you begin to apply a new layer.
Using a spatula or knife, you need to carefully apply the mixture to the place where the glass will be inserted. Then you should carefully insert the glass and press it. Excess putty should be removed immediately with a clean cloth so as not to spoil the aesthetic appearance of the window. After the glass is inserted, the composition should be applied to the side from which the glass was pressed.
The paste can be laid using the smearing method, as well as by rolling the mass into a rope, which is stuck into the grooves, and then leveled and the excess is removed.
After the mass is applied, it is leveled, cleaned and given an aesthetic appearance, for example, painted.
Modern building materials stores have a sufficient selection of any sealants. However, it is much more advisable to putty windows in dachas, greenhouses or other buildings yourself, without spending much effort and money.
The choice of putty for wooden windows should be based on the volume and complexity of the intended work. Depending on the condition of the wooden window covering and the expected end result, the choice of putty may fall on several options.
For example:
- wood putty with fiberglass (used for significant mechanical damage to the wooden covering, since the fiberglass included in this type of putty is tight and resistant to external environmental influences);
- adhesive putty for wood (has excellent adhesion to the working surface, but is slightly inferior in popularity of use);
- moisture-resistant putty for wood (for example, Eskaro Aqua Filler, quite expensive in cost, but they do an excellent job in situations where you need to protect wooden windows from prolonged exposure to water);
- acrylic putty for wood (it is elastic and resistant to temperature changes and climatic influences, it dries quickly and takes the form of natural wood - applicable for finishing both interior and exterior spaces);
Some of the best putties for wooden window surfaces, which have received great love and demand from consumers, are:
- Two-component putty “Unisoft”;
- Two-component polyester universal “Uni”.
In recent years, wooden windows are increasingly being replaced by plastic ones, which do not require frequent repairs and maintenance. However, not every homeowner can afford to install modern double-glazed windows, and in this case, you have to learn how to repair old wooden frames. And who even consciously give preference to natural materials, despite the fact that these products require much more trouble in caring for them.
DIY window putty
One of the required design elements of a regular wooden window is putty. It is used to hold glass in a fixed state, to seal them as much as possible, as well as to seal cracks that can form due to drying out and deformation of the wooden parts from which the frame is assembled.
Putty for window frames is quite short-lived, it tends to become brittle, crack and crumble, so from time to time it is necessary to replace it, completely removing the old, deteriorated material. Use store-bought or homemade putty for windows to install new glass or for preventive repairs.
It must be remembered that the integrity of the entire window structure depends on this seemingly insignificant component. Over time, moisture penetrates into the cracks of the dried putty, the wood begins to rot, and as a result, this layer will no longer help solve the problem of window sealing. Therefore, it is necessary to check each window sash annually and, if necessary, carry out preventive work.
Window putty is a paste that is applied to the joints of the wood frame and glass, ensuring the stability of the installation and creating the necessary level of sealing. In addition, several types of putties and putties are produced based on various components, intended for sealing cracks and joints of frame elements.
It’s easier, of course, to buy putty in a store. However, situations are different...
Typically, window putties can be made based on linseed oil, nitrocellulose, drying oil, polyesters and other materials. This material can be sold in paste form, packaged in different containers, or as a dry mixture. Dry putty is diluted with water to the desired consistency. Putty and putty are produced in different shades, so it will not be particularly problematic to choose a mixture of the color of the frame.
Puttying slopes - choosing the best option
In many ways, the puttying of slopes depends on how the old window or door was dismantled. That is, on the state of the opening, which may be destroyed or untouched. This, for the most part, depends on those who will install the new structure, since in 99% of cases dismantling occurs immediately before installation of the product. I want to draw your attention to the main vicissitudes that await you during finishing, and the video in this article will help you.
Consumption
It depends on two factors:
As a rule, the thickness does not exceed 2-3 millimeters.
Here are the consumption rates for some types of putties with a layer thickness of 1 millimeter.
| Putty | Consumption per 1 m2 with a layer thickness of 1 mm, kg of dry mixture |
| Eunice Kron | 1 |
| Eunice LR Plus | 1 |
| Prospectors basic, façade | 1 |
| Prospectors finishing | 0,9 |
| Founds T-34 | 0,9 |
| Founds T-36 | 1 |
| Founds PG35W | 0,85 |
| Founds Belsilk T-32 | 1,2 |
| Founds Graysilk T-31 | 1,3 |
| Litokol Litofinish Facade | 1,3 |
| Volma Finish | 1 |
| Bolars leveling | 1,4 |
| Vetonit Finish KR white | 1,2 |
| Knauf Fugen | 0,8 |
| Knauf Polymer Finish | 1,2 |
| Ceresit ST-127 | 1,2 |
| Ceresit ST-225 | 1,8 |
The consumption of this mixture is maximum due to the high density and high content of mineral filler.
Plastering work for window and door slopes
The general principle of finishing the slopes of windows and doors may differ:
- Puttying of door and/or window slopes can be done according to all the rules for plastering work. That is, beacons are installed in the opening and a leveling layer of the mixture is applied - first the starting layer, then the finishing layer. A cement-sand mortar can be used as a starting point;
- In cases where the opening is severely broken or simply to save time, the door and/or window openings are finished with plasterboard, which is subsequently covered with a finishing mixture and painted. In some cases, this method is the only option other than the alternative of leveling the slope with brickwork due to its severe destruction.
Tools and materials
You will need a few tools for finishing:
- of course, these are spatulas , of which you will need at least two - one to apply and the other to stretch the finishing mixture;
- in this case, a spatula with a wide blade should be slightly larger than the slope, that is, completely cover its width;
- to mix the solution you will need a mixer (drill with attachment) and a rubberized bucket ;
- for leveling you will need a long level or plumb line ;
- if you work with drywall, then you cannot do without a screwdriver with a special attachment .
Different perforated corner
From the materials we will need:
- paste or powder finishing putty;
- For leveling, the instructions allow you to use starting putty or cement-sand mortar . Also, if you wish, you can level the slopes with plasterboard ;
- in addition, drywall can be glued to the surface, rather than mounted on profiles, and for this it is best to use Knauf Perlfix ;
- You definitely need a perforated corner for clear edges;
- A primer will be needed for any leveling method.
Removing old paint from window frames
Paint can be removed thermally or chemically.
Thermal method
To perform thermal cleaning we will need an industrial hair dryer (heat gun).
It is best to remove old paint using a hair dryer
Do not try to heat up wood with a hair dryer. It will not give the desired temperature (200°). Also, do not use a blowtorch or propane torch - you will only char the surface!
On an industrial hair dryer, the temperature is set in the range of 200–250° . It is not necessary to go higher, as this will lead to a loss of quality of the material. It is advisable to put a narrow nozzle on the heat-generating hole, which will prevent the glass from heating up. They should be included in the set of such heat devices.
The frame needs to be placed on a narrow edge and rotated as needed. We consistently heat up sections of 20–30 cm, while keeping the hairdryer at a distance of 10–15 cm from the frame. When the paint begins to bubble, remove it with a spatula or shoe knife.
After heating with a hairdryer, the paint is removed from the wood with almost no effort.
Remember that the hair dryer quickly overheats, so follow the regime: 5 minutes of operation - 10 minutes of cooling.
You should not use a sharpened spatula; it will slip over the old paint or, conversely, cut into the surface.
Chemical method
The chemical method is effective only with a small number of layers of old paint. A special reagent, which is sold in hardware stores, is applied to the surface and left for a certain time according to the instructions. Then remove the softened paint with a spatula and rags.