The tightness of windows largely depends on the tightness of the active sashes to the frame structure, as well as the uniform pressure of the sealing contours along the entire perimeter of the light opening. If errors were made when equipping the fittings, moisture, air, dust and noise will enter the premises from the street. To prevent this from happening, the manufacturer must strictly adhere to technology. This article will tell you what standards regulate the clamping force for plastic windows, and how it can be improved after the windows are manufactured and installed.
Tips and tricks
In some cases, it may be necessary to adjust the window frame vertically. To do this, you need to remove the decorative plastic cap from the bottom hinge and use a hexagon to adjust the position of the frame. Circular movements clockwise will raise the sash, and counterclockwise will lower it.
- Once every 5 years, it is necessary to clean the fittings in hard-to-reach places from accumulated dust and dirt. This process cannot be called labor-intensive, but it will be much easier to do this work together. To do this, you will need to remove the sash from both hinges and remove the overhead elements. All parts must be cleaned and the moving elements lubricated with oil. After complete drying, the fittings are installed in their places, and the structure is assembled in the same sequence.
- It is not recommended to wash windows using abrasive cleaners and solutions. To clean the surface, it is best to use a soft cloth and a special product for plastic windows.
- Monitor the quality of the rubber seal - it needs to be replaced periodically. It should not have cracks or cuts. To make the seal last longer, periodically inspect the window and lubricate the rubber with silicone grease. Without proper care, the seal will become unusable after 5-6 years of operation.
- If the window is used for a long time, the seal may need to be replaced. This need is not always associated with poor quality rubber or inadequate care; there is also such a thing as physical wear and tear. Perhaps even an ordinary person can cope with replacing the seal. You need to purchase a new rubber seal from a hardware store and carefully remove the old one from the surface of the sash. It is better to start all work from the lower or upper corner. After this, the surface and any open grooves are thoroughly cleaned. Check in advance that the amount of new rubber is exactly enough for the entire window; the seal cannot be stretched.
Most of the work on adjusting plastic windows can be done independently and without experience. If errors were made during the installation process, or the window has withstood a long process of use, the problems can be dealt with by additional adjustments or replacement of fittings.
To learn how to independently adjust plastic windows, see the following video.
One of the most common complaints people have during the cold season is poor window sealing. It blows from under the doors, but it’s not always clear where it’s coming from. How to correctly diagnose your windows for pressure and determine why they are blowing?
Content:
Is it possible to check the window for pressure using paper? Does this method work or not? What kind of window pressure is needed for its normal operation? Requirements for window pressure, from the point of view of their operation. Recommendations from window manufacturers. Why do plastic windows still blow? Replacing seals and window pressure When and how to change rubber, and what is better not to do How to check a window for uniform pressure A simple way to check Fittings and window pressure Locking pins and strikers Winter and summer mode - myth or reality? Presence and absence of fittings parts Installation and location of clamping elements Natural wear of fittings Summary
Should you trust the paper?
There is a common misconception that the quality of window pressure can be checked using a regular sheet of paper. Like, if you managed to pull the paper out of the sash of the closed sash, the window pressure is bad.
Unfortunately, from a technical point of view, this simple method does not stand up to criticism.
Of course, such a “window pressure check” makes an impression on ignorant people - and completely in vain. After all, a sheet of thick paper, with desire and dexterity of hand, can not only be pulled out, but also pushed through almost any closed window. Moreover, if the window is adjusted correctly, it is often quite easy to insert paper there (we’ll look at why later). By the way, for wooden and aluminum “warm” windows, such a test is even theoretically useless - with them, the main sealing contour is located inside the frame, and the external one, as a rule, is not closed.
A paper check is beneficial only to the shabashniks - “rubber workers”, who are ready to replace your seals with new ones, at least every year, as well as to the would-be masters “twisters” - adherents of the “winter regime” sect. And we will try to figure out what really affects the pressure of the window, and how tightly it should be “pressed” to the frame.
Clamp and degree of compression of the window seal
First, let's decide what kind of clamp we need. How can you be stronger? Not at all!
You and I need a window clamp that:
1) The window was not blowing; 2) At the same time, it would open and close without much effort; 3) It would serve without adjustment and repair for as long as possible.
Don't forget that by turning ONE handle of a modern window, you activate at least 3 - 4 locking elements!
Therefore, a compromise solution is required here. Here it is:
The pressure on the window seal should be:
1) Minimum enough so that there is no blowing from the window; 2) Uniform around the entire perimeter of the window sash.
That is why the compression stroke of the elastic band recommended by the manufacturers, which ensures good “tightness” of the window sash, is only 1 mm. If you squeeze it tightly and for a long time (for example, unnecessarily switching the window to “winter mode”), its service life will sharply decrease, and the load on the handle will accordingly increase.
In just 1-2 years, such a “well-pressed” window will begin to blow again. And now it’s really impossible to do without replacing the seal.
The uniform pressure of the window, along its entire perimeter, is important for the same reason - to avoid areas of excessive “squeezing” of the rubber, and its early failure.
This is why even a properly adjusted window can easily fail a paper test. After all, pressing the seal by 1 mm is quite a bit.
Why (given such low requirements of manufacturers for clamping force) does it still blow from many plastic windows?
We must not forget that any seal must work correctly. If the window is not adjusted, or the geometry of the sash is broken, its petal may “hang” in the air. Since it is not pressed against the frame, the likelihood of blowing increases sharply.
The fact is that the outer side of standard seals, in most cases, does not fit tightly enough to the frame (you can read about the deformation of the sashes as a cause of blowing here). Well, there is no need to talk about the quality of the rubber itself - after all, if the window has a fake, or a seal “killed” by the builders, you can forget about a good clamp.
Improving window pressure by replacing the seal
If the rubber has served for more than 10 years, then after replacing it with the original (or a good analogue), the window pressure should be completely restored. And, with proper window care, it will last no less. However, beware of the “thicker is better” approach. A universal, or “foreign” seal, is quite capable of “killing” your fittings in a very short time. Why is this happening?
The force on the handle, after installing a thick rubber band, increases significantly - and the already “old” mechanism soon breaks from overload. In difficult cases, people even have to replace windows - after all, many, especially not very experienced craftsmen, do not undertake the repair of fittings for which there are no spare parts anywhere.
After all, many windows that are “older” than 10-15 years have not been on sale for a long time! Replacing the assembled mechanism is also not always possible (if the window profile was rare and is no longer produced).
This is now the generally accepted policy of most companies (not just window companies). If it's broken, don't repair it - replace it with a new one.
To select the “right” seal, it is enough to find an agreement with the name of the window profile (REHAU, KBE, VEKA, etc.). Or invite a specialist with sufficient work experience - after all, many once well-promoted window systems have long disappeared from the Russian market.
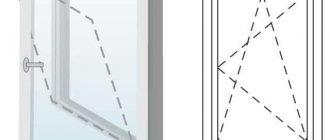
So how can you diagnose a window for uniform pressure against the frame?
Everything is very simple, and there is no paper fraud. For this, a regular tape measure or ruler is quite enough.
Press it against the window frame and you will see how many millimeters the sash is “above” the frame. The handle must be in the "closed" position.
The number itself is not important. Make sure that this value is approximately the same around the entire perimeter of the sash. If you see obvious differences of more than 1-2 mm (remember the recommended amount of rubber compression?), check the fittings. How to do this - read on.
Fittings and window clamp
Now, let's move on from the seals - directly to the hardware.
In modern windows, normal window clamping is ensured by fittings - a multi-locking mechanism operating from one handle. There are clamping elements on both the window sash and the frame.
Locking pins and strikers - what are they?
The axle is a movable protruding “roller” on the window sash, and the striker is a small oblong part screwed to the frame.
When you turn the handle, the trunnion goes behind the bar, which has a wedge-shaped bevel. The window pressure depends on this height difference, and can be changed by adjustment.
Most often, the eccentric is adjusted in the trunnion, on the sash (but in old windows with ROTO CENTRO fittings, the opposite is true - the slats themselves are adjusted, on the frame). The upper, and for some windows also the lower hinges, are also adjustable for pressure.
The myth of “winter and summer mode”
Everyone has probably heard about these modes. He doesn’t write about them, he’s only lazy, but I hasten to disappoint you - this is just someone’s invention. The standard adjustment of window pressure provided by the manufacturer is only needed in the event of a manufacturing defect or significant wear of the mechanism.
A properly manufactured and installed window does not need seasonal pressure adjustment as long as the seal is “alive” (if it is of normal quality). And this is usually at least 10 years.
But the myth is very tenacious, due to the apparent simplicity of the solution. It’s blowing – so let’s press harder! And the precision of manufacturing and installation of modern windows (down to every millimeter) is not at all obvious to the average person. And this is widely used by both window manufacturers and repairmen of all stripes, in every possible way supporting the winter-summer misunderstanding.
After all, if you don’t endlessly fiddle with the fittings, but just adjust the window normally once, there will be nothing to repair, and the seals will last for 10-15 years. And no one will replace the windows with new ones. Only losses!
So, we won’t press the window with eccentrics for now. After all, for the fittings to work properly, it:
1) Must be in the correct configuration; 2) Must be exactly in place. And all this needs to be checked!
Number of clamping pins
On a “standard” sash with a height of 130-140 cm, there should be at least 3 of them on the handle side. The trunnions should be located no further than 30 cm from the corner of the sash (this is according to GOST - but in fact, the closer they are to the corner, the better). It is highly desirable in our climate to have clamping fittings on top and bottom of sashes with a width of more than 60 cm (although, as a rule, they are installed with a width of 70 cm or more). Between the hinges of such a sash, one press in the center is enough. Opposite each axle, there should be a counter plate on the frame.
Simply put, the distance between two pressure points of a plastic window (including hinges) should not be more than 70 cm. At the corners, clamps are required (the hinge is also a pressure point).
Everything is fine with the presence of the trunnions - now we look at the slats.
The distance between the trunnion and the bar (the “open” position – the handle is strictly horizontal) should be no more than 5 mm. Otherwise, the window pressure may be insufficient, and tightening the eccentrics is even more useless.
The main reasons for incorrect relative positioning of fittings:
1) Sagging of the sashes. Here, the optimal solution would be to adjust the window geometry, which is beyond the scope of this article; 2) Rearrangement and removal of strikers by window installers (happens, and quite often); 3) Errors and manufacturing defects.
If the window is not deformed (and this is clearly visible from the results of the pencil test), then simply install the strikers in their “correct” places, 3-5 millimeters from the edge of the locking pin. After that, did the window become difficult to close? Then slightly reduce the degree of pressure with the eccentrics, and most importantly, lubricate its fittings!
Perhaps the biggest problem with window clamping occurs if the bottom hinges were installed incorrectly at the factory. If they do not have the appropriate adjustment screws, you cannot do without an experienced technician!
Poor seal on old windows. Natural wear and tear
If you don't lubricate the rubbing parts for years, they simply grind against each other.
As a result, the window pressure weakens by the amount of the worn area; usually the strikers are the first to be “worn.” For example, the production of the strip in the photo is 1 mm deep, and therefore there will be practically no pressure with the “factory” setting.
Unfortunately, finding new trims for old windows is often problematic. Therefore, in this case, it is useful to be able to adjust the fittings with eccentrics for increased pressure. Well, don’t forget to lubricate it every year!
Summary
Simply adjusting the window pressure with a key is in most cases not enough to eliminate blowing. Without precise adjustment of the windows, even a complete replacement of the seals does not guarantee the desired result.
Replacement of accessories
There are a large number of different elements located on the end part of the sash. The fittings play almost the main role in the quality of the window and are responsible for trouble-free operation throughout the entire service life. And the service life of the window depends on the quality of the fittings.
Window fittings are divided into three types.
Budget - often used by developers in new buildings. Such accessories are offered by domestic manufacturers, and they are usually limited in functionality. For example, windows with budget fittings do not switch to different seasonal modes and do not have the function of opening for micro-ventilation.
- Standard - produced by both domestic and foreign companies.
- Specialized - used by various manufacturers for windows installed in crowded places: airports, shopping centers, administrative buildings.
Blowing in the window frame
If the seal is leaking air, this problem can be eliminated by fitting the window sash. The fit can be adjusted using trunnions and counter eccentrics. Depending on the type of fittings, either one mechanism or another can be used for adjustment.
In the locking cylinders, you need to find a hexagonal keyway. If one is not found, then you should resort to using pliers. Then you just need to turn the eccentrics so that they come closer to the sealing layer. This procedure must be repeated for all cylinders that are located around the perimeter of the frame. The main thing is to ensure an even fit.
Handle malfunctions
Sometimes there is a problem with the operation of the pen. This part is most susceptible to wear and requires frequent maintenance. In order to secure or change the handle, you need to rotate it 90 degrees. Afterwards you will need to remove the decorative trim: you will see the screws that hold the handle. Unscrew them; After this, the handle can be easily removed. It can be replaced with a new one, which will need to be secured with screws in the reverse order.
If a comb is needed, it can be fixed to the base of the handle. In construction supermarkets you can buy a child-resistant handle.
The plastic window does not close
Sometimes the geometry of the window opening changes so much that even moving the sash to the maximum, we do not get the desired result: the plastic window does not close. What to do in this case? If there is an adjustment on the mating part, as in options a and b in the photo, try to get by with a little damage - tighten it further here. The principle is the same: insert the hex key and rotate it clockwise, pushing it to the maximum.
If a few millimeters are missing not in depth, but sideways, then you will have to install a lining under the mating part. They are cut from a piece of white plastic. The maximum thickness is 3-4 mm. First, unscrew the screws and remove the stops. Two gaskets are cut out: one is installed from below, the second from the side. As a result, the stop moves 3 mm deeper into the sash.
Types of mating parts on the frame
They are first installed on the desired place of the lining, on them there is a stop, which is screwed with a self-tapping screw. Protruding pieces of plastic are cut off with a sharp knife. Check whether the window closes or not.
If this does not help, there is another way: move the sash frame. It is quite flexible and can be moved about 5mm. The procedure is as follows:
- On the side that needs to be moved, the glazing bead (only one) is removed.
- Between the double-glazed window and the frame, just below the place where we will move it away, a plastic or wooden (not metal) smooth and narrow object is inserted. A flat spatula or ruler works best.
What to do if the plastic window does not close? How to adjust
Press the frame, insert a plastic strip that will bend it. Take out the ruler or spatula. Reinstall the glazing bead.
If you look closely, you can see that the frame is slightly curved. The main thing is that the window now closes. In 99% of cases this is enough. If you are unlucky and all these tricks do not produce results, you need to remove the slopes and also bend the frame.
You can watch all the steps described above in the video.
Indications for adjusting the pressure
The active use of metal-plastic windows has led to the need to introduce several useful functions into their design and thereby increase user comfort. The window can be opened completely, the sash can be tilted, or it can be set for micro-ventilation. Some designs also include adjustment of the door pressure density depending on the season. Using these necessary functions over time leads to loosening and warping of the sash, breakage of fittings and difficulties with opening/closing the window. When may technical intervention in a window structure be necessary:
- when closing, the sash catches the frame;
- loose fit of the sash to the frame and the appearance of a draft;
- distortion of the structure due to window subsidence;
- it is necessary to “switch” the window from winter to summer mode and vice versa.
In addition to temporary window wear, adjustment of the window sash pressure may be necessary due to poor installation. If the installation was carried out by specialists and the window is still under warranty, then it is better to call a specialist.
How to close a plastic window more tightly
Many owners of houses and apartments are interested in how to close a plastic window more tightly. In order to close the sash as tightly as possible, you need to clean the frame to improve the contact of the structural elements. Dirt and dust accumulate in it. If a mosquito net is not installed, leaves and bird feathers may get in. In winter, during ventilation, condensation is created on the frame due to temperature differences. It turns into ice, leading to loose closure and deformation of the sash. Therefore, the frame must be cleaned periodically. To do this, use a soft cloth or sponge. Additionally, it is recommended to use a brush to remove dirt from hard-to-reach places.
It is also important to lower the handle all the way when closing the plastic window. This will ensure the tightest possible contact of the glass unit with the frame. If the system is not completely closed, it will go into micro-ventilation mode.
How to adjust windows depending on the season
With use, the elastic band that creates a tight fit on the sash can become deformed, which will lead to a loss of its qualities and properties, causing the normal level of tightness and sound insulation to be lost. This can happen in the off-season, when there is a change in the temperature level outside. Accordingly, it is necessary to adjust plastic windows with your own hands in a timely manner so that problems do not arise after the change of season.
To avoid such inconvenience, which can be caused by a defect in window fittings or to eliminate it, there is no need to resort to complete replacement of components. For such purposes, the design of the window system contains mechanisms that allow you to adjust the clamping force so that the rubber bands provide a reliable level of window tightness. The following points will help you cope with this task:
- It is recommended to do this procedure once a year, especially if the temperature resonance in different seasons is quite large. If you make such a simple adjustment of plastic windows yourself, then with its help you can ensure a fairly long service life of the product and prevent the rubber seals from wearing out.
- Eccentrics, or otherwise trunnions, which play the main role in this process, are located in plugs and have an oval shape. The frame, in accordance with the location of the trunnions, has a mechanism into which these eccentrics fall and take position depending on the rotation of the handle. Depending on the stationary location of some and other elements, a certain level of pressing force on the sashes is created. Accordingly, adjusting plastic windows with your own hands in this part can come down to moving the components of the mechanism and selecting the optimal position.
Video - switching windows to winter mode
When faced with adjusting plastic windows with your own hands in terms of adjusting them relative to seasonal changes, you should know that there may be differences in this process depending on the brand of window. The differences usually lie in the following points:
- the trunnion may have a characteristic slot, which, when adjusted, must be rotated using a flat-type screwdriver;
- the eccentrics can be retracted using pliers, perhaps just by hand, after which it will be possible to rotate them;
- the trunnion can be adjusted immediately, in the place where it is located when turning it with pliers.
If no method is suitable for adjusting the degree of pressure, then you can resort to adjusting the mechanism located on the frame, into which the trunnions fall when the window is closed. There are two positions for adjustment, after the bolts securing the mechanism are slightly unscrewed:
- a decrease in downforce can be achieved by moving the hooks towards you, i.e. into the room;
- To increase the pressure, you should move them in the opposite direction.
The optimal number of pressure points on plastic window sashes
When manufacturing windows, manufacturers must be guided by the standards from GOST 30777-2001.
This standard determines that sashes with dimensions of 1500x800mm must have at least 8 locking points - 3 eccentrics on the right and left sides of the sash and 1 at the top and bottom. Since the upper and lower hinges for hanging the sashes also serve as pressure points, the estimated number of eccentrics is reduced by 2 pieces. The distance between a pair of adjacent locking elements located on the same side of the structure cannot exceed 700 mm. The distance from the corners of the trunnions (eccentrics) should not be more than 300 mm. When equipping windows with fittings, it is necessary to take into account the type of opening of the sashes. In a standard opening of a multi-storey panel house with a total dimension of 1520x1300 mm, a frame with a vertical impost is usually installed, which divides the opening into 2 parts. Typical models of such windows are equipped with:
- Pivot (hinged) sash
(753 mm wide) - this window element must have 6-7 pressure points. They are distributed as follows: one eccentric at the corners of the side of the sash where the handle is located, another trunnion in the center on the opposite side and a pair of clamping elements on top and bottom of the handle. Since in wide rotary structures not only the vertical post on the hinge side is considered “weak”, but also the horizontal sides, with such dimensions it is advisable to install one eccentric on each of them. - Tilt and turn sash
(width 453 mm) - when such structures are equipped with locking fittings, 3 pins are installed on the profile with a handle and one on the side that is hung on the hinges. A total of 6 pressure points are obtained, which are sufficient to seal the window in the contact area of this sash.
Despite the requirements of GOST, some manufacturers determine the number of pressure points at their discretion. Moreover, the state standards themselves allow not to install upper and lower trunnions in cases where the width of the active element is less than 700 mm. Since most sashes do not reach this dimension, the average clamp for PVC windows on the upper and lower horizontal profiles of the sashes is rare.
To avoid problems with tightness during operation of door and window units, it is recommended to discuss this issue immediately when ordering windows. With this approach, the manufacturer will not be able to violate technology in order to save on fittings.
Possible problems
The most common problems that you can fix yourself may be those listed in the table. How to cope with the difficulties that arise and adjust the windows yourself is indicated for each situation.
| Problem | Solution |
| The handle has become unstable | To get rid of this problem, it is necessary to make some manipulations in the fastening. The first step is to slightly pry the top plate of the mechanism, which is usually located vertically on the side of the sash. This should be done with an object made of a fairly soft material, or with your fingers, because you can leave scratches on the plastic. After the plate is slightly raised, you need to turn the handle 90 degrees. After this, 2 bolts that hold the mechanism will be visible; they should be tightened to the maximum possible limit. A screwdriver with a sacral tip will help in this process. After such manipulations, the position of the handle must be checked, making sure that it is stationary. |
| The handle needs replacing or installing a fuse | In some cases, it may be necessary to change the handle on the window due to the fact that a part has broken off and is not suitable for use, but most often the handle is changed to a special one that has a safety lock. This is done in rooms where children live so that they cannot open the windows themselves. The procedure for changing the handle is very simple, you first need to unscrew the same bolts as indicated in the previous paragraph, and then remove all the contents from the sash. The new element is inserted in a similar position and then secured with bolts. |
| The handle mechanism gets stuck or does not fully accept one of the positions | This problem is quite extensive and there may be more than one reason for it. The first reason that leads to such a problem is the need to lubricate and clean the components of the handle mechanism. The second reason may be the incorrect level of downforce that is set on the sash. If the cause of such a breakdown is the need for cleaning and lubrication, then you should unscrew the bolts in the mechanism that holds the handle. After this, you need to start disassembling it so that the interior can be cleaned and lubricated. To do this, you will need a brush and oil; you can use a vacuum cleaner and remove all dust particles with it. Glass cleaner can also help with cleaning, but you need to make sure that the mechanism does not remain wet after it and that liquid does not get inside the profile. You can lubricate all components of the mechanism using technical oil, but it is better to use WD40, which has a special thin tube that allows you to distribute the liquid throughout the mechanism. It is advisable to resort to the use of such a lubricant whenever the operation of the window mechanisms is adjusted. If the handle does not reach the closed position of the window, then it is necessary to adjust the pressing force of the window sash and reduce it. To do this, you need to adjust the eccentrics, which are located on the eye shutter in the same place where the handle is located. Also important in this process are the loops that are located on the opposite side. |
| Handle mechanism jammed | When such a situation arises, there is no need to dismantle the handle or replace the fittings, and there is no need to even disassemble and remove the mechanism from the sash. This problem occurs because the locking mechanism does not work correctly, so the window cannot be positioned to open. In order to get rid of this problem, you need to loosen the lever located in the locking mechanism a little and move it. This lever is located on the side where the handle is attached, at the end. There are two options by which such a mechanism can be designed. This may look like a plate with a tongue, which in the open position of the window should be located at an angle in relation to the rubber bands. Another case is a clip located on the rubber seal. |
Installing additional pressure points
Window owners are often concerned about the question of whether it is possible to install additional clips and how to do this. The reason for the interest, most likely, is that during the winter cold it blows through the windows, and only at the bottom of the window or in the places where the hinges are located.
Although the pressure on the shutters seems to be maximum, if you open the shutter, you can see that there are no locking points. The question immediately arises: why? The answer is also ambiguous. But first things first. According to the requirements of GOST 30777-2001, locking elements must be located at a distance of 700 mm from each other and from the corners no more than 300 mm.
Example: The size of a standard window in a nine-story building is 1300x1520 mm. A window without a frame has two sashes: a tilt-and-turn one with a width of 453 mm and a rotary one with a width of 753 mm.
The tilt-and-turn sash will have the following arrangement of clamps: on the handle side there is one pin in the corners, another one slightly below the handle, the next clamp is on the side opposite the window handle and plus two hinges, which also act as clamps. The 6 available pressure points in this case are the minimum number.
The turning post has 6 or 7 points, including the hinges, and they are located like this: 1-2 pieces where the handle is located and one pin in both corners. Another independent middle clamp is located on the opposite side of the handle. This amount is considered sufficient ideally.
If a given number of clamps does not cope with its functions, then there are several reasons, one of which is the softness of the profile. This is a consequence of the influence of time and cold on it, under the influence of which the profile, bending, does not have a tight fit with the seal.
Therefore, the softer it is, the more often trunnions are installed on it. Repair work on windows requires a lot of experience, so you should call a specialist for help. To make repairs yourself, you should carefully read this article to the end.
Additional clamps come in two types: trunnions and hardware locks. The first of them are installed only on swivel stands, since it will be impossible to tilt it back.
The rotational movement of the window handle and the trunnion are not connected by mechanics. The pressing of the sash during closing is carried out due to the interaction of both parts of the trunnion. One of them is on the sash, and the second is on the frame. This type of clamp is Rotobig. Such a clamp can be:
· average external;
· average hidden;
· medium hidden adjustable.
By installing additional fitting clamps, we actually extend the fitting trim to increase the number of clamps. The apparent simplicity of the installation process cannot hide the complexity of choosing window fittings among its variety.
Unlike professionals, amateurs who install plastic windows know only standard fittings that are known to everyone. The Roto fittings kit, which guarantees its products a decade of high-quality work, includes many parts that allow you to improve the pressing of the sashes.
The company's locking mechanism is distinguished by the presence of a flat tongue, so when closing the valves, much effort is not required, since the locking mechanism itself, or rather its parts, accept force evenly distributed over their surface.
You cannot begin installation work without identifying the brand of fittings already installed on the window. Having decided, we find it in the manufacturer’s catalog, which can always be found on the Internet, and select parts for the window. In most cases we are dealing with a corner switch and a middle lock.
Next case: let's imagine the same version of the window. Properly adjusted fittings, with a geometrically correct turn-out flap, cannot have any problems. Sometimes, it is necessary to change the middle lock (otherwise known as the hardware strip) located on the side opposite the handle with the hinges to a long one, which has more clamps.
Swivel posts of this size suffer from weakness on the sides located above and below, as well as on the side located between the hinges. Therefore, additional, called “rear,” axles are installed between the hinges, distributed along this side.
First, you should decide what the main constipation will be, and then get to work. The main lock can be rotary, tilt-and-turn, with the handle located in the center and fixed. The tilt-and-turn ones have a toothed comb, which is used to connect to other parts of the fittings.
Replacement should be made if the window was already equipped with a rotary main lock.
As an example, let's look at how to install Roto fittings with a handle located in the center, represented by two short “corners” and two medium locks. At
With this width of the sash, it is possible to use a regular corner switch, but the pressure point itself will move towards the hinge.
To install the fittings, you will have to unscrew and remove the window frame, remove the screws, and then remove the lock. Then the installation of the corner switches follows directly, using self-tapping screws.
The main lock is applied exactly in the center, not forgetting to mark the junction of the corners with the bar and the seat with the rod. The excess length is removed with a hacksaw, and the main lock is fixed with self-tapping screws after installation. All that remains is to install the middle locks at the top and bottom, attach the handles and install the strikers.
If the main turn-and-turn lock, which has a fixed handle height, is used during repairs, nothing fundamentally changes, but the lower “angle bar” should be replaced with a turn-and-turn one.
If you use fittings from another manufacturer, for example, MASO, then the “angle bars” will have to be replaced with latches.
Seasonal adjustment of the clamping mechanism
During the operation of a plastic window, the sealing layer laid around the perimeter often becomes thinner and this provokes the appearance of cracks. As a result, the tightness of the device is broken, cold air and extraneous sounds from the street enter the room. The reason for this phenomenon can also be thermal distortion of PVC windows in the warm season. To adjust plastic windows yourself, there is no need to completely change the seal. The fitting mechanism is designed in such a way that it allows you to adjust the fittings and the clamping mechanism at the same time.
The window sash at its end has oval cylinders, which are located inside the slots of iron plugs. Such devices are called trunnions or eccentrics. They are attached to the frame due to counter eccentrics built into it and when the window handle is turned, the sash fits tightly to the frame. You can adjust the clamping force by turning the trunnions.
If you need to adjust the closing of the window sash, you should turn the protruding part of the pin towards the inside of the window, and to loosen it, turn it towards the outside.
The eccentric settings may vary depending on the manufacturer and type:
- the cylinders at the end can be retracted using pliers or manually and then scrolled;
- if there is a slot on the trunnion, you should turn it with a flat screwdriver;
- The eccentric can be rotated with little effort using pliers.
If the eccentrics cannot be adjusted, there is no need to apply excessive force to avoid damage to the structure. In this case, it is necessary to adjust the position of the counter cylinders. They are secured with two bolts. The following manipulations must be done:
- use a hex key to loosen the clamping of the bolts;
- move the hook in the direction of the room - to loosen the fit;
- move the hook in the direction of the street to increase the pressure.
Once the fit is adjusted, you can begin adjusting the hinged side. To do this you will need:
- remove the plastic cover of the casing from the lower canopy;
- adjust the position of the sash using two visible bolts and one hidden in the canopy.
If you turn the hexagon in a clockwise direction, the pressure will increase, and if you turn it in the opposite direction, it will weaken. The adjustment must be carried out with the sash closed in order to know for sure how to adjust the windows and not damage the mechanism.
The upper segment of the sash is fixed to a structure called scissors. To get to the necessary bolts, you should open the window sash. Then do the following:
- find the lock at the end and press its lever;
- turn the window handle to ventilation mode with the lock pressed;
- with its upper corner the sash will come out of the groove and hang on the scissors and the lower canopy;
- find the head and adjust the fit of the upper segment of the sash. By slightly rotating the bolt head, you can adjust the clamping force in the same way as adjusting the eccentrics.
You can see clearly how to adjust plastic windows in the video here:
How to set up and repair a window: recommendations from professionals.
- When the handles become unusable, for further use they should be turned perpendicularly, then unscrew the fasteners securing the handle to the structure. Then the plates are turned in the opposite direction, checking the operation of the handle. If this measure does not eliminate the problem, perform the procedure of completely replacing the hardware element. The new handle must match the characteristics of the previous element; the optimal choice is from among the handles from the same manufacturer as the old handle.
- If the adjustment leads to damage to the function of the seal, it will need to be replaced . It is recommended to cause the seal to weaken at an extremely low value, and then release the window sash from it. It is recommended to replace it at least once every 8-10 years and monitor quality characteristics by monitoring wear. If the seal produces a squeaking sound when opening or closing it, it must be lubricated with machine oil.
- When the simplest manipulations do not help, you should not try to troubleshoot the problem yourself . Timely assistance from professional craftsmen will ensure a quick solution to the problem without bringing window structures to a deplorable state. Replacing damaged or worn parts, repairing sashes are much more serious situations, so issues need to be resolved immediately when they arise.
- The duration of impeccable service of a plastic window structure is influenced by operating conditions . Proper adjustment and adjustment of the fittings will allow you to easily use the product. The use of abrasive cleaning substances leads to deterioration of the condition of windows. All contamination on the plastic surface can be easily resolved with a soap solution and plain water, which is used to treat all parts of the product.
Advantages and design of PVC windows
Installation of plastic windows is considered very simple if the craftsmen fulfill all the requirements and follow the accepted technology. At the same time, the quality of products and the progress of operation are influenced by such factors as the country of origin, materials of manufacture, profile and fittings.
When purchasing such structures for installation in a house, owners must be prepared for the fact that they will have to periodically independently adjust the pressure of plastic windows. For example, moving parts may need to be lubricated, passages cleaned, or seals replaced. However, it is worth remembering that, taking into account seasonality, products may require special settings.
Advantages of plastic products
Despite the fact that the designs require attention, they have a very impressive set of positive characteristics. Thanks to these features, customers around the world choose them. Among the advantages of PVC windows it is worth noting:
- Protecting premises from the penetration of extraneous noise.
- Preservation of heat inside the building (1 double-glazed window saves 20% of heat).
- Due to the tightness of the structure, there is no need for additional insulation before the onset of winter.
- Long service life, which can be doubled if you properly care for your windows.
- Increased level of fire safety.
- The designs are distinguished by a variety of design solutions and ease of cleaning.
- PVC windows do not require regular painting, unlike their wood counterparts.
Design features of the models
In order for owners of PVC windows to know how to properly adjust a double-glazed window, they need to understand what elements it consists of. The main parts of the structure include: frames, sashes, double-glazed windows, fittings, seals, glazing beads, shuldki and imposts. More details about each element:
- The frame includes a plastic profile containing steel reinforcing reinforcement. All parts of the profile are connected using special welding, the strength of which is very high. The steel base is attached to the plastic part by screwing in self-tapping screws. The profile makes the window durable and allows it to withstand any load.
- The sashes also include a steel profile and ensure the normal opening/closing process of windows when in use.
- The fittings are made of steel and allow you to optimally operate the structure (ventilate, open or close the window).
- Double-glazed windows are considered an important addition that allows natural light to flow into any space. Manufacturers of plastic structures can install any number of double-glazed windows. Moreover, if there are at least two glasses, one air chamber may appear inside the structure.
- Glazing beads made of durable polymer are capable of holding glass in window structures.
- Seals are added to improve tightness. They prevent the entry of moisture and cold into the premises.
- An impost is placed if the window includes several components. This part is mounted between them and can consist of plastic or a reinforcing profile.
Setting the pressure points
During operation, it often turns out that the existing locking points are not enough, since the windows are blown out. Most often this happens with structures made from inexpensive profiles, which either have no reinforcement at all, or are reinforced with liners made of thin metal in violation of technology. Sometimes manufacturers save on fittings and reduce the number of locking pins. In such cases, it is necessary to increase the number of pressure points around the perimeter of the active leaf.
Installation of clamps
You can install additional clamps for plastic windows yourself. When installing hidden models, you can even do without dismantling the sash. The elements that make up such a clamp are inserted into the fitting grooves in the profile and screwed with ordinary self-tapping screws. It is only necessary to carry out the marking correctly so that the strip on the frame coincides with the pressing element on the sash. When installing the external clamp, it is necessary to dismantle the sash. This need is due to the fact that it is impossible to fix the device on the assembled structure. The algorithm of actions when installing an external model is as follows:
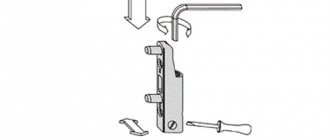
- The decorative trim is removed from the top hinge, and then the retaining pin is pryed off with a screwdriver.
- After the finger is removed, the sash tilts slightly forward and lifts up.
- Upon completion of dismantling the sash, a clamp is applied and screwed to its side end. This is done so that the sash part of the device does not protrude beyond the plastic towards the sealing contours.
- The sash is installed back into the opening. To do this, repeat the second and first steps in reverse order.
- The clamp is screwed to the frame. Since now almost all window and door blocks are made of reinforcing profiles, you need to use metal screws.
Before purchasing an external clamp, it is recommended to check whether the slopes will allow you to screw the striker to the frame. Sometimes they go too far into the profile, and in such cases you need to put hidden models.
Installation of additional eccentrics
This type of work is carried out to improve the tightness of models with tilt-and-turn sashes, and also, if necessary, to install trunnions on the lower and upper profiles of the sash.
In this case, the installation of clamps on plastic windows must be carried out by specialists. Modernization is accompanied by the procedure for dismantling the sashes. Moreover, this is not the most difficult stage. To improve the tightness in this way, you must first determine the brand of fittings and select the necessary parts from the catalog. The number of clamping eccentrics on vertical profiles can be increased by replacing the middle locking bar with a long one. At the top and bottom of the sash, trunnions are added by installing a middle latch and adding corner switches. At the same time, the apparent simplicity of modernization should not be misleading.
The process of increasing the number of pressure points requires excellent knowledge of the characteristics of each brand of fittings, as well as the ability to determine the type of main lock. All this is necessary in order to correctly connect the individual elements of the window fittings binding circuit. In some cases, modernization requires replacement of corner elements, which is necessary for the normal functioning of the updated system.
Required Tools
In order to adjust plastic windows with your own hands without much effort, you need to have or purchase some tools. During the work you will have to use:
- hex key, size 4mm;
- bits for a star screwdriver;
- Phillips screwdriver with No. 3 or No. 4;
- pliers;
- technical oil or WD40.
Regarding the attachments that are used for a screwdriver, they will be necessary only in certain types of windows; in general, you can do without them, but having them will not hurt, because it is impossible to know in advance that they will be useful without special knowledge of the type of window.
Using a furniture key, which is called a hex key, will be much more convenient if, in addition to its characteristic shape (the letter G), it has an additional curved upper edge, but you can also use such a regular-looking key.
It is impossible to do this without a regular Phillips-type screwdriver, because all the available parts of the fittings are attached to the retractable window frame with bolts that are designed for a Phillips-head screwdriver. In most cases, windows have to be adjusted only in roller-type carriages, where the distance required for work is set.
In addition to the tool, without which you cannot adjust plastic windows yourself, it is better to additionally familiarize yourself with the main adjustment points in advance, this will greatly facilitate the work.
| Element | Adjustment |
| Bottom loop | This mechanism contains an adjusting element in order to adjust the position of the open window in the vertical plane, as well as the angle at the bottom of the sash in the horizontal plane. |
| Top loop | In this mechanism, the sash is adjusted in its upper part. |
| Locking pin | The force with which one part of the window is pressed against another occurs in one of the specified parts of the mechanism. |
Adjusting the hinges
Inflating can also be from the hinge side. If you remove the cap from the bottom hinge, you will see a star-shaped hole. You need to insert a suitable screwdriver into this hole and turn it until it stops. This way you will press the sash against the frame as much as possible. If you turn the screwdriver in the other direction, you will move the hinge as far as possible from the frame.
As for the top loop, you should pay attention to the special tongue on it. This is a blocker, in other words, a limiter
Often it is provided for tilt-and-turn window models. If the lock is pressed, you will not be able to turn the handle either up or down. Adjustment of the hinge in this type of design is carried out by setting the position of the tongue parallel to the sash and lifting the handle up until it reclines. As a result of these actions, on the inside of the upper hook you will see a hole for a hexagon. The closer the mechanism is to the edge, the greater the pressure, the further from the edge, the less. After adjustment, you need to return the sash to its original position by pressing the tongue and turning the handle.
Tools and main places for adjusting fittings
Let's begin to analyze the repair process together, decide what knowledge we will need and what tools we should prepare to repair and adjust the fittings.
Window design
Let's start with the tool:
- A key with six edges, four millimeters in diameter.
- Star screwdriver bits marked T and TX.
- Standard screwdrivers cross number three and four.
- Any type of pliers or pliers.
- Aerosol oil VD-40.
For most jobs, you will only need a hexagon, but there are models of plastic windows that use star fasteners. Although such types of fittings are rare, it is still better to have such a tool on hand. To interact with the hardware fasteners you will need a Phillips screwdriver. Such a tool will also be needed to adjust and secure the handle.
There are not very many of them, let's look at which places you should explore:
- The hinges on which the window is held.
- Sash pressing mechanisms. There are several of them in the design and they are responsible for a certain area of the window.
- The handle with which it closes and switches the double-glazed window modes.
Adjusting plastic windows summer-winter
The internal mechanism of REHAU windows is adjusted in several planes:
- up and down;
- left and right;
- adjusting the sash pressure.
You can adjust the window according to the winter-summer principle yourself. In summer, the fit of the sash is weakened and the degree of pressing of the sash is increased in winter to avoid drafts by changing the position of the eccentrics.
The tight fit of the sash is checked with a lit match held to the closed window. The flame of a match will fluctuate in the presence of a draft.
Depending on the type and reliability of the fittings, REHAU plastic windows are adjusted in different ways. Windows with fittings from the manufacturer Siegenia Aubi are regulated a little differently compared to the manufacturer MAKO.
In one adjustment it is necessary to tighten the fastening screws, and in the other - to dismantle the sash.
REHAU blitz windows mainly use Roto brand fittings, which have their own specifics. Therefore, REHAU blitz adjustment is carried out according to the instructions of this manufacturer.
Knowledge of the design features of fittings is necessary. Roto does not recommend making adjustments yourself; it is better to entrust the troubleshooting to a professional.
What is a pressure point?
The tightness of the valves depends on many factors, but first of all it is influenced by the number of pressure points. Their correct location around the perimeter of the window opening is also important. Pressure points are the places where, after turning the handle to the “Closed” mode, a mechanical force occurs, pressing the sash into the frame. In modern fittings, they are located mainly in those places where the locking pins (eccentrics) extend beyond the strike plates. These elements of window fittings are made in such a way that when they are combined, the sash is pressed into the light opening with force and does not allow water, dirt, air and noise to pass through.
Review of other repair options
When buying PVC windows, people should understand that, regardless of their quality and correct installation, some maintenance activities will have to be carried out. They can serve without problems for the first few years, and then the first problems appear.
For example, due to friction, one sash may no longer close normally, or a draft may appear due to detachment of the seal. Such breakdowns cannot be considered serious, so it is quite possible to deal with them yourself. You just need to know which screws require loosening or additional tightening.
Switching to winter/summer mode
Most often, windows are adjusted before the onset of a specific season (by winter they are made airtight, and on the eve of summer they are loosened in order to obtain additional oxygen). Naturally, for this it is necessary to adjust the tightness of the valves. It looks like this:
The sash is pressed against the frames by trunnions (movable metal protrusions located on the side of the sash). When the window handle is turned, the trunnions extend beyond the plates located on the frame. To adjust the pressure, eccentrics are used. Metal trunnions come in different shapes and may require different tools to adjust them
For example, if the eccentrics are oval-shaped, their position can be changed using pliers. When doing the settings yourself, it is important to remember that the weak mode is best used for summer, and the standard and strong mode is best for winter.
Solving the draft problem
If the window lets in cold air, this indicates it is sagging. In this case, the locking protrusion loses contact with the counter plate and begins to blow. In order for the situation to be resolved as best as possible, it is necessary to move the sash to the side so that the trunnions that are missing from the plates can catch on to them.
Naturally, the first step is to figure out which protrusions are not reaching the plates.
You need to inspect the sash and remember where the trunnions are located. Then the window closes. A person will have to grab the frame where the protrusions are located and pull it towards themselves.
If there is contact, the frame will remain motionless, and if there is no contact, it will move. All windows are checked in this way to understand in which direction the sashes need to be moved to block access to cold air. Adjustment occurs by adjusting the upper or lower hinge.
Measures in case of violation of closing
There are situations when, after performing all the necessary actions, the structure does not close. In this case, if there is a response adjustment, you can try to turn the screw additionally using a hexagon. Rotations should be carried out clockwise, bringing them to the maximum accessible level.
If there is a lack of a certain distance to the side under the response mechanism, you will have to lay shims:
- They are made of light plastic, giving a thickness of up to 3-4 millimeters.
- You will need to remove the screws and stops before installing the shims.
- It is necessary to make two parts, where one is installed downwards and the other is installed on the side.
- The result is a shift of 3 millimeters deep into the sash.
Cleaning the fittings from dirt
Every few years, plastic products must be thoroughly cleaned of dirt. If this is not done, owners will have to repair structures after they lose functionality. To independently clean all the mechanisms of the product, you will need:
- Remove the sashes and trims from the frame.
- Remove the top axle.
- Release the doors from the hinges located at the bottom of the structure.
- Place the removed items in an accessible place.
It is best to enlist the help of a second person for this process. Afterwards, you need to thoroughly inspect the sash and unscrew all the screws attached to it.
All structural elements must be treated with a special detergent, which can be easily applied with a brush. Next, all washed parts should be dried in the fresh air or using a powerful hair dryer. Before assembling the window, all moving mechanisms must be lubricated.
By performing all actions on their own in accordance with the rules, people will be able to extend the service life of their window structures.
Advantages of plastic windows
Despite its apparent simplicity, the installation of a modern window must be done with high quality and in accordance with established technologies. The successful operation of the window will largely depend on the quality of the material used, the manufacturer’s brand, the components used, profiles, etc.
The advantages of window structures include:
- excellent soundproofing properties that prevent extraneous noise from entering from the street;
- the ability to retain heat in rooms allows you to save 25% of heat from one double-glazed window;
- hermetic properties provide protection from drafts, which eliminates the labor-intensive process of gluing before the start of the cold season;
- under standard conditions, the manufacturer guarantees excellent performance characteristics for a decade after installation; compliance with the rules for the functioning of windows will increase the term of impeccable service, with a twofold or threefold increase in the normal service life;
- for fire protection purposes, the design is designed in such a way as to prevent the fire of plastic products;
- plastic windows are particularly aesthetically pleasing, allowing you to choose the optimal shade;
- plastic does not require special care - regular wiping with a damp soft cloth is enough;
- unpretentious designs retain their excellent appearance for a long time, without requiring painting, a traditional type of renovation for wood products;
- a modern window has increased functionality (ventilation with different opening angles using a latch, mosquito nets).