An unfinished house made of any material cannot be left open for the winter. It has to be preserved due to the fact that changes in climatic conditions can negatively affect the building. As a result, this will lead to very large financial costs that can exceed the size of the planned budget. In this article, we will clearly consider several shelter options for buildings, especially with unfinished window and door openings.
Protected window openings in unfinished buildings Source michael-schwarz.livejournal.com
The main dangers from which a construction site needs to be protected
There are a number of negative factors that can affect the integrity of an unfinished building. These include:
- large amounts of precipitation and high humidity;
- damaging effects of UV rays from the sun;
- the appearance of pests in the structure of walls and internal partitions.
Because of such moments, care will have to be taken to ensure that when construction is resumed, new unplanned costs do not appear.
Unfinished brick cottage with roof Source odstroy.ru
Review of the best products for wooden frames
There are many ways to protect against cold weather: using simple paper and soap, fabric, cotton wool, foam rubber, sealant and special seals. It all depends on desires and capabilities, but even expensive products do not guarantee 100% results. It is better to resort to proven and accessible methods.
Paper and soap
The most popular “grandmother’s” method, which everyone is familiar with. Simply cut long strips of paper and then stick them onto the frames using soap. Previously, it was replaced with a paste made from flour or starch, since there was no desire to spend money on a soap solution. How to glue paper to windows:
- put laundry soap in hot water and leave until softened;
- generously lubricate the strips with the soaked part;
- Cover the wooden frames with paper in the area of the joints.
After drying, the paper becomes dense and almost impervious to cold air. The main advantage is that the strips come off easily in the spring; after washing with warm water, no traces remain on the paint. However, in winter, the paper can also come off, especially if condensation forms on the glass.
You can replace paper with strips of cotton fabric. It is advisable to grate the soap and dissolve it in a small amount of water to obtain a good solution. You need to dip the cut pieces into it and glue them. Make sure that the material is well moistened with the product.
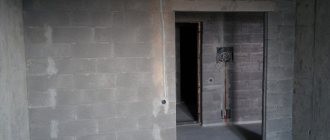
Shelter in unfinished window and door openings
If the house is at a stage when the walls have already been erected and even the places where windows and doors will be located have been determined, in such cases the following rules must be followed.
Protected window opening in an unfinished building for the winter Source odstroy.ru
Floor insulation over openings
Roofing material and thick polyethylene film must be laid on the installed ceiling in the building. Both of these materials protect the building material from moisture, which can accumulate inside during the winter and become a source of spread of pests and fungi.
It happens that before the onset of cold weather the ceiling did not have time to be installed. In such situations, you will have to mount a wooden frame on the walls. Its construction, of course, will seriously affect the budget, but will reliably protect against the harmful effects of climate in winter.
An unfinished house should not be left unfinished for the winter Source jackwharperconstruction.com
Traditional method
Previously, windows had to be insulated for winter. For this, strips of thick paper, cotton wool and paste were prepared.
This type of window insulation may make many people smile today, but it has many advantages. Cotton wool, soap and paper can always be found at home. The process of pasting paper strips takes little time, and heat loss is significantly reduced.
Perhaps in new apartments this type of insulation will look unnatural. But in dachas and rural houses this method of insulating windows is still used today. How to cover windows:
- cut strips of thick paper;
- We prepare a paste from flour or soap;
- Using a knife, we close the cracks with technical wool;
- Glue prepared strips of paper over the cracks.
If you do not have suitable paper, a roll of thick paper for covering windows can be purchased cheaply at any hardware store. The process of insulating window openings can be simplified if you buy tape with an adhesive surface. You simply caulk the cracks and stick a special film on top.
Recommendations for conservation at the foundation construction stage
If the concrete foundation has already been completely prepared and the construction site has to be frozen before the winter period, several protective measures must be taken to prevent its destruction. To do this, the following work is performed:
- Waterproofing concrete base. This operation is carried out using inexpensive bitumen impregnations. They also use other liquid products that look no different from plaster.
- Prevents moisture accumulation. To do this, soil is poured near the foundation, at an angle in the opposite direction from it. Shallow ditches are made in it, which will ensure rapid and unhindered drainage of water. Be sure to make an additional ditch that will remove moisture away from the future home. Such drainage is arranged around the perimeter of the entire foundation.
- Insulation of the basement (if provided). To do this, in its design, expanded clay or extruded polystyrene foam is poured onto the floor. Sometimes the surface is covered with sawdust, but in conditions of high humidity, this is not rational. If possible, the interior space is covered with a temporary roof made of boards, film, roofing felt or old unnecessary slate.
- Maintaining a horizontal plane. To ensure that the foundation does not begin to lose its horizon during the winter, building material is laid out evenly over the entire area. From above, all objects are hidden under sheets of roofing felt or dense polyethylene.
The concrete foundation must be comprehensively protected before stopping construction. This is the only way you can avoid its destruction.
Preservation of the foundation for the winter after it has completely dried Source remontnik.ru
Features of preparing an unfinished house for winter
“I didn’t even have time to look back when winter was rolling in my eyes” - this line from Krylov’s fable can very accurately describe the state of developers who did not manage to complete construction in one season. There were not enough funds, there were interruptions in the supply of materials or some other reason - there is no time to analyze now. Another important thing is to save what has already been built, so that the autumn rains, and then frosts and snow, do not destroy the work done. So that in the spring you can start where you left off, and not eliminate the consequences of “hibernation”
It's not time to say stop yet
It happens that construction has to be curtailed without having time to really start it. Let's say the work is interrupted at the stage of digging a 2-3-meter pit for the foundation and ground floor. What should I do? Leaving it to winter, next spring you will get a shapeless hole with washed-out walls and a soil structure disturbed as a result of freezing and thawing. But such consequences for the soil are by no means harmless, since they lead to a decrease in its bearing capacity.
That is why construction experts insist: in order to prevent destruction and winter freezing of the foundation, you should work harder and still complete the work on building the foundation (even without a basement), having first installed a system for draining rainwater from the foundation pit. Only in this case, with the onset of the construction season, you will not have to wait for the foundation pit to dry out, and also level and strengthen its sagging walls.
Foundation and basement
Construction conservation measures do not end with the construction of the foundation. Now you need to protect the foundation from moisture. If waterproofing material has already been applied to it, the structure only needs to be covered with a sheet of dense polyethylene. If there is no time left for insulation work, then you first need to carefully examine the foundation for cracks and other defects through which moisture can penetrate into the concrete body (when it freezes, it will expand and “tear” it from the inside), and fill them with mortar. And then cover the structure with roofing felt or hydroglass insulation.
A prerequisite is the drainage of water from the foundation. To do this, the soil must be backfilled, and the edges of the covering material from which water will drain must be located as far as possible from the walls. For surface drainage, a network of trenches 20–50 cm deep with a slope of 5 mm/m is opened. The task is the same - to prevent the foundation from being washed away and to force the water to go to the topography at the maximum distance from the base of the building.
Ventilation holes in the base - vents that serve to circulate air in the underground space - are plugged with ordinary wooden plugs for the period of conservation or special valves are installed there. As a result, neither water nor rodents will get into the underground.
Any suspension of construction must be planned and include conservation measures
If not only the foundation, but also the basement is ready by the end of the construction season, then you need to try to cover it in time. Otherwise, all the work may go down the drain: walls that are not rigidly connected to each other in winter will be at risk of deformation under soil pressure, as well as cracking under the influence of frozen moisture.
Video description
Walls made of aerated concrete for the winter without a roof.
If there are no drafts, then there is a possibility that evaporation from the soil will penetrate the building material from the inside.
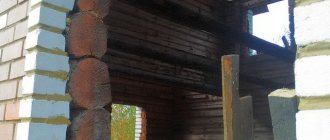
An unfinished frame house made of wood is left for the winter for natural shrinkage Source remontnik.ru
On a note! You should not try to shelter vertical structures from slanting rain. This is a waste of resources and effort.
Adjusting the plastic window lock
One of the reasons for increased heat loss may be incorrect adjustment of the locks of the plastic window or those that have become damaged over time.
Pay attention to the stationary part of the lock located on the frame. You can see a screw head recessed into the structure with a slot for a hex key (not present in all shut-off valve designs). This is an adjusting screw that changes the position of the wedge, behind which the locking “tongue” of the lock fits. Or as on the right side of the illustration - the clamp can be adjusted by turning the locking “tongue” itself
(in the illustration a Z-shaped hex key is inserted into it).
In addition, the windows may have adjustments in the area of the hinges and tilting mechanism. It can be difficult to reach them, but otherwise the gap cannot be eliminated.
The adjustment changes the tightness of the sash to the frame in the closed position. In summer, the closure density can be slightly loosened to avoid drying out of the seal, but in winter, on the contrary, the density must be increased as much as possible.
Adjustment is made with a hex wrench, which usually comes with the window or can be purchased at a hardware store. Typically a 4mm hex is used. Different key shapes may be required: G, Z, P (depending on the design of the windows).
Basic rules for covering frozen string for the winter
To cover an unfinished building for the winter, you should follow simple rules that will help you avoid large financial costs:
- Do not rush to completely complete the construction of a wooden house before winter. At the stage of erecting the walls and installing the roof, leave the structure as is for the winter. Close only door and window openings using any of the methods described above that are convenient for you.
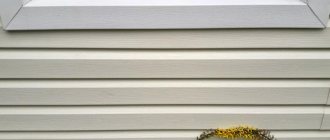
- If you are building a house from hollow brick or aerated block, provide protection in such a way that moisture does not have the slightest chance of getting into the pores of the building material.
- When you realize that you do not have time to complete construction before the onset of winter, then before the first drop in air temperature, take care of waterproofing the walls and foundation.
- Hide any structure that has already passed the stage of erecting walls under a temporary roof with the organization of sheathing, and treat the “forest” with impregnations that ensure its preservation during wintering from rot and mold.
These tips will help you simplify the task of hiding the unfinished structure during the frost period.
Waterproofing a building before freezing construction for the winter Source dsk-stroim.ru
Insulation of adjacent elements
We eliminated all the gaps around the glass and around the perimeter of the window frame. However, most window designs include opening elements. Sometimes only the window can open, sometimes half or both halves of the window.
Sealing rollers are installed at the points of contact between the opening elements. Over time, they begin to leak heat and need to be replaced. Let us describe the sequence of work:
- remove the sealing rollers;
- we clean the surface under the rollers from dust so that the glue comes into contact with the surface of the frame;
- glue new rubber sealing cords.
When installing a sealing tube, you must follow some rules. When the tube is installed, the closing frame should press against it and not slide along the surface of the tube. Then the tightness of the structure will be ensured. Sometimes, after installing the sealing tubes, the frame does not close properly. To correct the situation, you can slightly trim the surface of the frame.
Often sealing rollers are made not of rubber, but of foam rubber. What is the best way to insulate windows? Foam rubber insulates heat well and is cheap. However, seals made from this material are not durable. Probably, the design of window insulation with foam rubber can last no more than a year. In a year you will have to repeat all the work again.
Twin seal tubes are also sold. You can fix both tubes, or you can separate them in half. Usually they are separated easily, without the use of special tools.
What to do with building material
If a large amount of building material remains in stock for future work, optimal storage conditions must be provided for it, but what they will be depends on the type of raw material. Let's take a closer look:
- bulk mixtures are suspended on a raised surface and protected from lateral precipitation;
- the boards are laid in stacks of 50 cm, and space is left between them for ventilation, and the top is covered with insulation with ventilation;
- the brick is completely wrapped in plastic film;
- the sand is poured into a sandbox specially constructed from boards, having previously covered its bottom with geotextiles.
Modern method
In most city apartments, windows are insulated using new technology. We will describe how to properly insulate windows using modern materials.
What materials should I buy? You need to buy silicone sealant. Using this material we close all the cracks through which warm air leaves the apartment. It is better to buy a transparent sealant; once it gets on the glass, it remains invisible.
Insulation with sealant
To make it convenient to insulate windows with sealant, you should purchase a lever syringe. It's cheap. We insert the tube with sealant into the syringe structure. Then simply press the lever to squeeze out the required amount of silicone.
To seal all opening parts of the window, you should buy sealing tubes. They are usually made of rubber and covered with glue on one side.
Error No. 3 – Violations when mixing concrete
Often it is this error that causes cracks to appear on the surface of the blind area and further problems with the foundation of the building. Surely the main components of a high-quality concrete mixture are known even to beginners - cement mixture, fine and coarse aggregate (crushed stone and sand) and water. So what is the mistake?
Most often, the mixing algorithm is incorrect and the proportions are violated. Experienced specialists know that the bulk dry ingredients are mixed first, and then water is added. In addition, the “dosage” of the components must be clearly measured; deviation from it threatens poor adhesion of the cement and hardening of the blind area.
The concept of conservation of an unfinished construction site
The term “conservation” in relation to an unfinished object implies a temporary cessation of construction activities on the territory of the object with the mandatory execution of papers and the implementation of a set of measures to preserve the already constructed part of the structure. The technical customer (developer) has to resort to such actions in cases where there are no funds to carry out the work, weather conditions have worsened, or other force majeure circumstances have arisen.
The conservation process is documented, in the form of an order or instruction, which indicates the following information:
- The period of development of a package of papers that are used for conservation.
- Inventory activities.
- Entities and companies that are responsible for the preservation of the object.
- The amount of money required to complete the assigned tasks.
Replacing a plastic window seal
It is not difficult to replace a worn-out plastic window seal yourself. First you need to purchase a suitable seal. It’s better to buy a “original” one, but if this is not possible, a consultant at a hardware store will help you find the right seal to fit your window. As a guide, it is better to take a piece of the old seal with you - it will be easier to select the desired profile of the new one.
Advice: it is better to purchase a black rubber seal. The fact is that black is the natural color of rubber. Other colors are achieved by adding coloring substances to the rubber, which can affect the quality of the seal. In addition, street dust is not so noticeable on the black seal.
The process of replacing the seal is simple. First, remove the window sash:
We close the sash lock so that the sash does not “walk.” Remove the top hinge cover, remove the lock washer and carefully remove the pin. We open the lock, move it towards ourselves to release the sash from the top hinge and move it up to remove it from the bottom one. If the window is large, with heavy, massive sashes, then it is better to ask someone for help for this procedure.
We lay the sash with the inside (where the handle is) down. You can first remove the sash handle to avoid damaging it (turn the plastic cover at the base of the handle and unscrew the two screws with a screwdriver). Remove the old seal. First, let’s pry it off with a knife, then it “goes” on its own and can be removed without any problems simply by hand.
Having removed the old seal, thoroughly clean and degrease the groove. The durability of the new seal will depend on the quality of this procedure (including). Using a knife, we trim the edge of the seal and press it into the groove with our hands, bending it towards the sash. Having laid the entire perimeter with a sealing profile, we cut it so that the seal is 0.25-0.5 cm longer than the perimeter. By forcefully squeezing the “extra” end of the seal, we press it into the groove. If everything is done correctly, then there should be no gap between the ends of the seal, and the seal sticking out of the groove is also unacceptable (cut it further).
The seal on the frame is changed in the same way, after which the sash is installed in place.
The procedure for installing the sash is the reverse of the procedure for removing it:
The sash is placed on the lower hinge from top to bottom, then the parts of the upper hinge are connected away from you, the pin, lock washer and hinge cover are installed. We close the sash with a lock and check the quality of the work performed by testing the joint for drafts.
To ensure that the seal on a plastic window does not have to be changed every two to three years, this part requires proper care. The seal must be cleaned and lubricated at least once a year, but preferably twice, before the start of the cold season and at its end.
Wipe the seal on the sash and frame with a dry fluffy cloth to remove accumulated
mud. Then we wipe the seal with soapy water for better cleaning and degreasing and wipe it dry. Apply silicone grease to a cloth (it can be purchased at any auto store) and rub it into the seal. This simple procedure will protect the seal from drying out in the heat and “stiffening” in the cold, allowing it to retain its properties for a long time.