The appearance of life on earth, the health of people, wildlife and the conditions of their existence directly depend on the ambient temperature. In the morning, everyone looks at the thermometer to know what to wear to go out. When a person or animal becomes ill, the first step is to measure body temperature. Any technological process cannot do without temperature control. To measure temperature, a measuring device called a thermometer is used. In everyday life, thermometers are often called thermometers, obviously due to the fact that the unit of temperature measurement is a degree.
The thermometer was invented in 1597 by the Italian physicist Galileo Galilei. The Swedish scientist Anders Celsius improved and gave the thermometer a modern look in 1742. The principle of operation of a thermometer is the property of a liquid to change in volume when its temperature changes. Modern thermometers use tinted alcohol or mercury as a working fluid, which is used to fill a small glass reservoir with a thin (capillary) tube extending from it. When heated, the liquid expands and begins to fill the capillary. Along the tube there is a scale on which the temperature is read.
Types of outdoor thermometers
Technical progress does not stand still, and today in everyday life, in addition to liquid thermometers, mechanical and electronic thermometers are widely used.
The simplest and cheapest is a mechanical thermometer, similar to a watch. Its operating principle is based on changing the degree of twist of a flat spiral made of two strips connected to each other, made of different metals (bimetallic spring). A mechanical thermometer is clearly visible from afar, but its reading accuracy leaves much to be desired. Typically, a mechanical thermometer is attached with Velcro or suction cups directly to the glass, creating a gap. Dust gets into the gap, which can only be removed by removing the thermometer. For these reasons, mechanical thermometers are not widely used.
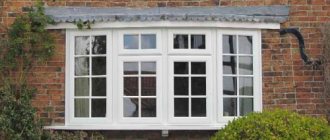
The most popular due to their budget price are the liquid glass thermometers proposed by Celsius. The principle of their operation ensures high accuracy of temperature measurement, and the tightness of the case ensures a long service life of the thermometer. One of the three glass liquid thermometers installed outside the windows of my apartment has lasted more than 30 years and, it seems, will last just as long. Based on price/quality ratio, a liquid alcohol thermometer is the best choice for measuring outdoor temperature.
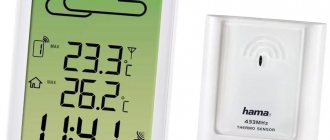
The electronic outdoor thermometer is the latest achievement of technology. It is installed outside the window and, depending on the model, is powered by a battery or solar panel, sometimes combining both power sources. In addition to temperature, it can additionally show time and relative humidity. It turns out to be a real home weather station. Unfortunately, its price is still unaffordable for many, and the service life of an electronic thermometer is many times shorter than that of liquid thermometers.
Tips for choosing
Taking into account the fairly wide range of varieties and models of outdoor thermometers available today, certain problems may arise with the choice
Many people first of all pay attention to affordable mechanical models, which at first glance are distinguished by their reliability and durability.
In this situation, it is important to remember that such a device can fail at any time, and its quality most often does not depend on cost
Many users and experts advise choosing high-quality liquid (alcohol) devices. By the way, for those who are embarrassed by their primitive appearance, many manufacturers offer original design solutions. Speaking about the most obvious disadvantages of such models, it is worth mentioning the unreliability of plastic fasteners. At the same time, for the majority of potential buyers, all the disadvantages are fully compensated by the affordable cost of the products.
For those who place measurement accuracy and innovative solutions at the forefront, electronic devices are the optimal choice. However, it is worth noting that when purchasing such thermometers you will have to fork out some money. On the other hand, paying once for accuracy, reliability and durability is a rational decision.
Regardless of the type of thermometer being considered, special attention must be paid to criteria such as:
- manufacturer's reputation;
- owner reviews;
- reliability and accuracy;
- installation features.
In the next video you will find an overview of a digital thermometer with a remote outdoor sensor.
The device of a glass thermometer
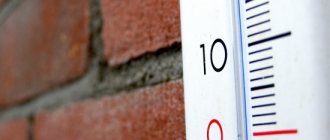
An outdoor glass thermometer is designed as follows. A graduated scale is installed in the glass tube, to which is attached a glass tube with a very small, calibrated in size, internal hole (capillary tube), to which is welded a small glass reservoir filled with alcohol. When the air is heated, alcohol expands; when the temperature drops, it decreases in volume (compresses). This is what we observe in the capillary tube in the form of upward or downward movement of a colored column. The alcohol is transparent, and in order to make the column better visible, a dye, usually red, is added to it.
FAQ
How to check the accuracy of a thermometer?
+
One popular method is to place the meter in a container with ice and melt water. A properly functioning thermometer should record a temperature of 0 degrees. To check the accuracy of the operation, you can also place a second device nearby and compare the readings after about 30 minutes.
Where to install the thermometer?
+
Correct installation has a great influence on the measurement result. It is better to install the thermometer on the north side of the building. To protect against solar radiation, you can use a special screen. A more accurate display of readings will ensure a gap of 3-5 centimeters between the mount and the wall.
Methods for attaching a glass thermometer
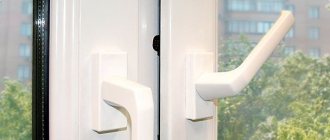
To attach an external thermometer, its glass body is usually inserted into two plastic cylinders with holder ears. The thermometer is attached to wooden window frames by driving nails through the holes in the thermometer mounting ears or by screwing small screws directly into the window frame. A sticky layer is applied to the legs of thermometers intended for mounting on euro-windows with plastic frames. To install the thermometer, you need to degrease the areas of the Euro-window frame on which the tabs will be glued, remove the protective film from the Velcro and attach the tabs to the prepared areas.
Fastening the thermometer using self-tapping screws to the frame
Today, wooden window blocks are being massively replaced with plastic windows, into which it is not recommended to hammer nails, and rarely does anyone dare to attach an outdoor thermometer in this way.
If you don’t mind making holes in the Euro-window, you can secure the outdoor thermometer using a self-tapping screw screwed directly into the profile of the plastic window. For these purposes, it is best to use the shortest 3x16 self-tapping screws with a hemispherical head in the form of a press washer. To prevent the mounting legs of the thermometer holder ears from splitting, before fastening it is necessary to pre-drill holes in them with a diameter equal to the diameter of the self-tapping screw.
Fastening the thermometer using self-tapping screws on the window slope
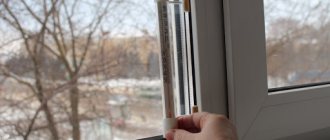
After replacing wooden windows with plastic ones, I also faced the need to attach an outdoor thermometer. The holders of the old thermometer crumbled as a result of the aging of the plastic during dismantling. I bought a new outdoor thermometer, specially designed for plastic windows, with pads on the holders for fastening with double-sided tape.
The first thing that surprised me about the purchased thermometer was the inscription on the scale “Souvenir thermometer” and the fact that the scale was an ordinary piece of paper on which divisions and numbers were printed in a typographical way. I also did not find an inscription stating that the thermometer complies with GOST requirements (previously produced ones had such an inscription). That is, the manufacturer has declined all responsibility for the accuracy of the readings and durability. There was no choice; according to the instructions, I degreased the area on the plastic frame with alcohol and glued it at a positive temperature. The first drawback appeared at the beginning of the thermometer’s use - the readings of the “Souvenir Thermometer” were false by two degrees. To check any doubts, I attached a mercury thermometer next to him. The “souvenir thermometer” actually showed two degrees more. When using the thermometer, I had to subtract two degrees from the read result.
Over time, the outer bulb of the thermometer became covered from the inside with a thin layer of condensation, which made it difficult to read the readings. Due to the flask not being sealed, moisture got inside it, and when the temperature changed, water condensed on the walls. Then the bottom support came unstuck. After a year of operation, the scale and numbers faded, although the thermometer was installed on the north side and the sun's rays did not fall on it. When it became warm, I removed this ill-fated thermometer, opened the flask, removed the moisture, moved the capillary tube down two divisions of the scale and sealed the flask with silicone. I glued the thermometer to its original place using new double-sided tape, taken from the computer wall socket package. The outdoor “Souvenir Thermometer” hung there for six months, and in the middle of winter it fell off and broke. I was about to buy a new one, but it was freezing outside and I couldn’t stick the thermometer on tape. I remembered that the thermometer removed from the wooden frame, which had served for more than 20 years, was not thrown away, and I could try attaching it behind a plastic window.
Any window has external slopes. So I came up with the idea of fixing the outdoor thermometer not on the euro-window frame, but on the slope using self-tapping screws. But the holders on the old thermometer were cracked, and even if they had survived, their shape would still not have allowed the thermometer to be secured in a position convenient for taking readings.
We had to make new supports from strips of metal, allowing us to mount the outdoor thermometer anywhere on the slope, subject to the conditions for ease of reading. In the photo you see how an outdoor thermometer is attached to the slope of a plastic euro-window using a homemade metal support.
It is not difficult to secure such supports; to do this, just select the location for installing the outdoor thermometer, drill two holes in the slope at a distance of at least four centimeters from the edge (so that the corner does not break off), insert dowels and tighten two self-tapping screws. If necessary, bend the supports for more convenient reading of the thermometer.
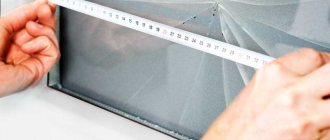
The supports can be made from any plastic sheet metal: iron, aluminum, copper and its alloys with a thickness of 1-1.5 mm. It is enough to cut a strip 10-20 mm wide; its length will depend on the distance at which the slope is located from the visibility zone through the window. To determine the length, you need to determine the desired location for installing the outdoor thermometer, measure the distance from its edge to the slope and add the length to the angle of attachment to the slope and three diameters of the thermometer cylinder. The length is about 15 cm.
To securely fix the cylinders in the support, it is necessary to bend the strip into a cylinder with a slightly smaller diameter than the plastic cylinder of the thermometer. To do this, you need to select a round mandrel of the appropriate diameter. It is best to shape the strip by clamping it with a mandrel in a vice.
First, the edge of the strip is clamped together with the mandrel, then the strip is bent around the mandrel by hand; then the jaws of the vice are slightly spread apart, and the mandrel is rotated along with the already formed part of the strip (it must be rotated until a cylinder is obtained from the strip). It is not necessary to close the cylinder being formed.
Then a hole with a diameter of 3-4 mm is drilled in the center of the second end of the strip, and in a vice it is given the required angle, which does not have to be straight.
Now you can cut off the holder ears from the plastic cylinders of the outdoor thermometer, leaving part of them to protrude 1-2 mm; this will serve as a stop when installing the thermometer into the metal cylinders of the newly made mount. This will increase the reliability of the fastening. The mount is ready and you can install the outdoor thermometer outside the window.
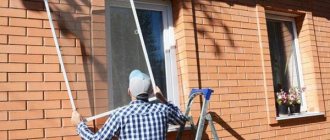
For more accurate thermometer readings, you need to choose a place where direct sunlight and warm air currents coming from the apartment during ventilation do not reach. It is advisable that the thermometer be installed on the north side.
As a result of a little work to improve the fastening of the outdoor thermometer, several problems were solved at once. Saved money on purchasing a new outdoor thermometer. The installation of the thermometer did not depend on air temperature and precipitation. The thermometer can be easily removed and installed back, for example, when repairing the facade of a building. The thermometer does not interfere with washing glass and installing a mosquito net. The thermometer is protected from accidental mechanical damage when opening and closing the window. An outdoor thermometer will never fall off. The scale of old outdoor thermometers is made by marking the glass and is not subject to rapid fading from sunlight and damage from humidity. I didn’t find any cons, maybe you can find them?
By the way, an old outdoor thermometer, if you don’t have one, can be found on the street; take a closer look at the discarded wooden window frames.
Best models
When deciding on a specific model of outdoor thermometer for measuring air temperature, a number of important points should be taken into account. For example, bimetallic devices have the shortest service life. Alcohol thermometers last a little longer, but over time they begin to “lie” due to alcohol evaporation. In terms of accuracy of readings, miniature electronic weather stations are the leaders.
One of the most common alcohol devices is the “Standard” TB-202 window thermometer, which has the following characteristics:
- thermometric liquid – methylcarbitol;
- measurement range – from -50 to +50 degrees;
- scale division price – 1 degree;
- thermometer weight – 30 g;
- dimensions (length, width, height) – 205x60x25 mm;
- accuracy – ± 1 degree.
For maximum convenience, the device holder is rotatable. This feature allows you to install the thermometer on any side of the window.
During installation and further operation of TB-202, the following rules must be observed:
- prevent mechanical damage to the device;
- install a thermometer on the part of the window that opens less often;
- Place the thermometer in places protected from direct sunlight as much as possible.
In accordance with reviews and current statistics, the famous “Bee” is now enjoying record popularity. We are talking about the Garden Show window thermometer, which is attached to the glass using silicone suction cups.
The device measures temperature in the range from -40 to +50 degrees. One of its main features is the absence of mercury.
The bimetallic model TFA-146006 represents the optimal ratio between the price of a measuring device and its quality. The device is attached to almost any flat surface using the Velcro included in the package. Measurement range from -50 to +50 degrees with an error of 1-2 degrees. The diameter of the thermometer is only 72 mm.
Its main advantages include:
- accuracy;
- quality of German production;
- affordable price.
The electronic outdoor thermometer RST 01077 is characterized by increased measurement accuracy. Unlike its “classmates,” this model cannot boast of having an arsenal of additional functions. However, this is fully compensated by its performance qualities.
The thermometer operates in the range from -30 to +70 degrees, and all results are displayed on the device screen.
Another device worthy of special attention is the digital thermometer-moisture meter AR807. Due to its versatility and functionality, this device is widely used in construction, agriculture and many other areas. One of its key characteristics is the maximum measurement accuracy (the error does not exceed one degree when determining temperature and 5% humidity).
This model operates in the range from -40 to +70 degrees and 20-99 percent. Temperature readings are recorded every 2 seconds. In this case, all data is displayed on a high-quality display. The device is equipped with integrated sensors and also has clock, alarm and calendar functions. Its main disadvantages include the rather high cost, exceeding 1 thousand rubles.
How to calibrate (check) a thermometer at home
If there are doubts about the accuracy of the readings of a thermometer, not necessarily an outdoor one, then the accuracy of its readings can be easily checked at home. There are two methods to calibrate a thermometer: using a thermometer that is known to accurately indicate and using water.
Checking with a reference thermometer
The first method is simple to use; it is enough to place a standard thermometer next to the thermometer being tested, which shows accurately. After at least half an hour, compare the readings. If the thermometers show the same temperature, then everything is in order.
Test using melting snow or boiling water
Since the thermometer has a linear scale, to check the accuracy of the readings it is enough to check any one point on the scale, zero or the 100˚C point.
The second method does not require a reference thermometer and is based on the law of kinetic energy of molecules. It is no secret that if a container filled with snow (ice) is placed in a room with a positive temperature, the snow will begin to melt and water will appear. The water temperature will remain constant and equal to 0˚C until all the snow melts. This law can be used to calibrate a thermometer that has a zero mark.
It is enough to lower the end of the thermometer into melt water and wait until the thermometer column stops moving (a few minutes is enough). The thermometer should show 0˚C
. Snow can be scraped from the walls in the refrigerator or frozen into ice cubes.
If the thermometer has a mark of 100˚C, then you can calibrate it by dipping it in boiling water. As you know, at normal pressure the temperature of boiling water is 100˚C
.
Based on the physical properties of water, the Swedish scientist Anders Celsius invented a thermometer scale, dividing into one hundred divisions the area between the readings of a column of alcohol in a glass tube when it was first placed in melt water with snow, and then in boiling water. In honor of his name, the temperature measured on his scale is called degrees Celsius, which is denoted ˚C
.
Peculiarities
The variety of possibilities for predicting weather and climate changes does not prevent residents of city apartments and private houses from being interested in temperature indicators outside the window. An outdoor thermometer for plastic windows has become as essential an element of everyday life as a convenient ventilation system or mesh on frames. It makes it easy to make decisions about choosing clothes before leaving home, and makes it possible to navigate weather changes without the help of modern gadgets.
A window thermometer for mounting on plastic frames has some differences from its counterparts used in combination with a wooden base.
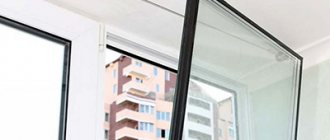
In addition, thermometers for plastic windows are often attached directly to the surface of the glass unit and have a completely transparent base made of polymer materials.
Alternative options
If you are using an electronic temperature sensor, you can leave it indoors. In this case, only the cord with the sensor is output outside, and the main unit can be located indoors.
If it is not possible to attach a thermometer to a plastic window, you can come up with another alternative - install it outside on the external slope. To do this you will need a drill, screws and a bracket. Other ways to attach a thermometer can be considered for non-standard window designs, for example, fixing it with a magnet. Some models can be hung on hooks or holders made of metal, plastic, or combined materials.
If you buy a model of an outdoor temperature sensor, you should not experiment with terminals and adhesive tape. For such devices, it is important to ensure reliable fixation. They must be installed on reliable fastenings that can withstand negative environmental influences and mechanical damage. But for ordinary thermometers all methods are suitable.
The safest and simplest methods for fixing the device
There are several ways to attach outdoor thermometers:
The most common method is to attach an outdoor thermometer using adhesive tape. If it was not included in the kit, it can be replaced with double-sided tape. Anyone can install the device using tape; this will not require much effort or additional materials, except for any suitable degreasing composition. As the latter, you can use alcohol, turpentine or nail polish remover, as well as any other product designed to degrease the surface.
How to securely glue the suction cup?
How to reliably glue the suction cup “tightly”, but without using any “superglue”? The advantages of suction cups are that you don’t have to damage the walls, you don’t need to nail them down or drill holes for them. Suction cup fastenings provide convenient installation, ease of adjustment and easy disassembly. The reliability of the retaining element is affected by such points as:
- the quality of the raw materials from which the suction cup itself is made;
- presence of defects on the suction element;
- total weight pressing on the suction cup;
- the structure of the material on which the Velcro item should be located.
It often happens that on the concave side of the suction cup there are various defects in the form of tubercles, seams, microcracks and other flaws formed during manufacturing or transportation. Such moments do not allow the Velcro to stick evenly to the surface, so after a while it falls off. If a seam or other protrusion is detected, the layering should be immediately carefully removed with a blade or utility knife. Cracks and breaks are difficult to repair, so it is better to immediately replace the suction cup. The structure of the suction cup must also be correct and even.
Another circumstance that prevents the suction cup from sticking tightly is a rough or embossed surface. If the tiles are made with patterns or non-uniform texture, then the fastening element will not be held. Also, glue particles, various seam putties and the joints themselves are not able to hold the suction cup.
Fixation methods
Various fixing methods can help solve many installation problems. All devices will do their job efficiently and will hold the suction cup if all the above and below conditions are met.
The most common methods of strong fastening are:
- use of a degreaser;
- use of products containing petroleum jelly;
- lining made of self-adhesive PVC film;
- silicone sealant.
Whatever option you use, you must initially prepare the surface for high-quality gluing. The action is to treat the area with any degreaser, it can be nail polish remover, acetone, a special degreaser, solvent, white spirit and the like. If you don’t even have a single alcohol-containing product on hand, you can wash the surface with ordinary laundry soap, then rinse thoroughly and wipe the desired area dry.
- The method with cleaning liquids is suitable for items that are light in weight and size. The main thing in this process is to thoroughly clean and then degrease the tiles or tiles. The surface should be cleaned of any contaminants such as rust, soap smudges, limescale, dust and other dirt. After thorough cleaning, you can degrease your surface, and at the same time the suction cup. After these procedures, you need to firmly press the suction element onto the tile. Usually this works and the suction cup stays on the desired area. If it is necessary to move the decorative stand, the surface near the suction cup should be moistened. The suction cup will slide perfectly along a wet wall to a more convenient place for you and you won’t even have to peel it off.
- The Vaseline method improves the adhesion of Velcro to a smooth surface. This option is even suitable for use in an aquarium with water, where there is also a need to secure an object. In addition, Vaseline is absolutely harmless to fish.
- A lining made of self-adhesive PVC film is suitable for medium-heavy interior items. Decorative elements are often attached to the bathroom not only for washcloths or toothbrushes, but also to hold towels, hair dryers and other heavier appliances. Self-adhesive is often included with modern accessories, and if one is not found, it can be purchased at an office supply or hardware store. You need to take the size you need or with a reserve, cut out circles from the film of the appropriate size and glue them to the tiles. After this, you need to remove the protective film and attach the part using suction cups along the contours of the self-adhesive.
- An effective and best method for holding heavy loads is silicone caulk. It provides strong adhesion between two surfaces and is indispensable in case of uneven tile structure. For better and more accurate gluing, transparent silicone should be used. Before applying the sealant, the tile and the inside of the suction cup should also be cleaned and treated with a degreaser or alcohol cleaner. After this, a generous amount of silicone must be applied to the concave side of the Velcro and pressed very tightly to the selected surface. Don't worry if excess sealing paste escapes outside the suction cup. Traces of such glue can be immediately wiped off with a cloth. Or after the sealant has completely dried, it can be easily and simply removed using a stationery knife. For high-quality gluing and drying of the silicone, you must wait a day before you start using the hanger, shelf or hook. Once the sealant dries, it can withstand heavy robes, towels, or even heavy appliances. Subsequently, you don’t have to worry that the suction cup will fall off and fall along with all the bath accessories. If necessary, the mount can be quickly dismantled using a regular knife.
The bee who loved to lie died in the winter :)))
Having become interested in the above review and tired of constantly Googling the weather forecast, I decided to purchase this thermometer.
The first bee that we attached to the suction cups that came with it flew on its plastic wings from the 12th floor the very next day. I found her lying on the lawn in the morning, but while my husband was slowly getting ready. someone has already managed to “attach legs” to our bee. I had to get another pet.
So, I’m telling you about the pros and cons of this miracle:
1) Nice design, children like it, looks interesting from the street
2) shows the temperature only when the sun is not shining.
3) not overpriced
More details about point 2:
Waking up early in the morning, I went to check on my bee, and smiled contentedly - the bee showed me 12 degrees, everything was fine. Happy as an elephant, I went to take care of the child, at lunchtime the sun came out and we began to get ready to go for a walk, but when I approached my bee, she assured me with an impudent face that it was 40 C outside.
In general, the thermometer turned out to be unusable during solar activity. It may be stupid, but I was hoping that the volumetric hollow body would somehow protect the thermometer from overheating, but no.
1) Fastening with suction cups turned out to be completely unsuitable, fortunately they are easily removed, I attached the bee with double-sided thick tape.
2) In the sun it shows abnormal temperatures, even my grandfather’s old window thermometer didn’t do that weird
In general, you be the judge.
We bought it at OBI for 200, I think.
As the temperature dropped below 7 degrees, it began to make more and more errors, and then finally died, now it always shows +6, although it is -10 outside the window
Having an outdoor thermometer makes the life of a modern person much easier, but only if the installation was carried out according to all the rules. To attach the device to a plastic window, you do not need to have specific skills. In this case, it is necessary to remember a number of nuances, otherwise the thermometer will produce unrealistic numbers or will not last long. In addition, it is recommended to choose fastening methods that cannot harm the plastic window by reducing its tightness or spoiling its appearance.