Even the owner of the highest quality windows may eventually have a question about how to change the handle on a plastic window. Since there can be many reasons for this important window element to break, jam, or malfunction, it is recommended that you first find out what happened. Depending on the problems detected (cracking, complete blocking, uneven position of the window, and so on), you should choose a method for solving them. So, for a stuck handle mechanism, the solution is to lubricate the moving parts of the window mechanism.
This is how the window should work Source byggmax.se
Why did the handle break?
If the handle on a plastic window breaks, in most cases this means that it is in the wrong position (not corresponding to the current location of the window sash). Let’s say the window is in ventilation mode, and the handle is in the lower state, that is, in one that indicates a completely closed window.
The probable cause of such a breakdown is jamming of the sash blocker. Apparently, this mechanism did not work correctly, so now the sash can neither be opened nor closed. The blocker is installed in all modern metal-plastic windows. It is intended to prevent accidental breakage of the window when manipulating the handle. When you turn the handle to vertical/horizontal position, this mechanism is activated. As a result, the handle can no longer turn independently or accidentally in this position. If you move the handle too quickly, the locking device may not have time to operate; in the worst case, it will jam.
What to do if the window is jammed Source actu.fr
Before you get an answer to the question of how to disassemble the window handle of a plastic window, it is worth understanding the reason for its malfunction. Here are nine more possible reasons for a pen to break:
- the blocking system was initially damaged or the manufacturers supplied a part of poor quality;
- the lubricant is dry or dirty;
- the structure is loose and requires adjustment;
- the steel rod is loosened, so the handle rotates without locking in any position and without making any sounds;
- due to improper assembly or defective parts, cracks appeared on the handle;
- the handle has worn out due to natural reasons;
- the mechanism is clogged, so considerable effort must be made to open and close the sash;
- due to too much pressure when opening, the handle broke into two pieces;
- the window sash sagged under its own weight.
If the problem is the sagging of the window sash, it is not the handle that needs to be repaired, but the sash itself, because even a couple of millimeters of narrowed gap can make the process of closing the window difficult or impossible. In this case, changing the position of the adjusting screws will help. They are located near the hinges on which the sash is held in the open position.
Repair of sagging sash Source stroisam2.ru
If you take a special metal tool with six edges (a key) and insert it into the corresponding hole in the area of the bottom hinge, having first removed the decorative trim from it, you can twist it to the sides: this will move the vertical window screw. When you turn it clockwise, you can see the sash lifting. If you turn the screw counterclockwise, the sash will lower.
At the top of the sash near the top hinge there is a hole for inserting a key horizontally. If the sash has changed its position, moving not up or down, but to the right or left, you need to work with this particular screw. When you turn it clockwise, the opposite lower sash corner will rise up; when you rotate it counterclockwise, you will see the opposite movement of the specified window corner - down.
See also: Catalog of companies that specialize in doors, windows and related work
Why it may be necessary to remove: breakdowns and ways to repair them
The need to remove the handle arises in cases where problems are observed in its operation. The most common reason for removing a handle is its breakage. Poor-quality mechanisms fail during short-term use.
Among the most common problems are the following:
- handle breakage;
- dangles;
- turns;
- incorrect position during closing.
In most cases, it is enough to just tighten, clean and lubricate the mechanism, since over time it becomes clogged with dirt, begins to work poorly, and because of this it becomes completely unusable. All these repairs can be done without any problems with your own hands, without resorting to the help of specialists .
It is also not uncommon for the mechanism to jam due to the window warping slightly over time. Such additional load will inevitably lead to breakage of the handle.
Features of the blocker
There is no definite answer to the question of how to repair the handle on a plastic window yourself, because first you need to understand what brand the fittings are. After a careful inspection of the window, you can find the name on one of its parts (most likely it will be on the end).
How to pinch the lock at the end with your finger Source stroisam2.ru
Aubi
For window systems, disabling a jammed locking system can only be done with the window in a vertical position. You need to find a metal part on the side of the door being repaired that acts as a spring, and press on it so that it also becomes vertical. Only after performing all the above actions must the handle be returned to the correct position. For an open window, this state is strictly horizontal.
After these simple manipulations, you should check whether the mechanism works. When problems arise again when attempting to open/close the sash, you need to find out what the relative position of the blocker and the response mechanism is. When you turn the handle and close the window, the locking mechanism must cling to the counter. If the breakdown is not corrected, the cause may be expansion of the material due to exposure to high temperatures.
The solution to the described problem is simple. You need to open the window sash and, having found the response mechanism, carefully unscrew it. After this, cardboard, thin plastic or something similar should be placed between the mechanism and the frame. Once the mechanism is screwed into place, the problem should disappear.
The blocker can also be located below Source arcont.it
Winkhaus
If the handle on a plastic window is broken and you don’t know what to do, try working with the lock. Owners of Winkhaus window fittings may be familiar with the problem of this device wearing out. Do-it-yourself repairs will require removing the window sash. You should first prepare pliers and a screwdriver. After removing the top hinge cover, you need to pull out the pin. Now you can remove the sash, freeing it from its hinges, and carefully install it on the floor, providing a strong support.
After the scissor mounting bolts are removed, you need to separate them from the window and then remove the blocker. Now you can install the scissors and the sash back. If the error has not been corrected, more serious repairs from professionals are required.
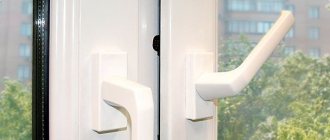
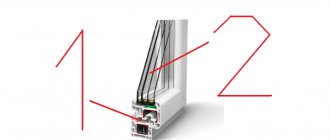
Types of window opening mechanisms
The industry produces eight types of window opening mechanisms:
- Standard (classic). These are standard models with no additional features. They allow you to open/close windows or set them for ventilation.
- With locking mechanism. This hardware comes with a key lock. The window opens only after turning the key. This guarantees safety if there is a child living at home. A reliable seller will include two or three additional keys in the kit with the accessories in case of loss. Moreover, the locks and keys are the same for the entire party.
- With a button. Push-button and lock-type fittings are identical in operating principle. Only in the first case, instead of turning the key, they press the limiter button. This option is more convenient than the previous one in that, unlike the key, the button is not lost.
- With a bend. Similar fittings are used in cases where the window sashes open outward. The curved shape allows the fittings not to hit the frame.
- Removable. These are handles that can be easily removed and reinstalled. Removable models are used on windows in kindergartens, schools and clinics for safety purposes.
- Anti-burglary fittings. A smart mechanism that completely blocks the window if it is physically impacted from the outside.
- Shell. This mechanism is mounted on the reverse side and is used when you need to cover or close a window while outside.
- Double handles. Double-sided models are placed on windows and doors that lead to a balcony, loggia, or terrace. Of course, they cannot be mounted on windows that face the street.
When the type of construction is chosen, pay attention to the material from which the fittings are made. Today, plastic models are common because they are affordable. But their durability is also low.
Reliable manufacturers produce fittings from durable materials:
- steel;
- aluminum;
- metal-plastic models, etc.
It is recommended not to skimp on the handle and choose a model with an aluminum base. The difference in cost is 100-200 rubles, and in durability - several years.
Replacing the handle
Let's look at how to change the handle on a plastic window yourself. To do this you need to perform a number of simple steps:
- Unscrew the decorative plastic covering the window handle mounting bolts to the side (just turn it 900).
- Two screws will be revealed that need to be unscrewed.
- Since the handle is not supported by anything else, it can be removed from the window sash.
This is how the handle is removed from the sash Source sakh.com
- Lubricate the fittings with oil specifically designed for this purpose so that they work well in the future.
- Place the new handle in place of the old handle, aligning the bolt spots with the existing holes.
- Screw the fasteners back and turn the closing plastic panel into place.
Removing a broken handle
If the window handle breaks off, that is, part of it remains in your hand when you try to close the window, you will have to replace the broken part. In this case, it is important to remove the damaged handle correctly and without errors, without damaging the window mechanism. First of all, you need to try to turn the piece of the handle so that the sash becomes vertical, but not inclined.
At the second stage, we apply the algorithm, that is, it is necessary to open the plastic decorative panel located around the handle and unscrew the bolts. When the remains of the handle are removed from the window, you should carefully inspect the remaining fittings for cracks, chips and other damage.
It is difficult to unscrew a broken handle, but it is possible Source blogspot.com
What tools are needed?
To change a window handle to a new one, you do not need complex tools and expensive consumables; usually all of them are available to the home craftsman for use :
A 4 mm hex key, standard for windows, is considered the main adjustment tool for fittings.
Available in retail chains, you can most quickly buy it in a regular furniture store.- Screwdriver set with replaceable bits.
- An electric screwdriver with a set of accessories, preferably bit attachments of models T or TX.
- Pliers are rarely used, usually to disassemble a window handle if the fasteners have become sour.
- The hammer is standard and has a rubber tip.
- Aerosol lubricant for mechanical rubbing parts WD-40.
Twist Handle Repair
If the handle on the window simply rotates 360 degrees around its axis, but the window does not close/open, you can try to make a repair. In the case described, the problem is most likely that the square part that the turning handle is supposed to cling to has moved and stopped clinging.
The first thing you should check is the sash: it must be in a vertical position. After this, you need to remove the handle. You already know how to unscrew the handle of a plastic window: just move the panel underneath it to the side and unscrew the two bolts that hold it. Now you should remove the square part from the opening mechanism and reinstall it so that it correctly takes its place in the special recess. After installing the handle back, the problem will disappear.
If the window handle turns without making any sound at all, this may indicate a broken or incorrectly positioned central rod. To carry out repairs, you need to remove the handle, as indicated above. In this case, a metal rod should remain sticking out of the window, which must be removed from the sash using pliers.
Handles with rods Source vse-okna24.com
In order for the rod to return to its position, you need to insert it tightly into the dismantled handle. Turning the handle so that the rod “looks” down, tap the structure on a hard object. This way the rod should take the correct position. You already know how to put a handle on a plastic window.
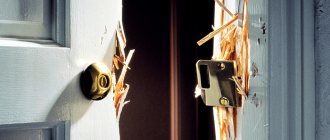
The hinge is broken
The problem is widespread primarily on large sashes, especially if they are often opened in the swing mode. The entire load, and not a small one at that, falls on the lower hinge and soon its body cracks or, what happens less frequently, the screws break off. The only way out in such situations is replacement.
To make the procedure go faster and all other elements of the window to remain intact, it is better to change the hinge together. The situation can be aggravated by the breakdown of the upper hinge, since the massive sash, with the lower canopy turned out, significantly pulls on the top and often deforms its parts.
Sequencing:
- Remove the decorative trim from the hinges;
- Open the window slightly in swing mode and partially knock out the supporting axis with a hammer;
- A part of the axial mechanism will appear from below, pinch it with pliers and pull down until it is completely removed;
- Hold the sash, pull it slightly towards you, then lift it up. This should release the lower support. There is no rigid fixation at the bottom, so you just need to move the sash to the side and remove it from the frame.
Replacing the hinge is done with improvised tools, depending on the type of fastener.
If it's jammed...
When the window handle is stuck in one position, before replacing the handle on a plastic window, you should proceed as follows. You need to purchase lubricating spray from a hardware store. Since this type of lubricant penetrates deeper than regular liquid oil, it is better to use a spray. You should spray it on all the elements surrounding the handle mechanism, you also need to treat the corner opening mechanism, which is located on top of the side of the sash.
When applying lubricant to moving parts of window fittings, you need to do it carefully so as not to drip onto the floor or window sill. When lubricating the handle, you must try to move it in one direction or the other. This is necessary so that the lubricant penetrates deeper into the mechanism. This increases the likelihood of fixing a jammed handle.
Is it possible to do without a master?
Thus, most of the problems associated with handles are eliminated in minutes. It is not difficult to adjust the fittings, tighten the handle, or replace it. This significantly reduces the cost of repairing a plastic window, since the price of the services of specialists can be quite high, and otherwise you will only have to pay for a new part or lubricant. It makes sense to call a specialist only if there are serious problems, with a valid warranty, or you are afraid that by your actions and attempts to repair the handle, you will completely break the window.
If you have any questions regarding pen repair, you can always contact me directly, I will try to understand the problem in detail and provide advice.
Nuances of handle repair and replacement
We looked at how to disassemble the handle of a plastic window, but it is also worth paying attention to some important nuances:
- the internal rods of the old and new handles must be completely identical both in shape and length;
- if the handle becomes loose, you just need to tighten the fastening screws a little tighter;
- for windows with limited opening, before installing the handle, you need to use a special comb (it is attached to the base of the handle);
- When screwing in the screws holding the handle, you should not use excessive force, as the plastic parts of the window may not hold up and burst;
- the new handle must be inserted into the window in the same position as the old one was in when dismantling;
- For work you need to use a Phillips screwdriver.
The door hung on one hinge
In such situations, the sash is held in the frame by the lower canopy and upper “scissors”. The breakdown is eliminated as follows:
- We put the top of the sash in its working position - as if nothing had fallen out. To do this, you need to gently press the upper corner with your palm until it stops; you should not apply excessive force.
- Pressing the lock with your finger, place it vertically and turn the handle horizontally. The main thing is that the upper corner is pressed at this time.
- When the upper mechanism catches on the hinge, you can close and open the window in the usual way.
The most common cause of such a breakdown is considered to be incorrect operation of the fittings combined with the human factor. The window is transferred from the ventilation mode to the swing mode without completely pressing the top of the sash to the frame.
Instructions for old windows without a lock
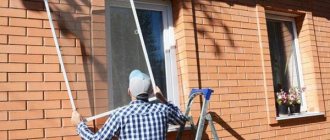
Are there reliable ways to remove primer from glass?
If during the work it was not possible to protect the windows, you need to know how and with what to wash the primer from the surface of the glass. The same problem occurs if the primer gets on the tiles. There are priming compositions that can be washed off with water, but there are also those for which it is problematic to choose a remover. Let's start from easy to difficult.
Primer for wallpaper
Often, before wallpapering, the wall is pre-impregnated with wallpaper glue. This primer washes off easily, especially if it is fresh. It can be wiped off with a damp cloth. If the glue has dried, it should not be removed with abrasives. It is enough to wet the stains on the glass and wait for the paste to swell. After this, it can be removed with any damp sponge.
Acrylic primers for water-based paint
This type is also easily removed from glass and tiles. The stains need to be wetted, and after a while they will be washed off well without the use of chemicals. The exception is those compositions to which dye is added. In this case, you will have to wipe off the dirt with White Spirit.
If the primer is very dry, it needs to be soaked with hot water. For floor tiles, whisk boiling water.
Adhesive primers
Impregnation compositions that improve the adhesion of the base and finishing materials, for example “Betonokontakt”, are very difficult to remove after drying. In fact, they can only be removed mechanically. The best way to clean glass is to use a blade. Holding it at an angle of 40-45º, you need to try to pick up the edge of the soil. After removing the strip/flap, repeat the procedure.
To facilitate the process, you can use organic solvents such as P 646. They contain ethers, which contribute to the swelling of the primer and the loss of its adhesive properties.
Cleaning is carried out as follows:
- wet a rag with solvent and apply to the stain;
- wait 30-60 minutes;
- remove the rag - a jelly-like film should form under it;
- pry the film with a blade and remove;
- Wipe the glass with soapy water and then with clean water.
Phenolic primer
To impregnate wood, phenol-based soil is used. If it gets on the surface of ceramic tiles or glass and more than 17 hours have passed, then solvents will have to be used. For disposal, xylene, solvent or a mixture of solvent and White Spirit (in equal proportions) is suitable.
Cleaning is carried out according to the following scheme.
- A solvent is applied to the contaminated area.
- After 2-5 minutes, wipe with an abrasive sponge.
- Repeat wetting with the solution and wipe with a sponge again.
- Wash the glass with water.
To wipe off fresh dirt, simply wipe it with a rag or damp sponge.
Universal method
If the type of primer is unknown, but there is some residue, then the problem of contamination can be easily solved. It is enough to moisten the stains with the same primer, wait a while, and then wipe off with a rag or, if necessary, an abrasive sponge. This action is explained by the fact that the soil always contains a solvent. However, if too much time has passed—more than two weeks—then this method may not work. As a rule, during this time complete polymerization occurs, and strong agents are required to remove stains.
Home remedies for stains
If there is no primer left and its type is unknown, the question of how to wash the primer remains relevant. In this case, you will have to try different methods and means.
From available means:
- boiling water;
- soda;
- vinegar.
Boiling water is used to clean ceramic floor tiles with a porous structure. In this case, you need to water the stain and wipe it with a rag after a few minutes. Vinegar is used for glass and acid-resistant tiles. It is applied undiluted to the dried primer, and washed off after 10-15 minutes. This processing has to be repeated several times.
Soda for glass and tiles. The stain is moistened and sprinkled with soda to form a paste. A few minutes after application, you need to wipe off the resulting mush with a sponge. In this case, soda acts both as an alkaline solvent and as a mechanical abrasive.
Chemicals
If none of the above helps get rid of primer stains, use the "big guns" - household chemicals - to clean up problematic stains. For window glass, any product can be used; for tiles, it is better to choose an alkaline-based cleaner.
- Dopomat;
- Hodrupa A;
- ATLAS SZOR;
- Veroclean;
- Corvette;
Powerfix is an acidic product, all others are alkaline. Corvette can be used to remove stains from porcelain tiles. All of these products are professional and highly concentrated, so before use they must be diluted according to the instructions. To get rid of stains, choose con. After use, the surface should be thoroughly rinsed with water.
Steam cleaner
Most primer stains can be removed with a steam cleaner. It is well suited for cleaning tiles with a porous structure, but it cannot be used for window glass. The glass will heat up unevenly and will burst. Glazed tiles can also behave unpredictably, so the use of this technique is limited to floor tiles.
The cleaning method consists of two actions that are performed simultaneously.
- Direct a stream of steam onto the stain.
- Use a hard bristle brush to remove dirt.
Before using a steam cleaner, the stain can be pre-treated with a solvent. In this case, mechanical cleaning will be minimized and the surface of the tile will not suffer from excessive friction.