About slopes
The sections of the wall adjacent to the window block are called slopes. They are internal and external. Strict requirements apply to internal areas.
The following functions are assigned to the slopes:
- giving the window structure an aesthetic and attractive appearance. Is it really possible to imagine a high-quality window that is connected to a broken wall;
- improvement of sound and thermal insulation. Window structures that do not have high-quality slopes do not have sufficient tightness;
- protection of installation elements and seams from environmental influences. A high-quality slope not only protects fasteners from corrosion, but also reduces the likelihood of windows fogging and freezing.
Thus, slope repair is a list of works aimed not only at restoring damaged sections of the wall, but also at creating additional insulation.
Basically, one of the following repair options is selected:
- Plastering the surface followed by painting. A widespread and inexpensive finishing option.
- Plastic sheathing. Plastic panels are combined with the window profile material; in addition, such repairs do not take much time;
- Installation of drywall. The option is labor-intensive, as subsequent finishing is required. The material is convenient to use for windows of complex configurations.
For any repair of slopes, first of all, high-quality surface preparation is necessary.
Various finishing options
Do-it-yourself finishing of plastic windows is carried out using different methods:
- Applying plaster with water-based paint.
- Installation of plastic panels. They harmonize well with the materials of the window blocks and are installed quickly.
- Use of gypsum boards. This technique is distinguished by the fact that it requires high-quality further finishing.
Plastering with dry mixtures
For the work, special plaster mixtures are used, which can be sold dry or already diluted. The plaster is diluted with water in the ratio indicated on the packaging so that the resulting mixture is not too liquid. Different manufacturers produce mixtures with different components in the composition. The plastering mixture should look like porridge.
For external areas where increased moisture concentration is inevitable, it is more rational to use a composition that contains a proportion of cement. Gypsum compositions are suitable for interior work: they are convenient to apply, they harden quickly, and the consumption does not exceed permissible standards.
Attention! Before you begin interior work, you need to purchase a special mixture in the store.
Plastering with tile adhesive
This material is suitable for exterior decoration. If high-quality tile adhesive is used for the work, such repairs will significantly increase the cost of materials compared to using classic cement with sand.
Finishing advantages:
- the surface does not absorb water droplets;
- does not deform even in severe frost;
- the material quickly sticks to any base;
- material consumption is as profitable as possible;
- high quality, durable material.
Attention! In order to complete all work quickly, it is important to use waterproof and frost-resistant tile mixtures for outdoor work. They need to be applied in a thin layer in several stages.
Finishing with plastic tape
PVC tape is often used when there are problems with waterproofing a room. In terms of characteristics and external features, it is more similar to the foam rubber that was previously glued to windows, but now updated.
- The plastic tape repels water and direct sunlight and is vapor-tight. The only drawback is its fragility: the tape loses its properties 6 years after installation.
- Installed in the free space between the wall and the profile to protect joints and seams foamed with mounting foam.
- If the entire seam is filled with foam, it needs to be cut out a few millimeters.
- Then rinse, wipe the joint, and let dry.
- A piece of a given length or slightly longer than required is cut from the tape.
- The tape should not be glued at an “angle”, otherwise it will be used irrationally.
- The tread liner is peeled off from the tape and glued to the area with maximum traction. It's best to use a profile.
Application of window sealant
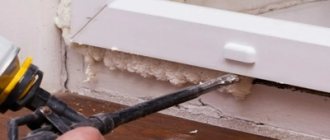
Some materials are used even at the stage of installation of the window frame - polyurethane-based foam wedges the window and can fill all the wall voids that are hidden under the plaster layer or slopes made of PVC or metal. Some of them can be used several days before the onset of cold weather. The cracks are sealed at the window sill line and at the junction with the wall.
One material will not immediately solve the problem with noise and heat insulation. It is important to use several tubes in combination. They are suitable for indoor and outdoor use.
Preparing the window opening
Restoration of slopes begins after their surface has been prepared. Preparation is performed in the following sequence:
- Use a chisel to knock down damaged and protruding areas.
In order not to destroy the restored slopes, the window sill is installed before the repair begins. To protect against dirt and broken elements, the window and window sill are protected with paper or polyethylene. It also wouldn’t hurt to protect the window handle and battery under the windowsill.
- Excess foam is cut off to seal the window structure. The dried foam is cut off with a knife. To do this, you need to pierce the protruding excess from the top of the window, and then remove it with a downward movement. The foam glued to the wall is also removed.
The protective film on the window is removed only after all work is completed.
- The surfaces of the slopes are thoroughly cleaned. Large dangling fragments are attached to the mortar.
- To improve adhesion, the surface is primed. Usually, a deep penetration primer is used before plastering; in other options, antiseptics are used.
What to do with cracks under the windowsill?
The cause of blowing under the window sill may be subsidence of the window structure, errors during its installation or degradation of the thermal insulation layer.
The problem of depressurization can be solved by using plaster or a shock portion of polyurethane foam from inside the room or from the street. The “outdoor” option is preferable, but it is not suitable for winter. When sealing the gap under the window sill from inside the room, proceed according to the following algorithm:
- Cut off the wallpaper at the work site.
- Unstitch the seam under the window to its maximum length and width.
- Fill the joint with plaster or foam.
- After the foam has cured, trim off any excess foam and cover it with putty or sealant.
- Cover the repair area with wallpaper.
You can fix the problem in 2-3 hours, even if you have no experience in repair work. But it’s better not to let things get too cold and carefully check the tightness of the structure in the summer. Sealing the seams from the street and inside the apartment is guaranteed to save you from an unpleasant draft under the window sill. After blowing in foam, be sure to cover it with plaster or sealant.
Sometimes a draft appears not under, but above the window sill. This problem can also be fixed from the inside or outside. In the latter case, you need to foam the seam that is under the low tide.
This method is effective, but it does not work at sub-zero temperatures. In this case, you should buy a sealant and carefully coat the joint between the frame and the window sill with it.
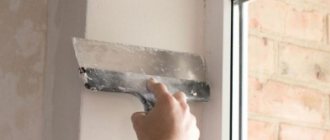
Plastering slopes
This option for repairing slopes is low cost. To seal, all you need is a finishing mixture, a set of simple tools and water-based paint.
This option also has disadvantages:
- To obtain a very smooth surface, you need to put in a lot of effort and spend a lot of time. An experienced installer performs this work much faster;
- Cracks often appear after plastering. This may be due to a single-layer surface coating, when a thick layer slides down. In addition, cracks appear due to changes in humidity or poor quality of the mixture;
- low thermal insulation of the window structure;
- lack of adhesion to the plastic from which the window is made.
It is believed that plaster looks more aesthetically pleasing for internal slopes than plastic and drywall.
Plastering begins with the correct selection and preparation of the mixture. In this case, it is necessary to take into account the location of the slope.
- External slopes are subject to special conditions: precipitation, wind, temperature fluctuations. It is recommended to use cement and heat-insulating mixtures with a water-repellent effect. This can be a product or a regular mixture of cement and sand.
- Internal slopes must have an aesthetic appearance. To ensure a smooth surface, gypsum mixtures are suitable. Starting and finishing putties are very common.
In any option, the drying time of the solution is taken into account, since further decorating work continues after it has dried.
The slopes will be of high quality if you follow the advice of experts.
Important!
1. Do not dilute a large amount of solution. This is due to savings - the unused solution dries quickly.
2. The solution is applied in several layers. The next layer is laid after the previous one has dried.
The repair sequence is as follows:
- The dry mixture is diluted according to the instructions on the package.
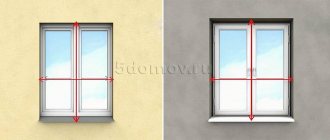
- The location of the corner is determined. Using a building code and a level, a lighthouse is marked on the wall.
Determining the starting point of the angle
Using a beacon and staff
View from above - The solution is applied by spreading or throwing. The plaster starts at the bottom and moves up the slope.
- Using a spatula, remove excess mortar from bottom to top and create an angle.
- Decoration can be done in any way. The easiest way is to paint. It is performed after applying a two-layer primer.
If you have any questions, watch our video:
Determining critical places
It is very important to find out exactly how cold air gets inside the room. To do this, you need to take a lighter and run it around the entire perimeter of the plastic window.
Pay special attention to the places where the frame meets the wall. The window sill and slopes are also worth checking
If you don't have a lighter, use an open palm.
Cold air can penetrate through the following structural elements:
- clamping elements that tend to loosen over time;
- a detached glazing bead that holds the glass unit in place;
- worn out seal;
- polyurethane foam, if it was applied in violation of technology;
- windowsill;
- slopes.
A double-glazed window rarely causes a violation of thermal insulation (the exception is its depressurization), but it can also be additionally insulated. “Extra” heat in winter will not hurt.
It is easy to identify leaky window elements - just run your palm along and across the entire structure, and you will feel that there is a decent amount of wind in some places. Some people recommend using a lighter for this purpose. If you light a flame and pass it around the perimeter of the window, maintaining a safe distance, it will tilt in those places where there is even a small draft. Be extremely careful with this method!
As a rule, work on insulating a plastic window can be done with your own hands. The exception is when it is necessary to insulate the slopes from the outside, and the apartment is located above the second floor. You need to be prepared that comprehensive insulation may be needed if several zones of warm air leaks are found, but first things first.
Covering slopes with plastic
As noted earlier, plastic is in demand due to its simple installation and low cost. Besides this, there are other advantages:
- The material goes well with the window profile. The slope and profile have the same expansion, so there is no tension between them;
- performance characteristics are maintained for up to 20 years;
- withstands temperature changes;
- there is a protective layer that does not burn or melt;
- easy care. Dust and dirt are removed with a damp cloth.
The following sequence is selected for work:
- A wooden block is attached to the slope so that the window space is not covered.
- Using a stapler, we attach the starting strip to the block.
- We cut strips of plastic to size. They are inserted into the starting strip fastener.
- After everything is inserted, carefully move the panel away from the wall and fill it with foam from the far corner.
- We fix the panels with mounting tape to the wall.
- After the foam has dried, the ends of the panels are closed with special corners.
It is possible to install the corners immediately
Installation process
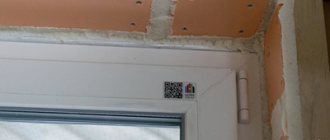
We have a window in a new building where only a window sill is installed.
On top there is a metal corner 100 mm thick. It is to this that the upper slope will need to be screwed.
We cut the starting profile to the width of the window and screw it along the edge of the frame, having first removed the protective film (from the frame). We twist the screws every 15 cm.
In the photo it looks as if the profile was not screwed evenly, in fact everything is smooth, it’s just that the material was slightly deformed during delivery. Cut off the side profiles. We take the length from the top profile to the window sill with a minimum gap and screw it (also along the edge of the frame).
Next you need to prepare the upper slope and install it.
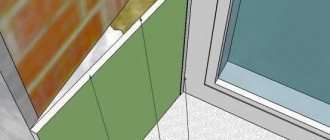
Sandwich paneling
When choosing this option, it must be taken into account that the minimum panel thickness is 20 mm.
Without auxiliary profiles, the slope is sewn up within a few hours. The order of plating is as follows:
- The panels are cut to fit the dimensions of the slope.
- “Liquid nails” are applied to the panel and it is pressed tightly against the surface of the slope.
- The gaps between the frame and the panels are sealed.
- The corners are installed on the outside with glue.
Lining and sandwich panels cannot be repaired. As a rule, they change when damaged. In this case, the choice of shade is of great importance, since it differs in different batches of material.
Looking for the cause of cold windows
To ensure that the insulation work is not in vain, it is necessary to correctly determine the weak point of the window that allows cold air to pass through. The reason may lie in different parts of the structure:
- Slopes (deteriorated or missing insulation);
- Window sill (cracks or bridges of cold may form in its lower part, which, at first glance, are invisible);
- Glass (blowing occurs at the junction of the glass and the frame; the putty that covers the joint deteriorates over several seasons and requires regular updating);
- Frame and sashes (shrinkage of wood, subsidence of sashes, movement of soil under the house - all these circumstances lead to the formation of gaps between the frame and the window frame).
Defects in a wooden window frame lead to heat loss in winter. If a visual inspection fails to identify the cause, you can use some tricks. For example, wet your hand with water and bring it to different parts of the window. An even more sensitive method is a lit candle or lighter. The flame reacts to any air vibrations, which will indicate places of heat loss.
A very old window requires an integrated approach. To achieve good thermal insulation, you need to eliminate all possible cold bridges
. Structures in good condition need to be insulated around the perimeter of the frame and opening sashes using any available method.
Tools
Plastering slopes requires a certain set of materials and tools.
You will need:
- mixer to prepare the composition;
- spatulas (spatulas) of at least two sizes - 9 cm, 35 cm or more;
- roller;
- grater;
- rule;
- brush;
- level (plumb line, level);
- square;
- masking tape;
- hammer;
- caulk;
- chisel;
- stationery or construction retractable knife.
Recommendations and useful tips
To get a good result, pay attention to the following nuances that can help with the correct design of the opening:
For maximum penetration of sunlight, it is better to make a turned corner. For this, on small windows, the best option would be to create slopes and frames of a light shade. In addition to the standard white color, you can choose beige, pastel shades, and coffee and milk.- For the kitchen and bath it is better to choose materials that can be washed, i.e. having resistance to moisture. PVC panels will come in handy, but there is also acrylic plaster, which does not absorb or allow moisture to pass through.
- Plaster will play the role of an excellent material for finishing a window opening in the form of a trapezoid, an arch, or any unusual shape that is difficult to decorate in other ways. Silicone plaster is suitable for roof windows, since it is not sensitive to ultraviolet rays and the coating will not lose its color, even when placed on the surface of a hot roof.
If there are drapes or curtains on the windows that will hide the slopes, then there is no point in spending money on expensive finishing. But for windows that are covered with blinds, decorated slopes will serve as decoration for the window opening.
Ways to fill the opening
There are several common solutions for how to remove a window in a wooden house:
- The most radical, but also the most reliable and aesthetic way is to disassemble part of the log house and replace the logs or beams. If we are talking about an attic or dormer window, this is not such an expensive solution, and it will allow you to forget about all the problems with blowing through the walls. But it should be borne in mind that old and new lumber will settle differently, so it is better to purchase dried wood and do not forget about laying insulation. When shrinkage is complete, re-caulking of the resulting cracks will be required.
- Installation of fragments of logs or beams of similar size and diameter into the hole. This is a rather labor-intensive method: the opening logs are cut at an angle of 45 degrees, the same angle is made at the ends of the insert pieces. There is also a minus: the new elements filling the hole will be very different in color. In this case, you will have to paint the entire wall to disguise the blocked part, or use another cladding option. You can build a false window: cover the closed space of the wall with decorative shutters. New parts must also be treated with antiseptic and fire retardants. It is recommended to coat the joints with a special sealant.
- If the house is equipped with brick cladding, the hole can simply be blocked with thick boards. They must fit tightly into the opening; insulation is laid between them so that there are not even small gaps left. On the inside, the walls can be covered with plasterboard or covered with clapboard; on the outside, the former window will be invisible because of the brick.
- Frame filling using various wood materials. This is the simplest and most common answer to the question of how to seal a window in a wooden house. Let's take a closer look at this repair method.
Frame method
How to install a window in a wooden building with minimal labor costs without cladding? There is a simple and effective method that will allow you to forget about the cold, and at the same time the structure will remain beautiful and neat. Sequencing:
- The old window block is being dismantled. The doors are carefully removed and the frame is removed. There is no need to throw away the plastic system: it will be useful for a summer house, greenhouse or gazebo.
- The resulting hole is cleared of accumulated debris and dust. After this, a frame made of thin timber or wooden slats is installed in it. It can be attached to the wall logs with nails or self-tapping screws.
A frame is stuffed onto the frame from the outside, and material corresponding to the walls is attached to it. If the house is made of logs, they usually use a block house, if it is made of timber, a horizontal lining of the required size is used. As a result, the opening will not be noticeable from the street, and the surface will appear smooth. To avoid any difference in color tone, the wall should be painted. The internal space of the frame is filled with insulation: you can use a thick layer of mineral wool, penoplex, extruded polystyrene foam or other materials. The insulation must fit tightly to the frame and sheathing, then the wall will not freeze. On the inside, similar work is performed: the sheathing is installed, and decorative material is nailed to it. Usually this is a clapboard or block house. Next, the entire wall is covered with varnish or paint so that it acquires a uniform appearance.
If external or internal cladding is intended, you can do without sheathing. OSB boards made from sawdust and shavings are nailed to the frame-frame, and the internal space is similarly filled with insulation. After this, the building is finished with the selected material: OSB boards retain heat well, the insulation will not allow the wall to freeze.
To better protect the structure from external influences, it is recommended to place a waterproofing film on both sides of the frame under the decorative material. It will protect the insulation at high humidity and will not allow it to collapse.
In some cases, a window opening in a log house is covered with brick or aerated concrete blocks. This method is possible if the object is supposed to be faced with brick or other material, with cladding on the inside. Typically, infill bricks are used only in very old buildings where shrinkage has long since completed.
Acrylic sealants for sealing the installation seam of windows according to GOST
Let's consider the advantages of sealants for insulating a heat-insulating layer.
Advantages of sealants relative to mounting tapes:
- A more hermetically sealed application means you don’t have to level the opening in advance and don’t have to wait for it to dry. Due to their liquid consistency, sealants fill cracks, irregularities and voids in the opening during the application of the external seam.
- Higher water resistance - in order for water to begin to penetrate through the sealant layer, a pressure drop of more than 600 Pa is required (this happens, for example, with a wind of more than 30 m/s). Through the joint of the tape with a wall or window, water begins to leak at 150 Pa, i.e. already with a wind of 17 m/s.
- Higher seam protection against blowing. A 2mm layer of sealant can withstand hurricane winds at a speed of 45m/s for at least 3 hours without blowing. No ribbon can withstand such wind.
Photo: the tape does not have a tight connection with the opening and the product; additional sealing is required
- Sealant can be used to cover an installation gap of any width, and the range of external sealing tapes is limited to several sizes (10, 12, 15, 20mm, less often 50mm)
- High maintainability – a damaged area of sealant can be easily restored; you don’t even have to remove the old one. The damaged tape will have to be replaced completely, which may entail a complete reinstallation of the window and slopes.
- More affordable price relative to high-quality tapes.
Disadvantages of sealants compared to tapes:
- In winter, installation will take two days: to apply the sealant, you need to wait until the foam hardens. In winter, this happens for several hours, so processing the seam will have to be postponed until the next day.
- Applying sealant takes longer than applying tape - approximately 15-20 minutes, including protecting the window with masking tape.
- It cannot be used when repairing an assembly seam when the window is already installed and requires repair.
According to industry experts in the field of installation, sealants today occupy about 60% of the market, due to the optimal price-quality ratio.
Finish
The drying time for facade plaster in normal weather is 24 hours, but it is better to focus on the color of the solution - as it dries, it becomes lighter. After complete drying, the slope is painted with façade acrylic; if you want a perfect slope, first putty it with façade putty, then paint it.
We advise people who are far from high aesthetic values to plaster the gap in the slope and forget about it. It will not be very noticeable either from the street or from the apartment.
Additional ways to insulate plastic windows
- Washing windows. Paradoxically, cleaning the glass unit helps save heat. After all, dirty glass loses its ability to transmit sunlight, but continues to transmit rays in the infrared spectrum.
- Thick curtains. Which speaks of seasonal mode. Before you prepare your plastic windows for winter, make sure there is such a mark on them. Which also trap heat indoors.
- Insulating windows with improvised means. This method somewhat spoils the appearance of the window, but in critical cases it can be a very worthy alternative to replacing the window unit. The following materials are used as insulation: foam rubber, soaked paper, window tape, strips of white fabric, etc.
- Insulation of windows with heat-saving film. The energy-saving film is glued to the entire surface of the window (on the sashes). The main thing is to do the gluing correctly, without air bubbles or folds. The film reduces heat loss through glass by 75%.
- Electric window heating. In this case, a heating cable is placed around the window, which heats the heating coil, or an oil radiator is installed on the window.
- Electric heating of double-glazed windows. The most technologically advanced way is to install plastic windows
with heated glass. The technology is applied at the window production stage. Plastic windows have become if you need to adjust the shift of the plaster and how to do it correctly. Winter is approaching, and for many the question is becoming increasingly pressing: how to insulate plastic windows? It involves installing a special conductive film (transparent film with conductive threads) on the inside of the glass, which heats the glass from the inside. - A complex approach. The most appropriate for insulating windows in an apartment or private house, since it allows you to eliminate all possible causes of heat leakage through metal-plastic or PVC windows.
What are the nuances?
When preparing the solution for further application to the foam, you should be careful and thoroughly stir the mixture to eliminate the appearance of lumps that will spoil the aesthetics.
It's better to use an electric assistant
Depending on what functions the plaster layer performs, prepare a place for it. If it is protective, then remove the excess foam with a recess of several centimeters in order to plaster it efficiently. If the layer is decorative, then a large recess is not needed; a depth of no more than a centimeter is sufficient.
If you need to hide the foam outside, take into account that even the impossibility of moisture getting on the protective layer does not eliminate the chance of damage from other atmospheric factors. Severe frost also causes damage to plaster. You should take care of this problem in advance and purchase a frost-resistant mixture. If the work is to be done indoors, this is not necessary.
Regardless of which recess is prepared for plaster, the holes are plastered so that the layer of the mixture is at least 5 mm. If you use a smaller layer, this will lead to the appearance of cracks on the surface of the plaster and its subsequent destruction.
Grouting is not done after the plaster has completely dried; it is enough to allow time for proper hardening.
High-quality protection
When working with plaster, do not forget to use gloves and glasses. Dried mixture on the skin is difficult to wash off, and contact with the eye leads to serious consequences.
Don't forget to clean the tools after completing the work. If the mixture has not hardened, do this simply by washing them in water; if it has dried out, it will have to be cleaned mechanically.
When installing windows or working with other openings, builders often need to use foam to seal cracks of different diameters. After treatment, the surface must be cleaned so that all further manipulations can be freely performed. For these purposes, you can use durable slopes made of different materials or plaster solutions.
Over time, the foam can lose its properties, which is why the quality of the sealing seam deteriorates significantly. In order for the structure to last as long as possible, auxiliary materials must be used. Dry mixtures are in demand, since after hardening they form a durable film through which moisture does not penetrate.
Final finishing of the structure