Interior doors
All entrance and interior doors have standard, universal sizes. But sometimes in some apartments (for example, the so-called “Stalinka”) or private houses there are non-standard openings, both in height and width.
When installing standard products, there is free space that needs to be closed. An excellent solution to this problem would be to use a transom.
This is a structural part that is located above them or to the side. Its main purpose is to fill the free space when installing a standard product and securely fix it.
Input products
The use of a leaf is due to the fact that all manufacturers limit the maximum size of doors.
They are mainly produced in the following sizes:
- height up to 2200 mm;
- width up to 1050 mm;
The product can be made larger, but in this case its weight increases and the load on the hinges increases accordingly. What to do if the opening has a size of 3000×1300 mm?
In this case, installing a standard door 2000x900 mm is perfect, and the rest of the space - on top and on the sides - will be occupied by a decorative detail - a transom.
Types of elements
One of the features of the doors is the possibility of using them in indoor decoration. Beautifully made and matched in color and texture to the doors, decorated with carvings and curly trims, it will be a wonderful addition to any interior (see Interior doors in the interior).
There are two types of transoms:
- arched (see DIY arched doors: how to install correctly);
- straight;
I mainly use arched doors indoors. This form allows you to make the interior more original and attractive.
Types of transom location
Possible design options
There are many types of valve arrangement:
- above;
- On the one side;
- on both sides;
- combined - from above and from the sides at the same time;
If the top and side transoms are used simultaneously, then such a system is called complex. Depending on the width and height of the opening, the most optimal option is selected.
Advice: when choosing the type of placement of the sashes, you need to think everything over very carefully. So, for example, if the opening is 1800 mm wide, then it is better to install products with a size of 800 mm and two side transoms of 500 mm each.
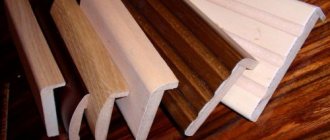
Materials for production
Basically, the transom is made of the same materials as the door itself and its frame. They can be solid or glazed. One of the interesting design solutions could be a combination of a solid structure (see Solid interior doors) and a transparent transom placed above it. It is both beautiful and practical.
When using glass, there is an additional opportunity to illuminate the room. For example, in a dark corridor it will be much lighter during the day, due to the sun entering from the windows of the rooms through the transom.
Tip: using an arched glass transom makes it possible to visually enlarge the doors
Expanding functions
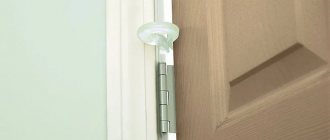
Doors with closed transoms require frequent maintenance, which can cause some difficulties. To make the use and maintenance of the structure simpler and more convenient, it is recommended to make it opening. This will make cleaning easier and create a flow of fresh air between rooms.
The opening function is realized through the use of ordinary rotary fittings. The main difference is the rotation of the sash in the horizontal direction. The sash can be tilted either from top to bottom or from bottom to top. It is recommended to use special transom fittings, which are equipped with limiters for the opening width of the sash - it allows you to significantly expand the functionality.
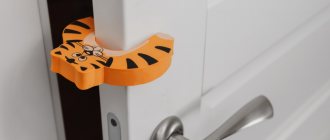
An entrance door with a transom becomes a reliable barrier for insects if a suitable mosquito net is installed on the latter. This is only relevant for opening structures. You can also sew up the transom to seal the opening. Remember - this will reduce the penetration of light from one room to another, but this is not critical.
Closed transom
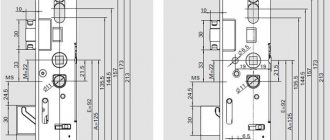
Door frame
Installation of the door and transom will not be complete without installing the frame. It is the basis of the future design, and the further operation of the product, its service life and ease of use depend on the correct performance of the work.
To install the door frame you will need the following materials and tools:
- Drill and set of drills.
- Screwdriver.
- Chisel or milling cutter.
- Hammer.
- Hand hacksaw.
- Plumb.
- Mount.
- Hammer.
- Bulgarian.
- Building level.
- Rotary miter box.
Before installing the box, you should assemble it. Assembly can be carried out in three ways: using tenons for connection, fastening the beam at an angle of 45 degrees, and similar work with the beam, but at an angle of 90 degrees.
The tenon connection includes several points. First, you need to make spikes in the adjacent bars. It is worth noting here that both horizontal and vertical beams must have spikes, with which the joining process could then be carried out. The second point that you need to pay attention to is that the height of the spikes should be equal to the thickness of the bars.
Assembling a door frame at an angle of 45 degrees is carried out in the following way. That part of the vertical beam, which will subsequently be connected to the horizontal beam, should be sawn at an angle of 45 degrees. Similar actions are carried out with a horizontal bar, but on both sides. It is worth paying attention that when choosing vertical racks you need to rely on the dimensions of the doorway: its height and the thickness of the beam. Don't forget about the gaps.
To assemble the structure and final fastening, nails or screws are required. They should also be screwed in at an angle of 45 degrees.
The connection at an angle of 90 degrees is much simpler than the previous option. In this case, the horizontal beam is laid directly on the vertical post, without any cutting. But you will still need to use a saw, since you need to saw off the porch. Self-tapping screws or nails are also used for connections.
;
Preparing for the manufacturing process
It happens that the door block itself appears in finished form before a bright thought arises about such a harmonious decoration of the opening in the form of a transom.
The doorway turned out to be larger than planned
A misunderstanding may also occur, such as an increase in the opening during dismantling work, when the replacement of interior doors took away part of a non-professionally installed wall.
It is worth noting that replacing large-width swing-type interior doors with sliding doors with a reduced leaf width in small apartments can solve the problem of free space. And part of the vacated opening can just be closed with a transom.
The installation of doors, a combined type of manufacture with a factory-made transom, is no different from the usual installation process. But the option of forced use of a transom reverses the whole process.
Factory-made products
The door insert can be ordered to be made from any material and any type of configuration from any carpenter and even from a door factory. Don’t give up and incur unexpected large expenses, because you can make a transom with your own hands.
A DIYer may be intimidated by the visual complexity of the door insert manufacturing process. In fact, the work is not so scary if you approach the process from a creative side. So to create a decorative element you need to prepare:
- choose the style and shape of the transom;
- decide on the type of filling: make the part blank or with glass inserts;
- Gather all the necessary tools and patience.
We advise you to opt for a transom with glazing. After all, the process of creating it yourself is completely identical, and the decorative component of the final result will exceed all expectations. Arched doors with glazing, as we know, are equipped with inserts of the same style and quality. If the glass for the interior doors was previously selected by the manufacturer, we recommend strengthening the composition by inserting stained glass into the transom.
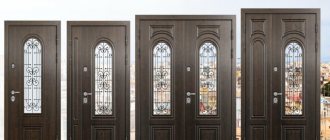
Transoms for entrance structures
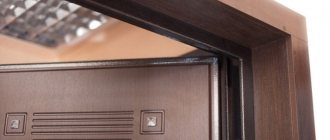
Entrance doors, in addition to serving as protection from uninvited guests, should also keep the cold out and look beautiful at the same time. Similar requirements apply to the doors of entrance products.
Input structure
When making entrance structures, their doors are constructed in the same way: heat and sound insulation material is inserted inside a body made of metal or fiberboard sheets (see Insulation for entrance doors).
Sectional design
Entrance door transoms, which are made in this way, can easily protect the house from the cold and from unauthorized entry. They will also make the entrance doors more solid and beautiful.
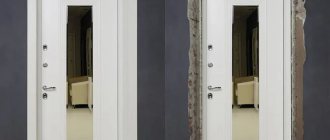
Transoms for interior structures
When installing products indoors, shutters are also often used. Thus, an interior door will add a certain zest to the interior of the house, a solid door will highlight the interior, and a transparent door will add light.
Interior products, photos
Tip: in many apartments, mezzanines are installed above the interior doors. In this case, the transoms can be used as doors to the mezzanine
;
What it is
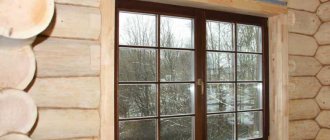
The part is a decorative part of the door structure. The element complements the opening from above or from the side, creating an overlap for the free space between the frame and the portal wall. The technical device is used for doors whose height is above 2.2 m and width is more than 1.05 m.
Design for high openings Source zakupka.com
A transom above the door is a practical solution for entrance and interior openings. When installing the structure, there are 5 advantages:
- Increases decorativeness. Being a continuation of the door portal, the detail visually emphasizes the size of the opening.
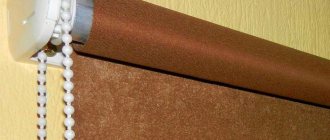
- Corrects room imperfections. A transparent transom looks like a window above a door and illuminates a dark room or hallway.
- Holds the block in the desired position. The part ensures reliable fixation of the structure in the wall opening.
- Frees loops from excess load. Instead of a dimensional door, a standard size model is used. The mass of the product does not exert pressure on the moving elements.
- Improves heat and sound insulation. A door transom in interior openings has a positive effect on the microclimate of the room.
Design
By design, transoms come in two types:
- One piece. In the case when the height of the standard structure is more than 120 mm, then such a box has one additional upper crossbar.
- Separate. If there is more than 120 mm from the top edge of the door to the lintel, then a separate leaf is used. This is due to the fact that doors or objects with a length of more than 2300 cm are very problematic, and in some houses it is even impossible to carry them up the entrance stairs.
The doors are also divided into blind and openable. Blind ones are a static structure that is attached to the box.
Opening transoms are mini-doors that are a smaller copy of the main doors. Opening the sash is very important when you need to bring in some large items.
What advantages does the model have?
The most important advantage of a block that involves the installation of stationary parts is the reduction of load on the hinges, frame, and wall as a whole. A good idea is to buy doors with a blind transom for a partition that cannot boast of high strength. They do not require the purchase of reinforced fittings, and even a very heavy panel made of solid oak or ash will not cause discomfort during operation.
Other positive aspects of the product include:
- the ability to preserve the architectural features of a room and its harmonious proportions. The opening remains the same as it was conceived at the stage of designing the space, the general plan of the builders is not violated;
- reducing heat loss in a room, especially if it borders a cold corridor;
- affordable price - the production of single or double doors with a blind transom is carried out using a serial method, without requiring the development of an original sketch. They are easier to manufacture and install;
- attractive appearance. The large structure itself is the central component of the interior, the personification of its prestige. Stationary elements offer a lot of additional opportunities for creating an original design. They are complemented with carvings, paintings, and gilding, turning a simply necessary part of the block into its decoration.
Transom installation
Installation of transoms is carried out as follows:
- The door frame is attached to the door;
- The finished structure is attached to the walls of the opening;
- A blind or glazed sash is assembled separately;
- After hanging, the sash is installed and secured in the frame;
- The final stage is the installation of cash strips and other decorative elements.
A simple design of the valves, with its further installation, can be done independently. But if you do not have the necessary skills and experience, then it is better to entrust this work to professional builders who will do it correctly, reliably and quickly.
The use of sashes allows you to solve many problems with non-standard openings. They will not only perfectly cover excess space, but will also give the doors a beautiful and aesthetic appearance.
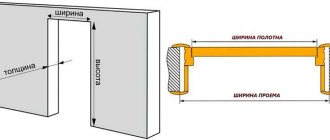
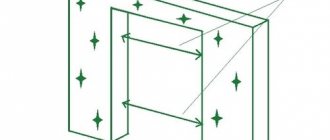
How to do
If the opening is of a non-standard shape, then the structure above it can be assembled and installed independently. First, carefully measure the dimensions of the free space that you plan to close. The transom above the wooden entrance door is made from box timber. The material is marked, sawn and adjusted in the problem opening.
The elements are fastened with self-tapping screws in the shape of a frame. The structure should not fit tightly into the door portal; small gaps should be left in the wall on all sides. The holes are needed to align the parts.
Opening design Source zakupka.com
Mark the fasteners in the box and canvas. The frame is inserted into the prepared area and carefully leveled with wedges. The gaps are slowly filled with mounting foam and left undisturbed until the mass hardens.
Measure the dimensions of the inserts. If glass (transparent plastic) is used, then cutting is ordered according to the parameters. Plywood (composite) parts can be separated independently. After polymerization, the decor is installed. The material will reliably fix the sanitary sealant and fastening. Finally, the extensions and platbands are installed.