Work can be performed using the following materials:
- Drywall. For production, GVLV brand slabs are used - this is a moisture-resistant plasterboard. Installation can be carried out in several ways: mounted on glue, putty, polyurethane foam, or mounted on a frame structure;
For the installation of slopes, moisture-resistant plasterboard and plastic panels are used. They have a pleasant glossy surface that harmonizes with the profile of the PVC window. Fastening can also be carried out by fixing it with glue, foam or using modern material - liquid plastic ;
Plastic panels MDF panels. They are not used very often for the manufacture of slopes due to the fact that it is not easy to choose the appropriate appearance of the panels so that they are combined with the profile material;
The use of MDF when constructing slopes is rarely used. Sandwich panels. They are used to install insulated surfaces of window niches;
Sandwich panels are used to install insulated slopes
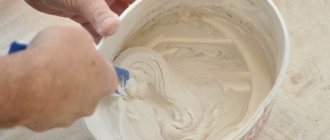
- Plaster. The most inexpensive and traditional material. Most often used for outdoor work. To work with this material, you must have certain professional skills to do the job well.
What are the dangers of installing window sills on polyurethane foam?
Polyurethane foam is an excellent building material that is used for gluing surfaces, insulating and sealing various cracks. It is mainly intended for insulation and waterproofing materials, but it can also be suitable for installing a window sill.
What are the features of working with foam:
- To ensure that the structure does not deform after working with foam, it is necessary to install safety fasteners. The foam swells, and the window sill can lead;
- you need to wear gloves when working with foam;
- Polyurethane foam is used for work at temperatures from +5 to 30 degrees Celsius. If it’s cold outside, then a special foam composition is needed;
- it seals cavities of no more than 8 cm. If the connector is used more, other means are used;
- when applying, first moisten the surface with water, then shake the foam for a while, and only then apply it to the required area;
- the mass hardens after 8 hours;
- To protect the foam from sunlight, it is covered with paint or sealant at the protrusion site.
When installing a window sill, you must consider what material it is made of. When choosing a window sill made of wood or MDF board, it is necessary to insulate the material from the walls, otherwise condensation will destroy it. This can be done using polyethylene.
What is liquid plastic
Liquid plastic has recently appeared on the construction market. It has found application in many areas, including the installation of plastic slopes.
Liquid plastic is used for gluing plastic slopes
Liquid plastic is a type of modern sealant that can be used as glue when attaching plastic slopes. The content of liquid PVC in its base gives this material many positive qualities.
Mode of application
Using this glue, you can guarantee strong adhesion between the material and the surface.
Using liquid plastic when processing joints and seams, you can be sure that it will never turn yellow, as happens with silicone analogues. This ensures a neat appearance of the window opening.
When temperature changes indoors, plastic panels secured with silicone may lose their joint tightness. And the panels, placed on glue in the form of liquid plastic, will stay in place for many years.
When working with this material, it is important to consider that it hardens in one minute . This is the interval during which it is necessary to apply it and distribute it over the surface. You need to work quickly and efficiently the first time.
It is also worth considering that liquid plastic is quite toxic due to the chemical reaction that occurs, so when working with it you must use a respirator and ensure a flow of fresh air into the room.
It should be noted that after liquid PVC-based glue dries, it will become absolutely harmless to the environment and people.
If the window sill is made of wood
Before installing the window sill, wrap it in cardboard to prevent damage. The end is coated with an anti-fungus and mold remover. Place the window sill in the gap under the window with a downward slope and fix it with bars. They are placed in space with a board that lies on the windowsill.
All voids under the window sill are treated with foam, after which the spacers are removed. General rule for installing a window sill. The board should extend no more than to the middle of the battery along its width. Otherwise the window will fog up.
If the window sill protrudes strongly above the free edge, then you should not stand on it and place heavy objects, otherwise it will break off. In general, such window sills are considered non-standard and are rarely used in construction.
You can also install a stone window sill. This is even easier, since this material has nothing to spoil.
Marking
Of course, before you install the window sill, you need to mark it. We measure the width of the window block, let it be 140 cm. We will buy a window sill 15-20 centimeters longer, since it should extend beyond the plane of the slopes by 7-10 cm (this is a matter of taste). So, we bought a 155 cm one. Let's put it aside for now.
Let's take a close look at our window opening:
Everything is fine with us, the foam layer will be about 2-3 cm. If you get more, it would be better to raise the lower “slope”, for example, with a self-leveling floor. This way the structure will be stronger (my personal opinion). Shortly before installation, the surface will need to be primed, do not forget.
Next, we must find the exact middle of the window (we have 70 cm from the edges) and, accordingly, the exact middle of the window sill (77.5 cm). In addition, we draw their central axes with a pencil. It is from them that we will set aside all dimensions so that the final result is symmetrical. As the article progresses, you will understand what I mean.
Now let's take measurements. There are four of them to remove in total, I labeled them A, B, C and D.
- A - approximately equal to the width of the window block, perhaps a little more if space allows; but no less.
- B – distance between the corners of rough slopes. As a rule, it is several centimeters larger than A.
- B is the distance between the far edge of our hero and the plane of the wall.
Under the window block there is a special groove about 2 cm deep, where it goes. You need to measure from the groove, and not from the plane of the window, be careful. Here it is also highly desirable that the wall with the window is already plastered. Let's hollow out some plaster under the “ears” and measure B so that they start “inside” the plane of the wall.
All the cut edges will then simply be covered with slopes and a wall.
- G is the total width of the window sill.
It is selected in such a way that it covers vertically no more than half the thickness of the radiator under the window.
Otherwise, in cold weather, condensation will form on the windows, since warm air from the radiator will not reach the glass. Usually the protrusion is 5-7 cm; it is not advisable to do more. Installers very often make this mistake.
This is what our window sill will look like after marking:
And after cutting it like this:
We try it on in place, insert it into the groove, manually set it approximately level, and inspect it for jambs:
Everything is in order here, you can adjust the height of the window sill. Since ancient times, wooden wedges have been used for this, but in general, anything can be used as supports. This time I conducted an experiment and used not wedges, but ordinary self-tapping screws, which I aligned with the laser.
It must be said that the experiment was only partially successful. The near edge was aligned easily and quickly, but difficulties arose with the far edge (the one that fits into the groove). After all, who installs windows in our country? That's right, Uncle Vasya. And I didn’t take into account that the windows, in fact, may not be strictly horizontal and may even bend!
I had to put improvised materials under the far edge, namely Penoplex insulation. It is necessary to ensure that there is no noticeable gap between the window sill and the window, that is, it must be pressed tightly against the window block from below.
It may be that the window goes in an arc. In this case, you need to choose the least evil. In my opinion, the main thing is the absence of a gap, and the unevenness of the surface is not particularly noticeable to the eye.
There are two requirements for the near edge: it must be strictly horizontal, and it must be lower than the far edge, that is, the window sills are placed at a slope.
The slope is usually 5-10 mm per meter. That is, for a window sill with a thickness of 60 cm, the near edge should be located 3-6 mm lower than the far one. This bias is invisible to the eye.
And it is done in order to prevent puddles, for example, when watering flowers. The water will flow down. Basically, if you don’t want to do the slope, don’t do it. I'm just describing a general case. If you use wedges, push them behind the plane of the wall so that later they are out of the way and you don’t have to tear them out.
When setting the slope, it is more convenient to use not our product itself, but cuttings from it. Insert one end into the groove, place a level on the cut and evaluate the slope. Once everything is set, we once again insert the “patient” into place and see if there are any cracks and if the required slope is ensured:
By the way, the photo shows that, firstly, I partially tore off the film from the far edge. I think it's clear why. Secondly, I aligned the central axes of the window and the sill. We see that there are no cracks. If you use wedges, there is a possibility that they may become dislodged.
To prevent this from happening, you can coat them with gypsum mortar, for example, alabaster. Then they definitely won’t go anywhere.
We can start installation.
When installing a PVC window sill
PVC window sills are installed simultaneously with windows and ebbs. If the window sill was old, then you can replace it with a new one without touching the plastic double-glazed window. And it is not necessary to groove the slopes of PVC windows. The main thing is to leave a gap between the window sill and the bottom of the window opening. We adjust the window sill in length and level it. It is necessary.
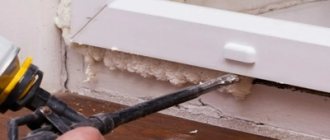
To prevent the window sill from moving upward, it must be pressed down after gluing with foam with a weight. It’s better to choose frost-resistant foam; this type of foam has much less expansion than regular foam.
As you can see, polyurethane foam is an excellent building material that is suitable for installing window sills.
If it seems difficult to install the window sill yourself, then invite specialists. They will install it quickly and without distortions.
What mistakes in installing a window sill on foam lead to drafts?
When installing window sills, unfortunately, many people make a number of irreparable mistakes. To prevent them, we will consider the installation details in detail. After installing the window, all the resulting cracks must be filled with foam.
The main feature of the product is that it greatly increases in size. Foam is used for reliable sealing and thermal insulation. Thus, your living space will be isolated from noise and air from outside. But not everyone knows how to achieve the desired result.
The most common mistakes when installing a window sill on foam
- Installing a window sill after painting the slopes. If you install a window sill immediately after installation work, this will lead to damage to the side surfaces of the slopes.
- Product quality. You cannot skimp on polyurethane foam; this will lead to the formation of microcracks, which will lead to unpleasant consequences.
- Extruded amount of product. When the container is opened, the gas sprays the contents outward, and the foam is saturated with air. Under the influence of moisture particles, it begins to expand and quickly harden.
- Thermal mode. Different products are suitable for use, depending on the air temperature.
Repair in a two-room apartment
Despite my considerable age, it just so happens that only now I have my own apartment. Moreover, in the area where I wanted, in a new building, and at the right time.
And the time has come to start repairs, because for now there are bare walls, screed on the floors, electricity has been installed and meters for gas, water and electricity have been installed.
I invited representatives of several construction companies for consultation. With some I spoke only about the bathroom-toilet, with others I walked through the entire apartment. And as a result, I was given an estimate.
Choosing polyurethane foam
Divided into several categories:
- household and professional;
- for summer and winter use;
- fireproof and combustible.
Household foam, in terms of technical characteristics, is much worse than professional foam; as a result, there is less of it. If you plan to install a window sill, it is better to use the first one.
In warm weather, summer foam is used, which exhibits its best qualities at temperatures from 15 to 35 degrees Celsius. In the cold season, they switch to the winter version; it can be used down to 18 degrees below zero.
Important! The container with the product should not be very cold; before installation, it must be heated to 11-16 degrees.
There are also all-season polyurethane foams that can be used in any temperature condition.
Basic rules for installing a window sill
- In accordance with the window sill profile, a strip is selected that must fit freely into the installation position. If necessary, remove interfering plaster.
- Install the window sill using a level. The inserted edges must be treated with a sealant before installation.
- Treat the concrete surface of the window base with water.
- To prevent the hardening foam from pushing out the window sill, place a heavy object on top.
- Fill the resulting empty space with building material.
- After hardening, remove excess with a special tool.
Failure to comply with one of the conditions can cause damage to all the work done. It is important that the foam adheres well to the surface, and that the niches are completely filled and have no gaps.
For those who have never dealt with this business, it is important to know that there are several components of success: accuracy, attentiveness, and the availability of the necessary tools for the job.
Portal about construction
Installing a window sill is usually the final stage of installing a plastic window, which is usually carried out by professionals - the company where you ordered this window. However, installing a window sill is quite simple compared to installing the window itself, and it is quite possible to do it yourself, without special skills. We will consider installing a window sill made of plastic, since this material is quite popular - it is cheap, durable, non-corrosive and easy to clean.
So, we will need the following tools:
- jigsaw or circular saw;
- level;
- a gun for polyurethane foam and the foam itself (if you don’t have a gun, you can do without it);
- tape measure and pencil or marker;
- a hammer drill with a chisel (if you have to make holes for the window sill).
Getting started - measurements
Of course, any installation work of anything begins with careful measurements. Decide how wide your window sill will be - it depends on the thickness of the load-bearing walls and how much it will protrude beyond the wall. The recommended protrusion is a maximum of 10-15 centimeters, otherwise it will simply get in the way. You need to add 2 centimeters to the total width of the window sill, since this part will be located under the window.
We add 5 centimeters on each side to the length of the window sill - this part will go into the side slopes of the window so that the cut edges of the window sill are not visible. By the way, if the slopes are already installed, you will have to break their lower part in order to insert the window sill there. If there are no slopes, you need to make grooves 5 cm deep with a hammer drill.
Window sill installation
We measured, checked all the calculations - you can cut off the excess from the window sill, which you should have already purchased. Of course, you need to purchase it when you already know the dimensions, and you will only have to cut it in length, and certainly not in width. You can cut plastic with an electric jigsaw or a hand-held circular saw - which is what you have on hand.
What tools and materials are needed for work?
Before inserting a plastic window sill into a home window, you should stock up on the following materials and tools:
In addition, you may need special PVC gaskets and perforated plates for fastening the plate.
How to properly foam a window sill video
A plastic window sill is an integral part of a window today. Thanks to a high-quality product, we can expand the functionality of the area near the window and make it more beautiful and suitable for our design.
A correctly selected window sill is only a small part of your happiness; it must also be properly installed and secured. After this, you can consider that the purchase was a success, and you will receive a quality product that will meet all your requirements.
Determining the parameters of the window sill
Manufacturers can produce window sills of any size and shape, but usually, window sill parameters do not exceed three meters in length and sixty centimeters in width. Since the standard window width varies from one to one and a half meters, and the window depth is about forty centimeters, these window indicators can be considered more standard.
How to take measurements
There are some rules and restrictions, following which you will be able to replace the old window sill with a new one with the highest quality possible. What to follow:
- Be sure to leave a margin of two to three centimeters on each side of the window to deepen and fix the window sill in the wall. If necessary, you can increase the recess.
- The width of the window sill should be measured from the frame profile and protrude no more than ten centimeters.
- If there is a radiator under the window sill, it should not overlap too much. In this case, the protrusion should be about four to six centimeters.
If you adhere to these simple rules, then the window sill you choose will be of very high quality, comfortable and functional.
Is a balcony a façade of a residential building?
In fact, you are the owner of a three-dimensional space enclosed within the walls of an apartment, which is essentially a structural part of an apartment building. You are also the owner of the decorative elements and finishing of your living space - wallpaper, suspended ceilings, parquet, etc. Ownership of an apartment is a legal fiction designed to provide certainty for the population without immersion in complex matters and ease of understanding.
If the house construction project provides for a balcony, access to which is, for example, from apartment No. 10 and this balcony is taken into account in the technical passport for the residential premises, then the three-dimensional space of this balcony belongs to the owner of apartment No. 10, while the balcony slab is the common shared property of all owners apartments at home.
Installation of a window sill block
Now we have come to the answer to the main question, how to install a plastic window sill. First you need to adjust the material; the best and easiest way to do this is with an electric jigsaw. After cutting to the required size, place the slab in the desired location to make sure everything is done correctly.
In order not to make a mistake and not damage the slab, first cut off a little with a margin, attach and accurately measure the area that needs to be removed. Then make a control cut and again check the compatibility of the slab with the opening of your window.
Window sill installation diagram
If there are no recesses in the walls, they must be made using a hammer drill. Do not make them very deep at once; knock out the holes evenly and slowly. Even if there is excess space, it can be easily sealed using polyurethane foam.
If you have adjusted the window sill plastic plate and prepared the recesses for it, you can proceed to the next installation stage.
Next, you need to place the plastic board in place and begin wedging its front edge using wooden wedges. The wooden wedges should be hammered in gradually every thirty to forty centimeters. This way you will ensure maximum load distribution and uniformity. The maximum height of the wedges may not exceed two to three centimeters.
If you use wedges of long length and with a small angle, then they are able to distribute the load well and take most of it upon themselves. Thus, the installed window sill will be able to withstand more weight on its plane.
When you have firmly secured the window sill using wooden wedges, you need to measure its position using a construction bubble level. Using such a tool, make sure that the slab is installed level with respect to all planes. If there are deviations, they must be adjusted by controlling wooden wedges. Minor deviations from the level can be left as is; they will not affect the quality.
Correct and incorrect installation
The final stage of installation will be reliable fixation and insulation of the window sill. This is done using polyurethane foam and a special gun with an extension for applying this very foam. It is necessary to foam the entire empty space under the slab so that there are as few voids as possible. If you can't get to the farthest edge, carefully seal the part closest to you.
Tips for improving quality
If during installation a too large void is formed under the window sill, then it can be filled with polystyrene foam or mineral wool. So, you will save on significant costs of polyurethane foam. It is better to use mineral wool, as it will be possible to install it more tightly. You also seal the edge with polyurethane foam.
To make the installation of the slab more dense, after foaming, you can put something heavy on it and leave it there until it dries completely, ideally for the whole night. In the morning, the weights can be removed and the window sill will be completely ready for further use.
To protect yourself and the surface of the product, do not remove the protective film during the installation process; it will protect the surface from scratches and the installation will be of the highest quality. Slopes and window sills must meet smoothly so that there are no cracks or gaps.
Plastic windows
In recent years, plastic windows have become an integral element of any interior. Regardless of the style of the room, it is equipped with energy-efficient plastic windows and window sills made of the same material. This is durable, and thanks to the large assortment of decorative films, very beautiful material has firmly entered our lives. This article will discuss how to properly attach a plastic window sill.
Content:
Advantages of a plastic window sill
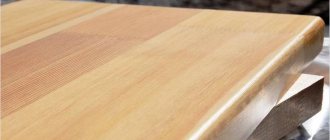
The most popular materials for window sills are wood, plastic and stone.
- Wooden window sills are too finicky and require constant maintenance. In addition, over time they dry out or become damaged from frequent staining.
- Stone window sills are certainly durable and beautiful, but they are very expensive and you cannot install them yourself.
- Plastic window sills are not just durable, light and beautiful; their technical characteristics best match those of PVC profile windows, which will make their maintenance easier.
- In addition, the service life will be the same, so after installing the window, slopes and window sills, you will not have to replace or restore any one element.
- If the window frame is laminated, then the same film is selected for the window sill.
- Due to its properties, plastic is resistant to moisture, so even with possible condensation on the windows it will not begin to rot. With regular care, mold does not form on it, since the surface does not have microcracks.
- Lower price than a wooden or stone window sill of the same size.
- Resistant to aggressive chemical environments.
- Due to the light weight and plasticity of the material, it is easy to cut and install independently without special tools.
- A plastic window sill is not a cast slab. It consists of transverse chambers. This not only reduces weight, but also serves as additional thermal insulation.
- More expensive models of PVC window sill have a special coating that makes it resistant to high temperatures and mechanical damage.