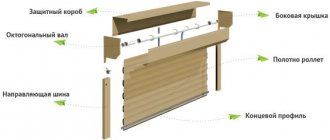
Names of parts on the block diagram.
- protective box
- bearing capsule
- bearing
- bearing support
- steam guiding device
- side cover
- guide rail pair
- stub
- side lock
- end profile
- fastening
- intrashaft electric drive
- locking bolt
- switch
Preparing a tubular motor for installation in a shaft.
1. Install the adapter and the end position ring on the electric drive.
2. We screw the mounting plate to the electric motor, which is necessary for attaching the shaft to the side covers.
3. Drill mounting holes for the mounting plate of the roller shutter motor.
2. We fasten the electric motor to the cover installed on the drive side with screws and nuts, having previously drilled the required number of holes in the cover and countersinked the head of the screws from the outside of the side cover.
Install the bearing into the capsule.
- install the capsule into the shaft until it stops, fig.
Assemble the octagonal shaft with the roller shutter drive.
- Install the electric motor assembly with the cover into the shaft.
- Pull the bearing capsule out of the shaft all the way into the cover and secure it with a rivet, having previously jointly drilled a hole for the rivet in the shaft and capsule.
Terol Torg company: 3D fencing, gates, roller shutters
If your store, office or home has roller shutters installed on the windows or doors, then you will certainly be interested in the question: how to properly adjust the roller shutters (roller shutters) for better performance of the entire structure?
First of all, we would like to point out that the entire setup process boils down to one thing - this is the correct and competent adjustment of the operation of the winding mechanism of the structure. This setting differs from the type of roller shutters - mechanical or electrical control systems for the curtain.
The process of setting up roller shutters with a mechanical operating system comes down to the following steps, which make it clear how to tension the spring on roller shutters:
- First, you should screw the spring onto the drive shaft a few turns.
- Fix the spring.
- Place the blade itself and secure it directly onto the shaft, and then remove the stoppers.
- After completing all of the above steps, you just need to check the operation of lifting the blade until it stops. If any problems are identified in this process, then, therefore, you need to further either remove or increase the number of revolutions.
It is even easier to increase or decrease the torque when using a crank drive for roller shutters, since in this case you do not have to exert any special physical force. The whole process involves winding the fabric itself and increasing or decreasing the speed of the mechanism shaft.
If even after this you cannot understand how to properly wind the spring for a roller shutter, then it is better to turn to professionals. Because if configured incorrectly, you can damage the entire mechanism of the structure, which will lead to high costs for its repair.
Figure 1: Roller shutter design
How to adjust electric roller shutters
If you have an electric drive to operate the structure, then you will have to adjust the roller shutter gate using a different principle than models with a mechanical control system.
In the process of solving the problem of how to adjust electric roller shutters, the shaft rotation time is of primary importance. It is measured by the location of switches at the ends of the structure where electrical contacts open. The entire process of properly setting up electrically driven roller shutters comes down to regulating the correct position of these switches.
Before you set up your motorized roller shutters, you should find a screwdriver. Remember that this installation process is carried out only while this blade is moving, that is, when the electric drive is turned on. It is while the roller shutter leaves are operating that you adjust the screws of the switches. For convenience and proper operation, this design contains markings that are visible and represent a pictogram.
Many are also faced with a situation where, after installing the entire structure, the roller shutter leaf is not fixed in the desired correct position. This situation occurs if the roller shutters:
- When opened, the canvas is not completely hidden in the box.
- When closing, the canvas does not completely cover the surface.
All this leads to a decrease in the protective mechanisms of the structure, a decrease in service life, and wear of the entire mechanism. That is why many are trying to find the answer to the question: how to set up roller shutters in this situation? This problem can be solved by correctly setting the limit switches. Here's what you need to do:
- Set up the switch that controls the position of the canvas at the very top. To do this, it is necessary to either increase the shaft speed using a positive screw, or decrease it using a negative screw.
- Set up a switch that regulates the position of the canvas at the very bottom according to a system similar to the one described above.
Figure 2: setting limit switches on roller shutters
The correct position of the roller shutters is at the top - the canvas is fixed at the level of the box, at the bottom - the canvas reaches the very floor. If your roller shutters are properly configured and adjusted, you will be able to extend their service life and also improve their quality characteristics.
And always remember that if during the process of self-configuration you encounter insurmountable difficulties and problems, then it is better to resort to the services of professionals.
Video: how to adjust electric roller shutters
Typical diagram for connecting an electrical wire to an electrical network.
Control in this circuit is carried out using a key switch with phase locking.
The switch must have a condition, mechanical or electrical phase blocking from simultaneous activation of opposite directions of rotation of the drive shaft.
If you look at the diagram in other words, terminals 2 and 3 should not intersect, since using a switch without a mechanical or electrical interlock will lead to a short circuit. The short circuit current is quite high, which causes failure of the roller shutter drive.
You have installed the engine in the octagonal shaft, secured the blade and the last step remains to configure the engine.
It is necessary to set the extreme adjustment positions (stopping positions of the roller shutter blade at the lower and upper points),
The extreme limit positions are adjusted by adjusting the limit switch system. Be sure to check that the end positions of the roller shutter are adjusted correctly,
Sometimes these adjustments can go wrong due to voltage surges.
In order not to repair the roller shutter, watch the adjustment of the end positions.
How to adjust roller shutter gates
Roller shutters need adjustment not only after installation or technical failure, but also for preventive purposes. They must be checked in the spring, when the snow has melted and stable warmth has established. If we are talking about an electronically controlled design, the same actions will be required as when adjusting the roller shutters.
However, automatic roller gates, while convenient to use, are not always the best option. When the power goes out, getting into the garage or your own plot will be problematic, although most designs provide for switching to manual mode in emergency situations. In addition, at high air temperatures, the thermal relay may be triggered, which will lead to delays in lifting and lowering.
If the gate is small and weighs up to 30 kg, it makes sense to think about mechanical models. They are much cheaper than automatic machines, less dependent on the climate and easier to repair. These roller shutters are equipped with a spring-inertial mechanism that promotes smooth movement. It is he who needs adjustment. It is necessary to tension the spring so that the roller shutter is well fixed in the given position. The number of shaft revolutions for a roller shutter with a given weight and dimensions is indicated in the instructions. But you have to additionally adjust the tension.
Work algorithm
- Traction springs are attached to the end profile in increments of approximately 50 cm. Their number depends on the width of the gate.
- Manually rotate the octogan shaft away from you until the characteristic clicks of the tensioned spring stop. Usually this requires 10 revolutions, and another 2 - 3 are added to them for safety.
- Having ensured primary tension, the blade is connected by inserting special “antennae” (narrow forked ends) of the spring into the perforated slots on the walls of the shaft.
- After assembly, check the operation of the mechanism by raising the roller blind to the highest point. If it does not hold, “sliding” down, the spring tension is insufficient and additional adjustment must be made.
- The moving part is removed from the guides, wound onto the shaft and the whole thing is turned away from you several times.
- The correction is made until the roller shutter is well fixed at each point where it is released.
If the device does not spontaneously move up or down, it means that the spring-inertia mechanism is configured correctly. With a large gate width, it is quite difficult to ensure proper tension. Then it is better to seek help from specialists or think about the automatic option.
Let's move on to eliminating sagging; this technique also applies to broken gate cables.
With the spring weakened, we were able to remove the lower cable thimble. Next we untangle the cable. Having untangled the cable, we throw the cable into the groove of the drum, at least 1/4 of the drum. Next, we lay the cable behind the rollers. We attach the cable loop to the thimble depending on the design of your gate.
Setting up the electric drive
The moment has come that is very important to ensure the correct operation of roller shutters and extend their service life.
Setting up the electric drive involves setting the end positions at which the blade should stop at the top and bottom points. The end positions are set by adjusting the limit switches.
Even if you don’t change the electric drive in the future, you need to regularly inspect the crossbars and debug the roller shutter limit switches, as they can go astray due to power surges
Assortment from a renowned manufacturer
Doorhan is an automation that can create work without interruption. Among the variety of systems from this manufacturer there is special equipment for swing and sectional doors. The main task of this automation is excellent site protection. This task is performed with high comfort. The company's product range includes a wide selection of electric drive devices, each of which is designed to equip specific types of gates: drive mechanisms for folding, sectional, and roller gates. You can select an automatic device based on technical and operational parameters.
Source
Ease of use of DOORHAN instructions
All DoorHan devices are easy and comfortable to use. On our website you will find any instructions for all types of Doorhan automation. Thanks to these instructions, you can quickly and easily configure the remote control for any selected device. These instructional manuals will allow you to do all the work yourself, without involving specialists, whose services will have to be paid additionally. And if the installation must be carried out by professionals who have certain knowledge and experience, then the instructions selected for the automation on our website will allow you to do everything on your own.
All documents are presented in Russian in a format convenient for each user. All information is accurate and reliable and fully corresponds to the originals in paper format. If you have lost or damaged the instructions, you can simply go to our website, select your model and download the document.
This manufacturer is known for its reliability and ease of use, which is why many users choose it. A large selection of instructions for all types of automation will help you choose a manual for any model.
All instructions are very clear, so even an inexperienced user can easily understand them and quickly carry out all the steps. Proper installation will extend the life of high-quality automation.
Installation of roller shutters
The Rolstar company has firmly taken its position in the market of services in the field of installation of roller shutters. Quality guarantee, traditional application of the latest developments in the field of safety and the use of modern materials will not leave indifferent even the most demanding customers.
A flexible system of discounts, a large selection of products, honesty and integrity - these are the main factors that characterize our company. Installation of roller shutters produced by our company will help secure absolutely any premises from illegal entry.
Roller shutters from the Rolstar company not only guarantee the safety of your home, but also give it an original, personal style.
Our experienced installers will quickly and efficiently install roller shutters of any type.
Roller shutter connection diagrams
The most popular connection schemes are as follows:
This circuit is designed to connect only one electric motor. Connecting two or more leads to damage to the electric roller shutter drive. To implement a parallel connection, you need to connect additional devices to the circuit designed to control the electrical circuit. (Scheme 2)