In the article we will talk about:
- Preparatory work that will need to be completed before dismantling;
- Correct dismantling of the old window and its structure;
- Installation of aluminum frame;
- Installation of ebbs, slopes and window sills - its constant companions;
- Safe insertion of double glazing;
- Proper window sealing.
In general, about how to properly install aluminum windows with your own hands. Go.
Preparatory work
Before removing the old window, you need to acquire the necessary tools and prepare the window opening. Read below for information on how to do this.
Preparing an old window for work
Before carrying out work, remove the curtains and remove flowers (if any) from the windowsill. Cover the floor and interior of the room with plastic film to protect them from dirt and construction debris. If there is a carpet or other similar items in the room, move them to another room. Next, remove the sashes and slopes from the window.
The initial preparation is complete, it’s time to start removing the old window.
Preparing tools and necessary materials
You will need:
- Chisel or jigsaw;
- Crimper and dowel-nails;
- Hammer;
- Foam;
- Screwdriver;
- Drill and hammer drill;
- Metal drills;
- Anchor plates;
- Plastic or wooden wedges;
- Vapor barrier membrane;
- Thermal insulation sash;
- Aluminum profile, double glazing and other components of the new window.
All items are collected, now it's time to remove the old window.
Sliding systems
It is also worth considering modern aluminum sliding window systems, which are called sliding windows. The movement of the shutters is carried out along roller guides.
Sliding window sashes move using rollers
It is common to produce profiles with several guides, which allows you to install 1 – 5 sashes. The use of aluminum sliding windows is common in small residential premises, on attic floors, on loggias of apartment buildings and country terraces.
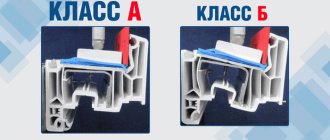
Roller mechanisms must be covered with a protective polymer layer
When choosing a manufacturer, you should pay attention to the roller mechanisms they offer . If a polymer shell is used as their coating, then such rollers will last a long time. This is important because the roller system is the weak point of sliding windows and doors.
Dismantling the old structure
The procedure involves removing the old window and sill. Let's look at the procedures in more detail.
Removing an old window
Use a jigsaw to cut several parts of the frame - this will help with dismantling in the future. Then carefully pry up the frame with a crowbar and remove the window base piece by piece.
Advice! It's better to start from the bottom of the window, because... it will be the easiest to pull out.
Removing the window sill
To remove the window sill, use a hammer and, if available, a chisel. During dismantling, support it to prevent it from suddenly falling off.
There is one universal method of removal: cut the window sill in the middle using a jigsaw or saw, and then break it out using a crowbar. You can also use a hammer drill.
Alternatively, you can simply break it off with your hands. But this will require physical training.
Now that the old window has been completely dismantled, you can begin installing the new one. It all starts with installing the base of the window.
After removal, be sure to clean the area: remove construction debris, concrete, glass shards and other items.
Configuration selection
Today there are six models of aluminum windows on the market:
- With flap. It opens only to ventilate the room. This window design is suitable for small spaces.
- Traditional swing design. The window can be opened wide.
- With tilt and turn doors. This design provides both opening methods described above.
- Solid glass unit. There is no option to open the window. Installed in non-residential premises, for example, train stations.
- Multi-leaf design. An excellent choice for wide openings. Such double-glazed windows are produced to individual order, and the client independently determines the method of opening each sash.
- Sliding window. Installed in small rooms that need to be ventilated.
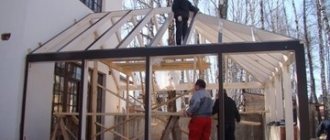
Installation of aluminum frame
Usually the frame arrives without glass, but with fittings. If you received the frame in a fully assembled state, remove the glass unit from it before installation, otherwise it will seriously interfere with installation.
Also, do not forget to check that you have prepared the window opening for installation: cleared it of debris and, if necessary, leveled it.
The installation of aluminum profile windows is divided into 2 stages: frame alignment and alignment. Let's look at each step in more detail.
Frame alignment
Before installation, make sure that the distance between the frame and the sides of the window opening is about 5 mm - then you will not have to waste additional anchor plates when attaching the frame.
The installation sequence itself includes 6 steps:
- The frame is carefully inserted into the opening; if necessary, it is leveled with wedges.
- Then it is covered with a special thermal insulation film - in the future this will protect the aluminum from freezing.
- After covering with film, a vapor barrier membrane is additionally applied to the frame to cover the installation seam.
- Anchor plates are attached to the window and then placed on wedge spacers. Then the plates are secured to dowel nails.
- Foaming is in progress. If you want, after the foam has hardened, you can remove them, and then re-foam the place from which you removed them.
- Excess foam is cut off.
Frame alignment
Important! When leveling, do not bend the profile under any circumstances, and maintain a distance of 5 mm. You can use wooden wedges - this way there will be less risk of damaging the metal.
The above instructions are also suitable for installing aluminum windows on a balcony.
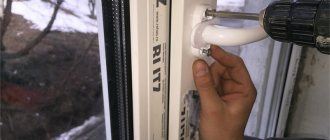
Installation of a sliding system
Installing a sliding aluminum window structure has some nuances. The window frame must be installed in the same way as a traditional plastic window.
To install the guides, you need to use a tape measure to measure the horizontal parameters of the frame . Then guides of the required length are made by cutting them in accordance with the obtained dimensions. The cut areas must be processed using a file. The guides are attached to the window frame from below and above using screws, observing a step of 30 cm.
First, attach the guides to the frame
Then the window sash is assembled:
- a double-glazed window is placed in the sash;
- rollers are fixed on both sides of the lower sash, maintaining a distance of 5 cm from the border of the sash;
- a schlegel is attached around the perimeter of the sash - a seal in the form of a brush;
The seal is fixed around the perimeter of the sash - the sash is installed first from above, then from below;
- The movement is adjusted using the adjusting screw, which is located on the bottom of the sash.
Window sill installation
Installation of an aluminum window sill is not much different from its plastic counterpart - place it under the frame, insert it into a special groove, align it and use polyurethane foam to “fit”. After installation is complete, you can use silicone sealant and go over the seam.
By the way! It is better to install it at a slight slope - this way less moisture will seep in.
Stage 2. Order
After measurements, the finished drawing should be taken to the window manufacturer, where all the necessary fittings will be selected. It is worth remembering that installation can be performed in one of two existing ways:
- through the frame in the installation plane;
- by means of support fittings equipped during manufacture.
In the first option, you will have to pull the package out of the frame, insert it into the opening and install the glass back. In the second case, the entire structure is attached as a whole. Each option has disadvantages - if you pull out the package, it may be damaged; and vice versa, if the window is installed assembled, it can be damaged due to its heavy weight.
Installation of double-glazed windows
To install, you will need glazing beads and a rubber mallet to attach them. Carefully install the glass unit into the frame and secure with glazing beads.
After this, insert the sash - first onto the lower hinge, and then onto the upper one. After this, you can additionally check and, if necessary, adjust the fittings. If everything is in order, the installation of the double-glazed window can be considered complete.
Formally, the window itself is also ready for use, but there are still 2 final steps left: installing slopes and sealing the window.
Other types of balcony glazing
For comparison, let’s take a look at other types of balcony frames available on the market of building materials and structures.
PVC frames
“Warm” glazing is made using a frame made of polyvinyl chloride and multi-layer double-glazed windows. The design of the glass unit and the use of rubber seals ensures:
- high noise insulation;
- reliable protection from the cold (hence the name);
- no draft.
Among the disadvantages of plastic glazing (which aluminum glazing of balconies does not have) are:
- impossibility of use on cantilever balconies;
- difficulty of repair;
- high cost compared to its aluminum counterpart;
- high electrostatics of polyvinyl chloride, which actively attracts dust microparticles;
- accumulation of condensate due to the tightness of the frame and, as a result, the need for frequent ventilation;
- heavy weight (due to which the PVC frame can only be installed on a reinforced parapet).
Intermediate type of glazing
This system consists of reinforced PVC profiles connected by corner elements, and works on the principle of a sliding wardrobe. Glass with a thickness of 4 to 8 mm is installed in the sliding system profiles containing the fittings inside. Combining the advantages of the two previous options, the intermediate option is devoid of the disadvantages of “cold” glazing.” However, the disadvantage of this design is its heavy weight.
Wooden frame
A classic method of glazing a balcony, used for a long time. The wooden frame is treated with a fire-resistant and anti-mold composition, which improves its performance characteristics. Thanks to rubber gaskets, the frame fits tightly to the walls of the loggia without gaps. The rotating mechanism allows you to easily ventilate the room. The advantages of a wooden frame include:
- environmentally friendly wood, which does not release chemically harmful substances into the space;
- long service life (up to 50 years) with proper care, which includes annual painting/varnishing and timely repairs;
- exquisite eco-design.
Wooden frames have their advantages, but they are more expensive than aluminum ones
But, along with the advantages, glazing also has significant disadvantages:
- wood swells when exposed to moisture, increasing in size; as a result, the doors close poorly;
- high price compared to installing an aluminum frame;
- the frame may change its linear dimensions over time (shrink or warp);
- Installing such a frame requires certain professional skills; it is difficult for a beginner to cope with it.
Frameless glazing
To glaze a balcony without frames, tempered impact-resistant glass with a thickness of 7 to 9 mm is used, which moves on special plastic hinges. In order to wash the glass, they are moved into an “accordion”. The advantages of this type of glazing are as follows:
- burglary resistance;
- wind and noise insulation;
- simplicity and ease of use (the doors open and close with a slight movement of the hand);
- Beautiful design;
- no obstacles in the form of a frame in the path of sunlight.
Significant disadvantages of frameless glazing make this design less than ideal. Let's list them:
- absolute transparency - this, at first glance, dignity turns into excessive publicity and the inability to hide from prying eyes;
- leakage of the structure, which acts as a decorative barrier: such a frame does not provide thermal and sound insulation, moisture can penetrate through it;
- the inability to attach a mosquito net makes the balcony vulnerable to insects;
- deformation of metal guides due to temperature surges.
Features of balcony glazing with extension
In order to expand the area of the balcony, the level of the floor or window sill can be shifted forward by up to 35 cm. In the first case, a profile is welded along the contour to the base plate, sheathed underneath with sheets of metal. The old railings are removed and new ones are installed. Upon completion of the work, the outside of the balcony is lined with clapboard, PVC panels or siding. For such redevelopment, which increases the load on the facade, it is necessary to obtain permission from the relevant departments.
When carried out along the window sill, the floor level remains the same, but the area at the window sill level increases. Using brackets, windows are pushed out towards the street or on the sides. The disadvantages of such glazing is the risk of the balcony collapsing due to non-compliance with technical conditions when its area increases.
Thus, of all types of balcony glazing, the “cold” version with an aluminum frame is one of the most preferable.
It is very important to make a balcony with removal in compliance with all safety requirements
Window sealing
After installation is complete, check all areas for drafts or unclosed seams. If you find it, use polyurethane foam or sealant. After this, check the fittings and set them up (if you haven’t done so before).
Done, your aluminum window is installed! By the way, sliding aluminum windows are installed in exactly the same way, except that rollers are screwed to the sash, which will help the window move left or right.
Equipment
To produce aluminum structures from profiles, you will need to purchase a number of small machines and presses. The cost of each individual device is not so high (
$3000 - $5000), but for the complete set you will have to pay at least $40 thousand. To organize production you will definitely need aluminum saws, copy milling machines, face milling machines, angle crimping machines or presses, glazing stands, manual sheet benders, pneumatic screwdrivers, pneumatic drills, piston compressors, chip ejectors.
Working stages
Let's consider all the working stages of installing PVC windows.
Installation of PVC transoms - step by step:
- Take measurements.
- Remove the old structure.
- Carry out preparatory work.
- Carry out the installation yourself.
Measurements
To measure as accurately as possible, you should:
- identify the type of opening (rectangle, with a quarter, a protrusion from the outside of the room);
- remove a layer of old plaster.
If a window with a projection is installed, then:
- Calculate the internal width of the transom using the formula: C = B1 + A + B2. C is the distance between the quarters, A is the length between the protrusions, B1 and B2 are the lengths of the depths of the quarters.
- Calculate the height (U = H + B3). Н – distance from the low tide in the area of contacts with the frame to the upper quarter. B3 – length of the upper quarter (take 2-3 control measurements with a feeler gauge)
Measurements in several places are taken from the narrowest part of the transom. The smallest value is found and 3 cm is added. If there is a flat opening, the width is measured minus 3 cm, the height minus 5 cm.
To determine the size of the window sill, it is worth measuring the width of the opening from the inside + 10 cm (it should extend beyond the radiator by 65-70%). The ebb tide is also measured, but from the outside of the house.
It is easier to measure a regular rectangular type of transom. Calculated:
- transom opening width +20 mm for installation gap;
- height + 25 mm for clearance;
- window sill length (width + 20 mm);
- ebb length (opening width from the outside of the room + 100 mm).
The height of the euro windows should be the same, so it is reasonable to calculate the smallest value. The measurement from the outside is carried out in a bottleneck, several times. Then the smallest value +3 cm is calculated. If the measurements from the inside and outside are the same, then the width is measured minus 3 cm and height minus 5 cm (for gaps under construction foam, installation).
Dismantling
The step-by-step instructions are as follows:
- The fastenings of an old window block are torn out or sawed.
- The thermal insulation and seal are removed.
- Slopes are cleared of plaster using a hammer drill and a spatula attachment.
- The window sill is removed. The cement layer underneath is cleaned off.
- All adjacent surfaces are treated with a primer.
Frost-resistant construction foam with double-glazed windows is being prepared for installation.
Preparation
Preparation for installation includes the following steps:
- Remove the double-glazed window by folding back the swing sash (necessarily with the window closed), starting from the blind side of the transom.
- Remove the plastic covers from the canopies by prying them up with a sharp object.
- Pull the rod out of the canopy at the top, using pliers. Press down with your hands. The rod should move from its original place and move outward with its lower edge.
- Open the shutter while holding the shutter with your hand. Lift it up. Remove from the canopy at the bottom.
- Lean the glass unit on the wall, placing it in a vertical position at a slight slope, and remove it.
- Remove the glazing beads using a spatula or knife. First the long vertical ones, then the horizontal ones. Number them so that when putting them back in their original place they will not be mixed up.
- Remove the glass (put on rubber gloves on your hands to avoid cutting yourself on the edge).