With the arrival of warm weather, we open the windows, but along with fresh air, insects often enter the apartment. Attaching mosquito nets to plastic windows has become the most popular way to protect apartments from small guests. Let's try to figure out how to select and correctly install mosquito nets on plastic windows so that they serve well and for a long time.
Features of fastening mosquito nets
A mosquito net is an aluminum or plastic profile with a mesh inserted into it. There are several types of meshes:
- frame – installation on window frames;
- sliding – installation on skids (guides);
- Rolled - a drum with a mesh is mounted above the window (door) and unrolled as needed.
Types of fastening mosquito nets to plastic windows:
- Z-shaped brackets (corners);
- eraser flags (wings);
- pins (plungers);
- metal hooks (hooks);
- on runners (rollers);
- on hinges.
The choice of fastening for a mosquito net on plastic windows should be based on the type of mesh and the design of the window - the most common method is a mosquito net on metal fastenings, mounted using Z-shaped brackets, but on sliding windows the mosquito net is fastened on guides.
Installation Methods
Method 1. On hinges
There is probably no clear answer to the question of how to attach a mosquito net to a plastic window. There are several fastening systems, and each has both advantages and disadvantages.
The first and obvious installation method is to install the mesh on hinges:
- For this technique it is necessary to make a structure from a special profile. On one side of the frame there are hinge groups (two or three, depending on the height), and on the opposite side there is a latch retainer.
Swing design
- When installing, place the stack on the outside of the frame and mark where the hinges will be located.
- Then we use self-tapping screws to install the mating parts of the hinges on the frame.
- We put the structure on the hinges and fix it with a rod.
- We put a latch on the response element and close the mesh, marking where the latch will be located.
Latch attachment
- We install the latch on the frame, fixing it from the outside with self-tapping screws.
It is very convenient to use such a product: if necessary, the mesh simply swings open on rotating hinges and the opening opens. But there are some restrictions:
- Firstly, dismantling the product for the winter is labor-intensive - you need to disconnect the hinges, which is not so easy to do.
- Secondly, such structures cannot be used on windows with installed external bars - there will simply be nowhere to open the grid.
- From personal experience, I’ll add one more nuance: with a side wind directed along the wall, the latch can open, and then the mesh swings open. As a result, the sailing canvas sometimes breaks off its hinges.
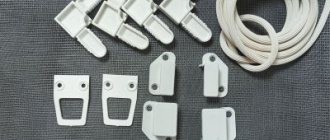
Method 2. On pockets
Simpler, more reliable, but at the same time slightly less functional fastenings for mosquito nets on plastic windows are the so-called “pockets”. They are plastic structures that are fixed to the corners of the mosquito net frame.
Installing pockets is extremely simple, but there is a little trick to it:
Set of pockets for installing parts
- Fastening is best done before the frame is mounted in the opening. This way we will be able to perfectly align all the details, otherwise we will have to fix the design “by eye”, which often leads to mistakes.
Installing the bottom pocket is a simple process
- We start installation from the bottom pair. To do this, we take two pockets with low front sides and secure them with self-tapping screws so that the upper edge of the mosquito frame profile coincides with the upper edge of the window frame itself.
- After this, we insert the mesh into the lower guides, and then carefully lift it so that the lower edge of the frame extends beyond the front walls of the pockets. Now we mark the position of the upper edge of the frame on the upper transverse part of the window frame.
Photo of a properly secured top pocket
- We install a pair of pockets equipped with larger sides so that the raised mesh fits freely into the resulting groove (we make a larger margin of about 3 - 4 mm). This, on the one hand, ensures reliable fixation of the structure in the installed position (i.e. when it rests on the lower pocket), but at the same time makes it possible to remove the mesh from the grooves.
After installing the window in the opening, the mesh is placed in the pockets very simply:
- first we insert the frame into the upper pockets until it stops;
- then press the bottom edge of the frame against the window;
- and place it on the supports of the lower pockets.
Of course, it takes longer than with hinges, but removing the mesh is much easier.
Method 3. On the “flags”
Another fastener for mosquito nets on plastic windows is the so-called flags. They are not very convenient to use, but they take up the least space:
Plastic flag
- The flag is a miniature part: either a Z-shaped plate made of thin metal, or an L-shaped rotary element made of dense PVC.
- Metal flags are most often placed directly on the profile frame (it must be aluminum, since the self-tapping screw comes out of PVC immediately). Plastic products are attached to the frame, close to the edge of the mesh installed in the opening.
- To attach one frame you need 4-6 flags.
- The flag works very simply: we turn each element using a self-tapping screw as an axis, and press the flag to the frame. Thanks to this, the mesh is fixed in the opening at several points.
Metal flags on a frame
- If necessary, the structure is removed according to the same scheme: we turn the flags so that they become parallel to the frame parts, after which we remove the product.
When turning the flags, the bridge must be held by the handles, otherwise it will simply fall out.
However, this mount has a significant drawback: it is inconvenient to rotate the flags due to their small size, in addition, both plastic and thin metal do not last long. And the self-tapping screws that secure the fasteners to the mesh frame also sometimes come loose. In general, this is an option for those who remove the mesh from its fastenings at most once a year.
Method 4. Velcro
Frameless insect screens also exist, and what’s more, they’re not difficult to use. As a rule, a pair of Velcro is used to attach such a structure:
- one is fixed on the window;
- and the second is sewn or welded around the perimeter of the mesh fabric.
There is a simpler option where the mesh is attached directly to the adhesive tape on the window, but it seems less reliable to me.
Gluing Velcro
The installation instructions for the product will be as follows:
- We thoroughly wash the window intended for installing the mesh, removing dirt and greasy stains (they form where we touch the plastic with our bare hands).
- Before attaching the mesh, wipe the window dry.
- Remove the protective tape from the Velcro, exposing the adhesive layer.
- We apply the product to the window and press it firmly, trying to paste the tape correctly the first time, without folds or “waves”.
- After the Velcro tape is glued, we attach the mosquito net to it. This product holds up well and can be removed in just a few seconds.
Using a frameless option
The disadvantage of this method of fixation is not the highest reliability: no matter how high-quality the Velcro is, in terms of fixation strength it is still inferior to mechanical fasteners.
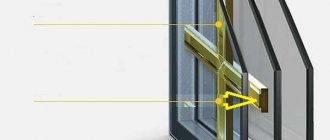
Installing a mosquito net on a window using Z-shaped brackets
As a rule, when purchasing a ready-made mosquito net, it comes with Z-shaped brackets together with self-tapping screws. The brackets can be plastic or metal, but this does not affect the installation method.
Advice: if you were offered a plastic mosquito net holder in the kit, then you need to remember that from sunlight, temperature changes and other “bad weather” the plastic can turn yellow and crack, so if you plan to use the same holders for several seasons, purchase metal brackets.
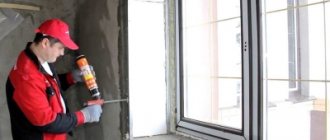
This type of fastening involves installation from the outside of the window. If you decide to install the mosquito net yourself, then you will need: a screwdriver (Phillips screwdriver), tape measure, pencil, self-tapping screws.
How to choose a mosquito door for a balcony, read our material at the link https://oknanagoda.com/balkony-lodzhii/remont-otdelka/door-mosquito.html. Read more about how to install a mosquito door on a balcony here.
A mosquito curtain on the balcony door will also help protect against mosquitoes and other insects.
Procedure for installing the mesh using Z-shaped fasteners:
- On the outside of the window, mark the places where the brackets are attached, 2 at the bottom and 2 at the top.
Advice: do not try to choose a place for fastenings closer to the corners; on the contrary, fasten the mesh closer to the center, because The edges of the profile are rigid and fit tightly to the window frame, but the center can move away a little and allow insects to enter the house.
- Using a screwdriver or screwdriver, drill holes for the fasteners on the frame.
Important! Some types of windows are equipped with holes on the outside for ventilation and condensate drainage; under no circumstances use them for fastenings.
- Attach the brackets to the frame - longer ones up, shorter ones down.
Tip: for ease of installation, glue the bracket for the mosquito net to the desired place using masking tape and screw it through it, this will help prevent the bracket from moving or falling.
- Insert the grid.
Features of fastening with metal hooks
Fastenings of this type are used quite rarely. They are installed only if installation of standard brackets is impossible. Metal hooks are simply screwed to the frame of the mosquito net with one side, and fixed to the seal with the other. This type of fastening has one very big drawback: they wear out the window seal very quickly
.
Installation of mosquito nets with metal hooks
Metal hooks help attach the mosquito net to the window opening from the inside - the hooks are screwed to the frame of the net, 2 at the top and bottom, then it is inserted into the window opening. The hooks hold the mesh on the window opening, preventing it from moving.
Important! Such holders are among the easiest to install, but at the same time the most unreliable - in strong winds, the fastenings may not hold the mesh and allow it to fall out of the window.
Frame mosquito nets with metal hooks
You can make a mosquito net for the window yourself. Read about this in our material “How to make a mosquito net for a window with your own hands?” For the best way to finish window slopes inside an apartment, read our material at the link https://oknanagoda.com/okna/plastik/otdelka-otkosov-okon-vnutri.html.
Roller shutters for windows protect the house not only from dust and noise, but also from burglary. Read more about how to install and manage roller shutters here
Roller shutters, plungers and other options
Plunger mount
Using a roller shutter design
There are several other options for attaching the mesh to the window opening:
| Mounting type | Design Features |
| Plunger | Plunger-mounted nets have an almost standard design: a fiberglass or PVC sheet is located in a plastic or aluminum frame:
This mount is reliable, but the downside is the need to install the structure inside the frame. There is an option for attaching the plungers to holes made in the overlay, but in this case the relatively thin layer of plastic will experience serious loads. |
| Roller shutter | Probably the most convenient, but at the same time the most expensive option:
The obvious disadvantage is the high price of the product, but otherwise it really turns out to be extremely convenient and very reliable. |
| Pleated | The operating principle of a pleated protective mesh is somewhat similar to a roller shutter, but it moves not in a vertical, but in a horizontal direction:
The disadvantages include not the tightest covering of the opening due to slight sagging of the material, as well as the high cost of the product. But for a balcony door or wide window it is indeed a very convenient option. |
Scheme of the pleated mesh structure
Installation of mosquito net with plastic flags
The most obvious advantage of this mount is that the mesh fits tightly around the entire perimeter of the window.
Important! This method of fastening is most optimal for windows on the first floors, since during installation you need to lean very far out of the window.
When installing plastic flags, the procedure is almost the same as fastening using z-shaped brackets, the difference is in the location of the fittings and in the method of attaching the mesh. The flags are mounted on the corner part of the frame on both sides, so that each corner of the mesh is pressed tightly against the frame, but after inserting the mesh, the flags must be turned and tightened from the outside of the window.
In some cases, special “flags” or, in other words, wings are used to attach mosquito nets. Their use is justified only if it is impossible to use standard brackets. The “flags” are attached to the window frame using ordinary self-tapping screws of a suitable size. They are placed on top,
Now take the net by the handles, turn it slightly sideways, and take it outside. Insert the upper edge into the upper brackets, align it vertically, lift it all the way, place the edge behind the lower brackets and lower it. The mesh stands supported by brackets.
How to install a mosquito net on a plastic window
If you are interested in how to install a mesh on a plastic window, there are a huge number of videos on this topic. To figure out how to install a mosquito net on a window with your own hands, you need to understand the structure of the net.
The mosquito net is a closed aluminum profile, painted to match the color of the window, with a mosquito net fixed in it.
Fastening principle
Any mosquito net is installed using fasteners. There are two types of mesh installation:
- installing a mosquito net using internal fasteners
- installation of the mesh using external fasteners
In the first case, you need to install it this way: you need to take the mosquito net by the side handles, place the hooks behind the window and lift the net up until it stops. After this, you need to align the mosquito net in the window opening.
Types of insertable mosquito nets
Forms
We can produce any shape of the product. The most common type is rectangular and fits all standard windows. However, the insert mosquito net can be made in a non-standard shape according to the size of the window opening, for example, it can be triangular, square or trapezoidal. Such a mosquito net, made to size, regardless of its shape, will provide reliable protection of the room from street debris and insects.
Colors
Internal mosquito nets can also be produced in a variety of colors. Traditionally, the frame is made in a neutral white color, as it goes well with classic white plastic windows and goes well with any colors of curtains and furnishings. If necessary, you can choose any other color of the mosquito frame from the RAL catalog.
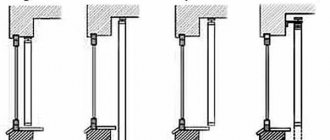
Installation of mosquito nets using plunger fastenings
The plunger is a prefabricated mount that consists of a metal rod, a spring and a cap. To install a mosquito net with internal fastening, you only need a drill - holes are made on the profile of the window frame and the mosquito net, then a pair of plungers are inserted into the mesh frame, pulled back and the mesh is placed in the window frame, where the plungers are straightened and fit into the holes, then the fastenings are tightened. The procedure is quite simple, but requires some skill.
Installation of mosquito nets using plunger fastenings
Important! With this method of fastening, it is recommended to glue felt or pile around the perimeter of the mesh (sometimes it comes included) for better protection from insects and dust.
This type of fastening is suitable for windows equipped with bars or windows with small slopes, but it is worth remembering that the mesh is inserted into the window opening, thereby reducing its clearance by its width.
There are two ways to attach them: Z-shaped brackets and rods (plungers). When mounted on brackets, they are mounted on the street side. In most cases, this is convenient and, if circumstances permit, this installation method is chosen. The dimensions of the mesh must be larger than the light clearance of the window sash: the frame is inserted from the outside.
When using plungers, the mesh is also attached behind the glass, but the clamps themselves (rods) are located on the side of the room. This device is convenient on the first floors: it is impossible to remove the mesh from the outside. When installing a mosquito net on rods, its frame must be equal to the size of the light opening. You can’t do it with millimeter precision, but to ensure there is no gap, a brush is attached around the perimeter. It prevents insects from getting in.
Difference in the use of fasteners
Design and purpose of mosquito nets
An anti-mosquito net that is attached to a PVC window is most often a frame product:
Basic elements of a mosquito stack
- The mesh frame is made of lightweight polymer (PVC) or aluminum profile. Plastic structures are less durable, which is why more and more manufacturers are switching to aluminum profiles. At the same time, a special coating protects aluminum elements from external influences.
- At the corners, the frame elements are connected with special corners. Thanks to this, the rectangularity of the frame is maintained, since plastic inserts give the product the necessary rigidity.
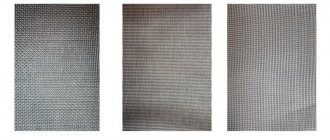
The size of the holes is such that a mosquito will definitely not get through
- A mesh made of synthetic fabric is stretched over the frame (fiberglass is most often used). The mesh is most often fixed into the profile groove due to the elasticity of a special cord, so if necessary, the damaged mesh can be removed and replaced with a new one.
Usually the canvas is painted gray. Neutral coloring makes sense: it is in this case that the weaves of the mesh are least noticeable in any lighting level.
- On the inside of the frame of the mosquito net, two handles are fixed, intended for installing the product and removing it from the opening. Plastic handles in 90% of cases disappear after about two years of use, and structures made from a polymer strip rolled into a ring last a little longer.
This loop handle is more reliable, but more cumbersome
As the name suggests, a mosquito net provides protection against the entry of flying insects - flies, mosquitoes, etc. into the room. The cross-sections of the holes in most nets are selected so that their size is less than the wingspan of the most common insects.
In addition, structures with tension fabrics installed in the sash of a window opening or on the window frame provide shading of an apartment or balcony. Despite the high transparency, the mesh material effectively absorbs the sun's rays, so in the heat the mesh is a good help, especially in the absence of curtains and blinds.
There are many options for fixing mosquito nets on the window
Installation of a sliding mosquito net
The mosquito net on guides is installed on sliding windows - it is fixed at the top and bottom using runners and rollers that ensure its free movement. Self-installation of such a holder for a mosquito net on plastic windows is quite troublesome, so it is recommended to seek the help of specialists.
Advantages of a sliding mosquito net:
- Convenience - if the mesh is installed correctly, it will easily move around the entire window; in addition, such a mesh can also be installed on a sliding balcony door.
- Functionality - since the mesh is usually attached from the inside, the width of the canvas can be adjusted and one large mesh can be installed to cover the entire opening.
- Durability Aluminum mesh parts are designed for long service life.
Well, the last advantage of such a fastening for window nets is aesthetics - the mosquito net will become an extension of the window, and the absence of fastening elements in prominent places will not irritate the eye.
This kind of fastening for mosquito nets is usually done on doorways. There are two types of fastenings:
- standard;
- reinforced (with closer).
They are mounted on the outside like regular door hinges, helping to protect the apartment from insects.
Important! When installing a mosquito net on a door, do not forget to install a latch, since the hinged net can move away from the opening due to the wind.
Rolled (rolling) mask nets
A special container is attached to the top of the window or doorway. It contains a rolled mesh roller in a twisted form. Using a special handle or cord, the panel can be stretched and blocked the open opening, fixing the edge of the panel at the bottom. This design is good for those openings that often need to be completely open.
Advantages and disadvantages of roller mosquito nets
- This option is considered one of the most popular and in demand due to its ease of use and attractive cost;
- The design of the product is aesthetic, and the system itself is compact and does not take up much space;
- Universally suitable for any doorway;
- During the cold season, there is no need to remove the canvas and store until spring;
- Easy care and cleaning;
- It differs favorably from the frame mesh in its ease of opening and installation;
- No free space is required to operate the product without problems;
- The system can be made in different colors.
The operation of the system is based on the operating principle of blinds. You can twist the fabric into a roll using a special handle or cord. The canvas is kept in the box until it is needed to be used. When the canvas is unfolded, it fits tightly to the frame, protecting it from insects, fluff, and debris from the street. Affordable prices for mesh from manufacturing companies allow you to install them without compromising your budget. Meshes can be ordered according to individual parameters.
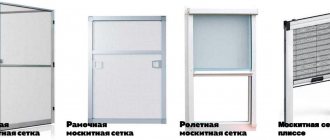
Types of mosquito nets
There are three types of mosquito nets:
- Frame. This is a frame made of metal-plastic profile, on which a mesh is stretched. The mesh is attached to the frame using special fasteners: Z-shaped brackets or plungers. This design is the most common, since at a low price it protects well from insects. The cost of producing a mesh is from 500 rubles per square meter.
Frame mosquito net is suitable for both wooden and plastic windows - Rolled. They are designed like roller blinds or blinds. A roll of mesh is attached to the top of the window. By pulling the edge, the net is lowered and fixed. When released from the latch, it rises up. An excellent device, but the price is from 5.5 thousand rubles per square.
Rolled mesh - good, but expensive - Swing nets. The mesh is stretched on the frame, but the frame is reinforced, with a larger cross-section than a frame mosquito net. It is most often installed on doors - balcony or entrance, but can also be installed on windows. It is attached to a door or window block using regular hinges. To prevent it from opening due to gusts of wind, magnets are built into it. The estimated cost of this type of mesh is about 2 thousand rubles. per square.
Hinged mosquito nets are convenient for doors - Sliding. These are meshes specifically for sliding window systems. They also have a frame on which the mesh is stretched. BUT this frame moves along special guides that are screwed on from the outside. This way it is possible to move the mesh to the place where the sash is open.
Sliding - aluminum windows based on the same system - Pleated. The method of action is similar to the roll one, but it is collected not upward, but to the side. There are two guides - top and bottom, along which the mesh that folds into an accordion moves on wheels.
Pleated mosquito net - original and not cheap
As you can see, there are many types. Nevertheless, in 90% of cases frame structures are installed. At a low price, they create a completely normal level of comfort.