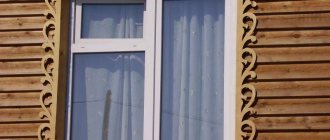
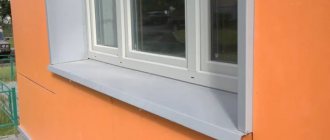
Flashings prevent water from entering the wall, extending the proper appearance and service life of walls and windows. Excess moisture forms gray spots, then mold appears, cracks in joints and corners. These elements are installed outside the window at the bottom of the opening, representing a layer at an angle of 15°, it exceeds the width and length of the opening for drainage of liquid precipitation.
Beautiful flashings to match the windows or plinth installations on the exterior of the facade create a beautiful finished look. Sometimes they are performed in combination with the roof. It is important that their installation is carried out in conjunction with windows or a balcony.
In some cases, decor is placed on such window sills on the street side (flowers in pots, bird feeders). This is relevant for restaurant buildings, guest houses, hotels in order to attract visitors. But the initial task is to protect the building facade and window frame.
The distance between the concrete wall and the window is most susceptible to heat loss from the inside and lets in the cold in windy weather and severe frosts. Therefore, the vulnerable spot between the wall and the window is protected from heat loss when installing drains of the correct thickness. Enhanced protection is provided by insulation or polyurethane foam.
There are a number of rules that must be followed for the quality of the design. For those who have experience in installing other building materials, installing window sills will not seem difficult. In this work, you need to familiarize yourself with information that will help you choose the right design and understand how to evaluate the work performed and avoid shortcomings.
Required Tools
How well the installation of drip tides will go depends not only on your skills, but also on the correctly selected installation tools. Don't forget to prepare:
- tape measure, ruler, marker;
- metal scissors;
- polyurethane foam;
- drill/screwdriver;
- self-tapping screws;
- sealant (preferably silicone based).
Before purchasing sills, take measurements of the window. It is important that the ebb extends beyond the level of the wall by at least five centimeters. Then he will cope with his task more effectively.
Once you have prepared the necessary tools and materials for installing window sills, you can begin to work.
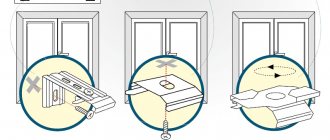
Methods for bending drainage edges
Experts use different methods to bend the edges of metal window sills. All of them have been tested in practice and allow you to get high-quality results.
One option involves using a tinsmith’s tool – these are special pliers. This device is distinguished by the presence of wide jaws. Thanks to the increased size, metal can be captured over a larger area.
Another method involves the use of pincer clamps.
They clamp the metal along the bend line and bend it. In this case, wooden blocks are additionally used. The entire process is carried out on a flat surface. Important!
If the third method is used, then the workpiece is placed on a flat, stable surface. It could be an iron table. In this case, the fold line is placed on the edge of a stable surface. Then they take a mallet and bend the metal. This process begins at some end of the bend line. If necessary, pass over it with a mallet several times. They strive to achieve an even and precise bend.
If the drain is made of thin metal, it can be easily bent with just your fingers.
In this case, be sure to wear thick gloves or mittens on your hands. They will protect your fingers from cuts. If they appear, then it will take a lot of time for them to heal. On a note!
How to properly install window sills: step-by-step instructions
So, installing ebb sills on plastic windows and wooden structures requires the following steps:
- If you already have a finished casting, inspect it and find a special bend. It will need to be inserted under the window profile. Or give the canvas the desired shape yourself. Using metal scissors, make cuts so that the ebb fits as tightly as possible to the side slopes.
- Make sure that the slope of the external window sill is at least 10 degrees. Water should flow freely at low tide and not stagnate.
- Place the bent part under the frame - many plastic windows have a special hole for ebb and flow. Or press the ebb tightly to the profile for fastening.
Average prices in the Russian Federation
Let's look at the prices in the country for products and their installation.
For the finished product
The pricing policy of manufacturers is quite extensive. The cost of the finished product depends on:
- supplier brand;
- the material from which the part is made;
- water coating;
- the presence of additional elements;
- delivery region;
- product colors.
Estimated prices vary from 480 rubles to 5,000 rubles for one product.
For installation
Approximate installation prices depend on the status of the locality.
For example, installing low tides in Moscow will be more expensive than in Voronezh. Also, the price varies depending on the list of services, the width of the casting and the material. If you need turnkey installation, it will cost from 900 rubles to 1500 rubles.
You can order a ready-made casting with installation. The minimum cost is from 2000 rubles.
Installing window sills: useful tips
To ensure that the installation of ebb tides is successful, listen to the following recommendations:
Do not seal the bottom window profile before installing the flashing, because you will need to insert a bend in the window into the hole.
| Remember that a well-installed window sill protects, first of all, the wall of your home. If water constantly gets under the window, this leads to freezing of the space under the window sill. In addition, moisture promotes the growth of mold, which is difficult to get rid of. |
Knowing how to properly install window sills, you can significantly extend the life of the window frame and protect the wall from getting wet during rain and snowfalls.
General recommendations
To suit the overall design of the façade, window drains should not be provocative or massive. This is unlikely to be a problem, because the elements are made to order, taking into account the color.
When constructing a new building, installation of flashings is carried out at the stage of facade work, when there is a possibility of high-quality sealing of seams and joints. In a finished house, the low tide is installed when glazing the balcony or inserting a new window. When glazing a balcony, also install an upper external window sill, attached to the above balcony slab.
How to install a metal sill on a metal-plastic window with your own hands
Metal-plastic windows indoors are perfectly complemented by functional plastic window sills and slopes, which have a number of undeniable advantages over outdated wooden ones. Outside such windows, the most ergonomic option is to install metal window sills, which are called ebbs. They are not designed to perform the same functions that window sills do in the interior of a home. Considering the important role a properly installed drip lining plays in preserving the walls of a house, its installation must be approached with particular care. Let's look at step-by-step instructions for installing low tide on metal-plastic and other windows yourself.
Using low tide as a decorative element
The main purpose of window sills is to protect against unwanted moisture. But modern models also do an excellent job of decorative function.
Take into account the color scheme of your own window, choosing a low tide to match it. You can also focus on the design of the building facade
In any case, the tides should look neat and not attract too much attention to themselves.
A truly high-quality ebb tide can be installed without much effort. Its further operation also does not cause difficulties.
Modern technologies have made it possible to create models in a wide range of shades. That is why manufacturers were able to significantly expand the range of available modifications.
The ebb design combines the following elements:
- Main part. It is located at a slight angle;
- folds. Thanks to them, fastening becomes possible;
- drips. Remove excess moisture.
Modern equipment has received ample opportunities. With its help, it is possible to create ebb tides of various configurations that can withstand a particular load.
The ebb characteristics correspond to the window configuration. However, it should not protrude beyond the wall by more than 5 cm.
Most modern companies producing window sills offer standard models to customers. They are created in accordance with the characteristics of certain types of profiles. But if your window opening has non-standard dimensions, this does not mean that you cannot choose a suitable option.
Window companies are striving to expand their range of products and services. Modern modifications of window sills differ from each other only in color, texture and size.
If your window opening is too narrow, you can simply cut off a certain amount of material, adjust the product and install it in place.
Today, ebb tides fit perfectly into any home façade design. We can thank the variety of textures and colors for this.
Company owners claim that they are approached for non-standard solutions quite often. But thanks to the development of production capabilities, this is not a problem today. The same can be said in relation to the materials used.
That's why each of us can get exactly what we want in our home.
By selecting individual ebb configurations, the manufacturer provides all the relevant information to help the home owner get a general idea of the benefits of these designs.
Dependence of installation and choice of material on climatic conditions
If the weather conditions in your region are quite severe, then the ebb material should be able to withstand temperature changes. It is unlikely that the products will last you too long if you ignore this point.
Russian conditions are considered one of the most unfavorable, which is why flashings for domestic windows must be created from durable materials.
What are the ebb tides and why are they needed?
In order to make external window sills, they use both ordinary, familiar materials - galvanized metal or plastic, and non-standard and more expensive ones - polyester and titanium. Most often, ordinary metal is used, which is coated with zinc to protect it from rotting and rust. From above, such ebbs are covered with a thin layer of special enamel, which gives the window sill the necessary decorative effect.
Plastic options are used much less frequently. They have an undeniable advantage in that they dampen the sound of raindrops. However, the plastic used in window sills is not intended for outdoor conditions, and destructive environmental factors very quickly spoil its appearance and render it unusable.
Titanium castings have increased strength and wear resistance, but they also cost an order of magnitude more than the options described above. All metal castings are painted with enamel in the required color, protecting the metal from the harmful effects of the environment.
Related article: White paint for windows without odor
Correct installation will allow water to fall directly from the window onto the surface of the slope and, under the influence of the angle of inclination, without touching the wall under the window, pour out onto the ground. After this, the ebb is used as an element of facade decoration, giving a unique style to windows and walls, completing the structure.
Design
The two main elements of low tide are:
- A gutter (tray) collecting water flowing from the roof.
- Gutters through which collected water is directed to the foundation of the house.
Gutters are channels open at the top, attached under the roof overhang. There are semicircular, rectangular, triangular shapes (rarely used). Contains straight and angular elements.
Drains (pipes) are also prefabricated structures of rectangular (rarely used) or cylindrical cross-section. Their elements can be straight or bent (knees).
The plugs prevent water from draining and leaking along the ends of the gutters. There are three modifications of the plugs for installation: universal, right- and left-handed.
Funnels are installed under the gutters; their purpose is to receive and redirect water into the pipes.
The leaf catcher grille protects the system from large debris entering the drainage system, preventing it from clogging.
Tees are parts required to separate the water flow.
The drain elbow is the final part of the drain that directs the flowing water away from the foundation (into the receiving cavity of the storm drain).
Couplings are parts for connection.
Clamps are used to secure the drain to the wall, preventing its vertical movement.
Brackets - fastenings.
Bypasses are used if the drainpipe needs to go around any obstacle.
Preparatory work
Usually, drip tides are installed together with new metal-plastic windows, then the installation is carried out by the same team, and this is already included in the cost of the contract. But the need for installation may be due to several factors, such as replacing an old, damaged sill, installing a metal window sill on a previously installed window (it can be either wooden or metal).
In any case, to independently install an external drip sill, the first thing you need to do is make or buy one. To purchase, you can contact specialized stores if your sizes are typical.
If you are unable to take measurements yourself or require a product of complex shape, then it is best to contact specialists who will competently take the necessary measurements and take into account all the nuances at the installation site.
Immediately before installation you will need:
- ready-made and available low tide; hammer drill or impact drill; hammer and chisel, sharp construction knife; broom or soft brush; sandpaper and a hacksaw for metal; building level, plastic pads.
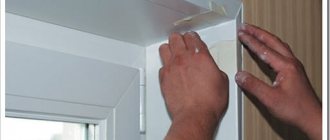
Step-by-step installation technology
The installation of the drip tide is carried out after the installation of metal-plastic windows, when they have already stood for several days, the mounting solutions and foam have already dried. All excess mixtures are carefully removed with a sharp screwdriver or a blade with a chisel. The dried polyurethane foam is cut off with a sharp knife so that there are no protruding nuances.
- According to standards, the ebb should penetrate the side walls by at least 2 centimeters. To do this, use a thin screwdriver or drill to carefully knock out even holes at the level of the future surface.
- Even if the product was made strictly according to the given technical parameters, a situation may arise that somewhere it still does not fit into the grooves. To do this, it is necessary to eliminate all interfering errors using a tool. It is advisable to start from the wall - carefully remove all construction debris from the work surface, knock down all protrusions, sweep away dust with a broom or brush. The window sill can be trimmed or wiped with a hacksaw or sandpaper, respectively. The main thing is not to scratch the surface, but to paint over all exposed metal with enamel of the appropriate shade.
- Once both the surface and the ebb are ready, you can proceed directly to installation. The wall on which the ebb will be attached needs to be slightly moistened with water. Polyurethane foam sticks much more easily to a damp surface - and it will be the main fixing agent. The window sill is carefully inserted into the prepared grooves - there will be punched strips on the sides, and on the side of the window there will be a niche specially created for low tide. The gaps should be minimal, the window sill should not move in them, but there is no need to grind in, because this will damage the enamel surface.
- The angle of inclination is set - it should be directed away from the wall so that the moisture drains directly to the ground. The horizontal slope is measured using a building level. The tilt in all directions is adjusted by plastic plates that move along the working surface depending on the desired result. The slope should be such that the exposed window sill can be pressed down with bricks wrapped in a rag. This will allow it to be securely fixed when the polyurethane foam expands.
- After the ebb is exposed and secured, the cavity under it is carefully filled with mounting foam - this will glue the slope and ensure the insulation of the window opening from moisture and drafts.
- After the tide has stood for several days, the bricks are removed, and all the seams around are rubbed and puttied. After completion of all work, the ebb is completely ready for use.
Definition
A plastic window consists of many elements, each of which performs a specific function.
Low tide is a very important link that ensures the reliability and longevity of the window structure. It prevents rain moisture from penetrating the window frame or wall of the house.
The part completely covers the lower slope and prevents it from getting wet. To ensure the drainage of water and snow, it is attached obliquely with a slight protrusion beyond the façade. It is made from a profile and installed on the outside of the building at the bottom of the window. It must have a bend that fully matches the design of the window.
Important! Mismatch of parameters leads to incorrect fastening of the element.
The product is equipped with bottom and side bends that ensure rapid drainage of water.
What are they for?
The main function of the element is to protect the structure from precipitation. Moisture is diverted to the side with the help of low tide and drained to the ground. The second meaning of the product is to give the window a finished and harmonious look. It can safely be considered a decorative element if you choose the right material and appearance of the part.
In addition to the walls, the flashing also protects the seams and foam from exposure to sunlight. This prevents premature destruction of the window structure and facade.
If you neglect the installation of the product, then:
- moisture will begin to collect on the windowsill;
- finishing materials will be destroyed;
- the plaster will fall off;
- window frames will become unusable.
Despite this, many owners of PVC windows complain about noise from raindrops at low tide. The question arises: is it possible not to install the product? You can refuse to install a low tide in one case - when the window is mounted flush with the facade without recessing into the wall. Then water does not accumulate on the windowsill, and the protective function is taken over by the canopy above the window.
Types of tides for plastic windows
Installation of ebb tides on plastic windows
PVC window sills are made from various components, among which it is worth highlighting products made from the following materials:
There are no standard sizes for ebb tides, since everything is customized to fit a specific window.
The range of products differs in such qualities as service life, resistance to temperatures and weather, price range, color, texture and shape, the possibility of coating with varnish or paint, strength characteristics, etc.
Materials for making castings
Today, ebb tides are made from two materials, each of them has its own pros and cons.
| Materials | Description |
Sheet steel | Most often used. The cheapest option is galvanized steel, the more expensive is the zinc coating is additionally painted with multi-colored polymer paints. A wide selection of colors makes it possible to solve design problems. Metal sills have no restrictions on their use; they are installed on plastic and wooden windows. Houses can be wooden, brick or block. The service life of high-quality metal castings is at least fifty years. Metal castings are technologically advanced; during installation there is no need to use complex tools. If you wish, you can make them yourself. |
Plastic | Modern ebb tides are most often used in conjunction with plastic windows. Made from modified sun-resistant plastic. Modern brands of plastics increase their resistance to the negative effects of hard ultraviolet radiation. Although stability is increasing, destruction still occurs slowly. Intermolecular bonds are broken, the material loses its plasticity and becomes brittle, and under dynamic loads through cracks may appear. In addition, the formation of microcracks is inevitable; dust accumulates in them over time, and mosses and lichens begin to grow. Despite the promises of manufacturers, the actual service life rarely exceeds thirty years. |
The advantages of metal castings are durability, versatility and a wide selection of colors. The disadvantage is low mechanical strength; it is undesirable to walk on them, especially if the base is not prepared correctly.
Low tide steel
Plastic ebbs can withstand relatively large static loads, but are used only in conjunction with metal-plastic windows. The metal ones are a little cheaper.
Plastic cast - photo
Arrangement and measurement of necessary materials
General diagram of the window drip device: M - Top shelf, D - drain, K - drip.
Depending on the type of ebb used, the design of the product may have a number of features.
However, any ebb has a similar design, consisting of the following elements:
- Top shelf.
- Drainage
- Lower capenos or dropper.
When choosing a window sill that suits your design, you should pay attention to the size of the top shelf, since when installed, this element should not interfere with drainage through the holes on the product.
If installation is planned on a substitution profile (if the slope is insufficient), the size of the upper element should not exceed 20-30 millimeters.
When choosing, it is important to take into account that the size of the ebbs for windows is calculated without “entrances” onto the slope wall, that is, it is better to add 10-15 centimeters to the original value to make bends.
General layout of the main parts and materials
When taking measurements, it is advisable to take into account the following points:
- depth and shape of slopes - for curly and protruding external slopes, it is advisable to take the maximum size for trimming. For decorative protrusions, overlaps of 2-3 centimeters in size can be made;
- when measuring the width, it is taken into account that the drip extension should be at least 20-30 millimeters relative to the plane of the wall;
- the recommended bend angle of the ebb should be at least 110-135 degrees;
- when the product dimensions are more than 1.5-1.7 meters in length, it is advisable to provide compensation gaps of 5-7 millimeters in size, filled with sealant, at the end of the ebb.
Features of installing metal ebb and flow in a wooden opening
The main fundamental difference between installing a metal drainage system in a stone house and installing it in a wooden opening is the creation of a base not from a cement-sand mixture, but from bars. The frame is made from them. It is on this that the ebb will rest.
Depending on the features of the building and the horizontal slope, only a few bars can be used. However, they will not always have the same thickness. The bars are attached to the building structures of the house using nails or self-tapping screws.
During installation, additional foam is used.
It allows you to strengthen the fixation and prevent snow from falling under the tide. On a note!
Preparing the tool before installation
Installation of ebb tide on a plastic window is carried out using a number of tools, each of which will be used for certain types of work:
- using metal scissors, sheets are cut to the required sizes and shapes;
- universal drill-driver with a set of attachments of different types and lengths - for quick fastening of structural elements;
- simple self-tapping screws for wooden frames, self-tapping screws with drill tips for metal-plastic structures;
- tape measure, marker, ruler for taking measurements and applying convenient markings.
Production
Basically, manufacturers offer designs of standard sizes, which can then be selected for your opening.
They are made in production using a sheet bending machine. First, the workpiece is cut to the required length, then it is fixed with a clamping beam and the casting part is bent with a rotating beam. Then the corners are bent, where drops of moisture flow down. That's the whole cycle of work.
In large production facilities, machines are serviced by operators. Production is carried out on a large scale.
Installation and fastening technology
Installing window treatments is a step-by-step process and can be done in almost any weather condition.
An example of correct and incorrect installation relative to the window frame
Installation of ebb tides for plastic windows is carried out as follows:
- Checking for product compliance in size and color. Visual inspection for defects and visible damage.
- We cut the ebb in accordance with the dimensions of the end caps. We measure the required size on the product, and use a marker or pencil to draw a cutting line. The strict perpendicularity of this line can be checked with a square. We cut the material along the line using metal scissors.
If the support bracket is not installed, a layer of noise-insulating material is attached under the drainage
Attaching the ebb to the window ends with a diffusion tape. Let's look at this point in more detail:
- We determine the place for applying polyurethane foam - this is the area under the stand profile, as well as the junction of this profile with the product. We moisten this area and then foam it;
- It is very important that the foam covers the stand profile along its entire height. We apply foam under the surface and along the entire length of the middle part of the ebb. Do not allow the foam to extend beyond the plane of the wall;
- we attach the ebb to the stand profile using screws;
- press on the surface of the product with your hands so that the foam underneath fills the entire area;
- We treat the joints between the slopes and end caps with silicone sealant.
What difficulties may arise
In absolutely any business, various embarrassments can occur. And first of all, you need to remember that this is normal, because those who do not make mistakes do not learn. Some difficulties or questions may also arise in the drainage installation.
Now let’s look at the most worrying and common mistakes in installing ebb tides:
- The size of the ebb tide is incorrectly calculated. It is important to remember that the length of the ebb itself should extend at least five centimeters beyond the wall, thereby protecting it from water ingress;
- Poor quality of the purchased product. It is important to read and study very carefully the material from which the molding is made. Otherwise, it will last very little;
- All technical parameters must be observed, otherwise the drainage system will lose all its aesthetic and technical qualities.
How to “care” for low tide after installation
The drainage system is manufactured using a special technology, taking into account the fact that it will be installed outdoors. Therefore, it is resistant to external influences and does not require special care or expensive products. If it gets very dirty, you can wash it with a cloth and water.
Approximate cost for installation by specialists
The final cost of installing window sills consists of the cost of individual specialist services.
Fastening is best done with a screwdriver, which will significantly speed up the installation process.
With a quick analysis of these types of construction services, the average cost of installing a low tide system will consist of the following costs:
- preparation and installation - from 350 - 400 rubles;
- reinstallation and alteration – 500 rubles;
- treatment of the seam with polyurethane foam – 250 rubles;
- seam treatment with sealant – 250 rubles;
- cleaning windows and seams from foam – 300 rubles.
Thus, attaching the ebb to a plastic window can cost from 1,150 rubles in the simplest version, without additional insulation and finishing.
How to install a window sill? On frame or under frame?
Once, at one popular construction forum, I had to argue with a consultant on the topic “How to install the drip lining correctly? On the frame or under the frame?
How many disputes were there? And the moderators, one of them, almost foaming at the mouth, argued that the ebb should only be installed under the frame. Well, let's see if this statement is true?
How to properly install a window sill?
So, there is a statement that the drainage system is installed only under the frame. And there is a logical explanation for this. In this case, water passes through the junction of the low tide with the window more efficiently and the likelihood that it will flow under the window is minimal.
And what do GOSTs, which many window companies refer to, tell us about this? After all, few people actually work on them, because installation according to GOST is more expensive, and for this reason clients rarely choose it.
Well, actually, I didn’t find a single diagram in GOSTs with installing a low tide on a frame. So we will consider it the correct option to install the ebb tide under the frame.
Semicircular or figured windows
Not all windows are linear. But what are the best sills for semicircular windows? All the same metals can save you. But just this time, the ideal option is copper shimmer. Copper is a ductile material and a slight curvature can be simply achieved by tapping it with a hammer.
You can make shaped products from copper
If copper is too expensive, there are factories that make radius castings to your measurements. Since this is an individual order, the cost of such a low tide will also be calculated in each specific case.
Radius flashings for windows in bay windows must be ordered
If there is a need to save money, you can make ebbs for figured bay windows from ordinary galvanized ebbs with a polymer coating. In this case, they are cut into pieces, with which you can create the desired bend.
Semi-circular ebbs from standard materials
With this method, one piece should overlap the adjacent one (by 3-5 cm) - this will make leakage less likely. To further reduce the likelihood of water ingress, a layer of sealant is applied to the joint.