Hello friends!
I haven't written anything on the blog for a long time. I'm correcting myself.
We recently worked on insulation and glazing of a balcony for one customer. Everything would be fine, but it was necessary to provide ventilation on the balcony so that there would be an influx of fresh air and the double-glazed windows would not fog up.
At first they wanted to do forced ventilation using a fan. But then we moved away from this idea and decided to install a window valve.
I outlined the whole theory about ventilation on the balcony in this article. If you have any questions, ask, I will answer everyone.
In what cases is ventilation required on the balcony?
Initially, the balcony and loggia were an open structure used for growing plants or drying clothes. The glazing trend came later, but since the windows had wooden frames, the structure of the material allowed natural ventilation.
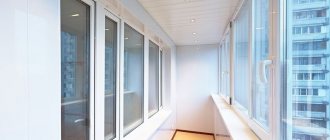
The situation changed with the advent of plastic double-glazed windows, which ensure almost complete tightness of the room.
Lack of ventilation leads to increased humidity in the room and the development of fungus and mold, which can become a threat to the health of people and animals
The benefits of such windows are obvious:
- High thermal insulation properties;
- High sound insulation properties;
- Tightness;
- Long service life.
But along with a number of advantages, the problem of condensation arises, which inevitably has to be solved. Partially, the problem of excess moisture can be solved with high-quality insulation, but even this effective work does not eliminate the need for a ventilation system.
Causes of condensation
Warm humid air on a balcony or loggia, when it comes into contact with the cold surfaces of partitions or double-glazed windows, quickly reaches the dew point. As a result, the resulting steam settles on the walls and glass.
Warm humid air on a balcony or loggia, when in contact with cold glass of double-glazed windows, due to the lack of high-quality exhaust ventilation, is deposited in the form of condensation
First of all, condensation forms on insufficiently insulated surfaces. But there is no escape from excess moisture even with high-quality insulation. Moisture will still continue to accumulate, albeit not as quickly. To eliminate it, you will need a ventilation system.
Signs indicating the need for ventilation
Any closed balcony or loggia (if high-quality glazing is installed) needs a ventilation device.
The main signs indicating the need to improve air exchange:
- Increased humidity, condensation formation;
- Formation of fungal black mold;
- Perceptible mustiness and stuffiness in the air;
- Rotting of wooden structures or natural fabric materials.
The absence of the problems described is not yet a reason to refuse ventilation on the balcony.
A ventilation system is necessary if:
- The balcony or loggia is glazed using modern double-glazed windows.
- The glazed unheated space is located on the top or first floor, which increases the risk of dampness.
- The room is used for drying things or storing food.
- Things that deteriorate when exposed to moisture are stored indoors.
- Lack of regular ventilation by opening windows.
Other troubles may also arise - when mold appears, through drying clothes or objects it can get into other rooms of the apartment.
Problems due to lack of ventilation
So, the main problem is condensation on the glass and walls, which over time will lead to the appearance of mold and fungal infections. And this is the most important reason to make ventilation on the balcony with your own hands. Other reasons:
- Moisture will collect on the walls of the balcony, spoiling their finish. This also applies to furniture.
- A closed balcony blocks the access of air through the windows to the room combined with it. And this is another hotbed of mold and fungi.
- Unpleasant odors, decreased oxygen content in the air, increased humidity.
This is what lack of ventilation can lead to. And if you can still somehow combat humidity and unpleasant odors, for example, by carrying out frequent ventilation, then only well-established ventilation will save you from mold and fungi.
Subject: Help needed! Cut off bars on plastic windows
Theme Options
- print version
- Subscribe to this topic...
Help is needed! Cut off bars on plastic windows
You need an aerial platform and a person who can cut off the bars without harming plastic windows. Ideally, I wanted to deal with the question this week. I can post a photo if needed.
Please PM me with specific suggestions.
In the kitchen there is a blank grille that does not open. And the distance from the window to the grill is very short - the hand cannot pass.
Well, if you can find such a ladder, then even better!
It is very difficult to work with a grinder in a canopy (it doesn’t cut from the top, but it turns out to be sideways). You need to sow confidently, preferably on a platform. If you bite the circle, you will fly away from the stairs along with the tool)) It’s easier to bite with scissors.
There, the reinforcement goes as thick as a wall. If only hydraulic
The 12th fitting is easily taken without hydraulics. Just be careful not to piss, otherwise he won’t pick up the scissors))
It’s better not to cut with a grinder. I cut this thing with a grinder. The circle pinches once or twice. I don’t think it’s worth talking about the consequences. It will be easier to cut with a metal saw.
depending on how the pins are driven in, if the distance from the grille to the window is less than 5 cm, and between the grille and the opening is less than 1 cm, then the canvas is not at all like
With an ordinary electric saw. Place the blade according to the mentality and forward. On the contrary, it’s more convenient to climb, there the blade is about thirty centimeters long.
For now yes, just speculation for now.
The man is still being sought!
Oh, that's right, I forgot to write the address. Engels, center.
Ugh, nope.
On topic - take out the glass and you will have greater access to the grille. In fact, you can cut it with a hacksaw.
PS If this path actually seems simpler to you, I advise you to look here for plastic window installers with a spatula and a rubber hammer. Without this tool it will be more difficult to remove/insert the glass.
No, I’m afraid to remove the glass, especially myself. The best option, in my opinion, is to eat with scissors, as described above. But will they take such a thickness?
Types of ventilation on a bed or balcony
Like any other premises, balcony ventilation can be organized in the form of a natural air exhaust and supply system, or in the form of forced ventilation with the installation of fans.
Natural ventilation
What natural ventilation is is two channels, into one of which air enters the balcony, and out of the second. That is, a draft is organized with a low air speed - up to 1 m/min. It will be invisible to a person, but air will definitely be exchanged in this way on the balcony.
In principle, one of the ducts, namely the exhaust duct, already exists in the house or apartment. It is usually located at the junction of the kitchen, bathroom and toilet. Therefore, all that remains is to install an air supply circuit on the balcony. To do this, you can use two design options:
- Install an air valve into the glazing structure.
- Install an air valve in one of the walls.
Both options are used today, their installation is simple, the effect is positive.
If the balcony is a separate room from the apartment, but glazed and insulated, then you can think about natural ventilation in the form of two valves installed: one under the ceiling, the second near the floor. They just need to be placed further apart from each other in order to cover as much of the space as possible for ventilation.
Forced ventilation
Forced ventilation on the balcony - there are several possible schemes that differ from each other in the location of the fan installation. Let’s immediately make a reservation that in such a small room there is no point in installing supply and exhaust ventilation. Therefore, we will consider two options: supply and exhaust circuits.
- Exhaust. The most common option, easy to construct. To do this, one fan is installed, with the help of which exhaust air will be removed from the balcony. It is mounted either in a window or in a wall. There is a small hole at the bottom for air flow.
- Supply. Here everything is the other way around: a fan is installed at the bottom, an outlet hole is made at the top.
Pediment
One of the types of external ventilation grilles is pediment. They are installed in the attics of private houses to ventilate the roof space. They are made of metal coated with powder paint or weather-resistant plastic that can withstand frost, high temperatures and ultraviolet radiation.
Ventilation grilles on the pediment
By type they are almost always overhead; in shape they can be round, square, rectangular, octagonal; for mansard roofs there are asymmetric ones. The color is chosen either white - if the roof design contains white elements, or to match the gable trim. Another option is to match the finishing of the house facade or roofing material.
In this case, it is better to install models with the ability to regulate the amount of air passing through - with blinds or a damper. This option is very useful in cold and hot weather.
Source
How to make ventilation on the balcony
Returning to the issue of ventilation on the balcony - how to do it, you need to start by calculating the air exchange.
Calculation
There are no exact standards that determine the rate of air exchange specifically on attached balconies and loggias. But since this premises will be used as a residential premises, the standards of residential premises are applied to it. Namely: 30 m³/hour. Although, as practice shows, this is a lot for such a small room.
Ventilation on a loggia or balcony is determined by its volume and intensity of use. For example, if a playroom for children is organized on the loggia, then the air exchange should be close to 30 m³/hour. If an office is organized there, then this figure can be reduced to 20 m³/hour. In the first case, you can use an exhaust hole with a diameter of 150 mm, in the second - 100.
Simple natural ventilation
As mentioned above, the simplest option is to use one supply-type air valve for the ventilation system. To do this, during the construction of enclosing structures made of foam concrete blocks, you will have to install a small pipe, into which you will subsequently need to install a supply valve. As mentioned above, the ventilation riser in the kitchen will be used as an exhaust duct. The flow of air will ensure its circulation.
Diffuser or ventilation grille
The construction of ventilation on a balcony with your own hands must be approached from the position of being able to regulate air exchange depending on how intensively the room will be used. Again, if this is a playroom where children are present all the time, then it is better to install a diffuser on the exhaust or supply vent.
This is a special type of grid with a disk inside. By rotating the handle, you also rotate the disk, which either opens the slots in the grille or closes it. The opening can be complete or partial. Diffusers are made of plastic, which guarantees their long-term operation without corrosive processes. Design - a wide variety of color shades, but white devices are more common.
As for traditional grilles, there is a huge variety of shapes and sizes, from which you can choose the required model, exactly according to the hole diameter and the calculated air exchange rate. It is important to install the grille both outside and inside the balcony.
Supply valve for window
Supply valve on the balcony
Installing a valve on a window with your own hands to ensure ventilation on the balcony and loggia is, in principle, not difficult. This device consists of three parts:
- An external air intake unit that is attached to the outer plane of the frame located above the window sash. A canopy must be installed above this block as protection from precipitation.
- The inner part is in the form of telescopic sleeves. They are installed in the frame profile itself at the location where the valve is installed. That is, for this you will have to drill holes in the profile.
- The indoor unit is the most difficult part. It consists of a nozzle through which air enters the room, a filter and a mechanism for adjusting the valve capacity. The block is attached to the profile opposite the outer part.
If plastic windows are installed on the balcony, then installing a valve of this type is the best option. The only thing you need to pay attention to is:
- if natural ventilation on the balcony is organized in this way, then it is necessary that the exhaust ventilation riser works well;
- in this case, the system will work if the street is not higher than +5C;
- with forced ventilation, the valve will work in any case.
It should be noted that there are two types of window valves: manual and mechanical. The first ones are equipped with a rope, by pulling which you can adjust the gap inside the mechanism. The latter are equipped with an electric drive, with the help of which they open, close and regulate air exchange.
Manual instruments are difficult to set up. You will have to use trial and error to select the required air flow from the street. At the same time, in winter the valves freeze due to improper adjustment, which can lead to the removal of significant heat from the balcony.
In the classification of air valves for windows, there are so-called rebated models. Their operating principle is based not on holes in the profile of the window frame, but on removing part of the rubber seals between the frame and the sash and installing rubber bands with a lower sealing density in their place. That is, air passes through the leak between the opening sash and the window frame. This is considered to be the most economical option.
Handle valve
Another original type of air valves installed on PVC windows. Essentially, it is a handle with a closing mechanism, the body of which has slots to allow air flow to enter. Positive sides:
- compact;
- invisible;
- does not freeze in winter;
- The design has a filter that prevents dust from entering from the street.
Principle of calculation of the ventilation system
There are no standards that would determine the volume of air exchange on attached loggias and balconies. But, if we are guided by the fact that this premises is used as a residential premises, then we can use the standard of 30 m³/hour per person. But in practice this figure is even slightly overestimated.
Of course, if you want to organize ventilation with your own hands not only on the loggia, but also in the adjacent room, then you need to take into account the total volume of the room. For a loggia, an air exchange volume of 20 m³/hour is quite enough. This figure can be increased by 50% if, say, a loggia or balcony is used as a playroom for children.
To ensure an air exchange volume of 20 m³/hour, an exhaust hole with a diameter of 100 mm will be sufficient, for 30 m³/hour - 150 mm.
How to make ventilation with your own hands?
An air conditioner will help solve this problem by providing fresh ventilation. There are two ways to install such an air conditioner: contact a professional or install the ventilation yourself. If you entrust the installation to a specialist, you won’t have to do anything yourself, except accept the finished work. But in order to save money and if you want to achieve comfort in the apartment at your own discretion, it is more reasonable to do the supply ventilation on the balcony yourself.
Supply ventilation on the balcony can be placed in three ways: at the top, at the bottom, or in two places at once - one in the upper, the other in the lower part of the room. The latter option provides normal exhaust and, due to the second fan, additional air supply.
Tools and installation
To work you will need:
- hammer drill (for a concrete wall) or drill;
- fans (can be taken from a personal computer).
In selected places, holes are made to suit the size of the fan. If the wall on the balcony is made of concrete, you can use a carbide drill instead of a hammer drill. We insert the fan into the prepared opening. To activate the air flow, in the case of two openings for the hood, one fan will blow air into the room, the other will blow it out. If you change the connection poles, that is, change the direction of operation of the fan, the air movement in the room will also change. During normal operation of the system, with the help of the lower device, heavy air leaves the balcony, and with the help of the upper device, the room is filled with fresh air from the street.
On cool and windy days, cold will be drawn in through the hood opening. Therefore, before you begin installing the hood structure, you should look for a removable option or buy a ready-made fan with a door. In the case of a removable version, in winter it will be enough to remove the device and properly repair the resulting hole. In order to seal the opening, plywood covered with batting or polystyrene foam is useful; it can be attached using screws.
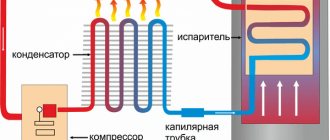
Breezer
Ventilation on the loggia can be done using compact breathers that provide a local supply of pre-purified air. These are supply systems that look like a small plastic box. They take fresh air from the street and, having previously cleaned it of dust and impurities, supply it to the room.
When installing them, a small receiving hole is made in the wall with access to the street. The equipment has the following features:
It is easy to keep the breather in excellent condition. To do this, you need to install a new set of filters once a year. Every month they are cleaned from poplar fluff, dust, and dirt, which gradually accumulate inside the channel.
Uninterrupted circulation of air flows between the balcony and the external environment is one of the conditions for comfortable use of the room as a place to relax or work. In order for the system to work without failures and not create problems, you need to carefully think through all the details, calculate the power and other parameters. If the technical requirements are not followed, the ventilation may be weaker than the required level, which will lead to the accumulation of condensation and deterioration of the finishing condition of the loggia.
What causes condensation on the balcony?
At a certain temperature, air vapor reaches such a state that water is formed from it, that is, water vapor condenses. This physical quantity is otherwise called the dew point. If mistakes were made during insulation of the balcony adjacent to the room or kitchen, then no amount of balcony ventilation will help. Mold and frozen water near the wall due to increased steam condensation will ruin the entire functional appeal of modern housing. Here, most likely, there are mistakes made when working on insulating the balcony.
Possible errors when insulating:
- poor sealing of possible cracks and crevices, resulting in a draft;
- deformation of the sheathing, which may be associated with the use of undried beams and slats for construction work;
- ill-conceived heating design;
- improperly installed ventilation system.
If, as a result of an incorrectly installed hood, areas with different air temperatures and humidity are formed on the balcony, condensation and dampness accumulate in one of its coldest parts. To eliminate this process, it is necessary to change the air exchange or create conditions under which it was possible to divide the room into a cold and warm part, for example, through a door.
The appearance of strong condensation on the walls is possible due to technological violations. For example, if, when insulating a balcony, you seal the joints with gypsum putty instead of foam, moisture will accumulate in these places, precisely because of the gypsum, and in cold weather it will lead to freezing of the walls. The only way out in such a situation is urgent repairs.
When steam from a warm room passes through the insulation, it collides with a frozen wall, resulting in condensation that gradually turns into liquid. Over time, the insulation itself gets wet, mold and fungi form, and the insulation loses all its original properties.
Ways to get rid of condensation
The principle of getting rid of condensation is that you need to increase the temperature in the room and reduce the humidity. To retain heat, sometimes it is enough to replace the double-glazed window with a double-chamber one, but correctly installed ventilation on the balcony will help to overcome humidity, which will be able to provide an influx of fresh air and timely exhaust. A mounted supply valve on a window or a slightly open window will help get rid of condensation forever. And a prerequisite is properly laid insulation.
External insulation
This is the most effective way to create a comfortable state in a room. External insulation is a structure of several layers, starting with sheathing with mineral wool or foam boards, sealing seams and cracks, followed by laying construction mesh and plaster. This insulation allows you to move the dew point outside, beyond the inner wall. The balcony becomes warm and dry, as condensation does not form on it. The only disadvantage of such insulation is the complexity of execution. The design of the outer wall of a balcony is not always within the control of the average resident of a city apartment.
Where to begin
Since any work related to the redevelopment or refurbishment of residential premises requires permission from the state housing inspection, you first need to collect a package of documents:
- Redevelopment project signed by an authorized BTI specialist;
- Technical report on the safety of residential premises for living;
- Documents confirming the legal rights to own the property;
- Certificate of compliance of the project with fire safety standards;
- A document indicating the consent of the remaining residents to the redevelopment.
In some cases, authorities may require a certificate confirming that the house is not in dilapidated or disrepair.
Internal insulation
If it is not possible to insulate the wall from the outside, resort to interior decoration. In this case, the same task remains - to prevent warm steam from coming into contact with a cold surface. To get rid of condensation and prevent rapid wear of the insulation, a special vapor barrier is used. To do this, when insulating the balcony, foil or polyethylene is placed between layers of insulation, for example, polystyrene foam. For this purpose, special balcony vapor barrier insulation is produced. It is not recommended to use mineral wool for insulation purposes.
In this case, the dew point is located in the inside of the balcony. Since the insulation gradually changes its temperature under the influence of warm air and a cold wall, the dew point moves inside the insulation. Protection against condensation occurs due to the fact that the warm side prevents condensation from forming on the surface of the insulating material, and the vapor barrier itself does not allow it to pass inside.
In this case, the loggia, in which all insulation standards are provided, the ventilation system is correctly installed, and sufficient heating is provided, for example, using an electric radiator or a “warm floor” installation, will become another comfortable part of the apartment at any time of the year.
Beginning of work
The first thing to do before arranging a sauna is to prepare a balcony.
For this purpose, continuous glazing is performed. In this case, the wooden elements will be protected from the effects of precipitation, and the level of thermal insulation of the room will increase significantly. Some of the insulation elements are made to open. This is followed by waterproofing the balcony. First of all, you need to cover the floor. Before laying the waterproofing sheets, the base of the balcony is leveled and treated with penetrating waterproofing. Then the power supply is introduced. On the residential side, the input is equipped with a packet switch.
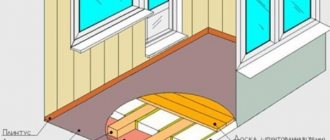
Floor
The best option for insulating a balcony is the use of polystyrene foam boards. This insulation practically does not conduct heat and has good waterproofing properties. Floor insulation is carried out in the following order:
- The logs are secured to the base using dowels. They are made from 30-40 mm timber. The height of the logs must be no less than the thickness of the insulation.
- In places of fastening, waterproofing is restored using liquid sealant.
- Thermal insulation boards are laid between the joists. They can be glued to a layer of waterproofing. However, they are often left loose.
- The seams between the insulation and the joists are sealed with sealant.
- A second layer of waterproofing is laid on top of the polystyrene foam.
- The final finishing – lining – is installed.
During work, you should adhere to safety rules. After such procedures, you can begin finishing the walls.
Waterproofing a balcony with your own hands is quite simple - it is important to select the necessary materials
Walls
To insulate the walls, the same material is used as for the floor - polystyrene foam. Penofol or foam glass are also often used. To secure the insulation to the walls, a special frame is made of beams. There should be a distance of 40-50 cm between the slats. Insulation is placed in each cell. Often pieces of material are not secured at all. When insulating a large area with mats, they are secured with special nails. The insulation layer consists of the following elements:
- insulation material
- diffusion film;
- clapboard finishing.
The top of the insulation is covered with a vapor barrier. This allows you to protect the material from moisture and condensation, as well as significantly increase the service life of thermal insulation and increase the safety of the balcony walls.
Often walls are insulated with polyethylene. The rolled material is thinner than mineral wool. In addition, it has a foil surface on one side. Aluminum protection reflects heat.
Penofol is laid with foil inside. The material is secured using wooden slats, which are nailed on the outside. After the insulation is laid, the walls are covered with clapboard. A photo of such a sauna on the balcony can be seen below.
Ceiling
Ceiling insulation is carried out in the same way as walls are insulated. However, in the case of insulated, the thickness of the insulation is less. Other aspects of the technology remain the same:
- first you need to fill the frame;
- then lay the insulation;
- fix the vapor barrier, perform finishing.
Such procedures will help to reliably protect the room from heat leakage. The work is done quickly and easily. The main thing is to follow the plan.
Ventilation
An important stage is the implementation of ventilation made in the outer wall. It will ensure the outflow of steam and eliminate foreign odors from the steam room. Ventilation is installed simultaneously with the construction of the ceiling. The outlet is equipped with a plug. It is made quite dense, which ensures heat retention in the room. For the plug, a piece of foam plastic cut to fit the dimensions of the hole is usually used.
Wiring
The electrical wiring stage is one of the most critical. Electricity is a source of increased danger, and moisture can cause a short circuit.
The lighting of the steam room must be closed. It is also necessary to reliably protect it from moisture. Thermal spotlights are often used to illuminate the sauna. They have a fairly high level of protection against moisture.
To protect the wiring from short circuits, the system is equipped with a special disconnect device (RCD). If you do the wiring yourself, you should follow the following sequence of actions:
- install a panel equipped with a 25 A circuit breaker;
- Use it to route wires to electrical points.
It is worth considering that only installation of lamps can be done inside the bathhouse. Switches and sockets must be installed outside. To protect the cable, corrugated pipe should be used. Its ends are carefully sealed.
Ventilation on the loggia: how to make a hood on the balcony
The loggia is one of the smallest rooms in the apartment. When glazing with metal-plastic windows, ventilation on the balcony must be provided.
What can a lack of ventilation cause?
Otherwise, the following consequences may occur:
- The appearance of mold on walls and other surfaces;
- Constant condensation on the glass;
- Increased humidity and, as a result, an unpleasant putrid smell in the apartment.
Condensation forms due to the difference in temperature between the outside and inside the room.
Advice! In order for the loggia to be dry and well ventilated, it is recommended to provide external and internal insulation along with ventilation. It is advisable to insulate both the walls and the floor.
How to make ventilation on a balcony as simple as possible
If it is not possible to install a fan on the balcony, the best solution is a supply air system. Most often there are 2 types used: window ventilation valve or diffusers.
Ventilation on the loggia using a window valve
A modern simple solution is to install a special valve on the top of a metal-plastic window. It is a PVC product in the form of a narrow box, which is inserted into the gap between the frame and the sash.
Its operating principle is simple - fresh air enters the duct channel from the street and then onto the loggia. The valve can be universal or consist of two blocks (external and internal).
The advantage of such ventilation is its low cost, the disadvantage is that it is not suitable for every window structure or requires violating the integrity of the metal profile.
Diffusers and grilles
The easiest way is to install a grille or diffuser on the loggia. The grille will simply let fresh air from the street into the loggia. The disadvantage of this solution is that in winter cold air will pass through it, you will have to take measures and seal the grille on the outside.
But if you install a diffuser, then there will be no problems in winter. The diffuser design involves adjusting the air supply, as well as completely blocking the flow.
There are two types of diffusers: exhaust and supply. Adjustable devices have blinds inside, with the help of which you can change the direction of the air. They are made of plastic or metal. Plastic ones do not rust, and metal ones are equipped with an anti-vandal system.
Diffuser installation
You will need a hammer drill, plaster, and sealant. The installation principle is the same as for a fan:
- Make a hole in the wall.
- Secure the diffuser with plaster.
- Apply sealant to the joints around the edges.
Description
Based on the technical specifications and proposed additions, a project of aluminum grilles for the balcony was created.
To optimize the use of balcony space, it was proposed to design the right side also in the form of a lattice cabinet in the same style.
The left side hides the elements of the ventilation system, and the right side will be used for household purposes. needs (storage of bicycles and small equipment).
The opening modules of the grilles are made in the form of doors on hinges and equipped with latches.
In the production conditions of the NEAL enterprise, gratings (like “blinds”) were manufactured using argon welding of aluminum.
After powder painting, the aluminum grilles were installed on site.
In particular, a canopy-roof was installed over the resulting room for protection from precipitation, made of polycarbonate and sound-absorbing material “Izolon”.
Features of insulation of balconies
To protect building materials from mold due to the destructive effects of condensation, it is important to take care of the correct installation of double-glazed windows, as well as the insulation of the balcony itself. If there are no problems with the windows and they are installed correctly, you should pay attention to other parts of the allocated space:
- semi;
- walls;
- ceiling.
Experts recommend using external insulation of the walls of the structure. A high-quality foam layer allows you to achieve a better result due to the displacement of the “dew point”. But you should also be prepared for the fact that such work will cost more than what can be done indoors.
For internal insulation, walls, ceilings and floors must be repaired. For them, it is best to use thermal insulation materials such as polystyrene foam or penoplex. You can also use construction glass wool. But, when laying it in the walls of the structure, you should be careful. Small particles irritate human skin. In addition, you should protect your own eyes and respiratory organs by using goggles and a respirator.
For the floor, it is best to use OSB boards, on top of which a special moisture-proof film is spread. After all insulation measures have been completed, you should begin finishing the room.
The most budget option
If the walls of the balcony are covered with fungus and there is an unpleasant smell, this is the reason for the lack of ventilation. Being in such conditions is dangerous to your health. Especially for people susceptible to chronic respiratory diseases. This can be avoided by using natural ventilation. Its advantage is that there is no need to purchase any devices.
All that is needed for natural ventilation is air flow. This can be provided by a regular window, which has several opening positions. It is these positions that allow:
- Open the window completely if you need to quickly get rid of an unpleasant odor or cool the room;
- speed up ventilation in the upper part of the room by setting the sash to vertical opening mode;
- fix the window in the “micro-check” position, opening the sash only 4-5 mm from the plane of the window frame.
The supply air mass will flow at different speeds at each position of the sash. Each person, if necessary, can choose a suitable mode for himself. In addition, there is another advantage. If the balcony is adjacent to the kitchen, it is easy to supplement the ventilation with a hood, which is often used to remove fumes from cooking.
Supply and exhaust ventilation will be more effective when using a kitchen hood only if it is in good working order and there are no obstacles between them - walls, furniture, etc. By opening the window slightly and turning on the equipment, you can achieve rapid air replacement, which is 3-4 times faster than using the usual natural option.
If you use a fan
One inexpensive way to provide high-quality ventilation is to install a fan on the balcony. This device can be mounted either in a window or in a wall. The main thing is to provide it with a through hole through which it will take in the supply air mass or remove unpleasant odors.
It is equally important what size balcony should be served by such equipment. If it is small, you should give preference to one fan that has the function of switching the direction of air movement. If the room is large, ventilation is carried out using two fans.
The simplest option is to install the device into the wall. For this you will need:
- fan;
- hammer drill or drill;
- drill;
- sealant.
To install the fan into the wall, you need to take a drill
If everything is ready, you can begin the installation. It is done like this:
- The dimensions of the working part of the device are marked on the wall.
- Using a hammer drill, a through hole is drilled strictly according to the established marks.
- A fan is installed and secured with sealant.
Do-it-yourself ventilation on the balcony will not take much time if all the materials and tools are available.
In addition, some craftsmen find an alternative way of arranging forced ventilation. As working equipment, you can use a regular cooler from the system unit of your home PC. If the household has such an unnecessary part, it should be used specifically for ventilation. In addition, it will save money.
But we must not forget that any fan requires an electrical connection. Therefore, after installing it, you will need additional sockets or extension cords. But, it is best to do hidden wiring.
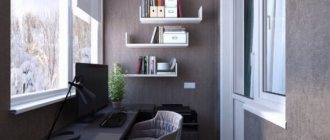
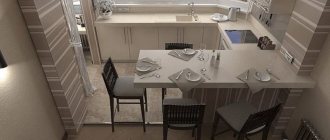
Organization of space
If a balcony or loggia is planned to be used as a technical, secondary space, then you can get by with one light source. It is convenient to place it centrally on the ceiling to obtain uniform lighting. A good option would be a model with an adjustable suspension, which allows you to direct the light flux in the desired direction and adjust the height of the lamp.
In other cases, to create full-fledged lighting, a comprehensive solution is required, especially for spaces with elongated geometry. On a narrow long balcony, you can install lighting only in the side part, but in order for it to be uniform, you will have to use both sides.
Lighting solution for narrow spacesSource prom.st
On a loggia, one source for improvement will also not be enough. If you use a ceiling model (chandelier or lampshade) as the main one, then the resting place will need its own light source.
Furniture (for example, a table and an armchair) and suitable lighting will help zone the space; on the loggia, the lighting design for the recreation area is selected based on convenience and personal tastes. It can be either a sconce, a table lamp or a model on a clothespin.
Winter garden on the loggiaSource i-okna.ru
Increasingly, they strive to make the space of balconies and loggias as useful as possible and equip them for specific purposes. In accordance with the method of landscaping, the type of lighting (basic, local, decorative) and lamps are selected. The design of lighting fixtures is chosen based on the interior style. The following arrangement methods are popular:
Rest zone. Owners of a loggia stretched along the floor can zone it using accent light. To do this, it is enough to place a table and a chair in the corners, complementing them with sconces or a directional lamp. An LED garland of retro lamps stretched along a load-bearing wall will help make the space more comfortable; It will turn out economically and stylishly.
Comfortable relaxation areaSource domosedy.com
Under the office. An LED panel is suitable for arranging a work area. To make it convenient to work, you need to take care of protection from reflections on the screen. A replacement for the LED panel can be an overhead backlight with adjustable brightness and direction of light. To prevent the glare of sunlight on the screen from interfering with work, blinds are hung on the window.
Working areaSource legko.com
- Winter Garden. Gardeners who fill every available space with pots and containers of flowers will need light with certain characteristics in terms of power and color temperature. LED panels will be a universal solution, and individual LED lamps on clothespins are suitable for exotic plants.
- Hobby. Bright lamps are suitable for a workshop or mini-sports room. You can additionally hang a source of directional light above your desk to do what you love.
Lighting design for the gymSource winstyle.by
About LED strip lighting in the following video:
Which glass unit is better?
An equally important issue of saving from the negative effects of condensation is the choice of double-glazed windows for the future window on the balcony. Even with the simplest air exchange scheme, good glazing will avoid condensation. In addition, the safety of the rooms adjacent to the balcony or loggia - kitchens, living rooms, bedrooms, etc. - depends on the quality of the material itself. Therefore, you should know about the features of choosing double-glazed windows.
The most budget option is one glass. Condensation forms on it very quickly, so it is better not to use it.
To prevent the glass from sweating, you should buy double or triple glazing. They are ideal not only for balconies, but also for any other rooms with high humidity and air temperature (bathroom, kitchen, etc.).
Thermal insulation errors
Residents expand the space of their living rooms and kitchens by adding a balcony to the adjacent room. The technical characteristics and microclimate in both rooms must be the same.
The following signs indicate errors in balcony insulation:
- mold in the far corners;
- water on the walls and condensation on the cladding;
- deformation of wooden parts.
The cause of such defects may be insulation flaws. If there are gaps between the ceiling and walls, in the floors, or on the balcony, drafts appear. This leads to dampening of materials and furniture due to cold air.
The appearance of water and condensation is caused by:
- malfunction of heating or its absence;
- improperly designed ventilation on the balcony;
- poor-quality insulation, flaws in the installation of thermal insulation.
Moisture appears on surfaces that become colder. Ventilation allows you to equalize temperature and humidity. If the indicators on the balcony and living room differ significantly, high-quality air exchange will help to avoid such troubles.
Consequences of poor ventilation on the loggia
In the absence of ventilation, dampness and fungus from the loggia gradually spreads to adjacent rooms, especially to hard-to-reach places. Wooden, metal interior items and furniture will deteriorate from exposure to dampness.
Due to poor flow of fresh air, the computer will overheat (if you have a workplace on the balcony), which will lead to failure of the boards. Increased dampness is detrimental to machinery and equipment stored on the loggia.
The smell of stale air in the absence of ventilation spreads throughout living spaces. Residents find it difficult to breathe, their health worsens, and headaches appear. A person begins to get sick often, immunity decreases, apathy and fatigue occur. Pathogenic microorganisms actively multiply indoors.
How to calculate the volume of clean air inflow?
The loggia occupies a small room, so ventilation on the loggia does not require additional calculations. When making calculations, you should use the following indicator: per 1 person in the room there should be 30 m3/h of clean air. If the room is designed to accommodate 3 people, then it is recommended to provide an influx of 90 m3/h of clean air.
If the loggia is combined with a living room into one room, the volume of inflow is calculated using the formula. The volume of the loggia, the air exchange rate increased by 25%, and the flow circulation taking into account the calculated rate are taken into account. Let's look at how to calculate the volume of inflow.
Let's take the following data:
- air flow speed according to current SNIPs – 1 m/s;
- loggia size: length – 4 m, width – 2 m, ceiling height – 3 m;
- air exchange rate increased by 25% - 6 m;
- the air mass exchange rate is 3.75.
According to the formula V=a×b×h=4×2×3=24 m3, where V denotes the volume of the room. It follows that the air exchange with an increased frequency will be 24 m3 × 3.75 = 90 m3. To maintain the flow of fresh air in a given volume, it is necessary to calculate the diameter of the ventilation shaft. In our example, a ventilation duct with a diameter of 16 cm is sufficient.