Currently, products made from natural materials are quite expensive, regardless of their scope of use and purpose. This fully applies to the construction industry, where wooden structures have begun to be replaced by products made from artificial materials (windows, doors, pipelines, fittings, etc.), in the manufacture of which polymer substances (plastics) are used. The development of technology has made it possible to create a separate line of production related to the production of plastic profiles, and this led to the creation of production facilities for plastic windows, and as a result, related products (plastic for finishing slopes, window sills, various components). Ventilation grilles for window sills, the principle of their operation and types, advantages of use and how to choose, as well as how to install it yourself and a price review is the topic of this review from the editors of HomeMyHome.ru.
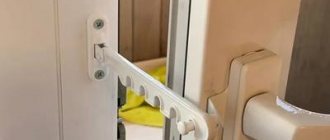
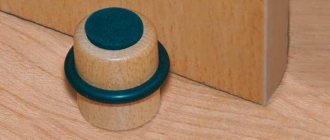
Ventilation grilles installed in window sills can have different shapes and be made of different materials.
The principle of operation of ventilation in the window sill of plastic windows
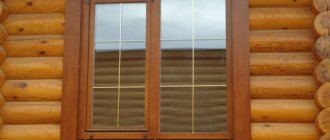
In rooms with windows, heating radiators are usually located under the window opening, which in the autumn-spring period, when heating devices are in operation, leads to the formation of condensation on the window sill. The formation of condensation is caused by temperature differences from different sides on the surface of the window sill. To prevent the occurrence of this negative phenomenon, use window sill grilles for heating radiators.
The operating principle of ventilation created in a window opening using special grilles is based on the natural circulation of warm air in a confined space. Warm air from the heating radiators rises upward, passing through convection grilles installed in the window sill, while the temperature difference on its upper and lower surfaces is insignificant, which ensures the absence of condensation.
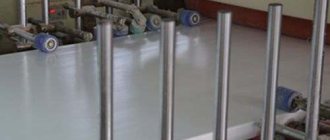
Air circulation in a window opening with a heating system installed underneath it
What causes condensation to form?
The concept of condensation refers to water that settles on window glass and frames due to excess presence in the air.
Most often, the occurrence of condensation is provoked by the following factors:
- operation of heating radiators;
- room temperatures are too high;
- making serious mistakes when installing windows in openings;
- lack of ventilation or incorrect operation of these products;
- installing a window sill whose width is too large and covers the radiators, resulting in water diffusion;
- high thermal conductivity of walls and window structures.
In most situations, the heating radiator is placed directly under the window sill tabletop, therefore, this element gets very hot and causes condensation. To get rid of this trouble, you need the correct installation of a ventilation grille that is built into the window sill.
Advantages of convection grilles for window sills
The presence of ventilation grilles for radiators of the heating system, installed in the window sill, has a number of undeniable advantages that ensure an optimal microclimate in the room where they are installed. In addition, the advantages of their presence include the following indicators:
- natural ventilation in the room improves;
- the issue of preventing the formation of condensation in the window opening is resolved.
The advantages of such products can also be considered:
- versatility of the installation method and ease of installation work;
- variety of shapes, designs and colors;
- ease of use and maintenance;
- affordable price for models made of plastic.
Convection grilles can be installed in different ways, depending on the materials of the enclosing structures, the design style of the room and the personal preferences of the user
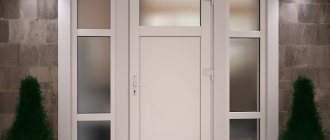
Supply valve to the wall: pros and cons
Modern people understand that their health and home microclimate depend on quality ventilation. In addition, it is necessary to install a special inflow that will allow air to be distributed over the entire area. If everything is done efficiently and according to the instructions, then you will avoid high humidity, the formation of fungi and other harmful organisms and bacteria.
Currently, every family has plastic windows. The fact is that they allow you to hermetically seal the room, do not allow excess air to pass through and do not require unnecessary attention. That is, for care you will need a small cloth and plain water. It’s enough to wipe them once a week and that’s it, nothing else is needed. Of course, all this is very cool, but there is a small minus. Such tightness does not allow ventilation to operate in standard mode.
In this regard, a rather logical question arises: what to do in this situation? And the answer is very simple. You should install a special inlet to the ventilation system. Fortunately, the modern market has a large number of such materials and parts.
Types of ventilation grilles in the window sill for radiators
Convector grilles for batteries are classified by material and color, size and configuration, as well as their design, which assumes a static or adjustable shape.
Material and color
For the manufacture of such products, various materials are used, namely:
- plastic is the cheapest material, making products made from it accessible to users of any income;
- metal is the most resistant material to external influences, therefore ventilation grilles made from it have a long service life;
- wood is an environmentally friendly material, which leads to the high cost of products made from it.
A variety of colors, shapes and designs allows you to choose products in accordance with the design style of the room where they will be installed.
The color of the design of ventilation grilles made of plastic and metal can be different, which depends on the chosen dye option, and for wooden analogues - in accordance with the types of used tree species.
Dimensions and shape
The shape of ventilation grilles can be absolutely varied: from classic rectangular and round to diamond and asymmetrical configurations. The most popular sizes of ventilation grilles are for:
- narrow models – 50×300 and 50×500, 50×600 and 50×800 mm;
- medium width models - 80×500 and 80×600, 80×800 and 80×1000 mm;
- wide models - 100×500 and 100×600, 100×800 and 100×1000 mm.
Decorative grilles designed for ventilation and installed in the window sill, in sizes different from the standard ones, can be ordered in accordance with the required need, determined by the location of their placement and the required air circulation.
Narrow models, as a rule, only frame the ventilation hole in the window sill
Adjustable and static models
By their design, these products are classified as static and adjustable. Static models can be built-in or overhead, which determines the conditions for their installation in the window sill. Built-in ones are mounted directly into a manufactured seat, and overhead ones cover the ventilation holes on top.
Static ventilation grilles are a one-piece structure with intermediate connecting elements. Adjustable analogues work on the principle of operation of blinds, when using a drive mechanism you can open and close their internal space. In addition, according to their design, static and adjustable models are divided into those installed in the plane of the window sill and those protruding above its surface.
Closable ventilation grille
Related article:
Which heating radiators are best for an apartment? The price of the product is not the only selection criterion. Here it is important to think through everything to the smallest detail - from the aesthetic component to practicality and economy. We'll talk about this in the article.
Types of gratings
Most often, the design dimensions are standard, so they do not always fit exclusive, atypical window sills. Manufacturers have provided for this, so on the building materials market you can find round-shaped products, distinguished by their compactness, or rectangular models for narrow surfaces (their width is 60 * 80 mm).
The holes can be varied - rectangular, round or shaped. Construction store specialists will be able to help you choose more quickly if you show a photo of the window opening and the location of the radiators.
Regarding design features, adjustable models are more functional, allowing you to change the direction and speed of air flows. Unregulated products are slightly cheaper.
When choosing, you should start from the material. This could be plastic ventilation in the window sill. Before purchasing, you need to weigh the pros and cons. For example, a PVC lamella will last about 2.5 years, then deformations will begin. And the palette here is not the richest.
Ventilation accessories made of steel are much more practical. Some manufacturers make products to order, so different designs are possible. They are painted according to the RAL table, which guarantees a large selection of shades.
Wooden grates are also quite durable. They are most often used in kitchens if the window sill is used as a countertop and is stylized. Aluminum models have increased resistance to moisture.
How to choose
The main criteria for choosing a ventilation grille for a window sill are the following parameters:
- Length of the product. The length of the grille must correspond to the length of the battery installed under the window sill. This can be a single structure consisting of several individual elements.
- Section of the product. The width or cross-section of the ventilation grille must ensure sufficient air circulation to prevent condensation from forming on the surface of the window sill.
- Presence and quantity of connecting elements. This parameter determines the possibility of foreign objects falling into the internal space behind the window sill. This is especially important if the front side of the heating radiator is protected with facing material.
- The style, color and design of the design determine the placement of a particular product.
- The cost depends on all of the above parameters.
One of the unconventional ways to design ventilation holes on a window sill
Related article:
Screen for the heating battery. Why is it needed, what materials is it made from; Tips on choosing, assembling the box and increasing the efficiency of hidden batteries, review of prices for popular screen models - read in the publication.
Useful tips
There are several important recommendations that will prevent condensation from occurring.
For wide window sills, installing ventilation grilles is a mandatory step. The grilles must be cleaned or replaced regularly to ensure proper air circulation.
Try to keep the number of plants in pots on windowsills to a minimum, as frequent watering promotes condensation.
If you are not confident in your abilities, it is better to entrust the installation of ventilation grilles to professionals.
Source: klivent.biz/ventilyaciya/reshetka-v-podokonnik.html
Choosing an installation location
The location of the convection grill for the battery is very important, because... the successful operation of building structures and heating system elements depends on this. The main criteria for the correct installation of such equipment are the following rules:
- the grille is installed directly above the battery;
- the size of the product (its length) must correspond to the length of the heating radiator;
- if possible, the grille should be moved as close as possible to the plane of the window opening.
In addition, the placement location must match the design style of the room where installation is being carried out, complementing or focusing attention on this element of decoration.
Using several separate products to frame ventilation openings on a large window
Methods of dealing with “crying” windows
If foggy windows were only an aesthetic problem, then it could be solved with the help of napkins or cleaning cloths. But falling condensate indicates a poorly functioning ventilation system. And this is the development of fungus, musty air in the apartment, damaged surfaces, rust, poor health of the apartment’s inhabitants.
Therefore, it is necessary to take effective measures:
- The window sill should cover heating radiators by no more than one third of its thickness.
- When replacing or installing windows, carefully make slopes and seal cracks.
- Constant ventilation of rooms, reducing air humidity.
- Repair broken ventilation ducts.
- Installing a ventilation grille in the window sill.
How to embed a grille into a window sill
Installing a ventilation grille in a window sill is a job that every tenant can do on their own, you just need to have experience working with plumbing and hand power tools, as well as have free time and the desire to work with your own hands.
What tools will you need?
To perform the work you will need tools such as:
- tape measure and construction square;
- pencil or marker;
- electric jigsaw or angle grinder (“grinder”);
- electric drill or screwdriver;
- a set of drills of various diameters.
In addition, you may need glue for plastic and self-tapping screws designed for attaching certain types of ventilation grilles, depending on their design and installation method.
Aluminum model GTV series 60x480 mm
Step-by-step process of installation work
The algorithm for installing a ventilation grille in a window sill is as follows:
| Illustration | Description of action |
| Markings are made on the surface of the window sill board in accordance with the size and number of products used. | |
| In the places where the corners are marked, holes are drilled using an electric drill (screwdriver). | |
| Between the drilled holes, using a grinder or an electric jigsaw, the surface of the window sill is sawed through. | |
| The cut fragment is removed, and the cut areas are cleaned. | |
| The grille is installed in the prepared hole and, if necessary, secured with glue or self-tapping screws. |
As already written above, installing a ventilation grill is quite simple, as evidenced by this work algorithm.
Basic installation methods
Installation of the ventilation grille does not require special knowledge and skills. It can easily be done by a home craftsman with patience and accuracy. Most industrial products consist of two parts:
- main body, mounted directly on a hole in the wall or door;
- a removable part inserted into the openings of the housing, which allows you to inspect and clean the channels of the ventilation system without any problems.
Begin to hang the internal ventilation grille from the first part, which plays the role of a frame. This is done using fastening materials or adhesives. Before this, the outer surface of the ventilation hole is prepared accordingly. It should be smooth and clean. Typically, the grille is placed on the wall after the finishing coat has been applied to it. This can be done in different ways:
- Fastening with screws or self-tapping screws is carried out on a solid wall made of concrete, wood or plasterboard. To do this, through holes are drilled in the grill body in places covered by the removable part, which are countersunk to the shape of the cap. You will have to install dowels in concrete or brick in appropriate places using a drill. When constructing a grating without a removable part, after installation, the screw heads are puttied and painted to match the color of the base material.
- Fastening with plinths or glazing beads is usually used for wooden products that fit well into a country-style interior made entirely of wood. In this case, self-tapping screws or finishing nails with a reduced head size are also used.
- Industrial models with standard spring-pressed spacer elements included in their device can simply be inserted into the ventilation hole, which must have standard dimensions for this.
- The easiest way to attach a plastic grill to any base is with glue. This is especially true for walls lined with fragile materials such as ceramic tiles. For this, compositions such as “liquid nails” are usually used. They are applied in a continuous stripe to the back side of the part, which is pressed against the wall and fixed with masking tape until completely dry. In this case, it will no longer be possible to dismantle the fragile part without destroying it.
The removable part of the grille is tightly inserted into the base fixed to the wall. In this case, for aesthetic reasons, it is better to rotate it so that the holes between the slats of the blinds are not visible to a casual observer standing on the floor of the room
When selecting and installing the transfer grids, pay attention to ensure that light rays do not directly pass through them. This can reduce sound insulation and does not look very nice
Plastic models usually include a thin mesh, which quickly becomes clogged with dust, reducing the effectiveness of the ventilation system. That's why most craftsmen don't install it. Otherwise, you will have to regularly clean the mesh.
Photo gallery of decorative ventilation grilles for window sills
This section of this article provides some possible installation options for various modifications of the products in question.
Decorative grille for window sill and table top
Slot type model size 720×70 mm
Models made of polished brass look stylish and expensive
Metal models look stylish on a stone surface
Round models look very original and unusual
Option for using slot-type products
Overhead plastic products are the most affordable option to use
Adjustable louvre-type grilles differ in the type of shutter drive, size and materials used in their manufacture. A variety of offers allows you to choose a model in accordance with your requirements
The color range of plastic products is quite extensive, which helps designers when decorating rooms in the same style
Summarize
Such elements are a fairly convenient way to get rid of dampness and fungus on slopes and double-glazed window frames. And the fact that the cost of plastic products is low, and installation is quite simple, only adds confidence in the necessity or simply profitability of their installation.
Sources
- https://ventihome.ru/elementy/reshetki/ventilyacionnaya-reshetka-v-podokonnik-konvekcionnaya-dlya-batarey.html
- https://HomeMyHome.ru/ventilyacionnye-reshjotki-dlya-podokonnikov.html
- https://okna-comfort.ru/ventilyatsia/reshetki
- https://oventilyacii.ru/otoplenie/ventilyatsionnye-reshetki-dlya-batarej.html
- https://seti.guru/ventilyatsionnyie-reshyotki-dlya-podokonnikov
- https://stroy-podskazka.ru/furnitura/podokonniki/ventilyacionnaya-reshetka/
How do you like the article?
Sergey Vladimirovich
Ask a Question
At what price can you buy ventilation grilles for a window sill - price review
Ventilation grilles for window sills can be purchased at building materials stores and retail chains that deal with similar products and also specialize in sanitary equipment. In addition, similar products are offered by online stores of various types, both working with building materials, and with plastic products and elements of decorative finishing of premises.
From companies engaged in the production of interior decoration elements, you can order ventilation grilles according to individual sketches
The following table shows the cost of individual models of ventilation grilles as of the second quarter of 2022:
| Image | Model and material of manufacture | Overall dimensions, mm | Average cost (as of May 2022), rub. |
| ERA 4513 (plastic) | 450×131 | 179 | |
| Vents МВ450/2 (plastic) | 450×70 | 151 | |
| Vents МВ350 (plastic) | 350×35 | 182 | |
| Vents МВ430/2 (plastic) | 450×70 | 137 | |
| Vents МВ450 (plastic) | 450×15 | 91 | |
| SETE (aluminum) | 480×60 | 370 | |
| GTV (inox) | 500×100 | 850 | |
| Werzalit (aluminium) | 800×80 | 1850 | |
| AIRO-LD (aluminium) - adjustable | 340×61 | 294 | |
| AIRO-PE (aluminium) - perforated | 700×352 | 763 |
The presence of a large number of models made from various materials and in a wide range of overall dimensions allows you to choose the necessary product for a specific location, and the ease of installation allows you to do the installation yourself.
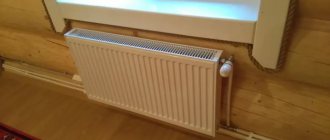
Calculation of the required number of radiator sections
With a ceiling height of 2.6 - 2.7 m, the method of calculating the number of sections based on the quadrature of the room is suitable.
Procedure:
- Find out the total area (from the documents for the apartment, or by multiplying the length and height). Let's assume this is a three-room apartment 56.5 m2.
- This data is multiplied by 100 W. (56 x 100 = 5600 W, or 5.6 kW). We received a total amount of heat sufficient to heat this apartment.
- According to the accompanying documents for the radiator, it is determined how many watts of energy one section can produce. Let's say for the aluminum A500 it is 185 W.
- Next, the total amount of heat must be divided by the energy of one section: 5600: 185 = 30.3. It is always recommended to round up, so to heat a three-room apartment with an area of 56 square meters. m, you will need 31 sections of A500 aluminum radiators.
Radiators after installation Of course, this method of calculation is ideal under ideal conditions.
If the apartment is well ventilated or has regular wooden frames, the heating output may not be enough. It is also better to make additional sections for corner housing and on the first and last floors. If you decide to install a larger number of sections than before, you need to remember that long radiators may not heat up effectively when connected from the side. You can improve performance by installing a water flow extension.
Screen manufacturing materials
You can buy a decorative screen for a heating radiator from the manufacturer. First you should study all the possible materials from which it can be made.
Tree
Wood panels are popular due to their aesthetic appearance. Wooden grilles mean quality, comfort, and a presentable appearance. This material is environmentally friendly, which allows it to be used in children's rooms and medical institutions.
Nevertheless, wood is subject to drying out and gradual deformation, so you need to have a source of moisture, at least place a vessel with water nearby.
Metal
Metal grilles add a modern touch to the interior. Depending on the color and type of perforation, they can be used in rooms of different types. The advantage is that you can choose almost any shade that matches the color of the walls, or, conversely, contrasts with it.
Thanks to factory equipment, you can “embroider” any patterns with holes through which heat will flow on a metal sheet. The metal heats up quickly and can cause burns in children, so you should not install such a screen in a nursery. In addition, if the material is thin, it will be susceptible to deformation upon impact.
MDF
MDF gratings are a budget option for fans of wood products. Thanks to its structure, the fibreboard will not dry out due to overheating. In addition, modern material can be made in different colors: oak, wenge, walnut, cherry and others. Such a variety of colors can rarely be seen in the line of wooden panels.
The product is equipped with a perforated HDF board. When caring for the panel, you need to remember that MDF is “afraid” of contact with water.
Plastic
When choosing a plastic screen, you must be sure to familiarize yourself with its performance characteristics. Many types of plastic become deformed when heated and begin to release harmful substances. Although the cost of plastic elements is low, you still need to make sure that this part lasts long enough.
The industry offers a wide selection of panels of different shades. In addition, a drawing, for example a 3D image, can be applied to the screen.
Glass
A very interesting way of decoration, related to the Art Nouveau style. The glass panel on the battery looks stylish, expensive, and unusual. The colored screen is prepared from tempered glass for stained glass, its edges are polished. Glass can be colored or act as a background for drawing, photo printing, or airbrushing.
It is possible to use methods of artistic cutting and sandblasting. A wide range of decoration methods makes this screen exclusive. Condensation may accumulate on the back side of the glass wall. This process can be prevented by making perforations - several holes for air circulation.
Forging
Forged grilles also have great potential for creating exclusive designs. Almost every product is original. And at the same time, it sets the tone for the entire room. Forging has a long, well-known past: elegant grates adorned the fireplaces of old European castles and Russian noble estates.
When choosing such a decorative heating screen, you should select the appropriate elements for interior design. These could be castle-style lamps, imitation brickwork, tapestries or a piece of antique furniture using Gothic elements such as pointed arches.
Drywall
Plasterboard boxes are the most common because they can be made by hand. The choice of final finishing is wide: the product can be painted, wallpapered or decorative plaster applied.
Disadvantages include the difficulty of performing perforation, which increases thermal conductivity.
Exotic materials
In addition to well-known and proven materials, you can choose an exotic coating for the product. For example, use bamboo panels, jute rope. It’s also worth trying leather - it’s environmentally friendly and interesting. The style of such a room will be colonial, southern.
Thanks to special perforation lines, the leather breathes and allows warm air to pass through.
What you need to do to improve battery efficiency with a screen
The screen to some extent reduces heat removal from the surface of the battery. That is, the difference in coolant temperature between direct supply and return will be less.
It is impossible to talk about a clear deterioration in the convection rate due to the presence of a screen. It is enough to give an example of electric convectors, in which the heating element is located in a housing in the form of a box with an inlet at the bottom and an outlet at the top. This device even improves convection, since the box acts as a vertical air duct, which increases the flow rate.
But what is good for convectors is not suitable for radiators. The battery works on both convection and radiation (radiation). And the screen absorbs some part of the infrared radiation, and reflects some back. And if the thermal energy absorbed by the screen creates conditions for secondary convection, then the reflected energy heats the facade. This heat can be made to work to heat the room. Even under normal conditions (without a screen), it is recommended to install a reflective plane behind the radiator, which returns infrared radiation from the inner surface of the battery into the room. Typically, foil foam (or similar material) is used. When installing a screen, this recommendation is doubly relevant.
Design
Screen design is an important factor. But to ensure that the chosen option does not reduce the functions of the radiator battery, some conditions should be taken into account:
- the facing base must conduct heat well;
- infrared rays should not remain in a closed space, but should effectively go into the room;
- the internal surface of the structure should be dark, since heat absorption and heat transfer in this case will be better;
- the color of the outside does not affect the quality of heat transfer - you can choose the shade that best suits the interior of the room;
- A special screen with foil will facilitate the high-quality redirection of heat inside.
This accessory part includes foam insulation. This element prevents heating of the external wall at the radiator attachment points. Without heat redirection, heat transfer is reduced very significantly in some structures. It is advisable to place heat-reflecting pads on the wall itself, behind the radiator. Decorative grilles are mounted in front of the battery.
Small holes in such a hinged casing will limit the flow of convection currents. If this protection option is installed, heat loss will increase, which means the cost of heating the medium to heat the room.
Fastening with glazing beads or plinths
This method is used infrequently and is typical for rooms with wooden flooring.
For installing a ventilation grille by tightly fitting it using glue or clamps directly into the hole itself, it is quite easy to perform. For such fastening, assembly adhesive, silicone or liquid nails are suitable. Using a special glue gun, glue is applied with a small protrusion above the depression along the entire perimeter. Next, the grille is applied to the mounting location - the wall, and fixed. After 24 hours, the glue dries and the grille is securely fastened. It must be remembered that the wall must be dry before installation, and the fixation with glue must be without gaps.
As a rule, an industrial grille is attached using spacers on a spring to a prepared hole. This method is simple and does not take much time.
Do not forget that for residential premises it is worth choosing ventilation grilles made of environmentally friendly materials that are harmless to the human body. If the grille is located outside, the material must be weather-resistant.
False fireplace
You can make a false fireplace from an ordinary battery. The main thing is that the heating device is located on a central wall, for example, in the living room or dining room.
How to beautifully cover radiators, screens and radiator grilles
For work use:
- screwdriver;
- saw;
- 10 mm plywood;
- furniture board;
- decorative metal grille;
- pencil and ruler;
- self-tapping screws;
- foam moldings;
- timber with a section of 3x3 cm;
- acrylic paint;
- wooden logs.
- First, a wooden box is made without one wide side. The dimensions of the box should be slightly larger than the dimensions of the heating device.
- A hole is cut out in the center of the other wide side, and a narrow long cutout is made below, like a woodcutter.
- The fireplace table top is fixed in the upper part of the box, and the fireplace shelf is attached between the holes.
- The box is decorated with foam moldings.
- The recesses from the screws are puttied and then sanded. After this, the fireplace is painted.
- Then on the battery you need to draw a fire that burns in the firebox.
- Now the fireplace box is fixed around the heating device so that the surface of the battery with the drawn flame is in the center of the largest hole.
- We put real firewood in the “woodshed” and put decor on the tabletop. A metal fencing grid is placed in front of the woodshed.