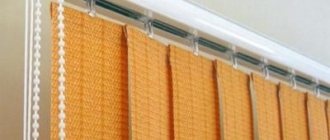
The starting profile is used during the installation of wall and ceiling cladding made of plastic panels; the element can be used when finishing surfaces with plasterboard boards, etc. Due to this element, the appearance of the tiled surface is significantly improved, work is accelerated, and the final quality is improved. The L-profile is installed in corners, near door and window openings. It is also used at the junction of wall finishing and floor coverings.
Collapsible starting L-profile
Improved starting collapsible L-profile
What is the difference between an ordinary starting L-profile and a collapsible one?
An ordinary profile is made using automatic presses and consists of one continuous element. This design creates problems for builders when cladding walls; it is difficult to work with - individual panels constantly go beyond the top strip during filling, and it is difficult to insert them back there.
Starting L-profile
In addition, this procedure is performed with a metal object, most often a kitchen knife, and it can damage the front surfaces of the panels. If excessive force is applied, their attachment to the support rail is disrupted. The risk of damage increases if the fixation is made with a stapler; such fastening is not reliable. When bending the panel to fit it into the profile, the thin tongue of the panel breaks off.
Start profile
Starting profile (L)
Collapsible starting L-profile
What are PVC panels
Plastic panels are an inexpensive decorative finishing material made of PVC (polyvinyl chloride) for interior decoration. PVC characteristics:
- tensile strength: 3.46MPa;
- resistance to alkalis and acids;
- ignites only when the temperature exceeds +391°C
- in the presence of flame;
- water absorption: <0.01%;
- weight of 1 panel = 0.66 kg.
Advantages of a collapsible starting L-profile
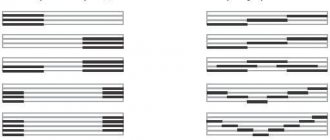
The width of the upper decorative front trim has been increased. If ordinary elements have a strip width that does not exceed 15 mm, then collapsible ones have a strip width of 22 mm. What does this give? It is much easier for builders to install panels; there is no need to accurately measure each of them, which takes a lot of time and increases the cost of work.
Installation of L profile
It is no secret that not all rooms have strictly vertical corners; often such a deficiency is present in the bathrooms of Khrushchev-era apartment buildings. If you use a regular profile, then such a panel must be mounted after taking individual dimensions for each panel. A wide collapsible profile can compensate for the difference in the width of the wall in the bathroom up to 4 cm, this is quite enough to compensate for construction defects made during plastering of the walls of the room.
Now you can stack all the panels, measure the width of the wall at the narrowest point and at the same time cut to length. The process of installing panels is accelerated by 25–30%, which is quite a lot for small rooms. Another plus is that the amount of unproductive waste is minimized, the length of the segments increases by about 4 cm, which allows most of them to be used for covering bathroom walls in the future. The distance between the corners of the walls and the door or window openings is small; in these places, if desired, you can easily fix the short panels remaining after cutting the standard ones.
It is possible to adjust the gap taking into account the thickness of the panels. This property makes the collapsible L-profile universal. The maximum thickness of facing materials can be up to 15 mm, which allows it to be used not only for plastic materials of various thicknesses, but also when covering bathroom walls with moisture-resistant plasterboard or wood panels. Moreover, regardless of the thickness, the tight fit of the top strip guarantees the absence of gaps along the entire height of the wall. The upper bar fits into the lower one with latches; they firmly hold the two elements along the entire length.
PVC panel (drawing)
When performing repair work, the risks of damage to the panels are minimized. If it is almost impossible to remove a panel from an ordinary profile without cracks, then with a collapsible profile it is much easier to replace it. Use a thin object to pry up the top bar and remove it from the latch. Next, the damaged cladding element is dismantled, a new one is installed and the decorative element of the collapsible profile is fixed in its original place. The work can be repeated several times, the design does not change its original characteristics and is reused without preparatory work.
Installing slats in the starting profile
The scope of application of the collapsible profile is expanding. It can be installed both at the beginning of the cladding and at the final stage. The element is used at the junction of the cladding with platbands, window and door frames, and when finishing walls and ceilings.
The order of finishing the walls changes slightly; below we will give step-by-step instructions for installing plastic panels on the walls of the bathroom.
Installation
Installing a profile for PVC panels is not a difficult task. Almost anyone can handle it. Before attaching the guides, several preparatory steps should be completed.
Leveling the surface. Initially, the walls or ceiling are analyzed for damage. If surfaces have large cracks or differences, it is advisable to eliminate them using special mixtures
But you can also construct it from special metal structures.
The profile fastening algorithm consists of several sequential steps.
Installation of starting elements. They are located along the perimeter of the finishing surface (ceiling, wall)
The starting profiles are fastened using brackets or special screws
It is important here to position them correctly horizontally and vertically. The installation of panels in the future depends on this
Installation of corner elements. In this case, both internal and external elements are used. In most cases, they can act as starters. They can be secured according to the same principle as the previous type.
Fastening of internal intermediate profiles. Systems of this type are installed on walls that are too long, where it is impossible to select a panel of the required size.
Plastic panels can expand or contract with temperature changes. Therefore, it is necessary that when installing in a profile, there is a small gap between the wall and the material. It is advisable to take it into account when designing the entire system. Before attaching all profiles, it is advisable to choose the direction of laying the sheets.
During installation work, you need to carefully take measurements to avoid errors.
Not every experienced specialist can do this right away.
When the profile frame is formed, you can begin installing and fastening the panels. The installation technology is selected individually and depends only on external conditions. In most cases, you just need to insert the end of the product into the groove of the profile. The panel is then leveled and nailed or glued to the frame.
Profiles for PVC panels are universal products that not only speed up installation, but also extend the life of the entire system.
How to install panels with a collapsible starting L-profile
Bathrooms have high humidity and temperature. Due to such operating conditions, we recommend using plastic slats and clips for the supporting frame.
PVC lathing
If the walls are smooth, then you can fix the sheathing with glue, but this method is not considered optimal; the walls of the room must “breathe” for natural humidity regulation. Wooden slats must be impregnated with antiseptic along the entire length, paying special attention to the ends. After cutting the slats to size, soak them in a chemical solution. If you don’t have it on hand, use ordinary vegetable oil.
Wood slats
Step 1. Calculate the dimensions of the wall minus window and door openings. When purchasing material, make a reserve of 5%; if you have little experience in performing such work, then it is better to increase the reserve to 10%. This is much more profitable than going to the store again to purchase the missing material. At the same time, purchase plastic slats and clips. They should be all over the wall at a distance of no more than 60–70 centimeters. Multiply the width of the wall by the number of rows. The guides are sold in standard lengths, buy one to spare.
Step 2. Check the condition of the wall surface; if large protrusions are found, remove them. There is no need to level the entire wall; pay attention only to those areas to which the guides will be fixed. To do this, make markings on the wall and mark parallel lines at the selected distance. Place a level board or level against them and look at the gap between them and the wall.
How to check the evenness of walls
Step 3. Use dowels to secure the outermost bottom and top plastic slats. For drilling, use a drill Ø 6–8 mm with pobedit tip. Drill the first and last holes first, secure the rail, and then install the intermediate dowels.
Practical advice. Before drilling holes, we recommend covering the floor near the wall with plastic film or paper; dust from drilling will accumulate on them. If this is not done, it will end up on the grout joints of the ceramic floor tiles. It is very difficult to remove it from there; you will have to wash the floor several times with a clean rag or sponge.
Installation diagram
Arranging a frame for a suspended ceiling made of plastic panels
Step 4. To speed up and simplify the process of installing the remaining slats, it is recommended to pull ropes between the outer ones. Their level controls the position of all remaining elements.
Important. The collapsible L-profile has one feature. Its bottom plate must have a stop, otherwise problems will arise when snapping the decorative top part into place. An ordinary profile does not have this feature; it can even be put on free-hanging cladding panels. To ensure support, the slats must be installed tightly against the wall, and the lower part of the profile must be attached to them.
Step 5. Measure the height of the profile, cut a piece to size. Disassemble it, fix the lower part to the supporting rails. You can fix it with self-tapping screws with a countersunk head or stapler staples, there is no difference, the profile does not support mechanical load.
Profile installation
Step 6. Prepare plastic panels taking into account the size of the wall. Cutting them off is much faster with a grinder. Stack 5–10 pieces on a flat table and draw a cut line. For cutting, use a thin metal disk. Make sure that the cutting angle along the entire height of the stack is 90°. A slight bevel appears - no problem. The collapsible profile has a wide top bar, it will hide errors of up to 4 mm.
Cutting a panel with a saw
Step 7. Try on the first panel, strictly observe its vertical position; it is difficult to correct non-parallelism later. The fact is that the plastic panels have special latches for a tight connection with each other. If you place them at an angle, the latches will not work along the entire length, this will be noticeable. In addition, the tightness of the connection will be broken, which is very undesirable in bathrooms.
PVC panel installation technology
Step 8. Everything is fine - secure it with clips. They can be plastic or metal. It is better to use plastic ones in bathrooms. Although metal ones have a zinc anti-corrosion coating, it can be damaged during transportation of parts or directly during snapping. Rust appears in damaged areas with all the ensuing negative consequences.
Examples of fastening PVC panels
Step 9. Continue installing the panels to the opposite corner of the wall. There is one panel left - take the exact dimensions. Snap one side into the groove of the previous panel, and lean the other against the starting profile. Use a pencil or marker to mark where the panel fits against the edge of the bottom plate of the collapsible profile. Cut with a margin of up to one centimeter, let the panel be somewhat narrower. The gap will be hidden by the top decorative strip, and the presence of a gap will eliminate the need for repeated cutting. You will have to cut the last panel lengthwise, it is a little more difficult. You can use a ruler, but it is difficult to hold on to a slippery surface. If you have little experience, practice making long cuts in sections. Don't worry about the cut line being uneven. One of the advantages of the collapsible profile is that the width of the upper decorative strip has been increased to 22 mm; it will hide all the irregularities.
Installation of plastic panels on walls
Step 10: Reinstall the top bar. To do this, first snap the bottom part and gradually fix it upward along the entire length. The plank should fit until it clicks, the edge fit should be smooth and without gaps.
At this point, the wall covering of the bathroom is finished, you can put away tools and materials, wash the floors and use the bathroom.
PVC panel finishing
Useful recommendations from professionals
In order not to make a mistake when choosing one profile or another, you should contact a store where sellers will be able to offer you ready-made kits that are ideal for the corresponding PVC panel. Otherwise, you can buy constructs that will not fit with the coating or not buy something important. When purchasing, you should definitely take into account where such molding will be applied, and depending on this, buy certain types of initial profile. For example, if you need to decorate a part of the surface where there will be no window openings or corners, then only those profiles that form the sheathing are required. If you have to decorate the ceilings, then do not forget about the ceiling skirting boards. Almost all manufacturing companies produce moldings in white, which is ideal for any type of interior. but if there is a need for multi-colored models, then you should either look for them in specialized stores, or order them individually. When choosing plastic moldings, it would be good to find those that have increased strength characteristics. If we talk about technical parameters, then you should pay attention to the groove width that is intended for the panel. To learn how to install PVC panels, watch the video.
How to attach a collapsible profile to the wall
Such situations are rare, but you need to be prepared for them. Let’s say right away that fixing collapsible starting L-profiles is more difficult than ordinary ones. The second ones are simply leaned against the wall, screws with countersunk heads or dowels are screwed into the area between the plates. Of course, all work must be done level; it is advisable to first mark the location of the profile on the wall. How to fix a collapsible profile?
- Draw a line on the wall along which the profile will be installed. Please note that the mounting location must be absolutely level, otherwise the profile will bend during fixation and the appearance of the skin will deteriorate significantly. If the wall is uneven over the entire area, then tackle only this strip. Prepare some finishing putty; it is better to use gypsum-based materials. In our case, strength is not a critical indicator, the main thing is that it sets quickly. Apply it to a previously cleaned and dampened wall with a metal spatula. For gypsum putty, 30–40 minutes are enough and you can continue construction work.
- Take measurements for the height of the bathroom wall and prepare a corresponding piece of collapsible profile. You can cut it off with a mounting knife (quite inconvenient) or a grinder with a thin disk for cutting metal.
- Assemble the profile, insert the front strip into the bottom one, and click it until it stops. Before assembling, draw arrows on the invisible side; they will serve as a guide during final fastening.
- Place the profile on the edge of a flat table, drill through holes in the end surfaces. In order not to damage the table, a wooden strip 3–4 cm wide and more than a centimeter thick should be placed under the profile.
- Prepare a drill; the diameter should be 1–2 mm larger than the diameter of the screws or dowels. Drill through holes at a distance of 50–60 cm. It is necessary to drill three planes: two in the lower strip and one in the upper removable one. Make sure that the planes do not shift during drilling; all holes must completely coincide along the same axis.
- Remove the front panel from the latches; there will be holes on the perpendicular plane. Using a mounting knife, at a distance of about a centimeter on both sides of them, make cuts all the way to the side part, cut the place with the hole from below and remove it. This will expand the free area that fits into the latches of the lower part at the attachment points.
- Place the profile against the wall and mark the locations of all holes on it. Work very carefully, preferably with an assistant.
- Drill holes according to the marks. Assemble the profile, place it against the wall and insert the plastic parts of the dowels into the holes. Screw in the metal ones one by one, being extremely careful not to compress the collapsible profile with great force. After each screwed dowel, check whether the upper face plate is jammed, whether it can be pulled out and with what force. Make sure that the profile does not tilt; it should be at an angle of 90° to the wall.
Practical advice. The marks on the wall will be more accurate if you mark them with a drill through the existing holes in the profile. Let the assistant hold it motionless, while using a drill and a drill, mark the locations one by one. Do not drill deep, just go a few millimeters into the wall. Then remove the profile and drill holes to the desired depth. The depth should always be several centimeters greater than the length of the plastic parts of the dowels, otherwise they will not fit to the required length and will have to be removed and drilled again. The fact is that it is difficult to remove all the dust from the prepared hole; it is better to leave a place for it to collect while pushing the dowel.
Fittings sizes. Possible colors, dimensions
Most molded PVC products have the same length of 3 m. Some varieties are produced in several modifications in thickness and length.
The color of the finishing elements is most often white. Manufacturers guarantee that the plastic will not turn yellow for 1-2 decades.
Some elements can have a laminated surface and be painted in any color. Such parts must be ordered, indicating the name of the decor from the catalogue. Colors can be:
- universal corners;
- F-profile;
- connecting elements;
- skirting boards (fillets).
If the desired shade is not available, it can be ordered from the same company where the panels are purchased.
Answers on questions
In what cases are liquid nails used?
Liquid Nails
If wooden slats were used during installation, then the plastic panels can be glued. It is applied to all slats at once approximately to the width of three panels. Next, collect them into a lock and press them against the slats. The thickness of the glue is approximately 0.5 cm. Gluing takes time; during this period, do not touch the panels or tear them off the slats. This method speeds up the installation process, but problems will arise if it is necessary to replace a damaged panel. It is very difficult to tear it off without damaging nearby ones. You will have to cut it into pieces and tear it off the slats piece by piece. In this case, use a sharp and durable knife to undermine.
Applying glue to the wall
You can apply nails not to the wall, but directly to the panels
How to cut collapsible profiles in corners? Additional difficulties arise when joining collapsible profiles at angles. This operation must be done in several stages.
- Using a mounting knife, cut off the part of the profile that has the latches. The length of the cut is 3–4 centimeters. Do not damage the face strips; the cut should be made as even as possible. This operation should be performed for two joining pieces of the starting profile.
- Insert the top bars into the latches until they stop. If they do not fit, check the cut; there are probably protruding areas left, remove them and straighten the cut. Reassemble your profile.
- Everything is fine - use a sharpened pencil to make marks where the top plates overlap. Marks must be made simultaneously on two plates in the two extreme places of overlap. This is a very important operation; the more accurate the marks are, the smoother the corner joint will be.
- Disassemble the profile and draw a line between the marked points. Cut the corners along it; you can work with ordinary scissors. If you don’t have practice, it’s better to cut with a margin of length. You will have to assemble the profile several times and adjust the cut location until both elements fit smoothly.
This method is suitable for joining profiles at any angle. If the angle is exactly 45°, then a special template can be used. If, despite all your efforts, a gap appears at the joint, cover it with silicone to match the color of the front parts of the profile. But we must remember that after a few years the silicone will peel off, you will have to remove the old one and repeat the putty.
How to dismantle casing with collapsible profiles? Much easier than with ordinary ones. The face plates are removed, allowing access from either side of the casing. Then everything is as always. Carefully remove the damaged plastic panel, clean and fix the new one. When finished, reinstall the face plates.
Removing panels
Is the high cost of collapsible L-profiles justified? First you need to understand what explains this cost. There are two reasons. First, such elements are much more difficult to produce than conventional profiles. More precise and complex molds from an engineering point of view are needed; the technological process is more difficult to control, which increases the number of substandard parts. In addition, to manufacture a collapsible profile you will need three times more material. The second reason is that a successful advertising campaign allows manufacturers to further increase the cost of selling their goods. As for the benefits, this is a controversial issue. There are both advantages and disadvantages. For professional builders, there is no fundamental difference which starting profiles to use. Both options, with practical experience, give excellent results.
Are collapsible profiles used as ceiling skirting boards? If desired, they can be used for these purposes. This is justified only in one case - the entire bathroom is decorated with plastic panels using these elements. Then it is possible to create a bathroom interior in the same style. In all other cases, it is more advisable to use special ceiling elements; they are easier to work with.
Finishing the bathroom with plastic panels
Design of a toilet finished with plastic panels
What should I do if there is a gap between the face plate and the panel? This situation occurs when the recommended algorithm for wall finishing is not followed. It will not be possible to fix the problem without silicone. As soon as you press the face strip tightly in one place, it will begin to deform in another, and a new gap will appear. There is only one recommendation - follow the work procedure. Remember that preventing a problem from occurring is much easier than dealing with it later. Don't rush, constantly monitor quality. A mistake noticed in time is much easier to correct. Study the bathtub made of cast marble at the link.
Peculiarities
The plastic starting profile for PVC panels looks like a U shape, one side of which is usually slightly shorter than the other. As a rule, installation of the entire structure begins with its installation, which is why it is also called initial. It “sets” the direction of the entire plastic finishing structure. This molding is used to cover the ends of panels, and, in addition, in cases where the PVC sheet is adjacent to the openings of windows or doors. Its use can significantly save time and materials for finishing and installation work.
Such elements have a number of obvious advantages. They generally exhibit resistance to ultraviolet rays and can avoid yellowing for up to 10 years. The material is elastic, but not brittle, so when cutting you can prevent the appearance of cracks. The composition is good because it contains a minimal amount of chalk and substances harmful to the human body.
The moldings are easy to install and, thanks to their convenient shape, fit smoothly even with uneven walls.
Everything or almost everything about slopes and finishing
In this article we looked at some options for finishing window slopes. Of course, in one article it is impossible to fully cover the entire process of finishing such an important element as slopes. After all, there are slopes not only on windows but also on doors. When installing door slopes, there are also a lot of options, these are the ones we described and additions with extensions, with significant thickness of the walls, and you can also use wall panels and many other different materials. Let us repeat, it’s simply not possible to consider everything in one article. If you want to learn more about the possibilities of installing slopes for windows and doors, finishing with panels or wall panels, you can always learn about this in more detail by visiting our resource. With us you will always find answers to your questions regarding construction and finishing works. After reading articles, watching videos or photos of processes, you can find the most suitable options for yourself. Good luck!
vote
Article rating
Window finishing with plasterboard
Installation of plasterboard slopes begins with preliminary cleaning of the masonry from construction debris and dust. Next, a thin layer of cement is leveled on the surface, covering cracks and gaps that allow wind and noise from the street to pass through.
- Panels of the required sizes are cut from a plasterboard sheet;
- Using self-tapping screws, each panel is fixed to the slope;
- A layer of insulation is laid between the sheet and the wall, protecting against freezing and blocking the development of mold and mildew on the surface of the sheet;
- The edge of the drywall farthest from the window is glued to the wall;
- When the glue dries, the edges are covered with a layer of putty;
- It is convenient to glue wallpaper or apply paint to drywall;
- To protect the outer corners from abrasion, special perforated metal corners are used, which are covered with a layer of putty and paint.
The plasterboard solution for finishing slopes takes several days and is quite labor-intensive and dirty work.