The weak point of the window slope is the line where the frame meets the wall. Cracks often form on the seam; if the sealing is insufficient, it is blown through by the wind. Many problems arise during the plastering process: you need to carefully create a smooth plane of the slope and at the same time be careful not to stain the frame and glass unit with the solution. A special window adjacent profile with reinforcing mesh will make the craftsman’s work easier. Let's find out what this element is for, how to choose and use it correctly.
Peculiarities
The adjacent profile is used for finishing slopes. It is becoming an increasingly popular building material and is gradually replacing roll-tape sealants. Because high-quality plastic provides first-class stable sealing and reliable sealing of all installation seams that are on the windows. Additionally, the profile is equipped with a special reinforcing mesh. Thanks to this, it is possible to firmly fix the plaster on the slopes and prevent the formation of unevenness, cracks, crumbling and other defects.
The material of the slats is manufactured in strict accordance with state standards. It is not afraid of mechanical damage, temperature changes, direct solar radiation, it is steam and moisture resistant.
Installation of the profile is simple and does not take much time.
Device and technical characteristics
The abutment profile consists of several elements.
- Polyvinyl chloride base. The main material for the manufacture of strips is solid PVC, to which a self-adhesive thin sealing plate made of polyurethane is attached. Due to this, the profile is attached to the window frame. It ensures tight fixation of structural elements, and also acts as a kind of damper gasket - compensating for the expansion of materials under the influence of temperatures and wind. The plate (lamella) guarantees the preservation of the plaster and slopes.
- Cuff for protection. It is made of soft polyvinyl chloride, similar to plastic. The cuff is necessary to give an aesthetic appearance to the structure. It covers joints, cracks and other defects that exist or may appear on the window unit.
- Tear bar. It has an adhesive strip with a protective film, by removing which you can easily fix the polyethylene (membrane) to prevent the plaster from getting on the window. If necessary, the film can be easily removed.
- Reinforcing mesh made of alkali-resistant material.
Varieties
Window profiles come with or without mesh.
With mesh
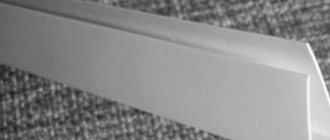
It is a thin and even strip-shelf with a strong protective mesh and a self-adhesive seal, which is designed to frame the window frame. The strip has a neat, aesthetic appearance. The profile is also equipped with a side strip, which is necessary for the adhesion of the protective film , which protects the window (door) block from contamination, moisture, mechanical damage, and the formation of mold. This is the most common option for an adjacent window profile.
Without mesh
Since this type of profile does not have a mesh, it is usually used exclusively for interior decoration. But if additional reinforcement is not planned, it can also be used for exterior decoration. This profile makes the process of applying plaster noticeably easier and guarantees high-quality and uniform coverage.
In some cases, the profile can be supplemented with PVC corners with a mesh or an open drip profile. In the first case, it will be possible to achieve a higher degree of window protection and strengthen the corners. In the second, to eliminate the chance of moisture entering and accumulating in the corners of the structure, to provide additional reinforcement of the plaster layer, to reduce the number of cracks and other defects.
Advantages and disadvantages
Window profiles are popular due to their many advantages:
- affordable price;
- simplicity and ease of installation;
- effectiveness in combating cracks between the plaster layer and window (door) blocks;
- effective protection from the adverse effects of the external environment;
- reliable insulation of heat-insulating seams;
- reduction of heat losses and heating costs;
- resistance to mechanical damage and dirt (will not become anther);
- ensuring reliable adhesion of the plaster mixture to the surface;
- aesthetic and harmonious appearance;
- no need to use additional sealants.
The only disadvantage that can be highlighted is that the profile can be damaged if handled carelessly.
Adjacent profile for window slopes
The weak point of the window slope is the line where the frame meets the wall. Cracks often form on the seam; if the sealing is insufficient, it is blown through by the wind. Many problems arise during the plastering process: you need to carefully create a smooth plane of the slope and at the same time be careful not to stain the frame and glass unit with the solution. A special window adjacent profile with reinforcing mesh will make the craftsman’s work easier. Let's find out what this element is for, how to choose and use it correctly.
Area of use
Depending on the type, window adjacent profiles are used in the process of finishing external and internal slopes. They are effective in creating precise and high-quality plaster joints along the entire perimeter of slopes. Mainly self-adhesive adjacent profile is used for:
- plastering door and window slopes in places adjacent to door and window blocks, serves as an effective beacon of 6 or 9 mm (depending on the thickness of the plaster layer);
- plastering works in places where the profile adjoins other façade materials.
Adjacent window profile on the external window slope
Purpose of the adjacent profile
This product is a universal bar that performs several functions at once:
- Plaster: a durable fiberglass mesh reliably holds the liquid solution and reinforces it, preventing the appearance of cracks after drying. In addition, the profile itself acts as a beacon. A spatula or rule is rested on it and a neat and even slope is drawn out.
- Sealing: the element ensures the tightness of the seam at the junction of the slope and the window frame.
- Protective: not only prevents contamination of the window during plastering work, but also resists atmospheric influences during further operation.
Scope of application
Plastic profiles are used in the process of constructing window slopes both outside the building and indoors. It guarantees a clear and reliable fit of the plaster mixture over the entire surface of the slopes.
The adjacent profile is also used when finishing door slopes at the junction with blocks or other facade materials. The profile also acts as an effective “beacon” at 6 and 9 millimeters, based on the size of the mixture layer.
Profile device
This element is made from polyvinyl chloride in accordance with GOST 19111-2001. The profile material is resistant to shock and temperature influences, is not afraid of ultraviolet rays, is easy to install, and does not allow steam and water to pass through.
Structurally, the profile consists of the following elements:
- The base is made of unplasticized (hard) PVC, on the back of which there is a self-adhesive sealing lamella made of polyurethane foam. It is this part that the profile is glued to the frame. It allows the element to fit closely to the window frame, and also plays the role of a kind of damper gasket, compensating for the thermal expansion of materials and wind load. By damping these vibrations, the lamella helps to preserve the inelastic layer of slope plaster.
- Protective cuff - inserts made of soft plasticized PVC. After finishing work is completed, this part of the product remains visible. It forms a neat and aesthetic joint between the slope and the window block and hides cracks that may appear on the corner seam over time.
- Tear strip equipped with a strip of glue. After removing the protective film, it is easy to attach polyethylene or a membrane to it, protecting the window from contamination by the plaster solution. After finishing the work, this strip is easily separated from the box.
- Reinforcing mesh made of alkali-resistant fiberglass, attached to an additional shelf.
The following video will tell you in detail about the design of a profile with a grid:
Self-adhesive plastic profiles with reinforcing mesh are used to form slopes on the outside of the building and inside the building.
How to choose
Some tips for choosing a profile:
- The element must have a protective insert-cuff that covers the junction of the slope and the frame; in the absence of this junction, the end of the sealing lamella made of polyurethane foam will be visible around the perimeter, which easily absorbs moisture and dirt. It will get more and more dirty each time you wash the window, and it will look completely unsightly.
- It is recommended to pay attention to the color of the product. It is desirable that it be made of virgin PVC, which has a pure white tint. Upon completion of the work, the grayish PVC insert will stand out against the background of the white frame and will not look very aesthetically pleasing. In addition, the dirty gray profile made from recycled PVC is of poorer quality and breaks more easily.
- It is important to choose the correct height of the adjacent profile. There are models on sale with a height of 6, 8, 9 mm and more. For standard finishing with plaster and putty, you need to choose an element with a minimum height. If the slopes are insulated with penoplex, this value should be higher.
Selection rules
When purchasing material, be sure to pay attention to several important parameters.
- The presence of a protective cuff. If there is no such element, then seams will be visible at the joints of the slope and frame. In addition, the end of the bar is made of polyurethane foam, which perfectly absorbs dirt and moisture. This means that after each washing of the windows, the frame will become more and more dirty, and its appearance will become much worse.
- Profile color. When the profile is made from high-quality primary polyvinyl chloride, it has a uniform white tint. This profile combines harmoniously and beautifully with the window unit. If the material has a gray or dirty gray tone, then the profile is made from recycled PVC materials. It is not only less aesthetically pleasing, but also more fragile.
- Product height. For standard work with plaster and putty, you must choose a profile with the smallest height. Moreover, if finishing with insulation is planned, this value increases. On the modern market there are adjacent profiles of different heights: 6 mm, 8 mm, 9 mm and others. They are marked as follows: 6x2400, with the first number indicating the height, the second the length.
All designations are indicated in millimeters.
Installation
- Mark the line along which the profile will adjoin the frame. It is most convenient to use a laser level, but if you don’t have one, a bubble level will do.
- The required section of the product is measured and cut. To do this, use metal scissors.
- For good adhesion, the frame is first cleaned of dust and other contaminants. Only under such conditions does the manufacturer guarantee the reliability of the resulting connection.
- The protective film is removed from the damper lamella, and the profile is glued to the frame along the marked strip. This is done as follows: after detaching a little of the film, the strip is aligned along the line and pressed against the box, after which the remaining protective layer is finally removed at an acute angle.
- Having removed the protection, glue on a material that covers the window from dust and dirt - plastic film or a special membrane.
- Having straightened the reinforcing mesh, the slope is plastered.
- After the plaster has dried, the tear strip is removed along with the film covering the window.
Profile installation work is carried out at a temperature not lower than +5 ˚C.
The entire installation process of this element is clearly shown in the video.
(votes: 3 , average rating: 5.00 out of 5)
Video lessons
All external corners of the building, as well as the corners of window and door openings, are reinforced with corner PVC profiles with reinforcing mesh (ProfilSystems trademark).
To prevent moisture accumulation, a special profile with a drip line (ProfilSystems trademark) is installed on horizontal corners.
After installing the ProfileSystems corner profile, the tops of the corners of window and door openings must be additionally reinforced with rectangular strips of KAST façade reinforcing mesh measuring at least 20x30 cm.
Before applying the base plaster layer on the slopes of door and window openings, it is necessary to install a special adjacent window profile with ProfileSystems mesh.
The profile ensures sealing of the installation seam and protects it from moisture and ultraviolet radiation, acts as a beacon strip for perfectly even application of plaster, protects the window from mechanical damage and contamination, and guarantees the absence of cracks in the areas where the plaster adjoins the window frame.
The profile is glued to the frame along its perimeter, with the exception of the window sill area.
Gluing of insulation boards must be done using special adhesives.
Thermal insulation boards are glued to the facade wall from bottom to top, starting from the ProfilSystems base profile, in horizontal rows, with vertical seams tied in each row. Gear engagement should be performed on external and internal corners. After installing the first row of insulation on the base profile, the gap between the wall and the profile must be filled with polyurethane foam. The insulation is installed close to each other. If after installing the slabs there are gaps more than 2 mm wide, they must be filled with wedge-shaped strips cut from insulation. At the corners of window and door openings, the heat-insulating board is installed with a corner cutout /letter G/.
Advantages and installation of the profile
The main advantages of the adjacent strip of the above type are:
- a budget option;
- fast and convenient finishing;
- preventing cracks between the plaster layer and window or door blocks;
- providing high-quality protection from weather influences and vapors;
- maintaining the thermal insulation functions of the seams: reducing heat loss and heating costs;
- protection from mechanical damage, as well as deep contamination during the finishing procedure;
- ensuring an aesthetic and harmonious connection of the plaster layer to the frame of window and door types;
- no need to use additional sealants or carry out additional repair procedures.
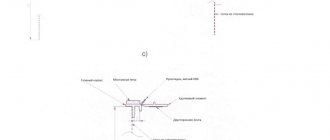
Step-by-step installation
Self-adhesive profile installation diagram
- Measure the desired length of the profile and cut it.
- Break off the beginning 3 cm.
- Remove the protective tape a little, install the profile closely, and pull the protective film off at an acute angle. This way the adjacent profile will not bend.
- Cover the window with film and carry out plastering and painting work.
- Upon completion of work from point 4, you should wait until the surface is completely dry. Remove the protective film and break off the tear-off part of the adjacent window profile.