To brick a window yourself, you don’t need any special skills. The work is completed quickly if you follow the stages in construction. It is advisable to use red brick in the work, the thickness of the masonry will correspond to the size of the building wall. Using a level when working will help avoid distortion of the masonry and deformation of the wall.
How to brick a window with your own hands
There are various situations in construction: in some cases it is necessary to make an additional window, in others it is necessary to reduce their number. To reduce the number of windows, it is enough to block an unnecessary opening. Conditions that lead to the blocking of a window. If redevelopment is planned during the renovation, the opening may turn out to be completely unnecessary in the new room or the size of the opening may be reduced. Also, very often, owners of corner apartments block up windows, since a large number of windows in one room creates some inconvenience.
The most common use for these purposes is brick. The window opening can be blocked completely or partially.
To install a window, you will need standard construction tools:
- Master OK;
- level;
- solution container;
- a drill with a special “mixer” attachment for stirring the solution.
Materials you will need:
- sand and cement for mortar;
- brick;
- Styrofoam.
Preparation
First of all, you need to remove the window sashes from their hinges and find out how the frame and frame are attached to the wall. If there are dowels, you need to unscrew them and knock out the window along with the frame. The most time consuming job
is to get rid of old plaster, debris, thermal insulation with your own hands and prepare the opening for filling. A drill with a hammer drill is best suited for this; it will also speed up the process. Next, the surface of the window opening is carefully primed
In order to maintain the thermal insulation of the entire wall during work, it is necessary to ensure a wall thickness that meets the requirements for the required thermal insulation of the room.
Having finished dismantling the old window, you need to decide on the method of filling the opening.
Experts use two ways to bookmark a window with their own hands:
- blind - this method consists in completely laying the wall along its thickness with continuous rows of bricks in the place of the window;
- hollow - one row is laid from the street side, the second from the room. The space that is formed between the rows of masonry is completely filled with foam plastic as additional heat and sound insulation. During laying, the brick should not protrude beyond the walls, and the rows should be laid strictly parallel.
Tips for building masonry
- For the work, red ordinary brick is usually used, for the so-called rough masonry. To save material, brick blocks can be laid on edge.
- When choosing a brick for masonry with your own hands, you need to pay great attention to the thermal conductivity of the material. If this indicator of the wall and the blocked opening is different, dampness, fungus, condensation and unpleasant freezing of the seams may appear.
- Mortar for masonry is prepared in a ratio of one part cement to four parts sand. The mixture should not be too liquid, as it will flow out from under the brickwork.
- To lay the opening evenly, to avoid distortions in the masonry and errors during work, you need to carefully monitor the level of the masonry horizontally and vertically using a level and plumb lines.
- When partially filling the opening with brick, you need to leave a small gap of a few centimeters from the window frame. Tin plates are screwed to the window using screws, the ends of the plates are laid between brick blocks using mortar. After the solution has dried, the gap between the frame and the masonry is filled with foam.
- If the work is carried out in an area of the country with a harsh climate, craftsmen advise installing a protective layer (roofing felt, thin plywood or fiberboard) on top of the window.
Completion
The final stage of work on laying a window opening with brick is plastering the masonry on the outer and inner sides of the wall.
This is done not only to make the bricked window beautiful and aesthetically pleasing, but also to protect the brick from moisture, exposure to weather conditions and as additional thermal insulation. Before starting, the brickwork must be treated with a deep penetration primer. Plaster can be of two types:
- gypsum - suitable only for interior decoration and costs more than cement;
- cement – suitable for external and internal work.
After the wall has completely dried, you can begin lining the blocked opening to match the general appearance of the wall.
To prevent dampness or fungus from appearing on the wall, each layer of work must dry very well. After completing the finishing, the wall should be allowed to dry for 1-2 weeks, then use the surface for your own purposes. This time is enough for the solution to completely harden. There is nothing difficult about blocking a window opening with bricks. But all stages of work must be treated carefully and with full responsibility in order to avoid unpleasant situations after completion of the work.
Drywall
There is nothing easier than covering a doorway with sheets of drywall. This method is great for both straight walls and for building niches. It is much more convenient to work with it, and it will require much less money.
Installation of a partition with plasterboard is carried out by attaching it to the frame. As materials for it, you can use special metal profiles or durable wooden beams. It is much more convenient to work with the first type, since you can build a structure of any shape.
Drywall is attached with self-tapping screws to a metal profile frame
How to seal a doorway using drywall:
- Using self-tapping screws and a drill, secure the metal frame around the perimeter of the opening.
- Cut the profile into transverse strips. They are installed in increments of 20 to 40 cm to strengthen the wall structure with plasterboard in the opening.
- Measure the size for the plasterboard sheet and cut out suitable pieces.
- Secure them to the profiles with self-tapping screws.
- If you decide to make a niche in the opening, first build a frame according to its shape and then cover it with plasterboard sheets.
- All joints between drywall are glued using a sickle mesh.
- After this, you need to putty the joints and completely level the surface.
How to make window openings in brickwork and lay them
Well-designed and high-quality window openings in brickwork are the basis for the future interior of all interior spaces of the house.
How light and cozy the house will be depends on how correct the design solution to this issue is.
Running is the basis of reliability
Laying brick window openings requires precision in calculations and accuracy. The basis of the hole in the wall - the purlin (lintel) should serve as a supporting structure, resting on the piers in the upper part of the window or door opening. Usually the following is used as a run:
- ready-made reinforced concrete lintels;
- manufactured on site by concreting the console;
- metal channels;
- metal corners.
The main thing is that the material can withstand the expected loads. The lintel must rest securely with its ends on the partition along the length on each side by at least 15 cm. That is, if the window is supposed to be 1 m wide, then the purlin must have a length of at least 1.3-1.4 m. The least preferred material for the purlin device there is a metal corner. Even with a large cross-section, for example 100x100 mm, it has insufficient rigidity and can only be used for openings of small width. If the length of the corner exceeds 1.5 m, it may sag and, as a result, subsidence and subsequent destruction of the brickwork. Ready-made and home-made concrete lintels are more reliable and are designed for heavy loads.
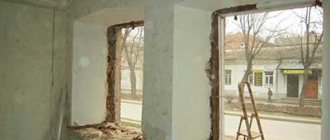
New opening in a brick wall
How to make a window opening in a brick wall without violating the rigidity of the structure and without causing a collapse?
- The first operation is marking the future opening. It is important to correctly calculate the width and height, and take into account the allowances for foam seams necessary for installing the future window.
- When the marking is done, the wall must be carefully freed from the outside and inside of the plaster layer, having previously taken care to de-energize all house electrical wiring. Unless you know for sure that it is missing under the plaster layer.
- You should also know that a distance of at least 3 m must be maintained from the chimney in the wall to the window or doorway.
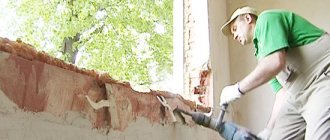
- Bricks should be knocked out starting from the top rows. A jumper must be inserted into the groove cut out in the upper part (it should be slightly wider than the marking). It will hold the top rows of the masonry and allow further work to be carried out without unnecessary risks. It is concreted and work continues only after the solution has firmly set. It is better to remove bricks with diamond drills, gradually knocking them out without excessive effort, otherwise the brickwork around the windows will be damaged.
Nuances of preparatory work
The newly constructed opening should not be visually distinguished along the façade from the existing openings. Therefore, it is extremely important not to make a mistake with its size.
To mark a future hole in the wall, it is better to use laser and construction levels in combination. They will help you choose the right upper and lower marks of a window or door in relation to already installed structures or equipped openings. Otherwise, windows located asymmetrically relative to each other can spoil the appearance of the building's facade.
Work order
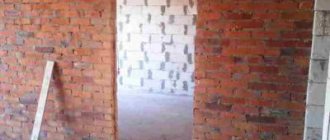
As a rule, when sealing an unnecessary doorway with brick, a partition thickness of 12 cm (half a brick) is maintained, since this structure does not bear any load; the upper part of the existing wall is held by a lintel. A window in an external fence can also be laid in half a brick, provided that additional insulation is provided.
To ensure that a blocked door can bear the load from hanging cabinets or any household appliances, the usual method of laying stones is used - on spoons. In this case, it is necessary to bandage the seams by half or a third of the length of the brick. Sometimes another method of embedding is used - a one-and-a-half hollow stone 88 mm high is laid with a bandage on the edge. But it should be taken into account that such a partition will not be able to bear additional load.
The work is carried out in the following order:
- Prepare a simple cement-sand mortar of M50 grade, using 1 part M400 cement to 5 parts well-sifted sand. Another option is to purchase ready-made masonry mixture and mix it with water, following the instructions on the bag.
- Moisten the base and sides of the opening with water. Place 1 row of stones near the installation site, cut the last one to the required size.
- Carefully spread the mortar to the length of 2-3 stones and begin laying 1 row. After each laid brick, pull the mortar to its side with a trowel, and then press it with the next stone.
In a situation where it is necessary to pass heating pipes made of PPR, metal-plastic or metal through the gap being laid, steel sleeves (cases) are placed in the partition. Their diameter must be greater than the outer size of the pipe. The length of the case is selected so that its ends extend beyond the surface of the masonry by 2-3 cm.
After the mortar has hardened, the structure must be lined so that the door covered with bricks does not differ in appearance from the rest of the walls. Choose the appropriate type of finishing - plaster, drywall or other material.
In a dilapidated building in Penza, it is planned to cover the windows with brickwork
A technical report on the condition of house No. 35 on Udarnaya Street has been received. It notes that it is necessary to fill the window openings with brickwork to prevent the collapse of the entire entrance. City Hall employees are once again inviting residents of a dilapidated building to move to a flexible building.
Being inside an emergency building becomes life-threatening. But people are in no hurry to leave their apartments. For many, the hostel on Udarnaya is their only housing.
“In order to understand what the conditions are there, you need to go to the maneuverable fund. Unfortunately, most of the people who are now talking about this were not personally in the maneuver fund themselves. They make their conclusions only based on the words that they heard from residents of other entrances,” said Andrey Grishin, head of the housing and communal services department of the city of Penza.
Meanwhile, not only residents of the second entrance, but also their neighbors gather for an impromptu meeting almost every day. After all, the inside of the house looks the same to everyone: cracks in the walls, pieces of plaster falling off, sagging doorways.
The window sills, unable to withstand the load, began to crack. To avoid further destruction of the building, the mayor's office, based on the preliminary results of the examination, proposes to block the window openings of the first floor of the second and third entrances with brickwork. And the residents will be evicted into a maneuverable fund. Square meters in it will be provided only to those who do not have other apartments. As for finding a contractor, this is the concern of citizens, as explained in the city housing and communal services department. It is the owners at Udarnaya, 35, who must hold a general meeting and decide which construction company to choose and how much the repairs should cost.
According to Andrei Grishin, the fate of the house is in the hands of the residents at 10 Kulibina Street, where part of the brickwork collapsed. However, this happens here regularly. The building is built of sand-lime brick. And because of a leaking roof, wet walls lose their strength.
Water continues to saturate the walls, and if urgent measures are not taken, new collapses will occur. Now the employees of the management company have only fenced off the places where the bricks fell. And, despite the statements of citizens, nothing more is being done to eliminate the emergency situation.
If you find an error, highlight it and press Shift + Enter or click here .
Many thanks for your help. We will fix this soon!
Recommendations
When finishing a house with brick, you should consider some nuances:
- Laying is carried out at positive temperatures and low humidity.
- The parts can be slightly moistened to prevent rapid absorption of water from the solution.
It is advisable to wet the brick before laying
- Layout of more than 6 rows is not carried out. It is necessary to wait until the composition sets to avoid deformation.
- To highlight window openings, they are decorated with bricks of a different color. In these places, binding is carried out along the entire perimeter.
In this way, you can lay facing bricks with your own hands.
How to fill an opening in a wall with bricks, instructions
When, having decided to redevelop a room, we are faced with the question of how to fill an opening in a wall with bricks, we look for an answer on the Internet.
Having our own living space, we try to resort to the services of paid craftsmen as rarely as possible. Everything that can be done with one’s own hands significantly saves the budget and, most often, does not differ at all in quality from professional work.
Suppose you have a need to brick a window opening, but you have no idea where to start.
Don't panic, because this doesn't require any special skills. If you collect the necessary materials and tools, then step by step, you can achieve what you want.
- 1 How to brick a window with your own hands 1.1 Preparatory work
- 1.2 How to brick a window? 1.2.1 Deaf method
- 1.2.2 Hollow method
How to brick a window with your own hands
Before you start working, you need to purchase or get from stock a simple set of tools:
- drill mixer;
- trowel;
- rod for laying an even seam;
- perforator;
- construction plumb line;
- hammer;
- scraper;
- scrap;
- polystyrene foam for insulation if you are using the hollow brick laying method.
In addition to the tools, you will need the following materials:
- sand;
- cement;
- bricks;
- container for stirring the solution. However, if you purchase a ready-made mixture, you will not need a container.
Preparatory work
In order to brick a window, you need to do some preparatory work, namely:
- Dismantle the old window, removing all the old parts.
- Clear the opening from the layer of previous mortar to make it easier to apply the new one.
- Remove the window sill.
- Produce surface primer.
- We create grooves. On the side walls of the opening, in the old seams, make small recesses for better adhesion of the old and new masonry.
- Destroy traces of dust and dispose of debris.
- Decide on the laying method.
How to brick a window?
Perhaps in the world of construction, there are many different ways of “how to seal a window opening in a brick wall,” but we will highlight only two of them - the simplest ones. So that everyone who turns to this article can brick the opening themselves.
Deaf way
The first method is called “deaf”.
It allows you to completely fill the previous window opening with bricks, laying them out in one continuous row.
Hollow way
You can also brick a window by resorting to the second method, which is called “hollow”.
This method allows for two layings of brick material - on the outside and inside of the room. And their connecting link is polystyrene foam, which performs sound and heat insulation functions.
This method is used in cases where the walls are very “thick” and a flat wall surface is required both inside and outside.
When performing the above method, it is necessary to understand that it is necessary to lay out brick rows parallel to each other.
options for laying bricks using the hollow method
Basic tips on how to brick an opening in a wall
To fill an opening in a wall with brick, it is best to use red brick, because it is considered one of the most durable materials. In addition, you don’t have to “worry” about the thickness of the masonry, because the red brick will perfectly match the dimensions of the walls of the brick room.
But, if you have another type of brick, then naturally, use it. Even if it is a used brick.
Be sure to use a level with a plumb line - it will help avoid distortion, deformation and do the work competently and correctly.
Briefly about the main thing
The window opening is finished with brick to visually highlight it on the facade. For cladding, single hollow, figured hyper-pressed, clinker, glazed and even silicate building materials are used. Brick window framing is performed in houses under construction or already built. Before facing, openings can be expanded, reduced or combined. When their size increases, it is often necessary to install a new lintel from a metal corner or reinforced concrete in the same way as when creating a new window in a place where there was none before.
Often the framing is done in a quarter of a brick. This method involves pushing the building material forward by 60 mm. When finishing, a row, arched, beam and wedge brick lintel can be created above the window.
Homemade
How to do it yourself... homemade... with your own hands
- Auto-moto-lover
- Useful
- Gardener
- Homemade electrician
- Homemade products
- To the builder
Categories
- Auto-moto-lover
- Useful
- Gardener
- Homemade electrician
- Homemade products
- To the builder
The last notes
- How to restore a hexagon with your own hands
- How to install a faucet on the wall with your own hands or “Curved pipes - how to install a faucet?”
- How to replace broken tiles or how to replace damaged tiles yourself.
- How to repair the remote control with your own hands. We restore non-working buttons ourselves.
- How to make a mousetrap with your own hands. A simple trap made from scrap materials.
- DIY miracle shovel, improved or Homemade miracle ripper.
- How to measure with a caliper. Simple and with pictures
- How to refill a marker or Two simple ways to restore an old, dried out marker
- How to make a clicker for training with your own hands
- How to use construction foam
- How to make a gate with your own hands
- How to make a floor with your own hands
- How to make a grill yourself
- How to lay a window opening with your own hands
- How to make an extension cord with your own hands
- How to make a wooden staircase with your own hands
- How to make a palette knife with your own hands
- How to make a muffler with your own hands.
- Homemade rake
- How to make your own winch
How to lay a window opening with your own hands
How to lay a window opening with your own hands.
Often, when remodeling or renovating premises, it becomes necessary to partially or completely block the window opening. How to do this
Not everyone knows this, so today we’ll talk about how to brick a window opening.
To begin with, I will describe the situation that arose for me.
When insulating the house with polystyrene foam, we decided to cover the threshold of the house with corrugated sheets and make something like a dressing room.
In this case, part of the window will fall inside the room, and since we were going to replace the old wooden window with a metal-plastic double-glazed window, it was decided to block the unused part of the window opening and install a smaller metal-plastic window (that is, one compartment less wide).
At the beginning, we wanted to simply cover the window opening with polystyrene foam, plaster the outside, and sew up the inside with plasterboard, but then the choice fell on brick, since it seemed that it would be safer.
Now I will describe the process itself and the list of necessary materials and tools.
For masonry, bricks were used from what was available, namely red brick for rough masonry.
To prepare the mortar (concrete), ordinary Portland cement and sand were used in a one-to-one ratio.
Tools that came in handy:
- Bucket for preparing the batch.
- A construction mixer or drill with a whisk attachment.
- Construction trowel (aka trowel).
- Construction water level. Used instead of a guide line.
- Primer brush.
So, how to lay a window opening with your own hands.
We will not discuss the process of mixing the mortar, and will move directly to the laying.
I almost forgot to mention that surfaces that will come into contact with the brickwork must be thoroughly cleaned of dust and other contaminants.
Then you can start priming these same surfaces.
I note that the solution should be thicker so that it does not spread too much, because the brick will not stick to the pile.
We laid the brick “ruba”, that is, on the edge, to save bricks and reduce weight.
But that is why it was necessary to lay it in two stages, and continue only when the first half of the laid brick was already firmly “standing on its feet” and the concrete had already set a little.
In order to control the evenness of the masonry plane, you can use a stretched fishing line or thread, or even several of these “tips”, the main thing is that they do not interfere with you.
Since sheets of expanded polystyrene will be laid on top of the masonry, the requirements for such masonry are not very high and during the work they were limited only to applying the level by eye.
The horizontal evenness of the rows was not controlled due to its unimportance (everything will be sheathed on both sides).
How to brick a window opening
In our case, the edge of the masonry was adjacent to the new metal-plastic window, so a gap of several centimeters was left.
Tin plates were screwed to the window with screws, the ends of which were sealed between layers of brick using mortar.
After the initial drying of the masonry, the gap was filled with construction foam.
And only then they covered it with foam plastic and plastered it, but this is completely beyond the scope of our article.
Advice from Selfmade.
In our case, we made additional ventilation in the form of one hollow brick. I don't know if there will be any positive effect, but it looks pretty good.
Articles on the topic
Preparing a brick surface for plastering - rules, instructions, advice from masons
How to insulate a half-brick house with mineral wool and expanded polystyrene?, instructions, advice from masons
Installing a bathtub on bricks - what materials are used, instructions, advice from masons
How to renovate an old brick house - methods, preparation, instructions, advice from masons
Brick partitions - preparation, construction, instructions, advice from masons
Waterproofing a brick plinth - horizontal, vertical, instructions, advice from masons
Ventilation in a brick house - diagram, purpose, instructions, advice from masons
Cladding a house with bricks - how to calculate how much material is needed, instructions, advice from masons
Reviews ()
How to brick a window
Very often, owners of corner apartments, in order to provide comfortable living conditions and keep the room warm, get rid of one of the windows. Most often, brick is used for these purposes.
To brick a window, you need to stock up on some tools. Among them you will need a construction level, a mixer for making the mixture, a trowel, a spatula and a bucket. Such a tool will allow you to complete all the work without much effort. The materials you need to stock up on are bricks, cement with sand and polystyrene foam.
Work should begin by dismantling the window frame. This must be done together with the box. After this, it is necessary to remove all construction dirt and begin laying the material. In some cases, gas silicate blocks can be used instead of bricks.
All work must be carried out in such a way that the thermal insulation of the walls of the house is maintained. To do this, it is necessary to maintain the thickness of the wall covering specified in the design documentation. Therefore, laying bricks is carried out in 2 ways - hollow and solid.
Tools
Brickwork does not require any special professional tools. For
For such work, it is necessary to prepare the following:
- appropriate container for making the solution;
- a drill with a special attachment for mixing the construction mixture;
- Master OK;
- hammer;
- plumb and level.
If it is possible to purchase a ready-made solution at a specialized enterprise, this will significantly facilitate the work process. It is advisable to carry out such work in warm, dry weather.
How to carefully disassemble a window and correctly lay the window opening
The need for such changes as sealing window openings in a wooden log house does not arise often, so not everyone imagines how to install a window in a wooden house without resorting to such a labor-intensive and costly operation as complete dismantling of the log house with the subsequent installation of new logs.
Just as in many other situations, sealing windows in a wooden house is more complicated than similar operations performed during the reconstruction of a stone building. The differences are due to the special structure of wooden building materials, as well as the fact that in this case it is necessary to take into account the moisture deformation of the wood.
In what cases is it worth sealing a window in a log house?
The need to seal an existing window opening may arise for various reasons, the most relevant of which are listed below:
- an old house was purchased and the new owners decided to carry out a large-scale reconstruction;
- during the first years of operation, it turned out that real heat losses exceeded the calculated ones, and since windows are the main channel of heat loss, the owners decided to reduce the total glazing area (most often, a similar situation arises after the construction of a bathhouse);
- there was a need to change the internal layout of the rooms and, as a result, it was necessary to install one or more old windows;
- During the construction of the house, the requirements for the casing design were ignored, as a result of which the installed PVC double-glazed windows burst, and it was decided to install new windows with a reduction in the glazing area.
Please note that removing a window is a complex and expensive operation, so before deciding to start such work, we recommend weighing the pros and cons several times.
In addition, it should be taken into account that in order to completely hide the location of the sealed window, you will have to significantly modify the interior and exterior of the house.
How can I block the opening?
In general, there are two different approaches to solving the question of how to seal an old window:
- disassemble and assemble the wall of the log house, while installing new logs;
- dismantle the old frame and double-glazed windows and fill the opening.
The first approach is applicable in cases where there are no heavy structures above the windows or the house is small (for example, this is how windows in the end walls of bathhouses or country houses are sealed; windows in the attic, etc.).
From the point of view of thermal insulation and reliability, this solution is the most correct, but it is not always feasible. But even in this case, it is necessary to take into account that new logs may have a completely different level of humidity, so when purchasing a “repair kit” you should monitor the humidity and degree of shrinkage very carefully.
The second option - dismantling the old window and filling the opening - is more versatile and can be made using various materials.
How the block house is attached
If a log or timber house has additional external finishing, then the easiest way is to fill the opening with foam blocks or bricks, and build up a finishing layer on the outside. However, we note that wood has much better heat-insulating qualities, so it is better to make the backfill from timber.
In cases where it is necessary to close a window in a wooden house with timber or logs, and there is no external finishing, a lot of effort will have to be made to hide the traces of such repairs. The classic solution to such a problem is to use a frame frame, mineral wool and planks of a block house that imitates a log house.
The list of options would be incomplete without mentioning such exotic solutions as sealing plastic windows from the outside with decorative wooden shutters and creating a false window on the inside.
Stages of dismantling and sealing the opening
Let's look at the sequence in which the window opening is dismantled and installed using frame technology, if all the steps are done by hand.
Purchase of materials
First of all, you should decide what technology will be used for the reconstruction and how to fill the opening. It should be taken into account that, depending on the method, it will take different times to adapt building materials to the required humidity level.
Dismantling
It is advisable to begin dismantling old windows by removing double-glazed windows from the frames (or glass in old structures).
The next step is to remove the frames. Please note that the frame installed between the frame and the frame will still be needed, so all stages of dismantling must be carried out extremely carefully.
After the frame is removed, we recommend that you do not stop and disassemble the casing, since in any case the seal must be changed.
Frame assembly
If during the inspection it is determined that all casing strips have remained in working condition, you can begin the reverse process - closing and thermal insulation of the opening.
The assembly of the frame should be carried out according to the internal size of the frame and taking into account the fact that the installation of finishing strips is carried out on clamps. To increase the rigidity of the box, the inner and outer planes can be covered with chipboards.
Installation with vapor barrier
To improve thermal insulation, the internal cavity of the frame is filled with mineral wool slabs. At the same time, it is advisable to seal the surface of the embedded box that is directed outward with a waterproofing film.
Application of masonry mesh
Fastening facing bricks to a load-bearing wall is often done using a masonry mesh. This is a fairly old but reliable method. The mesh is inexpensive and does not require complicated installation, but it must be laid at the time of construction of the aerated concrete wall; it will not be possible to attach the mesh to the finished structure. The mesh is needed so that when the building shrinks, the load is distributed evenly and cracks do not appear on the facade. You can use a metal product or galvanized mesh.
Attaching the mesh to the foam block
An option for attaching the mesh to the wall using pieces of cut mounting tape and wood screws
Attaching facing bricks to the walls using a mesh should occur every three rows. If a masonry of 2 blocks is used, then you can lay a grid every 4 rows. If not very strong blocks are used, more frequent laying of the mesh is acceptable, but in no case less frequent. It is necessary to reinforce the row from scratch: this will help firmly secure the cladding and avoid damage in the future.
Another option for attaching the construction mesh
This type of fastening for facing bricks can be made from different materials, for example, steel, fiberglass
When choosing a mesh, you need to pay attention to its rigidity; for example, fiberglass is not suitable for areas of the wall that are subject to heavy loads. Metal mesh is considered the most reliable; it can be used for any type of building
Steel springs well, is not afraid of strong physical impacts, is tensile strength, and is lightweight and does not overload the structure. This is one of the simplest and most practical fastenings for facing bricks. The metal mesh is sharp, so there is a high risk of injury. Basalt in this regard is much safer, moreover, it does not rust, and can withstand the same loads.
Fastening a wall made of facing bricks to aerated concrete using a mesh has the following features:
- Withstands loads up to 50 kN/m.
- Has high strength.
- The small mass of the product does not act on the structure as an additional load.
- It can stretch, so it has a certain plasticity.
- If you use a metal mesh, cold bridges may form inside the walls; the basalt option eliminates this problem.
- It is worth noting that the basalt mesh is stronger in tension.
- Not afraid of environmental influences. If the mesh is made of basalt or stainless steel, ordinary steel can oxidize under the influence of moisture and oxygen, which causes rust to appear and the product loses its quality over time.
Conclusion: fastening facing bricks to aerated concrete is possible in a variety of ways, the choice of which depends not only on the cost of the products, but also on the stage of construction.
Video:
Video:
Video:
What is needed for the process?
To fulfill your desires, you need to stock up on serious equipment; it is especially necessary if your goal is “outrageously fat.” Therefore, purchase or borrow from friends:
- a grinder with a diamond blade that easily crushes concrete and wood;
- a hammer drill of sufficient power (a rather dusty alternative);
- a drill with a crown, which is good for marking the contours of the opening;
- welding machine;
- a chisel that cleans masonry seams;
- hammer.
For an arch or door you will need: concrete mortar, fasteners, baked bricks and wooden beams. You also need to take care of earplugs or headphones, gloves and glasses, because the work ahead will not be easy or dusty.
Sand-lime brick
The basis of silicate brick is quartz sand. During production, lime, special additives and dye are added to the sand. After molding, the bricks are sent to the kiln. Firing occurs at a temperature of 200 degrees. The pressure is raised to 12 atmospheres.
In the finished version, sand-lime brick provides sound and thermal insulation. Regular exposure to moisture is undesirable.
When using sand-lime brick, specialized compounds are used. Large roof overhangs will also increase its moisture resistance.
Preparatory stage
If you decide to decorate your home yourself using brickwork, then you should first carry out a series of preparatory work. You should not neglect them if you want to achieve a good and sustainable result. Make sure that the foundation of the house, as well as its overall structure, is designed for the installation of brickwork. The foundation must be constructed in compliance with all building codes. It must withstand significant loads. Cheap and simple bases will not work in this case.
You should also make sure that the foundation of the house is made of raw materials such as monolithic concrete (concrete blocks are also acceptable). The foundation itself must be sufficiently wide
This requirement is especially important because it is on the foundation structure that the facing brick will rest. In some situations, bricks are placed on special steel corners, which are attached to the base using anchor bolts
In addition, it is allowed to organize an additional foundation if the quality of the main one leaves much to be desired. Another foundation must be poured along the perimeter of the building, retreating about 30 cm from the first foundation.
Next you should pay attention to the roof structure
It is very important to take a closer look at the roof. In most cases, in old houses, the cornice part does not protrude beyond the perimeter of the building by more than 25 cm
With such a structure, the bricks will become endlessly wet and may even be subject to destruction. After about 5 years of such use, the brickwork will become unusable. This problem can be solved in one sure way - you will need to coat the walls of your home every year with a special water-repellent compound, but keep in mind that such products are quite expensive
In most cases, in old houses, the cornice part does not protrude beyond the perimeter of the building by more than 25 cm. With such a structure, the bricks will become endlessly wet and may even be subject to destruction. After about 5 years of such use, the brickwork will become unusable. This problem can be solved in one sure way - you will need to coat the walls of your home every year with a special waterproofing compound, but keep in mind that such products are quite expensive.
If you plan to cover the main wooden walls with brickwork, then before starting work you will need to coat the wooden bases with antiseptic compounds. If you are decorating external walls, then you need to buy the appropriate product for them. For external work, you should not purchase internal impregnations - they will be of little use. In addition, it will be necessary to attach a vapor barrier material to the wooden walls using a construction stapler. These coverings should be laid with an overlap (minimum - 10 cm).
You will also need:
- carefully inspect the surface of the walls of the house, remove all unnecessary parts, such as lanterns, gutters and other similar objects;
- the previous paint layer, peeling elements, and shedding should be removed;
- all noticed defects must be covered with a layer of putty;
- if the damage to the walls is too serious, you will have to completely plaster them;
- In order to install the insulating layer, you need to put a layer of primer, which will be responsible for better adhesion of the wall and the adhesive.
In addition, it will be necessary to properly prepare the solution. A simple cement mixture is hardly suitable here, because facing bricks are resistant to water absorption. This problem is especially acute when it comes to the installation of clinker bricks, which simply require specialized additives to ensure more effective adhesion.
The correct solution consists of the following ingredients:
- cement grade M500 – 1 part;
- sand – 4 parts;
- water.
Some craftsmen add a little clay to the solution to achieve greater plasticity of the composition. However, here the opinions of different masons differ - some see this as only harmful due to the leaching of the clay component from the composition and a decrease in its strength, while others, on the contrary, believe that clay makes the joints of the brickwork more durable. In this matter, each user relies on his own opinion and experience.
Slag or slag-pouring house
Brick cladding in the case of buildings using slag is used more often when cracks spread along the walls. This happens mainly when the slag has exhausted its resource and began to crumble. On average, its service life is 50 years, it is reduced if the humidity of the walls is high.
Brick cladding of a cinder block (cinder block) house will only delay the inevitable: it will slow down the destruction, but will not stop it. The duration of the delay depends on the condition of the material and the measures taken. On average he is 8-15 years old. It is hardly possible to do without consulting a specialist: the cost of a mistake is too high.
In most cases, it is recommended to build a frame around the house, on which to transfer part of the load of the floor and roof, and carry out waterproofing work. One of which is the external protection of walls from precipitation using brick cladding. The brick is selected with the lowest water absorption. For greater protection, the masonry can be impregnated with a hydrophobic compound (but does not create a vapor-proof film). Penetrating hydrophobic impregnation of the main wall will not be superfluous. To do this, you can use impregnations such as “Penetron” and analogues. They will simultaneously strengthen the material and significantly reduce water saturation.
Watch the video about the practice of facing old buildings with bricks.
Tying the exterior trim to the main wall
Without proper attachment of the finishing layer to the wall, rapid destruction of the structure, displacement of its elements, and cracks are possible. There are dozens of ways to tie designs together. If there are no rods, plaster mesh and other elements intended for tying, then fastening is carried out using dowels and flexible wire (knitting). A dowel with a diameter of 6 mm is driven into the wall, and a wire fastener is screwed to its head, the length being equal to the width of the brick. The ends of the wire are hidden inside the masonry. A high-quality binding is a wire fastening every four rows. In width - every 60-70 cm.
Choosing a mounting method
An important condition for filling openings with bricks is to ensure a reliable connection between the new structure and the old one.
There are two binding methods:
Scheme of ligation of sutures.
- ligation of sutures;
- anchoring
Bonding seams with an existing structure is used to seal brick walls. To do this, at the ends of the doorway it is necessary to knock out bricks to a width of at least 12 cm. Niches are formed into which new stones will fit when the opening is filled with bricks. If the partition is folded into half a brick, then it is enough to knock out the finishing halves in every fourth row.
The dressing method is not very suitable for sealing window openings, because they are made in a load-bearing wall, folded into 1.5-3 stones (thickness from 250 mm). Here it is more appropriate to perform anchoring: using a hammer drill, drill holes in the side ends of the structure and hammer pieces of periodic profile reinforcement into them.
The diameter of the connecting reinforcement is from 6 to 10 mm, the depth of immersion into the thickness of the structure is at least 100 mm. Anchoring is performed every 3-4 rows; it is most convenient to do it during the construction of the partition so that the seams of the new and old masonry coincide. This method is also used for connection with concrete walls.
Standards
The window opening has its own standards, and they differ for houses that were built in different time periods. There are various types of window openings for the so-called “Stalinka”, “Brezhnevok”, “Khrushchev”. The construction of such houses was carried out in a thorough manner; they were equipped with walls of sufficient width, high ceilings, and huge footage of interior spaces.
Hole standards, if there are quarters, look like this:
- 1 leaf: 85x115, 115x190cm;
- 2 doors: 130x220, 115x190 cm;
- 3 doors 240x210 cm.
The concept of the entire building should not be violated due to the fact that the openings for the windows will have inappropriate parameters, or the number of these blocks will be suboptimal. Experts took into account the number of floors of the building, the height of the ceilings of the rooms, the area of each room, and other important architectural features.
To make the exterior of a building pleasing to the eye, the exterior decoration, as well as the shape of the window groups, is important. Moreover, finishing work can be carried out using a variety of materials.
The construction period, which took place from the 30s to the 60s of the 20th century, was characterized by the creation of beautiful buildings, their decoration was made with red brick, the facades were equipped with monumental stucco.
Closer to the 80s, the brick was replaced by a panel structure, and here the internal floors began to be made of frames. In panel houses, plasterboard was especially often used. Here the rooms had a small area, the ceilings were quite low. The standard opening also became smaller; it had parameters depending on whether the window would be mounted in a brick or panel wall.
“Brezhnevkas” had an improved layout; they were houses with nine floors, equipped with an elevator and a garbage chute. Here all dimensions were determined by strict compliance with GOST. The houses of the sixtieth series were distinguished by the largest openings.
Modern new buildings have parameters that are regulated by state standards. The width and height of the holes vary; in addition, strict records of the area of the interior are kept. The difference in the size of the holes allows you to achieve an optimal level of illumination of the space.
Important!! Multi-storey buildings of modern construction differ in that. that here the openings for windows are located in the load-bearing parts of the building, therefore changes to these structures are strictly prohibited.
Manufacturers of structures made from PVC profiles do not limit their own production to strict limits; they follow the wishes of the buyer, happily equipping even non-standard structures. There are only a few nuances regarding the design capabilities of a particular type of profile, as well as the weight of the glass unit.
the requirements of the state standard are subject to mandatory compliance. This is the only way to guarantee the safety of being indoors. Any deviation from generally accepted standards leads to an increase in the cost of the entire structure. Whereas standard models will help make the system cheaper while retaining heat inside.
Peculiarities
According to building codes, the boundaries of the premises of any building are formed by walls. Depending on the design features, they can be external and internal, load-bearing and as interior partitions. Regardless of the type of wall, they can be equipped with doorways.
Since the walls have different thicknesses, the width of the door openings is also different. Therefore, if there is a need to lay down an unnecessary door, in each case a different seal and the appropriate type of masonry can be used.
How many bricks and materials are needed?
You will need a drill mixer.
Necessary:
- Master OK,
- capacity,
- hammer drill,
- drill with mixer attachment,
- plumb level.
For dismantling, you may need tools such as a hammer, spatula, or crowbar. Necessary materials include polystyrene foam, mortar ingredients (sand, cement), brick.
The amount of brick used depends on the size of the window opening and the thickness of the wall. It is better to use red (rough) building material. At the stage of preparatory work, you can calculate the required quantity by assessing the dimensions of the space and knowing the area of one brick. Also, the volume of material used may vary depending on the type of bookmark.
Purlins from channel (angle)
Diagram of a window opening in brick load-bearing walls
One of the most common types of lintels, by means of which window openings are formed in brickwork, are metal channels (corners) of the appropriate size. When laying half-brick partitions, the most convenient channel size is 120 (140) mm, and for full brick walls, the standard size 240 (270) mm is best suited.
When using a metal corner as a jumper, you may encounter certain restrictions on its size related to the load capacity of the structure. Even fairly strong corners with standard dimensions of 100 × 100 mm (100 × 75 mm) can be used only in cases where the masonry above the window opening and the masonry of the walls are securely connected to each other, and the length of the purlin itself is short.
During installation, the corner must be positioned so that its two edges have contact with the material placed on top of it. The length of the corner lintel cannot be more than 1.5 meters, since a larger span can bend and the masonry above it can sag.
Standard jumper
Window lintels
When designing a window opening using concrete lintels, you will be faced with two possible options:
- use of finished industrial products;
- production of homemade jumpers, poured at the place of their installation.
If you use a finished product, you should simply use it to close the opening in the wall, and then continue laying the wall along its entire length.
Masonry above the opening
Unfortunately, it is not always possible to purchase a ready-made concrete lintel of the required size, which most often happens with non-standard window dimensions.
On the other hand, the weight of the finished lintel often exceeds 100 kg; so without using special lifting equipment you are unlikely to be able to raise it to the required height. Most performers who do not want to deal with the rental of lifting mechanisms prefer jumpers made in-house to the finished product.