The question of how to install a roller blind on a plastic window is often asked by owners who have chosen the option of using roller blinds instead of the usual fabric curtains. The advantages of roller blinds are undeniable - they are comfortable, elegant, reliably isolate the room from bright sun, are easy to use and do not require special preparation for installation.
The demand for roller blinds in the interior is constantly growing for a number of reasons: from their functionality to the variety of options offered. The ability to install them yourself is considered the most important advantage - roll systems of any type and weight can be easily installed on your own, with a minimum of wasted time and effort.
How to install a roller blind on a plastic window
The main guideline is the attached instructions; all manufacturers of roller blinds provide a detailed diagram of assembly and fastening procedures. The future owner should only decide on their type and dimensions. Work begins with careful measurements of openings and sashes, and only then, based on the data obtained, the following is selected separately:
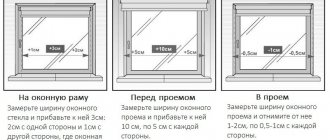
- Web width. When tightly adjacent to the sash, as a rule, implemented in closed systems, this parameter is found by the formula: clearance width + dimensions of two edge guides. In open, but mounted inside the opening, the panel should be slightly larger than the sash clearance. Deviation to a lesser extent leads to the appearance of cracks; to a greater extent, it is allowed and even welcomed only when installing roller blinds outside the opening (installation on walls or ceilings). In any case, the panel should not interfere with the operation of the handles or cling to decorative elements.
- Height of fabric blinds. When installed inside an opening, this parameter should simply correspond to the height of the opening (particular attention is paid to windows with non-standard dimensions). When fixing the curtains outside the opening, the dimensions of the bracket itself are added to the required height. In this case, it is the deviations to the smaller side that are critical; the excess is simply wound onto the roller.
More on the topic: step-by-step instructions for attaching curtain rods to the wall.
After measurements, the type of curtain system is selected. Closed systems with side guides are better suited for fastening directly to the sash; open systems are better suited for placement outside the opening.
The location of the roller blind winding control unit is taken into account. One-sided views should not be installed on the same window; with proper selection and installation, the chains of raising and lowering the curtains are located on the sides and not in the center of the window.
You may be interested in the information: how to lubricate plastic windows yourself.
The completeness of the system is checked immediately upon purchase and before installation work. Dowels and screws are most often purchased separately, taking into account the weight of the curtain and a small margin.
Problem seven – lack of parts
You are armed with the purchased product and the determination to decorate the window - but there is a shortage of components. Two scenarios. The first, simplest one is to review the available spare parts and compare them with the list specified in the instructions. Carefully look around to see if any parts have rolled under the sofa. Usually this helps, the missing components are found, and the installation continues safely.
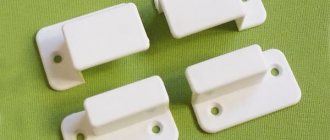
Accessories for roller blinds
The second scenario is that the set is truly incomplete. In the language of sales managers, this is called the word “underinvestment.” In human terms, the production forgot to put something in the packaging. You will have to try to exchange the purchased product for a full-fledged one. If you have not exceeded the two-week return period and the seller is conscientious, there should be no difficulties with the exchange. For OLEXDECO, “under-investment” is extremely rare thanks to the system of double checking the correctness of the package. But no one has yet succeeded in completely defeating the “human factor”.
Finally, we will repeat in order of increasing importance, which should not be forgotten for the correct fastening of roller curtains:
| IMPORTANCE LEVEL | ACTION |
| Just in case - most likely it won't be useful | Make sure you have all the necessary parts |
| At your discretion | Don't rely too much on the self-adhesive mounting option |
| It's better not to take risks | Do not attach the brackets too close to each other |
| For competent window decoration | Make sure when purchasing that the control units are removable |
| This will be a service to you and your interior. | When installing, use a “level” |
| Can't do without it | Carefully calculate all dimensions and take measurements, be sure to double check |
| Without doing this, even touch the product | Select a product according to the desired type of fastening |
I hope my tips will help you avoid common mistakes and become truly happy owners and users of high-quality window compositions. Alex the cat and his human colleagues from OLEXDECO are always ready to help with advice and action.
What methods of installing roller blinds are there?
Depending on the fasteners used and the installation location, there are two main installation methods: fastening without drilling and installation with drilling and fixing the brackets to dowels with self-tapping screws or self-tapping screws.
Fastening without drilling, using double-sided tape or a special adhesive tape included in the kit - this method is chosen when fastening light-weight structures exclusively to plastic window sashes. The tape simply will not stick to other surfaces. Both the frames themselves with the curtain roller, as well as the guides and holder brackets, are glued. Despite all the advantages (simplicity, installation in a matter of minutes, no need to damage the integrity of the frame), installation with adhesive tape cannot be called reliable; as the adhesive strip dries, the curtains simply fall under their own weight, and the fastening has to be renewed.
More on the topic: what to do if it blows from plastic windows.
Installation with drilling and fixing the brackets to the dowels with self-tapping screws or self-tapping screws - this method ensures high reliability of fastening and is suitable for installing curtains with large weight and dimensions. But its implementation requires more time and experience, in particular, the skills of drilling holes in windows or surrounding foundations.
When choosing the second method, roller blinds can be attached not only to plastic sashes or frames, but also to the walls above the window, the ceiling, or the upper slope of the opening:
- Mounting on the walls above the window, with a distance from the edge of the upper opening of at least 50 mm, is the best option for rooms with small windows without protruding window sills; the method allows you to visually enlarge the opening by changing the size of the curtains.
- Mounting on the ceiling, using the same brackets, but with a downward rotation - with this installation, the room is visually stretched and defects are hidden, but the requirements for the evenness of the ceiling increase. In particular, if there is a deviation in level between the brackets of more than 1-2 mm, pieces of rubber, plastic or wood must be placed under them.
- Fastening to the upper slope of the opening - this method is most often implemented in office premises; when chosen, the window opening looks laconic and modern.
You may be interested in the information: how to insulate wooden windows for the winter.
When choosing a mounting method, in addition to design considerations, it is worth considering the type of curtain construction. Open systems (shaft, mounting angles, chain) have different sizes and are installed anywhere, either with adhesive tape or with self-tapping screws. Closed, with a box and a guide, most often designed for installation on a window frame or sash. They also ensure the tightest fit of the panels and are optimal for installation on south-facing windows.
Problem two – too much hope for the “no drilling” model
No need to make holes in the window frame, remove the film from the self-adhesive plate, glue it to the holders, then to the PVC profile - and you're done. You can invite your household and show off your creative interior composition.
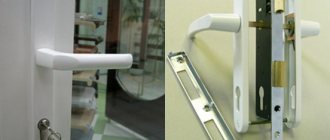
On the left is an option for installing on a window frame using self-tapping screws; on the right – fastening with double-sided tape
I was invited to admire such a spectacle more than once. It’s beautiful, no doubt about it, but until the moment when the tape won’t hold up and the whole structure will fall. Within a couple of days - if the self-adhesive material is of poor quality. Even the best-quality tape will lose its adhesive ability and sooner or later the curtain will fall off. Believe me: cats who love to lie on window sills are aware of this trouble better than others.
- First advice:
“rolls” on a blind window sash are more reliable, safer, and easier to secure permanently, with self-tapping screws. - Second tip:
if you do attach fabric blinds “without drilling” to the frame, do not place fragile objects on the windowsill, do not move an aquarium or a child’s bed close to the window.
Installation tool
To attach roller blinds to plastic window sashes you will need:
- Building level.
- Double sided tape.
- Alcohol-containing products for degreasing the surface (used when attaching with tape without drilling).
- Drill and drill bits with a diameter in the range of 1.5-2 mm. Conventional ones - for plastic or brick, Pobedit ones - for preparing concrete bases.
- Plastic dowels and screws.
- Screwdriver or screwdriver.
- Pencil, square and tape measure for taking measurements and markings.
More on the topic: which ones are better to choose interior doors for your home.
If it is necessary to adjust the dimensions of the product, additionally prepare a hacksaw, a stationery knife, a metal ruler and fine-grained sandpaper. Most often, such actions are performed with guides. In this case, it is advisable to leave the open edges intact; to fulfill this requirement, trimming of the guides is performed in the upper hidden part.
Procedure for carrying out work when installing open systems without drilling
Regardless of the chosen method, work begins with opening the packaging and checking that the curtains are complete. At this stage, it is not recommended to use sharp tools that can damage the blade or chain. After recalculation, all the details should be put in one place or box. Further actions depend on the type of roller blind and its installation location. If it is necessary to fix lightweight systems to a fixed sash, the following work is performed sequentially:
- The surfaces of the window and the glued part of the bracket are dried and degreased.
- A piece of double-sided tape is glued to the holder without removing the film from the outside.
- All other parts of the curtain are assembled.
- Using a pencil and tape measure, mark the installation location, while simultaneously trying on the curtain (without removing the film from the tape!). The installation line is checked using a level.
- The roller with the curtain is temporarily removed, and the protective film is removed from the tape on the holders.
- After this, the holders are installed at the marking points and pressed tightly against the plastic and held in this position for about 1 minute.
- The mechanism for raising and lowering the curtains is placed on the curtain shaft, after which it is carefully secured in the holders.
- The operation of the curtain is checked.
You may be interested in the information: how to insulate a door in a private house with your own hands.
Problem six – holders installed too close
First, the brackets are always secured, then the pipe with the roll is inserted into them. There will be no difficulties with installation on a rotating transom; the products can be freely moved. But with stable fastening with screws, it is necessary to carefully measure the distance between the holders. When the gap is too narrow, leaving not the slightest gap, the brackets can be damaged when a shaft is placed between them.
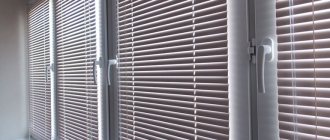
Roller blind holders installed too close
Plastic is a flexible material, but not indefinitely; if you bend the holders too much, they will break and render the curtain set useless. Such excesses happen regularly, although buyers do not like to talk about them - who wants to look in an unsightly light? Do not rush to despair, if such grief befalls you, deal a preemptive blow to the villainous fate: purchase products where they offer the opportunity to buy spare parts for them separately.
Repair kit for roller blinds
Then you won’t have to scour different retail outlets and risk buying an unsuitable part according to the description “well, probably something like this...”.
How to install open roller blind systems with self-tapping screws
To install roller blinds on self-tapping screws (walls, ceilings, window openings or sashes), perform the following steps step by step:
- An approximate marking of the position of the curtain is carried out, and the approximate points of its edges and center are determined.
- The fully assembled curtain is placed against the wall or ceiling and aligned, positioning brackets and drill holes are specified and clearly marked.
- The structure is disassembled, the brackets are once again attached to the base and the points of future holes are updated.
- Using a drill with thin, strong drills, holes for dowels are prepared, and dust is brushed off the surface.
- Dowels are installed in the holes, brackets are installed and screwed with self-tapping screws.
- The shaft with the curtain is installed in the holders and its operation is checked.
You may be interested in the information: wooden ceiling in the apartment.
Installation instructions for closed systems with guides
When installing tightly adjacent roller blinds, the box of the closed cassette itself is fixed with self-tapping screws, and double-sided adhesive tape is used to connect the guides. As a rule, a strip of the required size is included in the kit or is already glued to the parts, but there are exceptions. To attach roller blinds of this type, the following operations are carried out in stages:
- The completeness and condition of the cassette is checked. Closed systems are usually implemented in assembled form; the control unit side is specified in advance.
- All surfaces are degreased with alcohol.
- After attaching the curtain and checking the horizontal position, mark with a pencil the approximate edges of the body, drilling points (to do this, the side covers are removed from it in advance) and the location lines of the guides. At this stage, it is important to check the operation of the mechanism and the symmetry of the location of the guide beads and the curtain fabric itself.
- The position and length of the guides are checked - if necessary, the glazing beads are cut at the top.
- At the marked points, holes are made with a diameter of no more than 2 mm and a depth of up to 3 mm. The box is leaned against and screwed with self-tapping screws. The case covers are put in place, and if necessary, the chain retainer is hung separately.
- The protective strip is removed from the tape on the guides, after which they are installed in the desired place.
- The curtain fabric is lowered to the lower border, and a travel limiter is installed at the bottom.
- The fabric is raised and lowered several times, after which it is left in the desired position.
You may be interested in the following information: suspended ceilings in a wooden house, pros and cons.
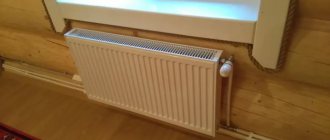
Roller shutter design
There are many types of light-protective sheets, but they have common features. All of them consist of a metal tube-roller, or rod, on which fabric is wound: bamboo or cotton material. The length is adjusted using a chain that is attached to a rotating mechanism on one side of the roll.
Usually at the bottom of the curtain there is a steel or wooden weight bar that protects it from deformation, allows it to hang evenly and fit tightly to the glass. The latter is achieved using a pair of small magnets that are glued to the bottom of the frame and attract the weighting material, if it is metal.
You can take a more complicated route and thread a fishing line through the guides, which will hold the roller shutter during wind fluctuations and opening in the “window” mode. It must first be threaded into the upper fasteners several times so that when tensioned it does not pull out. Unwind it all the way and insert it into the special eyelet on the weight bar. At the bottom of the frame, attach small corners with holes for fishing line. Pull it there, tie it, cut off the excess.
Sometimes manufacturers install a spring inside the shaft. In this case, there is no need to fiddle with the cord with your hands to open or close the “roll”. It is enough to pull the plumb line located on the bottom bar with a little effort.
The procedure for installing roller blinds on sashes and spring brackets
This method is chosen exclusively when installing lightweight systems on opening doors and is not suitable for other places. When implementing it, the following operations are performed sequentially:
- The operation of the system and the position of the web are checked. The main requirement is placement in the center of the sash, the fabric should not move.
- The spring bracket is hung on the window sash. The part consists of two parts, the small corner is fixed first, then the holder itself is inserted into the groove of the part. To improve the reliability of fixation, a piece of double-sided tape can be placed between the bracket and the surface of the sash.
- The side covers are put on the brackets, the curtain shaft is inserted and its operation is checked.
Structure management
Roller curtains can be controlled mechanically. Manufacturers offer the following devices:
- cord with chain. The simplest adjustment is to select the position of the material with a cord on the panel. You will need to lift, fix in the desired position and lower the roller blinds manually. The chain cord can be placed on any side of the mechanism. If handled carefully, the system does not sag and can be used for a long time;
- spring holder. The device is suitable for classic sun protection options and curtains that open from bottom to top. The control process is implemented by automatically fixing the material at the desired level. Spring mechanisms are only suitable for curtains without constant adjustment. Otherwise, they may stretch and weaken. Problems with fixing blinds lead to expensive repairs to the holder;
- electric drive. Despite the complexity of the design, the system is easy to use. The electric motor allows you to control the canvas on high windows, ceilings, and sloping attic walls without going near it.
Mistakes when installing roller blinds
Top common mistakes include:
- Purchasing curtains without preliminary measurements or sets without the possibility of disassembling the elements. Ideally, roller blinds are purchased after all dimensions and fasteners have been determined, with a set of parts for repair (for example, with spare chains or brackets).
- Installation of fasteners without checking angles and levels. Tube distortions of more than 1-2° lead to breakdowns, extraneous noise during operation of the lifting unit and displacement of the panels during winding until they “stick” in the drum.
- Placing curtain holders too close to each other. To avoid this error, which can result in bending of the brackets or the shaft, the distance between the holders should be carefully measured and checked before drilling and their final fixation.
- Attempts to install with tape, without screwing on curtains with a large weight with self-tapping screws, and ignoring the need to degrease the window surfaces and the parts themselves using the same method.
- If the panels are too close to the wall when installed outside the opening, this can lead to problems when winding and unwinding them in the future. Mistakes also include ignoring protruding window sills when planning to completely cover this area with a curtain.
- Errors in the selection of fasteners, namely attempts to install open systems on sash holders, or vice versa, installation of closed cases with a tight fit on protruding wall brackets.
Summarizing the recommendations
Avoiding the listed mistakes is quite simple - just take measurements, select the desired type of system with fasteners in advance and follow the manufacturer’s instructions. When checking the level, you should focus on the horizon of the shaft itself, and not the line of the window sill, ceiling or pattern on the walls. Small deviations of the body from them are not critical, but distortions of the panel, on the contrary, are always noticeable and dangerous.
During installation, the position of the roller blinds is checked several times - when marking, installing fasteners or gluing tape, and after securing the shaft. Any deviations are eliminated without delay; a correctly installed roller blind should unwind and reel smoothly, without distortions of the panels, wobbly brackets or clicks of the drum.
Summing up all the recommendations on how to install a roller blind on a plastic window, I would like to emphasize that the most important condition when choosing a roller blind option is the specific conditions for their fastening and the need to ventilate the room. If an important requirement for the consumer is the need to ventilate the room, then preference is given to structures with the possibility of attaching them to the window sash itself.