Benefits of cladding
Most contractors who finish window sills with tiles highlight the following advantages:
- Visual. The apartment owner can choose tiles that suit the interior design of the room. The uniqueness of the work depends only on the imagination of the customer.
- Physical characteristics. By decorating the area near the window with ceramics, the apartment owner can avoid frequent cleaning. The tile is not so susceptible to dirt and dust and is easy to clean. In addition, it is able to withstand greater physical stress than conventional plastic.
- Duration of operation. Ceramic tiles benefit significantly when it comes to durability. In addition to the service life, the strength of the entire structure increases several times.
In short, in almost every component, ceramic or tile will be better for the home. If renovations in the house are being done “for yourself,” then it is recommended to opt for higher quality materials.
What you will need
To decorate windows in your house with your own hands, you will need:
- wide board for window sill;
- narrow boards for framing windows (if desired, you can also make wooden slopes);
- ordinary wooden slats;
- putty;
- primer;
- paint or stain, brushes and roller;
- nails 5 cm long;
- hammer, electric saw, pry bar;
- sandpaper and sanding machine;
- chisel, tape measure, ruler, pencil.
You can use any wood for window cladding. These can be expensive types of wood with a beautiful texture or cheap ones, for example, ordinary pine boards. Choose putty to match the color of the wood.
Advice from experienced masons
The cladding process will not be difficult if you pay attention to the following factors:
- Surface condition. The base must be complete. If during preparation you find cracks, large scratches, chips, empty spaces, etc., then the problem should be corrected. If you ignore these nuances, the finish will not be of high quality. The tile can simply crack.
- Choosing a base. A concrete base will ensure the durability of the structure and high quality of finishing in general. It will lie on any surface (wooden or plastic) without any problems.
- Surface condition. After checking the area of work, you need to make sure that it is firmly fixed in the opening and will not “ride” during installation.
- Choosing the tile itself. The most important aspect. The type of masonry and the complexity of the work depend on the size of the tile. The diagonal of the tile is selected based on the size of the base. If it is not large, then it is recommended to go with 10x10 or 15x15 tiles. This will eliminate the need for cutting and will give the surface a more attractive appearance. If the dimensions of the base allow you to choose a larger tile, then you can think between 30x30 or 40x20 centimeters. Any store has a wide range of products, so choosing a model is not difficult.
Installation begins only after a new double-glazed window has been installed and the external type of drip has been correctly installed.
Installation
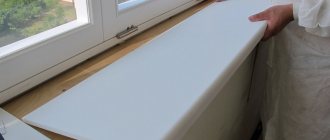
Even a beginner can install the cover without the help of specialists. The installation process will not take much time, since dismantling of the old structure is not required.
Before starting work, you need to check that you have all the necessary materials and tools:
- overlay of the required size and plugs;
- glue;
- silicone;
- fine-tooth saw or jigsaw;
- construction tape;
The work process includes several successive stages:
- Step 1. Preparatory. The surface of the window slab must be flat, so if there are chips and cracks on the concrete base, they must first be repaired with gypsum putty. Plastic or wooden surfaces do not require special preparation, but must be clean. If necessary, you can treat with an antiseptic.
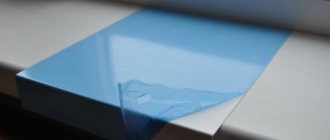
- Step 2: Cut it out. You can cut the overlay with a mounting knife or jigsaw. The parameters of the window recess must be carefully measured; to maintain accuracy, you can make a paper template preserving all the contours of the opening.
- Step 3. Installation. You need to apply mounting glue to the wrong side and distribute it first around the perimeter, and then in zigzags over the free space. After placing the pad, you need to press it and place the weight on the corners to secure it firmly. No further work can be carried out while the glue is drying.
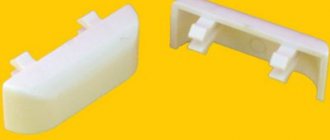
- Step 4. Plugs. The plug must be cut to size and glued to the sides of the window slab.
- Step 5. Sealing. The joints along the slopes and the window frame are treated with sealant. A layer of silicone is evenly applied to the seams to hide the joining line. You can use rubberized profiles or special corners.
The price calculation, taking into account the individual dimensions of the window sill, can be done in the installation company or independently. In any case, the result will please you compared to the cost of replacing the structure.
The price consists of several main parameters:
- Quality of material.
- Manufacturer's brand.
- Product size.
- Color.
Approximate prices per linear meter of material are:
- For plastic covers – $7.
- For MDF board overlay – $30.
The price varies depending on the width and color of the material. End caps cost $4 on average.
Renovating your interior yourself is a rewarding and fun activity. Following the recommendations, you can carry out restoration if necessary. And if you just want to introduce a new element into the familiar environment of your home and show your creativity, try changing the surface of the window sill. You will succeed!
Do you need to choose a trim to disguise decorative flaws, or install a new window sill slab? Then you've come to the right place! Specialists of the Healthy Window company provide similar services in Moscow and the region at a reasonable price from 2000 rubles .
By contacting us, you provide yourself with the opportunity to repair the window system without unnecessary nerves and financial losses - we will do everything quickly, efficiently and inexpensively, all you have to do is enjoy the result.
Required Tools
A universal list of tools that will be required during the work process:
- Universal type soil mixture.
- Adhesive solution.
- Tile.
- Marker for marking.
- Rubbing material for seams.
- Pliers.
- Glass cutting tool.
- Hacksaw.
- Level.
- Hammer (it is better to choose a rubber one so as not to damage the materials).
- Spatula (regular one is enough).
In order not to waste a lot of time, such materials for work can be found in the same store where you will buy the tiles.
Kinds
Decorative overlays are available in two types: made of polyvinyl chloride (PVC) or MDF panels (from the German name Mittel Dichte Fazerplatte - fiberboard).
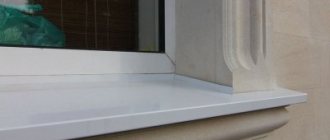
Plastic
Available in different color shades: white, imitation marble or wood pattern.
Designed for installation on window slabs made of different building materials:
- wooden;
- concrete;
- tiled;
- made of stone, natural or artificial;
The lining is selected to be 2 cm wider than the window sill in order to prevent the appearance of a gap with a gap on the old base. In the kit with the overlay, you need to select end caps made of the same material, suitable in width and shape for finishing the sidewalls.
Manufacturers offer standard sizes of PVC overlays: width – 15–52 cm, thickness – 3.5 mm, maximum length – 3 m.
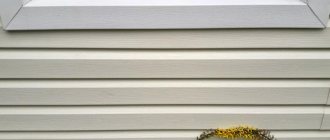
MDF linings with drip edge
It is possible to restore the same window sills as those made from polyvinyl chloride. The difference between MDF overlays is the limited range of colors and the absence of corresponding end caps. In construction markets they are less common than plastic ones.
The MDV panel overlay should be wider than the board being closed by at least 6–8 cm, and the drip edge itself will serve not only for its main purpose, but also to cover the old window sill.
The usual dimensions of MDF overlays are: width - 35-70 cm, thickness - 15-18 mm, length - up to 4 m.
Before purchasing a pad, you need to make a balanced choice.
It is recommended to take into account the following criteria:
- The color shade must match the entire window system or be in harmony with wallpaper, curtains, and interior details.
- Quality characteristics should reflect resistance to moisture, temperature changes and sunlight.
- Possibility of using common detergents.
- The size is as close as possible to the dimensions of the window sill, taking into account the necessary “margin”.
- Availability of plugs suitable for the size and shape of the slab.
Selecting masonry type
In most cases, the master has to choose from two options:
- Along the area around the window.
- Perpendicular to it.
The dimensions of the base should be taken as the basis for choosing the type. It is necessary to minimize unnecessary trimming of materials. To adjust the die to the dimensions, use a regular type of glass cutter.
After determining the location of the incision, the area is marked with markers. Cladding should only be carried out on a smooth surface that is firmly fixed. Otherwise, you will not be able to trim the marked marks.
You should not be afraid to press hard on the laid material. If you press weakly, then there is a chance that the tile will not press through.
To do the job carefully, a rubber hammer will help, which should be used to slowly tap ceramic products in places where there is a potential cut. As an alternative to a hammer, you can use the handle of a spatula. But you should wrap it in something soft (for example, a towel) in advance, otherwise there is a risk of damaging the product.
The selected part must be broken off with a sharp and forceful movement. If you are not sure that the process will be like this, it is recommended to use an angle grinder. It will save time and physical effort.
Working conditions:
The minimum cost of work is 2500 rubles.
The visit of a specialist is free when ordering a service. In case of refusal of the service, the visit of a specialist is 1500 rubles.
What do you get for that kind of money? When installing window sills, we guarantee that for at least 1 year you will not be disturbed by:
- blowing;
- freezing and cold from windows;
- mold and mildew;
- the condition of the slab - its fastening, location and appearance.
We can tell you the approximate cost of the work in advance, but to do this we need to know some parameters. Call us for pricing information.
Window sill finishing options
In addition to the standard option for finishing the area near the window, there are several popular options.
Mosaic cladding
Ceramic material can neatly fill a small space near the window. Moreover, outwardly it will look stylish.
If a white mosaic matches the interior, then only white glue should be chosen. Otherwise, the color at the end of the procedure will not be in harmony.
The installation process will be much simpler than with standard tiles and much faster. The finishing material is perfect for any interior design, from classic style to postmodern.
The only significant drawback is the presence of many seams that divide the overall picture. After a certain period of time, without proper care, mold may begin to form in them. Dirt and dust also accumulate in the seams. It is enough to use a high-quality cleaning product at regular intervals.
You can use not just the classic method of laying mosaics; to achieve symmetry, it is recommended to mount the mosaic on a pre-installed grid.
Based on your needs, the dimensions of the entire structure are easily adjustable. Before installation begins, the working surface is checked for cracks and chips. If they are not there, then the tiling process will not differ from working with tiles.
Upon completion of installation, the work area is cleaned. The procedure for insulating the window sill is carried out before installation.
Working with plastic and wood bases
Cladding a wooden window sill is practically no different from working with a concrete surface. It is enough just to properly flash the tree and the entire structure as a whole with a sheet of drywall; after flashing, the procedure can begin.
There is a method in which you do not need to cover it with plasterboard. You will need to treat the wooden surface with an acrylic type primer. Next, epoxy type glue with the same grout is used.
Working with a plastic base is easier. It is recommended to replace the glue with liquid nails. The more textured the plastic, the higher the quality of grip.
When purchasing, it is better to select a composition that is originally designed to work with plastic or wood.
Afterwards the design will be ready for use.
When needed
Repair linings on the window sill can be installed in different cases:
- damage, cracks in stone and concrete slabs;
- the appearance of chips at the corners;
- white plastic surfaces turn yellow and fade;
- damage from hot objects;
- traces that remain from flower pots, water that dries up;
- spots that appeared from various exposures;
- accidental mechanical damage;
- scratches;
- the need to refresh the appearance of the surface.
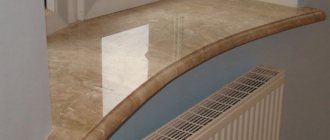
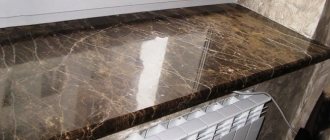
DIY porcelain stoneware window sill
When covering a window sill in the kitchen, porcelain stoneware is suitable. Experienced builders highlight its strength, which is considered the highest among alternative materials. If the technological part of the work is done correctly, the porcelain stoneware will be wear-resistant and resistant to high temperatures.
The advantages include:
- life time;
- ease of cleaning;
- the ability to place hot dishes;
- integrity.
Cladding a porcelain stoneware window sill begins with preparing an adhesive solution. It is important to pay sufficient attention to this point, otherwise the glue will not perform its direct function and will not hold the tile.
The prepared solution is gently and without strong accumulation added to the work surface where the back side will be. It is recommended to apply the glue with a spatula in order to do it evenly.
When applying the solution to the work surface, make sure that the pattern and elements completely match.
The main thing is to maintain the gap between the dies. This will allow you to maintain symmetry in the installation of materials at the same distance from the previous one. Plastic crosses are suitable for this. They also differ in size. A sales assistant in a store can help you with a more detailed selection of crosses.
You will need to allocate space for an inclination for the base of the structure; the angle is kept small. The slope comes from the side of the glass unit and towards the street. This action allows you to avoid the accumulation of concentrate on the structure area. The created slope directs the resulting concentrate from the base of the frame to the edge so that it flows out.
Upon completion of the laying of horizontal dies, the laying of the end elements begins. After laying the tiles on the surface, they proceed to preparing and applying sealing materials.
Putties in dark colors are popular. Dark tile options will look good. Running options:
- Blue color (preferably dark shades).
- Beige.
- Brown.
- Burgundy.
When choosing an option, you should base your choice on the color of the selected tile.
It is better to give the solution as much time as possible to harden. Afterwards the work area is cleaned and washed.
When facing work, make sure that horizontal and vertical elements are joined in the right places. Otherwise it will ruin the whole design picture.
After cleaning the window sill, the surface is renewed and ready for use.
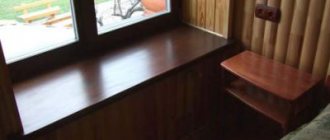
Window frame
To make your window design more stylish, install a frame around the perimeter of the window. Narrow boards are suitable for it. To make frames, measure the height of the window. Cut two boards to the appropriate length. Secure them on both sides of the window with nails. Install the boards so that their lower ends rest tightly against the ledges of the window sill.
Now measure the width of the window. Add to this parameter the width of the already installed vertical boards. Cut the board to the desired length. Install it in place using nails.
To make the framing more attractive, run narrow slats around the outer perimeter of the boards. Install slats using the same technology as the frame itself.
Eventually
Thus, if the appearance of your window sill has become unusable, although it itself is still durable, or you are not satisfied with the color scheme, you can easily order an inexpensive overlay for any size and color and install it yourself.
A glue gun, liquid nails, a hacksaw, a jigsaw (preferably an electric one), a knife, putty and silicone will be useful for the job. The base is cleaned of debris and old varnish. If the surface is distorted, you can level it using putty. After which the window sill is treated with any antiseptic. After which the pad is prepared for work. It should be cut according to the dimensions of the connector. You can cut off the overlay using a sharp knife. Glue is applied to the inner surface of the decorative overlay. After which it is glued to the window sill. Silicone is used to make end caps on the sides. Installation of plastic covers is quite easy. But you can also contact us so that professionals will do this work, freeing you from unnecessary work.
Plastic covers can quickly transform any window sill without any replacement. This is hassle-free and saves money. After all, completely replacing a window sill takes a lot of time and takes energy. The pads are made of durable plastic, which is affordable. The material is UV resistant, moisture resistant, fire resistant, and can withstand temperature changes. Overlays are often veneered. Thanks to this, you can choose any color for the product. Installation of the overlay usually takes 50-60 minutes.
Recommendations from experts
When replacing a plastic product, use the following practical guidelines:
- Before installation, you need to thoroughly moisten the back side of the canvas and the base of the cement screed of the window opening with water using a sprayer. This will speed up the polymerization process of the polyurethane foam.
- You should not fill the voids with a large amount of foam. It is better to foam the space with stripes, leaving gaps between them. This way you can save mounting foam and avoid undermining the entire installation when the foam swells over time.
- It is better to treat the surface under the new canvas with an antiseptic - this will take a little time, but in the future it will protect the structure from moisture.
Advantages and disadvantages
Advantages of plastic finishing:
- environmental friendliness;
- durability;
- giving a neat appearance;
- variety of choice;
- reliable adhesion to the window frame;
- perfectly flat surface;
- heat and sound insulating properties;
- reasonable price;
- high installation speed;
- possibility of self-installation;
- no additional steps are required to level the surface of the opening after dismantling the old windows;
- moisture resistance;
- ease of use;
- Possibility of use on arched structures;
- preventing fogging and freezing of windows;
- a small amount of dust, dirt after installation.
Among the shortcomings are noted:
- tendency to mechanical damage;
- poor quality of additional elements;
- inability to replace part of the panel if damaged.
Puttying
To make the window finish look neat, use putty in the next step. If you don’t have store-bought putty, you can make it yourself. Take wood glue and wood chips left over from cutting the boards. Take only very small sawdust. Mix glue and sawdust in a 1x1 ratio.
Novosibirsk Tolmachevo Airport will be decorated with columns in the shape of airplane turbines
A teasing hare and other photographs for an international photo competition
Andrei Ilyin said that Yakovleva’s son was wildly jealous of his mother’s on-screen husband
Now seal the holes in the wood and the nail heads. Also repair defects on the boards themselves (cracks, chips), if any. Wait for the putty to dry. Remove any excess with fine sandpaper. Make the surface of the boards absolutely smooth.
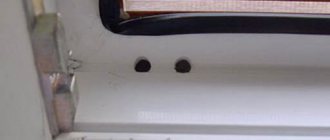
Reasons for the formation of cracks
The first sign of increasing cracks is dust on the windowsill, which appears a short time after erasing. Also, a violation of the tightness is indicated by fogging of glass, drafts and noise. The biggest problem is the appearance of drips on the wallpaper under the windowsill and mold.
To seal cracks, it is important to find out the reason for their appearance:
Violation of installation rules. Unprofessional installation leaves large, poorly foamed gaps between the wall and the glass unit. The installation material dries out over time, causing the window to warp and cracks to form. A candle will help check the tightness. Pass the flame of a candle or lighter along the joints. The external contact areas of the frame must be tightly foamed, puttied and plastered.
Seal wear. The rubber bands can crack, jump out of the groove and tear. Untreated material is destroyed by sun, snow and rain
It is important to apply a coat of plaster or paint on the street side to protect the seal.
Wear of fittings. Natural wooden frames are susceptible to adverse environmental influences
The wood dries out during use and the cracks increase. In plastic structures, rubber seals, locks and latches become unusable.
Features of coloring
Special paint for plastic window sills must be selected. Standard enamels cannot be used; they form an uneven layer on such a coating, and it will peel off quickly. In addition, it is necessary to clean the surface from old paint and varnish material. Otherwise, it will not be possible to apply a new layer evenly and reliably.
The priming stage is required; it will ensure a long-term coating, the color of which will last for many years.
Neglecting these steps will lead to the need for re-painting after 6 months.
It is necessary to clean the surface from old paint and varnish material.
How to remove deep scratches on plastic
To remove deep scratches on plastic that completely spoil the appearance of any thing:
- melt a small piece of plastic that will be exactly the same as the area being repaired;
- dissolve it in White Spirit;
- now that the substance has taken liquid form, rub it into the crack;
- Finally, polish the surface.
Special products hide deep scratches.
You can remove large damage on a plastic base by using a special product called Displex, which is sold in hardware stores, packaged in tubes. It is worth noting that this substance contains microparticles of a plastic nature, so they most accurately fill deep scratches and make them invisible to others.
This tool should be used as follows:
- apply the paste to the scratch using a cotton pad, flannel or other cloth;
- rub the product in, making circular movements, for 2 minutes;
- If the scratch does not disappear after one procedure, repeat the manipulations several more times.
As a rule, Displex copes well with deep damage, but in the case when all influences are ineffective, it makes sense to turn to specialists. For example, if the scratch is inside the car, use a special damage removal service that most car washes offer.