In an effort to make your home more comfortable and cozy, you often come up with the idea of replacing conventional swing doors with sliding doors (they are also called sliding, sliding, hanging). The good news is that you can install sliding doors yourself without any problems. The bad thing is that a normal mechanism costs about the same as a high-quality blade. What is captivating about them is that when open they hardly “eat up” space. They either hide in the wall (a better, but more difficult to implement option), or move along it.
You can hang interior sliding doors yourself
All this is true, but there is a significant drawback - a very low degree of sound insulation, especially in the sliding door version. When the canvas simply covers the opening. When installed in a pencil case (in the wall), the situation is a little better, but the degree of sound insulation of a swing door cannot be achieved even with this installation method. If all this doesn’t scare you, you can start studying the systems, selecting them, and then installing them.
Sliding door systems
There are two types of mechanisms: suspended and rail. Neither is perfect. Briefly about their advantages and disadvantages below.
Top rail suspension system
The suspension mechanism is a supporting beam to which is attached a guide in the shape of the letter “P” with “legs” bent inward. The rollers to which the door leaf is attached move along this guide. In technical terms, it is a hanging door on a top rail.
Basic design of sliding interior doors on the top rail
When installing such a door, the floor under the door remains smooth, only the lower roller is installed on the right and/or left in the doorway. It slides along a groove made in the lower end of the blade. It is necessary so that when moving it does not deviate vertically. This design is the easiest to install. Installation is very simple and consists of several steps:
- secure the top rail;
- screw the roller mechanism to the upper end of the canvas,
- roll the canvas into the guide;
- install stoppers at the top (so that the doors do not fall out);
- Having opened the doors, insert the lower roller into the groove and secure it to the floor.
Single-leaf interior sliding doors
That's all. Doors on rollers are installed. But this system, in the form shown in the photo, has very low noise insulation characteristics. They are practically zero: the passage is simply blocked.
Rail sliding doors
This type of door has two rails: top and bottom. Rollers are also installed at the top and bottom. Thanks to this design, the system has a high degree of rigidity: it can be shaken without causing much damage.
Rail sliding doors
The disadvantage of having rails in the floor is known: they are difficult to clean. Debris and dust constantly get into the grooves, so you have to keep them clean. This type of door is most often used in cabinets and dressing rooms. They are used as interior doors if there are active children in the family. Then safety is more important than difficulties with cleaning.
Recommendations when choosing
During installation, hanging sliding doors require taking into account the strength and hardness of the surface where the equipment for moving the door will be installed, and you should also pay attention to the fact that hinged doors should weigh no more than 40 kg. With more weight, the guide may sag and break. When taking this point into account, there is a rule according to which, for a heavy sash, powerful rollers are selected to ensure sufficient force to hold and move the doors.
The starting materials for the production of such doors are:
- Plastic;
- Aluminum;
- Glass;
- MDF.
A plastic door, which is hung on a wall or ceiling, is valued for its strength, lightness, and resistance to various environmental influences. Moreover, the price of such doors is much lower.
Aluminum doors have a number of advantages compared to other types of materials:
- Using chemicals for cleansing;
- Long service life;
- Various door shapes;
- Possibility of installing a thermal insert to create an additional heat source;
- Easy installation;
- Elimination of the possibility of loss of shape (compared to wood).
A hanging glass door is suitable for a high-tech or minimalist interior. This type of door is made in solid or frame form. Glass is also used for installation on cabinet doors. A wall cabinet with a glass door adds elegance and luxury to the interior.
Hinged sliding doors are equipped with a hinged system made of aluminum. This material has the necessary properties:
- Good resistance and strength to loads;
- Corrosion resistance;
- Convenience and ease for creating decorative details.
Mounting options
Regardless of the sliding door system, installation methods can be:
- Sliding doors. Guides are fixed on the wall along which the canvas rolls.
Sliding doors. The guide is mounted on the wall above the correct opening - Cassette. A special niche is made in the wall into which the door leaf is hidden. They are also sometimes called “retractable.”
Cassette sliding interior door: the door is hidden in a wall niche - Cascade. They consist of one fixed blade and several movable ones. The movable ones, if necessary, move and hide behind the fixed part.
Cascading sliding doors: one leaf pulls the other
The simplest installation option is sliding doors. They can be installed independently, not only at the repair stage, but also after it. It is only important that the opening is smooth and the wall has normal load-bearing capacity. The disadvantage of such a system is that you cannot place anything close to the wall in the place where the door rolls back. There is one more thing: very low sound insulation. This is easy to explain: if you look from the end, there is a gap of several millimeters on the sides. It is necessary so that the canvas does not “shuffle” along the wall. And all sounds penetrate perfectly through it, becoming only a little quieter.
Cassette doors are good because when open, the door leaf is located in a niche in the wall and does not interfere. The second advantage is that seals can be installed around the perimeter of the opening, which provide much higher sound insulation performance. The disadvantage of installing a sliding door in a niche is that it can only be done at the renovation stage. The second drawback: to make a pencil case for sliding doors, they usually install a false wall, and this means stolen centimeters of space.
Cascade doors are one of the types of sliding doors. It simply has a larger number of guides: according to the number of movable door leaves. Installation is perhaps the most difficult: there are many parts and high installation accuracy is required. The systems belong to the elite category, and they rarely save on installation: repairs will cost more.
Main advantages
This design visually expands the space and saves useful space. It is easy to use; the doors open easily, without any effort. The design is resistant to mechanical damage.
Hinged doors do not open on their own, for example due to strong wind or draft. Installing an automatic opening system makes it even easier to use the door and extends its service life; installation can be easily done independently.
This is interesting: Doors to the bedroom are an important element of the interior (27 photos)
Features and installation procedure
You can install sliding doors yourself even without much experience. It is quite possible to do without installers. It will take a little time, and also installation instructions. We will try to give a detailed description of the process with photos and video materials.
Self-installation of sliding interior sliding doors
The systems may differ slightly, but the general rules remain the same. There are several requirements that must be met before installation:
- The opening must be level, otherwise you will have to take a canvas that covers all deviations with a margin.
- The load-bearing capacity of the sides of the doorway should be high, as should the wall above it.
- The opening must already be finished: plastered and painted, covered with wallpaper or decorated with decorative panels.
Next we proceed to assembly. First you can attach the rollers. Different manufacturers have their own recommendations. Some recommend retreating 1/6 of the width of the door leaf from the edge; in other systems, they are attached immediately from the edge, and the mounting plates provide the indentation. This is the system we install: in it, roller platforms are installed immediately from the corner.
Marking the installation location of the rollers
We center them, measuring so that the distances are the same. Having positioned the plate, use a pencil or marker to mark the locations for the fasteners. Drill holes in the marked places. The diameter of the drill is 1 mm less than the diameter of the screw.
Securing the Roller Shoes
We set the plates and screw in the screws. The length of the fastener depends on the weight of the canvas, but not less than 70 mm. We twist them exactly perpendicularly, otherwise unnecessary stress will arise.
Installation of rollers
Supports for the rollers are inserted into the installed plates. They are fixed with a lid on the side surface. Next, roller platforms are screwed onto the threaded pins.
Roller platforms are screwed onto the pins
It is also convenient to install handles and locks before hanging. They need special, mortise ones. If you bought a ready-made kit, the required holes are available. If you have used a regular canvas, you will have to trace the outline with a pencil and remove the excess with a chisel. After the handle or lock fits into the recess, the attachment points are marked, holes are drilled for them and the fittings are installed.
Handle installation
Next, you can begin installing the guide. With mounted rollers, this will be easier: you know exactly at what height the bottom edge of the rail should be.
The most convenient way is to hang sliding doors on a dry wooden beam. Its cross-section is less than 50*70 mm, its length is twice the width of the door leaf + 5 cm. We cut the guide to the same length.
We measure the length of the carrier and mounting bar
Having aligned the guide along the beam, it is attached to the beam with self-tapping screws no less than 8 cm long. The number of fasteners is at least three, departing 10 cm from the edges and in the middle (more often is possible, less often - not).
Attaching the guide to the beam
Now you can measure at what height to mount the timber. A guide with a beam is “rolled” onto doors with installed rollers. This way you can accurately note how tall the doors are. We drill at least four holes in the side edge of the beam for mounting to the wall.
The guide with the beam “rolls” onto the rollers on the door
Add 7-10 mm to the resulting mark - the doors should hang and not shuffle along the floor. 7 mm is the minimum gap, which is sufficient if there is no floor covering in the opening. If they are planned (later to lay laminate, carpet, linoleum, etc.), then the thickness of these coverings must also be taken into account.
Trying it on to the doorway
To prevent the canvas from “walking” during installation, it is wedged with small wooden wedges. At least two stops are required - near both rollers.
We wedge the canvas
Having placed the beam against the wall and adjusted its position using a level, we mark its position with a pencil. If the wall allows, you can fasten it to the wall through and through, but for this you need to use self-tapping screws at least 120 mm long, or better yet, place it on anchor bolts.
If the wall, for example, is concrete, the installation of dowels is required. To do this, you need to transfer the marks for the fasteners to the wall. This can be done using a thin and long drill, the diameter of which is smaller than the drilled hole.
Transfer the marks to the wall using a thin drill
An even simpler option: a long thin nail. It is inserted into the hole and a mark is made on the wall with a couple of blows. The following procedure is known: drill holes for the dowel plugs, insert the plugs, hammering them in if necessary. Then we install the doors.
Attaching sliding doors to the wall
Stoppers must be secured along the edges of the guide. They are inserted from the sides, the required location is established experimentally (so that the canvas covers the opening completely when closed, and rolls back sufficiently when opening. They are fixed using clamping screws.
Installing stoppers on sliding doors
Having opened the doors, we install the flag roller on the floor. It fits into a groove cut into the bottom of the blade. It is necessary to ensure that the doors do not deviate vertically.
Installing Flag Roller
First, we insert it into the groove, mark holes for fasteners, drill, then secure with short self-tapping screws (length about 15-20 mm).
This is what the installed flag roller looks like with the doors open
At this point we can assume that the sliding doors have been installed. They are already fully functional. Finishing work remains. The mounting beam with the guide is covered with a decorative overlay, matched to the tone of the door leaf. It can be nailed directly to the timber with finishing nails.
The decorative overlay can be nailed directly to the beam
Only when you put it out, make sure that the wheels are closed. It’s much more beautiful this way)) Now that’s it, you’ve installed the sliding doors with your own hands.
A video tutorial on how to install such a door is shown below. There are several installation options.
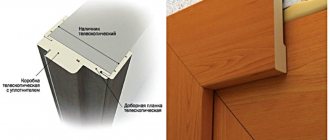
We install cassette-type sliding doors (in a pencil case)
The process of installing the guide and hanging the door leaf is almost identical to those described above. There is no need only for finishing, but all other stages are necessary. Instead of installing a decorative strip, a false wall is mounted at a distance of at least 10 cm from the wall. It is usually made from plasterboard profiles, which are covered with wall plasterboard. But this is not important - you can use gypsum fiber board or plywood, or any other suitable material.
Where does the distance of 10 cm come from? The thickness of the door leaf and the gaps on both sides are 5 cm. At least another 5 cm is added to this for installation of the profile. So it turns out to be 10 cm.
Since the main load will fall on the wall, the frame made of profiles need not be reinforced. If such a wall does not seem very reliable to you, you can insert wooden blocks inside, which are screwed with self-tapping screws. This will make the structure very rigid.
The basic principles for calculating a pencil case for a sliding door, as well as marking features and principles for preparing a doorway for installation, see the video.
Professional Services
Only high-quality service guarantees the preservation of the product’s advantages and serves as its ticket to a long and effective “life.” The assembly of rather complex and capricious engineering solutions is carried out by the masters of the Academy company. The price of installing hinged doors from specialists has a minimal impact on the total cost of the product. In this case, the client receives a model that:
- works smoothly, without interference, braking, or jamming;
- does not creak or rattle when opening and closing;
- does not move spontaneously;
- looks neat and presentable;
- designed for many years of service.
Homemade sliding doors
Any door leaf can be installed on rollers and will work as a sliding door. The guide and all other components - rollers (carrying and flag), stoppers, stops - can be purchased. Hang on them at least a piece of plywood or a door assembled from several boards. This will be the simplest and cheapest option. But making the mechanism yourself is a more difficult task. One of the options for a sliding door mechanism made from scrap materials (from round pipes of different diameters) is in the video. The system was intended to be installed in a closet, but judging by the design, it can easily withstand even a solid oak door.
Flaws
Low sound insulation. As a rule, such doors are not installed in bathrooms and toilets. In addition, such doors are quite expensive. Special locks are installed on hinged doors, intended only for this type of structure. They cost much more than regular ones.
The cost of hinged interior doors may vary depending on the material used, fittings, decorative elements or their size.
Lately, glass hinged doors have become very popular. For this design, only very durable and safe glass is used. You can depict any design on them, even print family photos. There is also a large selection of colors and shades of glass.
Installing interior doors - 2 simple methods with full descriptions
Until recently, installing interior doors with your own hands was quite a difficult task and required serious experience and skills from a person. Now everything has become much simpler; having a good tool and knowing the procedure for installing interior doors, any home craftsman is able to finish the job in a day. Next, we will show you step by step how to properly install an interior door in two ways.
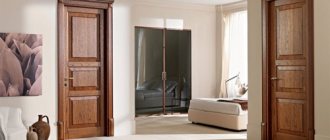
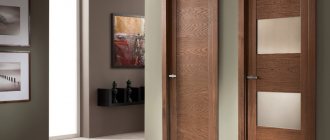
Options for interior doors.
How to decide on a color?
Interior doors play an important role in the interior of a room and must be of high quality and attractive.
The main requirement: the canvas should not stand out against the background of the walls and the entire interior. Therefore, it is advisable to select colors that echo the color of furniture, wallpaper and flooring. If you don’t yet know how the room will be decorated, then you should stick to neutral shades. This will be the best solution.
If you are a fan of non-standard things, then choose a door in a rich and bright color. Then, in order to maintain harmony, it is advisable to update the color of the baseboards or window trims. It looks attractive.
If the guide is furniture, then for an ideal combination you will need a door 3-4 shades lighter. To dilute the too dark color of the model, use colored inserts.
An original solution would be a door with sides of different colors. Such models are ideal if neighboring rooms differ greatly in design and style. Such models are ordered individually.