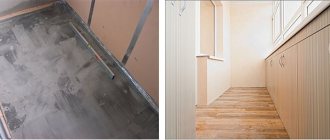
It is no secret that loggia and balcony rooms are used in the most difficult conditions, so the floor in such “apartments” is destroyed and pressed down much faster than in any other rooms of the apartment. Of all the existing options for arranging flooring, most often the owners think about not inventing anything new and simply laying tiles on the floor on the balcony, and, if possible, with their own hands. The task looks quite simple, but in some cases this is absolutely not worth doing.
Is it possible to lay tiles on the balcony?
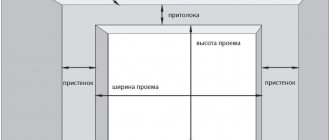
The decision about whether tiles, ceramics or any other installation material can be used must be made taking into account the technical condition of the concrete floor slab. For example, laying tiles on the floor of a loggia can be recommended as one of the best flooring options. In the case of a balcony, the situation looks somewhat more complicated, so the tile covering can only be laid if two conditions are met:
- The concrete slab of the balcony is not in poor condition, there are no cracks or chips in the surface, there is no damage to the reinforcement of the supporting frame;
- The wooden floor, if any, has been thoroughly repaired, worn and rotten floorboards have been replaced, the joints between the boards have been caulked with wooden wedges using glue.
Important!
The most stringent condition is to ensure the correct operation of the balcony console; the tiles laid on the floor for an open balcony should not lead to overload and damage to the concrete slab. At first glance, this is nonsense, but if you consider that the average area of a balcony is at least 7-8 m2, and the weight of a square is more than 10-15 kg, then the additional overload can be more than 100 kg.
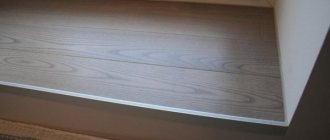
On a closed, cold balcony, tiles perform decorative functions
For a heated balcony or loggia, as a rule, there are no problems, since there are no conditions for condensation to form under the floor covering. It’s another matter if you plan to lay tiles on a cold balcony, and even on a wooden floor. In this case, you will need to take care of waterproofing and ventilation of the wooden parts, otherwise over time the wood will simply rot, and the tiles laid on the balcony will fail or peel off from the base.
In general, the idea of laying tiles on the floor on the balcony deserves the closest attention, since today this is the best flooring option for an unheated and, especially, an open room.
Laying process
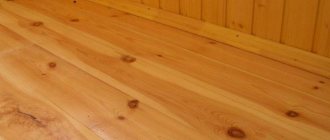
Preparing a wooden floor for laying floor tiles
Before installation, it is necessary to prepare the surface, lay the mat and apply primer.
In the classic version, if the balcony area has the correct shape, right angles and perfectly straight walls, you can start laying from the smooth edge. But it is better to measure a distance from the wall that does not exceed the size of the tile and from there begin laying. For convenience, you can use a profile (fixed longitudinally on the floor and the first row goes to it) or a cord.
The glue is applied evenly with a notched trowel. You should not cover an area with glue for two or more tiles (unless you are sure that there will be enough time for the glue to harden). If the glue has dried slightly, it becomes noticeably more difficult to work with, especially for a novice craftsman. You should not leave adhesive stains on the front surface; after drying, they are difficult to remove.
First, the entire tile is laid, all trimming is left for later. The seam size is set using spacer crosses. The position of the material on the plane must be checked with a level and, if necessary, corrected with a rubber hammer.
The size of the tile to be cut is determined using a tape measure. If you subsequently plan to install the plinth, you can cut it with an allowance for the ceiling.
The next day after installation, you can grout the seams. This is done using grout and a small rubber spatula. The remaining grout is removed with a damp sponge.
Types of tiles for balconies
It is not for nothing that tile material is considered one of the most popular types of flooring; the choice is simply huge, so it is always possible to choose the appropriate type of tile for laying on the balcony in specific conditions.
Focus on water absorption and presence of glaze
Most often, floor tiles for the balcony are selected according to the residual principle; sometimes leftovers from the renovation of a bathroom, toilet, or kitchen are used. But it is better to purchase the material separately, choose a minimum thickness, but a large size. For a balcony, tiles of at least 40x40 cm with a special protective coating are suitable. Wear resistance and resistance to mechanical stress can be ignored.
In addition, finishing the balcony with decorative tiles should provide good thermal insulation of the floor for heated rooms and minimal water absorption for open cold loggias.
Which tile is better to choose for the floor on the balcony?
There is a lot of material, but not all types of tiles can be laid with equal success on an open and glazed balcony on a wooden or concrete floor. Most often, the selection of tile coverings is carried out based on the following criteria:
- For loggias and warm heated ventilated balconies with glazed frames, you can use cotto, majolica, and cottoforte. If the rough base is covered with plywood, then the ideal option for the balcony would be quartz vinyl tiles;
- For cold but closed rooms, monocottura is suitable; if an impact-resistant coating is required, then porcelain stoneware;
- For open loggias and balcony boxes, it is better to use clinker tiles or unglazed porcelain stoneware.
Clinker tiles for balconies, photo, are usually produced in a lightweight design, with additional relief knurling on the back side. This not only simplifies cutting the material and makes the coating itself lighter, but also improves the adhesion of the base to the glue.
Types of material
Modern manufacturers offer us several types of floor tiles: they differ not only in the composition of raw materials, but also in the production technology:
- Ceramic tiles The starting material for this type of tile is a mixture of clay, sand and some materials. After molding, the tiles go into a kiln and are then given a glazed coating. It is the glaze that determines the color and texture of the tiles, which are very, very diverse.
- Porcelain tiles The production of porcelain tiles occurs as follows: a portion of the clay solution located in the molding container is compressed with considerable force, after which it is fired, and the temperature of the latter is significantly higher than the firing temperature of the tile. The result is a material not only similar in appearance to natural stone, but also corresponding to it in terms of such characteristics as strength, resistance to temperature changes, water absorption and frost resistance. Porcelain stoneware is produced both in its pure form and with a glaze coating. Glazed porcelain tiles come in a variety of colors and surface textures, making them more attractive from a design point of view. The disadvantage of porcelain stoneware is its significant cost; it is one of the most expensive types of flooring.
- Clinker tiles This type of tile is a reliable and durable coating. Its main advantage is high wear resistance. Having a solid set of advantages, including frost and moisture resistance, clinker tiles are cheaper than porcelain tiles.
- Quartz vinyl tile This is a new type of polymer tile, which, in addition to PVC, includes quartz sand (up to 80%). Naturally, such a high quartz content cannot but affect the properties of the product. Quartz vinyl tiles are highly durable and are practically not subject to abrasion. Although the “culprit” of the latter advantage is not quartz, but a polyurethane film applied to the tile over the decorative layer.
- Cotto tiles Until recently, tiles of this brand were made without a glazed coating, which is why they had a natural brown or yellowish color. Now glazing is becoming more common, which has significantly expanded the range of tiles in color and texture.
What tools and materials will be needed
In advance, before starting the process of installing tiles on the balcony, you will need to first stock up on the most important tools, check them in action, practice and test them in their work:
- Laser level; in extreme cases, a set of construction bubble levels will do: a long one and a half meter and a short one half meter. Working with a laser without experience is quite difficult, and given the very cramped conditions and small size of the room, a modern device will allow you to lay tiles on the balcony quickly and with minimal errors;
- Grinder or table tile cutter. You will have to cut tiles or porcelain tiles right here, on the balcony, so this needs to be done quickly and as accurately as possible, but manually adjusting the material is simply unrealistic.
In addition, you will need at least a set of mounting crosses, a container for glue, and a rubber hammer. If the process involves laying tiles on the balcony with a lining layer, then you will additionally need a jigsaw, wooden slats, and a carpenter's square.
The main problem with the floor is the uneven surface with numerous slopes, so there is nothing to do on the balcony without a level
In addition to the ceramic tiles themselves, you will need to prepare the following for the balcony floor:
- Primer;
- Film waterproofing;
- Polyurethane foam;
- Tile adhesive;
- Grouting compound, better for epoxy or polyester acrylic base.
It is clear that the specific set of materials depends on what base, concrete or wood, it is planned to lay the tiles on the balcony. However, the main operation, namely gluing onto the base, will need to be mastered in advance, since redoing and correcting mistakes will be extremely difficult.
Preparing the base
Before laying tiles, you must ensure:
- floor level;
- surface cleaning;
- installation of reinforcing mesh;
- priming the base.
Floor level. If the balcony is not glazed and this is not expected in the near future, the floor level should have a slight slope from the threshold. This is done so that water after precipitation does not accumulate under the wall and doors. If the balcony is sealed, the floor should be level. In case of deviations from the level of more than 2 cm, it is advisable to make a quick screed.
Preparing a wooden floor for laying ceramic tiles
Cleaning. The floor on which the installation will be carried out must be cleaned of dust, dirt, grease accumulations, concrete (or mortar) peelings, and remnants of old coatings must be removed.
Reinforcing mesh. A so-called polyethylene mat is laid on the cleaned surface. A reinforcing layer is necessary to prevent cracking of the tile covering.
Primer. The cleaned floor must be covered with a special compound (primer) for an absorbent surface (screed, concrete, brick). A salesperson at a hardware store will tell you the type of primer you need if you explain to him what it is needed for.
How to lay tiles on a balcony with your own hands
There are two main ways to install tile flooring:
- Directly onto the concrete floor;
- On a sub-base or refinished plank floor.
The first option is considered the fastest, most durable and least labor-intensive to work with. The only inconvenience is that you have to put up with the uneven surface of the concrete slab.
For your information! On all open balcony floors without exception, the concrete slab always has a slope of several degrees to ensure the drainage of rain and melt water. Sometimes the slope occurs in several directions at once, it all depends on the quality and condition of the console.
The second option is simpler, but more labor-intensive. Tiling a balcony will require laying a plywood or plasterboard base, which leads to an increase in the height of the floor level and additional financial costs.
How to lay tiles on a wooden floor on a balcony
If you decide to lay the cladding without dismantling the old plank base, then the wooden floor must be properly cleaned, freed from old paint, and sanded to “white” wood. In addition, at the stage of trimming and stripping the floorboards, it is necessary to check the horizontal position of the wooden base, otherwise the tiles on the balcony will lie at a slope.
The wooden floor is sealed with plywood or plasterboard
The wooden floor will need to be treated with a protective impregnation that protects the wood from rotting, painted and a waterproofing film applied. There must be vents under the floor to ensure normal pressure of water vapor and condensate, otherwise the wood will rot.
The next step is laying plasterboard sheets; moisture-resistant plasterboard with a thickness of at least 18 mm is used for lining. The joints between the sheets are sealed with silicone, and the seams around the perimeter are sealed with polyurethane foam. The material itself is laid on a wooden base without screws.
Ceramic tiles on the balcony floor must be laid using acrylic glue. But it is best to use silicone-based elastic compounds. The same material, but of the appropriate color, matched to the tone of the floor covering, is used to grout the joints.
Laying tiles on a concrete floor
First of all, the stove on the balcony must be thoroughly cleaned of debris, dust, washed and dried. Next, we apply an acrylic primer to the surface of the concrete floor, which improves the adhesion of the tile adhesive and tiles.
Marking for sticker
The process of gluing tile material to concrete begins with measuring the floor surface. You can use a laser level or string several paint cords aligned with the horizon. It is necessary to find the highest point on the surface of the concrete floor. It is from this point, or almost from it, that you will need to start laying tiles or porcelain tiles.
The highest point of the surface is usually located under the wall near the balcony door
After the highest point has been found, we move the laser beam or cords from it 17-20 mm higher. To reliably glue ceramic tiles at the highest point of a concrete floor, you will need at least 5-8 mm of tile adhesive plus 10-12 mm of the thickness of the ceramic itself, so you get the desired value of 17-20 mm.
We glue the tile material to the floor on the balcony
We begin laying the tiles from the far row, right under the fence. The top point, as a rule, is located under the wall of the house, so we place the first tile on the floor in the corner opposite, photo.
Since the floor was not leveled, the layer of glue turns out to be quite large
For installation, you will need to apply a fairly large amount of glue, the layer thickness is approximately 15 mm. We leave a small gap, 4-5 mm, and lay the tiles in place, after which we level them using a building level or a laser in two mutually perpendicular directions along the horizon.
Next, you will need to lay the entire row under the balcony railing to the end. When laying tiles, do not forget to install seam crosses. At this point, work was stopped for at least two to three days until the glue completely sets. We lay out the second and third rows in a similar way on the concrete floor of the balcony using a snake or parallel strips.
Grouting joints
After the masonry mortar has completely hardened, remove the plastic inserts, clean the seams from any glue residue, blow through and prime the surface. To grout joints, you can use the same adhesive composition, but with a small addition of plasticizer to improve the elasticity of the material. The grout is applied with a regular sponge for glazed tiles; for porcelain stoneware or clinker, the joints can be rubbed with a rubber spatula. After the composition has dried, wipe the floor dry and wash with clean water.
Floor installation instructions
This example describes the standard installation method. First of all, we make markings. Laying should begin along the parapet from the far corner of the balcony slab.
- Apply the solution to the selected area with a thickness of no more than 3 mm. To avoid drying of the solution, it is recommended to apply the solution to an area of no more than 1 square meter.
- Excess glue is removed with a notched trowel and the surface is leveled.
- We prepare the tiles and, if necessary, cut them to the required size.
- The mortar is applied to the back of the tile and leveled with a notched trowel.
- Press the tile evenly onto the prepared surface and check the evenness with a level.
- Then, by analogy, subsequent tiles are laid. To ensure symmetry and evenness of the seams, plastic crosses are used. If porcelain stoneware tiles are laid, then seams are not needed since you need to achieve a monolithic surface.
- Leave the floor to dry for a day.
Pros and cons of tiles on the balcony
What is attractive about the idea of using ceramic flooring is the enormous stability and reliability of the tiles. Even if the floor on the balcony is regularly flooded with rainwater, snow and ice, nothing special will happen. The tiles can easily withstand any trash and unnecessary things that many residents of high-rise buildings love to put on loggias-balconies.
In addition, a beautiful ceramic floor is also a reason to tidy up the room, put finishing touches on the ceiling and walls and turn it into a full-fledged outdoor recreation area.
There are, of course, negative aspects. Firstly, the cladding creates additional load on the concrete slab. Secondly, even terracotta tiles are too cold, and the floor may have to be insulated. Thirdly, if the covering model is chosen incorrectly, it will be much more difficult to redo or knock down.
Preparing the balcony for installation
If you carry out all the steps step by step, the procedure for tiling a balcony will be done efficiently, the result will please you and will serve for many years:
- Correct calculation. The installation scheme must be selected in advance. This will solve not only design issues, but will also allow you to buy as much material as needed. You won't have to overpay for extra boxes.
- Purchase of materials. Before picking up the tiles from the store, check for chips and cracks on the plates. The color and quality of the coating must match. Thickness is of fundamental importance, all blocks must be the same, otherwise there will be no result. Check the labeling on the packaging and the heat resistance of the product.
- The surface is being prepared. You will probably have to change the screed or strengthen the walls with additional masonry. Finally, prime with primer.
- Purchase of installation tools. List: grinder with diamond wheel, electric drill-mixer, construction level, spatulas (rubber and with comb). Consumables: adhesive, primer, grout, guides (plastic), screws.
- Mixing the adhesive. It should be chosen according to the recommendations of specialists; formulations from German manufacturers are in demand. Prepare the composition according to the instructions on the package. After cooking, it needs to sit for some time.
Afterwards you can start installation.
Recommendations
To make the tiled floor on the balcony as durable as possible, you need to choose the right tile adhesive. It is best to use frost-resistant, even if you put the cladding on the floor in a heated balcony or in an insulated loggia room. It is clear that you will have to pay special attention to the grouting of the joints. If moisture gets into the voids under the tiles, the floor covering will peel off over time.
Wooden floors on new balconies are rare, more and more laminate or decking. But if there is a need to lay the material on a wooden base, you need to be sure that the floor will not shrink and will not swell due to accumulated moisture.
Key points when choosing
When choosing a suitable option, it is necessary to take into account the architectural features of the room, interior design, and the wishes of future owners:
- It is recommended to cover narrow and long spaces with products of medium or small size. A large one will look rough.
- If the balcony is located on the shady side of the house, it is better to choose a light color for the coating. This will add warmth to the interior and brighten the room.
- On small balconies, light weight products are used for safety reasons. On loggias, the issue of weight is not so acute, since the floor on them is one slab with the floor of the adjacent room. The balcony is an attached element that is designed for a weight of 200 kg per square meter. It is necessary to take into account the total weight of all finishing (including glazing) and furniture.
- The design of the material for the loggia, which is one space with an adjacent room, should be combined with it and match the interior items.
- On small balconies, small tiles look better; soft colors will visually increase the space.
- Wear resistance should be greater than 3. Please note that the floor needs a surface with an anti-slip coating.
- Medium-sized material can be placed on the wall; it must be moisture resistant and well tolerate changes in temperature.
The choice is based on the type of tile, which determines the characteristics of the coating as a whole.
Design options for balconies of different shapes
With the right selection of patterns on the tile covering, the room of a loggia or balcony can be seriously transformed, becoming brighter and more interesting. You can use the photo as examples of the design of finishing the inside of the balcony with tiles.
Grouting joints
A day later, after the surface has completely dried, we proceed to grouting the joints. Grouts containing epoxy resins are considered universal because they have water-repellent properties and do not wear off quickly.
We select a grouting compound of a suitable color and mix according to the instructions on the package.
- Apply a small amount of the mixture to a rubber spatula and rub it into all the seams between the tiles.
- Excess grout is periodically removed with a sponge. In addition, this allows you to level the grout layer inside the joints.
- After the grout has dried, the surfaces are washed with a sponge.
At this point, the work on finishing the balcony with tiles can be considered complete.
Ceramic tiles or porcelain tiles?
When choosing ceramic tiles or porcelain stoneware for finishing a loggia, you should pay attention to the following points:
1. Abrasion class. For a loggia, the best option would be 5 (the highest).
size 2. It is better to opt for small-sized models that weigh little and will not burden the structure.
3. Characteristics. The coating should have a rough surface to avoid injury. For “cold” finishing it is necessary to choose frost-resistant samples. It is better to immediately refuse glazed products, despite their fabulous beauty. They are not designed for low temperatures and are very slippery.
4. Color and design. If you prefer ready-made solutions, visit construction supermarkets, where you can find entire collections of ceramics specially created for cladding loggias. Adherents of non-trivial approaches to balcony design can use their imagination and create an exclusive design. Coverings in peach and cream colors look great on loggias. Remember that light monochrome tones visually increase the area. And variegated and patterned ones make them smaller.
Decorative plaster
A traditional option for wall decoration can be called decorative or relief plaster. This material is produced in a wide range, and is applied with varying depths and complexity of relief. This type of coating is at the same time protective, as it protects the walls from the penetration of moisture and dust.
It is very important that having applied the plaster solution to the walls once, the owner is free to change the color of the finish at any time, since re-painting the surfaces will not be difficult. To change the color scheme you only need water-based paint, a brush and a roller
Choosing material for finishing the balcony
Not every finishing material is suitable for these purposes. Taking into account the specifics of the room, it must be resistant to temperature contrasts and high humidity, exemplary strength and frost resistance.
The above characteristics have: porcelain tiles, ceramic or vinyl tiles. The first option is an example of strength, wear resistance and durability.
Ceramics are practical and do not require maintenance. It is distinguished by a variety of shapes, luxurious textures, colors and is rightfully considered the most beautiful coating. Modern PVC coatings are resistant to moisture, easy to clean, non-slip and very easy to install. Their installation is more reminiscent of a puzzle game than a workflow.
Option 3. Drywall
Balcony cladding with plasterboard
The following material is also popular, and many are interested in whether it can be used for cladding a balcony. Let's immediately say that drywall is fragile, it is quite difficult to clean, and it quickly loses its original appearance, but at the same time it has its advantages.
These include:
- ease of installation;
- the ability to implement various design solutions;
- low cost.
Now let's get acquainted with the installation technology.
Installation instructions
Table. We cover the balcony with plasterboard
| Stages, no. | Brief description of actions | Photo |
| Stage 1 | First you need to build an iron sheathing on which the gypsum board will be installed. | Installation of the sheathing begins from top to bottom Scheme of wall sheathing on the balcony |
| Stage 2 | Then (if necessary) insulating material is placed into the cells of the sheathing. All formed cracks and joints are filled with mounting foam or sealant. | Laying insulation |
| Stage 3 | After this, the actual installation of drywall begins. The sheets are attached to the metal sheathing with self-tapping screws, and the latter should be screwed in with extreme care to avoid deformation. | Fastening the sheet with self-tapping screws |
| Stage 4 | At the end finishing work is carried out. A layer of putty or any other material for a similar purpose is applied on top of the drywall. | Plasterboard putty |
How to putty
When all the work is completed, the walls can be painted to make the material look neater.