Are you not averse to getting a new experience, landscaping your windowsill in an original way, saving your budget and surprising your friends? Then it's time to find out how to grow tomatoes on the balcony. Fortunately, this does not require much space, money or effort, and the result will definitely please you. It is unlikely that anyone will remain indifferent to the fragrant and bright fruits grown in close proximity to the kitchen table. You just need to choose the right variety of tomatoes, as well as create suitable conditions for them.
Features of growing tomatoes on an open and glazed balcony
You can grow tomatoes both on an open balcony and on a glazed one. Both options involve some restrictions and conditions for creating a comfortable microclimate for plants.
An open balcony is suitable if you plan to harvest in the warm season. The minimum night temperatures at which seedlings can be taken out into the open space are +8…+10°C.
It is important to understand that the lack of glazing makes plants vulnerable to precipitation, wind and temperature conditions. For this reason, it is better to foresee in advance the possibility of bringing tomatoes into the room or the presence of a windproof and shading structure. This could be curtains, a screen, etc.
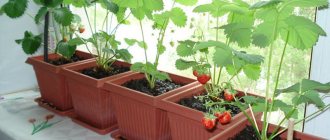
Tomatoes are brought out onto an open-type balcony no earlier than April-May
The glazed balcony allows you to enjoy your own grown tomatoes even in winter. If you wish, you can adjust the ripening period of the fruits so that they decorate the festive table for the New Year or a family celebration. But for this, the balcony must be effectively insulated and landscaped.
High-quality thermal insulation allows you to maintain a stable temperature in the room, and good air ventilation helps control its humidity and prevent the development of infections on the bushes.
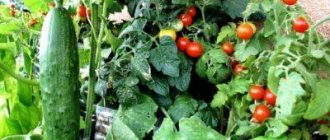
These tomatoes will decorate any balcony
Note! Regardless of which balcony you are going to grow tomatoes on, you need to evaluate in advance the possibilities of placing the planting container. You should have easy access to each plant.
Harvesting
For better ripening, excess flowers growing near the clusters with fruits are removed.
Tomatoes are removed as they ripen; it is not advisable to leave ripe ones on the bushes . This greatly inhibits the formation of subsequent ovaries. It is better to cut when the fruits are just beginning to turn pink. If the tomatoes taste sour, they need to sit in the sun for a couple more days.
With the onset of cold weather, unripe tomatoes are removed from the branches and stored warm until fully ripe. If there is space in the room, the plant is placed on the windowsill.
Tomato varieties for balconies and windowsills
Not all varieties of tomatoes are suitable for growing on a windowsill or balcony. It is recommended to give preference to the shortest species. There are a number of reasons for this:
- Such plants have a small root system. For one bush, a planting container with a volume of 3-3.5 liters is sufficient.
- The fruits of low-growing tomatoes ripen faster and more evenly.
- Small bushes absorb all nutrients from the soil better.
- They are easier to care for.
Low-growing varieties are ideal for any windowsill
Indoor tomatoes have the following characteristics:
- Small bush height. Usually it ranges from 20-60 cm.
- Standard building. This means the presence of a thick central stem around which the crown is formed.
- Abundant fruiting. The number of fruits on one cluster can reach 20 pieces!
- Modest size and weight of the fruit. Usually this is 15-70 g. Small round fruits, even without regard to the variety, are often called “cherries”.
- Resistant to lack of light. Although tomatoes are considered light-loving, most indoor varieties can be content with 5 hours of daylight.
- Determination. That is, stopping the growth of the bush after the formation of a certain number of flower brushes. This makes caring for the plant much easier.
- Precocity. Usually, within 80-95 days after planting the seeds, the first harvest can be harvested.
- High degree of decorativeness. Compact bushes with bright fruits between fleshy leaves are pleasing to the eye.
The most popular cherry tomatoes for growing on the balcony: “Bonsai”, “Balcony Miracle”, “Room Surprise”, “Angelica”, “Pinocchio”, “Garden Pearl”, “Pearl”, “Baby”, “Oak”. In most cases, reviews of these varieties are not just positive, but admiring.
Care
The main principle of caring for seedlings and tomatoes on the balcony in general is regularity. Absolutely all procedures are carried out according to a clear scheme - thereby increasing the percentage of successful and abundant harvest.
Pest Prevention
Tomatoes have many diseases and pests. Since this is a heat-loving, capricious plant - even in the conditions of an insulated balcony - they are very sensitive to all procedures and atmospheric influences.
Insect pests can enter from open windows, with soil, or as a result of insufficient disinfection of seeds. The first signs of the disease are not immediately visible; gardeners usually begin to notice drying out of the leaves and the appearance of spots on the surface.
Unfortunately, this is already a progressive process, meaning that the insects are already firmly attached to the back of the leaf.
Wilting leaves indicate the presence of diseases
To prevent diseases, inspect the plant regularly and at the first sign, remove diseased leaves from the trunk.
One of the ways to prevent pests is regular spraying with soda or soap, alkaline solution from a spray bottle.
Before planting, we recommend treating the soil, for example, with Trichodermin or a mixture of Gamaira and Alirin. Find out about the characteristics of the Benito tomato variety at this link.
Watering
By the appearance of greenery, it is easy to determine whether there is enough moisture, whether there is an excess or lack of it. Poor watering affects the color and direction of the fibers on the leaves. The greenery itself becomes dark in color with drooping hairs.
With an overabundance, a different picture is observed: the foliage becomes light green, very pale, and the trunk itself is fragile and easily vulnerable.
At different stages of development, tomatoes are watered with a certain frequency. During active flowering and mass fruiting, watering is increased more often by adding microelements to the water. On cloudy, rainy days, watering, on the contrary, is reduced and the condition of the soil is monitored, preventing waterlogging. Read about the best varieties of tomatoes for open ground in this article.
When there is an excess of moisture, the foliage becomes light green, very pale, and the trunk itself becomes fragile and easily vulnerable.
Watering balcony tomatoes is carried out before 11 am to avoid the formation of burns on the leaves.
Temperature, humidity
The optimal range for keeping Kumato, Agata and others tomatoes is from +18 to +30 degrees. When temperatures are violated relative to the lower or upper limits, development is inhibited. Self-sterilization of pollen is also possible. All these problems lead to reduced yields.
Comfortable humidity for tomatoes is quite high - 50-60%, it is achieved by periodically ventilating the room, as well as irrigation and installing humidifiers and steam convectors on the balcony. This material will tell you about Dutch varieties of tomatoes.
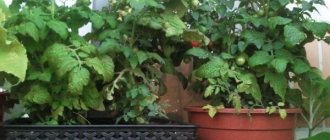
When growing tomatoes on the balcony, you need to carefully monitor the temperature to prevent the crop from freezing
Harvesting
When the first frost occurs, tomato cultivation should be stopped and the entire harvest should be harvested. Green. I place unripe fruits on newspapers on the windowsill, and cover them with newspaper to prevent sunburn.
The best temperature for reddening tomatoes is considered to be +25 degrees with a relative humidity of 70%.
If cherry tomatoes grow on the balcony, then there will be no issue with ripening, since their life cycle is shorter than that of classic tomatoes, and the ripening process occurs in all tomatoes at the same time.
Step-by-step instructions for growing tomatoes on the balcony
It would seem that 80-95 days is not so much. Planted, watered, harvested - that's all! In fact, you will have to do much more during these days. Don’t be alarmed, growing indoor tomatoes will not require Herculean efforts from you. Just attentiveness, compliance with a number of care rules and a little love for what you do.
Soil selection and preparation
Soil selection and preparation are important for proper growth and abundant fruiting of tomatoes.
Suitable for planting:
- Ready-made soil, which is easy to find in a specialty store. It is already enriched with essential minerals and is usually labeled accordingly, for example, “for tomatoes.”
- Personally prepared mixture: 1 part humus, 1 part turf soil and 1 part peat. An alternative would be a mixture of leaf soil, peat and sand in a 2:1:1 ratio.
Having chosen the soil, it is important to properly prepare it for planting seeds. Preparation involves disinfection. You can do this in several ways:
- Heat in the microwave. For this, 1-2 minutes are enough at a power of 800-850 W.
- Warm up in the oven. At a temperature of 200°C, 10 minutes is enough.
- Completely spill the soil with small portions of boiling water or a solution of potassium permanganate.
The soil for indoor tomatoes should be nutritious and loose
Subsequently, the soil is slightly dried or cooled, depending on the chosen disinfection method.
Preparation of tomato seeds - disinfection and germination
Like the soil, the seeds also need to be prepared for planting - select the bad ones, disinfect them, germinate them, especially if you took them from friends or bought them second-hand. Seeds in sealed packages from well-known agricultural companies undergo a disinfection procedure in the factory and are characterized by a high percentage of germination.
To select seeds unsuitable for planting, pour them into a glass or bowl of water and stir. Good seeds will settle to the bottom, while bad seeds will float on the surface.
You can disinfect planting material using:
- Potassium permanganate – 1 g per 100 ml of water. It is recommended to soak the seeds in this solution for 15 minutes.
- Soda – 0.5 g per 100 ml. In this case, the seeds should be kept for at least a day.
- Special means. One of the most popular is Fitosporin. If you purchased it in liquid form, for processing it is enough to dilute 1 drop per 100 ml of water. In dry form, you will need ½ teaspoon for the same volume. The seeds are soaked for about 15 minutes.
Disinfection of seeds using potassium permanganate
You can plant the seeds immediately, or you can germinate them first. Practice shows that the germination rate in the second case is higher. For germination, planting material is wrapped in wet gauze or bandage and placed in a warm place. In a couple of days, sprouts will appear. After this, the seeds are ready for planting in the ground.
Note! As soon as the sprouts hatch, be especially careful that the gauze does not dry out.
Sprouted tomato seeds
Planting seeds and first picking of seedlings
At a distance of at least 3 cm from each other, holes or grooves with a depth of 1-1.5 cm are made in the soil. Seeds are laid in them, which are then covered with earth and sprayed generously with water from a spray bottle. If you plant seeds straight from the package, they can be grouped in 2-3 pieces. But it’s better to lay out the sprouted ones one at a time.
The planting container is covered with a transparent moisture-proof material (film, plastic lid) and placed in a warm place with an air temperature of +22…+24°C. This will create a greenhouse effect for better germination.
When sprouts appear, it is important to provide them with the following conditions:
- Be sure to ventilate the greenhouse so that the seedlings are not destroyed by fungal and other infections. To do this, remove the lid 1-2 times a day for 5-10 minutes, each time increasing the ventilation time.
- Make sure that the top layer of soil, where the tender roots are located, does not dry out. It is better to water with a spray bottle, since a regular stream of water can wash away the soil.
- Provide the seedlings with good lighting. Usually it is simply transferred to the windowsill.
The first picking of seedlings is carried out after the appearance of the third leaf, not counting the cotyledons. If you used a shallow container to sow seeds, then it is better to plant young plants in two steps: first in a regular plastic glass with a volume of 200 ml, and then, after a month, in a large pot for an adult bush of 3-3.5 liters.
If you immediately planted germinated seeds in glasses, monitor the condition of the root system. If there are three normal sheets, it should occupy almost the entire volume of the container.
Important! Seedlings are planted one at a time. At the same time, stronger specimens are selected. The weak are disposed of.
When picking glasses, you should not make holes in their bottoms to drain moisture, otherwise there is a high risk of such a small amount of soil drying out. When planting in large pots, the presence of drainage holes and a drainage layer at the bottom of the container is mandatory!
For ease of picking, you can use a wooden spatula or a regular fork.
When and what to feed tomatoes
Seedlings need to be fed, as they require large amounts of nutrients to grow and bear fruit. For this purpose, complex mineral and organic fertilizers are used.
In stores you can find the following suitable compositions: “Emerald”, “Krepysh”, “Gumat +7”. Folk remedies include ash, banana peels, eggshells, or onion peel infusion.
The first fertilizing is carried out 12-14 days after the appearance of the first shoots. The second - 10 days after it, and the third - about a week before picking the seedlings into large pots. Tomatoes are also fed during flowering and fruiting – once every 10-12 days.
Important! Fertilizers are applied only to moist soil - a few hours after watering or even the next day.
Potassium and phosphorus, which are important for tomatoes, are contained in the ash.
When feeding tomatoes, it is important not to overdo it. All solutions are prepared in strict accordance with the manufacturer's instructions. For young seedlings, they use a dosage that is half the recommended one. Pay special attention to nitrogen fertilizers. If they are overdosed, there is a high risk that the bush will actively begin to grow green mass, “forgetting” about flowering and fruiting.
Caring for seedlings - watering and other activities
Caring for seedlings includes measures to create a favorable microclimate and proper watering.
Tomatoes are heat- and light-loving plants. They feel great on south and south-east windows. Most varieties easily tolerate short-term exposure to even direct sunlight. However, on the hottest days it is better to shade the windows.
If the windows are not sufficiently illuminated by sunlight, use fluorescent lamps. They make it easy to extend the daylight hours for tomatoes during the cold season or cloudy weather. To do this, lamps are installed above the plants, at a distance of 25-30 cm from the tallest bush. They are usually turned on 2-3 hours before dawn or the same time after sunset.
Illuminating seedlings using lamps
The daytime temperature for comfortable plant growth is +22…+26 °C, and the night temperature should not be lower than +16 °C. Regular ventilation of the room will help regulate the temperature. It is worth noting that tomatoes love this procedure, but they are afraid of direct flows of cold air.
As for watering, it is rare but plentiful. In the cold season, the bushes are watered once every 5-7 days, and in the warm season - once every 2-3 days. It is important to monitor the condition of the soil. You may need to adjust the watering regime taking into account the microclimate on the balcony.
Tomato seedlings need to be watered at the root
Formation of a bush - how to properly perform pinching
Growing balcony tomatoes involves timely removal of side shoots. Why is this necessary?
- Thinning the bush allows light to reach all the leaves.
- The plant is well ventilated, this reduces the risk of many infections and harmful insects.
- The fruits after this procedure develop more fully.
- The bush has a well-groomed and more decorative appearance.
It is easy to carry out pinching: the emerging shoots are broken off with your fingers, leaving a “stump” of 1-1.5 cm. To avoid infection, it is better not to use scissors.
Bushes are usually formed into 1-3 stems. One stem is left for standard varieties. It is thick and perfectly supports the vertical position of the plant, which does not need support or tying. If you want to form a bush with 2-3 stems, save the first stepsons.
Technique for growing tomatoes at home
Many indoor tomatoes are determinate. After releasing four to five flower clusters that appear after 2-3 leaves, they stop growing. In terms of caring for the bush and its formation, this is very convenient. In indeterminate varieties, even after releasing 8-9 clusters, stepchildren continue to appear. Such plants require more attention.
Pollination - is it necessary indoors?
For self-pollination of balcony tomatoes, air fluctuations when ventilating the room are sufficient. But if you notice that they do not set fruit, look for a problem in the microclimate. This is what it should be:
- Air temperature within +22…+25 °C. At higher values, the pollen will become sterile, and at lower values, the flowering process will simply slow down.
- Soil humidity - at least 70%. Dry soil often causes flowers to fall off.
- Air humidity – 60-65%.
If you see that the tomatoes on the balcony are not blooming, try shaking the top brushes slightly. Then the pollen from them will fall on the lower flowers. But for the desired effect, the plant needs to be watered a few hours after this procedure.
Artificial pollination can be done by touching the brush to the flowers
Necessary conditions for cultivation
To get a good harvest of tomatoes on the balcony, they need to create optimal conditions for growth, development, formation and ripening of fruits. This is not as difficult to do as it seems. Plants need light, warmth, moisture and a medium for roots, that is, fertile soil. In addition, you will need to feed the bushes with fertilizers throughout their growing season.
Lighting
Tomato is a long-day crop. In order for plants to begin to bloom and bear fruit, they need lighting 14-17 hours a day. If there is less light, the tomatoes' bushes become very elongated and the root system does not have time to develop well. Shorter daylight hours are only necessary when growing seedlings. Constant lighting leads to the death of most plant varieties.
Humidity and temperature
For growing adult tomatoes on the balcony, the ideal temperature is 22-25° C during the day. With such indicators, plants feel best, grow quickly and bear fruit well. At night, the optimal temperature is 16-18 ˚C.
Tomatoes do not like cold. If the thermometer reading stays at 15˚C for a long time, they stop blooming. At 10˚C plants stop growing and die at subzero temperatures.
But overheating also leads to crop failure. At a temperature of 30˚C, pollination of the ovaries does not occur. Young plants, especially at low humidity, lose flowers and their leaves begin to curl. A sharp increase in temperature to 35 ˚C after cold weather and rain leads to wilting of tomatoes. Therefore, the temperature on the balcony when growing tomatoes must be controlled artificially, maintaining it within normal limits. The ideal humidity for tomatoes is 70-85%.
Slightly different conditions are necessary for tomato plants at the very beginning of growth. Strong, healthy tomato seedlings are obtained differently.
We recommend reading
Rules for feeding tomatoes with ash
The benefits and harms of tomatoes for the human body
Symptoms and measures to combat major tomato diseases
How to grow tomatoes on a windowsill in winter and summer
Soil composition
Since small containers are used to grow tomatoes on the balcony, you need to choose the right soil in which the plants will be planted. It must be fertile, contain all the nutrients the plant needs, and also allow water and air to pass through well.
Usually, for balcony tomatoes, you buy ready-made universal soil mixtures for vegetables or special ones for tomatoes. The composition of such soils includes fertile soil, humus, a mixture of peats, coconut fiber, perlite, and mineral fertilizers. They have neutral acidity, do not compress for a long time, and do not contain pathogens (ideally, but not always). Tomatoes grow and develop well in this soil.
When preparing the soil yourself, a composition of turf soil, humus, sand or sawdust + complex fertilizers with microelements is suitable. The complete agricultural technology of the crop can be learned from the step-by-step instructions presented below.
Growing tomatoes in plastic bottles
Tomatoes can be grown not only in pots, when the crown of the plant traditionally points upward. There is an alternative and much more original option - planting in plastic bottles, but... upside down!
Bottle planting technology
Slightly grown seedlings are usually planted in bottles. At the same time, it is better to abandon standard varieties with thick stems. They will not look entirely aesthetically pleasing.
The sequence of actions should be as follows:
- Cut off the bottom of a clean 2-3 liter plastic bottle. The cut line is where the width of the container becomes stable, without narrowing or widening.
- At the bottom of the cut part, make 1-3 small holes intended for drip watering of the plant. You can use a heated nail or a hand drill.
- Turn this element upside down and insert it into the bottle. Mark and make 2-4 holes around the perimeter so that you can insert a strong rope into them and tie the planting container to the support. Disassemble the structure.
- Take the seedling along with a small lump of earth and carefully insert it into the container through the cut off bottom. Insert the stem with leaves into the neck. To prevent the soil from falling out of it at first and to retain moisture, the roots of the seedling can be wrapped in a paper napkin or toilet paper. Another option is to make a plug for the neck from moss or foam rubber.
- Fill the planting container with soil, lightly compacting it. Please note: it should not be laid to the top (the top in this case is the bottom of the bottle)! Leave a free space equal in height to the cut piece.
- Place it in the bottle so that the holes for the rope line up. Pull it through and securely tie the container to the support.
This may seem incomprehensible and complicated, but a few thematic photos and videos will definitely help you figure it out.
Making a hole for hanging seedlings in a bottle
Placing a plant in a bottle
Advice! For the convenience of hanging planting containers, you can use plastic buckets. You just need to make holes in them for the seedlings.
Advantages and disadvantages of using hanging containers
Growing tomatoes upside down has its pros and cons. The advantages include:
- Convenient watering. You don’t have to focus on watering around the root or along the walls of the container. It is enough to pour water into the inverted bottom, and it will flow drop by drop into the ground.
- Decorative planting and its originality. A bush with its roots up is a mesmerizing sight in itself, and if it also bears fruit, the effect is doubly amazing.
- Saving space. Using vertical space allows you to free up the window sill for traditionally growing greenery.
- There is no need to tie up the bushes.
Bottles with soil can be placed in decorative flowerpots
With all the tangible advantages, this method of growing tomatoes also has disadvantages:
- While the root system is small, water can flow down through the neck of the bottle. The solution may be the above-mentioned plugs or substituting another pot with a plant under the planting container.
- A bottle with a fruiting bush can weigh up to 25 kg, so you will have to take care of reliable support for the plants. Most often, metal brackets are used for these purposes.
- A bottle of soil limits light access to the plant while it is small.
Thus, when choosing one or another method of growing tomatoes, you should carefully weigh its pros and cons.
Transplanting seedlings to a permanent place
In early April, when the seedlings reach a month of age, you can transplant them to a permanent place. By this time, from 4 to 6 true leaves have formed on the plants, they become cramped in the common container, and the sprouts will stretch regardless of the degree of illumination and moderation in watering. Simultaneously with transplantation, tomato seedlings are picked - a mandatory procedure for tomatoes grown on the balcony. After picking, the root grows to the sides, becomes more massive and, naturally, better provides the plant with useful elements.
Picking seedlings:
- The soil in the boxes with seedlings is moistened abundantly so that the root extracted from it suffers as little as possible;
- Taking the stem close to the ground, the plant is pulled out of the soil along with a small lump of earth on the roots;
- Using scissors treated in an alcohol solution, 1/3 of the root is trimmed;
- A hole is pierced in the prepared container with a stick, and the root is placed in it up to the cotyledon leaves. This planting depth is normal for tomatoes, since additional roots form on the stem over time;
- The plant is watered, the soil near the stem is lightly pressed down with your fingers.
Low-growing tomatoes are planted two at a time at a distance of 5-10 cm from one another, and tall tomatoes are planted one at a time in a container. If seedlings are planted in large boxes, the plants are placed at intervals of 40 cm. Tomatoes are grown in any suitable containers.
What to plant tomatoes in:
- Flower pots;
- Cut plastic containers from under water;
- Plastic buckets and deep basins;
- Wooden boxes;
- Balcony flower boxes.
Immediately after transplanting, the windows on the balcony are shaded, and the air temperature is maintained within 18-20 degrees - in such conditions, the plants will more easily tolerate a stressful situation and quickly adapt to the new place. When the tomato stems straighten and the leaves spread out (after about 2 days), the shading can be removed.
Problems of growing indoor tomatoes - pests and diseases
To ensure a bountiful harvest, tasty fruits, and beautiful bushes, you need to carefully care for the plants. This will prevent the development of diseases and the appearance of harmful insects. However, you need to know the enemy by sight in order to understand how to deal with him if he appears.
The main diseases of tomatoes on the windowsill:
- Late blight. It is expressed in the appearance of brown spots on all parts of the bush and even the fruits. The reason is high levels of humidity combined with heat. Late blight easily affects neighboring plants, so it is better to dispose of the diseased plant.
- Blackleg. It affects young seedlings growing too densely and in an excessively humid environment. They turn black at the surface of the earth, become thinner and die. During this period, it is necessary to remove diseased plants, reduce watering and thin out the seedlings.
- Gray rot. Formed on tomatoes of any ripeness. First, small gray spots appear, which, as they grow, become watery in nature and emit a putrid odor. Affected tomatoes are thrown away along with the soil.
Manifestation of late blight of tomatoes
Common pests found on tomatoes include:
- Whitefly. An adult specimen does not exceed 1.5 mm in size and has a yellowish body. The larva, on the contrary, is green and flat. It is she who damages the leaves by sticking to them. Visually, the affected areas are characterized by black spots, as they are actively colonized by sooty fungi.
- Spider mite. Lives on the back of sheets. The affected areas first resemble dots, which then grow into a “marble” pattern.
Adult whiteflies on the back of a leaf
Spider mite infestation
Special substances – insecticides – help to effectively combat harmful insects. They can be found in specialized stores.
Choosing the best container and soil
Plastic pots or buckets, fairly deep boxes, and 5-liter drinking water containers are used as “homes” for tomato bushes Their neck is cut off.
Miniature varieties will feel comfortable in containers with a volume of 2-5 liters, but it is imperative to follow the recommendations of seed manufacturers.
Tall tomatoes with a fairly large root system require large volumes of soil. Otherwise, the soil will quickly become depleted and the plants will begin to wither due to lack of nutrition.
Fertile, loose soil that has a neutral or slightly alkaline reaction is suitable for tomatoes . To reduce the acidity of the soil, slaked lime, dolomite flour, ash or chalk are added to it. Ready-made soils containing mainly peat are not the best option. The exception is a mixture intended specifically for tomatoes.
An alternative to buying a ready-made substrate is to make it yourself. The soil mixture must contain :
- turf soil (2 parts);
- sawdust or peat (1 part);
- humus (2 parts).
Potassium magnesium, potassium sulfate, and superphosphate are used as fertilizers . Before planting, the soil substrate requires disinfection. If you ignore it, the pathogenic microflora remaining in the soil will affect the growing tomatoes. The mixture is poured with a hot solution of potassium permanganate. The second disinfection option is calcination in the oven.
Video master classes on growing balcony tomatoes
Vertical beds and other ways to compactly plant tomatoes and herbs on the balcony:
Details about growing tomatoes on the balcony and windowsill:
It is very exciting to watch how small seeds gain strength day after day, turning into beautiful fruit-bearing tomato bushes. Add potted greens to them in the form of lettuce, parsley, and basil. Plant a few decorative peppers and you will create an amazing mini-garden on your windowsill with your own hands!