The choice of fittings for a balcony door must be taken responsibly. Its correct installation is also important. Due to the fact that there are many options for door handles, even before starting repair work, you need to determine exactly what kind of fittings you will put on your doors.
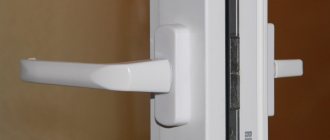
Typically, double-sided balcony handles are chosen by people who install or repair plastic doors on the balcony. Double-sided handles make it easy to close and open doors, both from the balcony and from the apartment. As a rule, such fittings last for many years. Because it is metal inside and covered with plastic on the outside, which protects the metal from corrosion. There are glass models, and other materials are used.
Double-sided balcony handles, regardless of the shape and material of the handles, have a locking mechanism. Thanks to it, the door can be closed tightly, preventing drafts through the door cracks. Typically, the locking mechanism is made of heat-resistant material; it ensures trouble-free operation of the mechanism in hot and cold weather. Typically, double-sided balcony handles are narrow and fit into the design of the door structure.
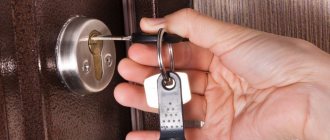
If you are concerned about safety on the balcony, i.e. There is a possibility of entry into the apartment from the balcony; you need to choose fittings that are equipped with an anti-burglary security mechanism. This problem is especially relevant for residents of the upper and first floors. However, if your balcony is protected by a grill or glazed, then you can safely choose a regular double-sided handle.
On the one hand, it will allow you to tightly close the door from the side of the balcony, and on the other hand, it will prevent blocking a person on the balcony from the side of the apartment. For example, children often do this when they hide their parents on the balcony. And woe to such parents if there are no more adults in the apartment! Especially if an emergency happens in winter. An inexpensive, easy-to-install double-sided PVC balcony handle will prevent such troubles.
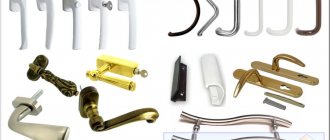
Types of door handles
There are the following stationary and movable handles for plastic balcony doors:
- Single-sided handle for the balcony. One of the most popular, simple and budget designs. They are installed if the door will open on one side.
- Double-sided handles for balcony doors. In this case, handles are present on both sides of the door and are connected by a metal rod. In this case, the balcony door will be very convenient to open both from the outside and from the inside.
- Double-sided asymmetrical. Asymmetry makes them more practical and reliable thanks to the use of a special mechanism.
- Balcony handles with anti-burglary mechanism. An excellent solution if the apartment is located on the first or second floor (or if the balcony or loggia is in a private house). In this case, intruders will not be able to enter the balcony or loggia.
- A petal handle is also a toffee. Often used in families with children, so that the little fidget cannot open the balcony door on his own. There is no locking mechanism here. Also, a petal on a balcony door is a very convenient option for those who often go to the balcony and back (for example, to smoke), since the petal can significantly reduce heat loss during entry and exit. Sometimes it is called “smoker’s pen”.
Latch Installation
If there is a smoker in the family, a latch would be a good option for securing the door from the outside. It should be installed if there is a petal or shell on the outside. This simple device will ensure that the door closes tightly and protects the room from cold and tobacco smoke.
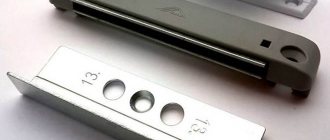
Mounting the magnetic latch
This type has a clear advantage over others: the absence of friction between the elements of the mechanism ensures a long service life. In addition, even if the door sag, the magnetic latch continues to securely fix it. Closing the door is completely silent.
Installing the latch consists of screwing a magnetic plate onto the door frame, and a matching metal strip onto the end of the door. Typically, the holes for attaching the strips coincide with the holes in standard door hardware. First, we screw the plates loosely and check how the latch works. After making sure that everything is in order, tighten the fasteners until the end.
Material and appearance
For the manufacture of this element of fittings, plastic is usually used - this is a simple, budget-friendly and reliable option. Their service life is several years.
You can also find fiberglass options - they are beautiful, original, but less durable than plastic ones. But if you want to get the maximum degree of strength, then you should purchase metal products (steel, brass or aluminum). This is the most durable option, which is suitable not only for a balcony in a private apartment, but also for public places.
As for the design, the most common option is white, but if you wish, you can apply any design, pattern, or texture to them that most accurately matches the interior.
Features of repairing doors made of solid pine
Repairing or eliminating simple damage to a wooden door can be done with your own hands. For example, scratches can be easily hidden with a furniture marker, the color of which is matched to the shade of the door. If the scratch is deep, then it is best to use furniture wax or acrylic wood putty, the tone of which should also match the palette of the canvas.
The putty is simply applied to the scratches, removing excess with a napkin
During operation, other breakdowns are also possible, which can be eliminated using various methods:
- the broken lock or handle is carefully removed and new parts are installed in their place;
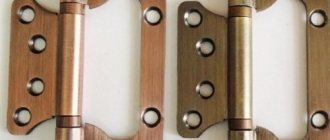
- when the canvas sag, tighten the self-tapping screws of the door hinges;
- Cracks between panels are hidden with putty.
How to choose a balcony handle
If you find it difficult to choose the type of pen, it is important to take into account the features of each type. Most often, combinations of “double-sided design” or “one-sided design + petal” are installed, but the most versatile and reliable option is the double-sided asymmetrical version. It is important to take into account all the nuances - the floor on which the apartment is located, the presence of small children, budget and other factors.
As for the manufacturer, it is better to give preference to well-known brands - for example, products manufactured by the German company Schuring or the Polish brand Medos. There are also cheaper options made in Turkey and China, but their quality will be significantly inferior to products from European or American companies.
Connecting ebb tides to each other. Installation technology
Making ebb tides yourself is a feasible task. Installation is carried out between the cladding of the base and the walls. Check the horizontality of the base using a building level. If there are severe distortions, it is necessary to level the base with cement-sand mortar. Next, installation is performed in the following order:
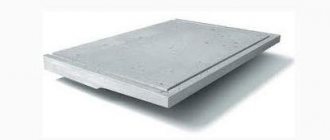
Low tide installation diagram
- Perform markings. A cord is pulled between two corners using self-tapping screws, which will serve as a marking for applying the solution when making slopes.
- Prepare a solution for making slopes. For preparation use one part cement and 3 parts sand. The amount of water is calculated so that the mixture does not drain from the trowel.
- Slopes are made along the lace. For this you will need a trowel. The minimum tilt angle is 15 degrees.
- After completing the work, it is necessary to allow the cement to gain strength. The waiting time depends on the ambient temperature. With an average daily temperature of 20 degrees Celsius, 1-2 days are enough; if the weather is cool, more time may be required.
- The next stage is determined depending on the method of fixing the tides. If you plan to attach them directly to the wall, no preparatory work is required.
- If you decide to attach the ebbs to the outer wall cladding frame, you must first install its guides.
- The ebb moldings are attached to the guides with self-tapping screws. Fastening to the wall is carried out using dowel nails.
- The length of the ebb strips is connected with an overlap of at least 30 mm. The joints are treated with sealant.
- After securing the linear sections, proceed to the corners of the building. Fastening is carried out in the same way. The corner strips are made from the remains of a linear strip. To do this, the material is bent and the necessary undercuts are made to simplify bending and improve fit. To cut metal, you need to prepare special scissors.
- The process is completed with sealant treatment. They need to coat the junction of the wall and the ebb and fastenings.
Installation of different types of handles on PVC doors
If you are glazing the balcony yourself, then the pressing problem will be not only the selection of the necessary fittings, but also their correct installation. Each type has its own characteristics in installing the handle. Let's deal with them.
Installation of one-sided handle
When installing a one-sided structure, proceed as follows:
- Insert the handle into the hole provided for this purpose in the frame, then turn it to the “open” position.
- Then we pull it out and insert it strictly horizontally.
- Tighten the screws until they stop. If you screw them loosely, the structure will not function well and will wear out quickly.
- Screw on the decorative strip.
How to make the inner corner of the base casting. Installation instructions for foundation ebbs
The base flashing is a strip that is used at the junction of the foundation protrusion with the wall of the building. The casting of the base prevents moisture from entering the joints and premature destruction of the foundation. Most often, foundation flashings are made of galvanized steel with a polymer coating to match the color of the building's finish. Galvanizing the ebbs and coating them with polymer paint reliably protects the product from damage and corrosion. Due to the variety of engineering and design solutions, foundation castings are manufactured according to customer drawings in the sizes required according to the building project plan.
To install ebb tides you will need:
- Screwdriver with ph2 attachment
- Tinsmith's pliers
- Metal scissors
- Low expansion foam
- Self-tapping screws, press washer 16mm or dowel nails
Installation of the foundation ebb is carried out after finishing the base, before finishing the walls. The plinth is leveled to prevent kinks in the tides and is cleaned of dust and mixture residues. To reduce noise, during rain, before installing the drip tide along the entire length of the base, apply vibration-absorbing tape Psul or similar. The ebb is fixed to the wall with self-tapping screws or dowels with nails.
The optimal indentation (protrusion) of the ebb from the edge of the base is 1-1.5 cm.
Possible malfunctions and methods for eliminating them
Sometimes, when installing balcony handles, certain malfunctions occur. This may be due to a manufacturing defect, poor quality of the product as a whole, careless installation, and much more. The most common reasons are:
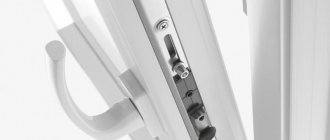
- Jamming. If the handle is stuck in one position and it does not close completely, then you should not try to forcefully turn it - this may lead to breakage. The point here is that the lock has been triggered, and until it is turned off, it will not be possible to open or close the door completely. This is a metal tongue located at the end of the window. You need to gently press on it while turning the handle. If this does not help and the handle still does not turn, try contacting the manufacturer - they will provide you with the information you need.
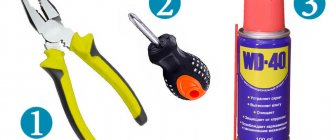
- Pressing force. If there are no problems, the handle turns quite easily. If you need to exert a lot of force to turn or press, then something has gone wrong. The reason for this may be an insufficient amount of lubricant (in which case you need to remove the lock, clean it with WD-40 and lubricate it with oil).
- Displacement of mechanism elements. It is for this reason that the plastic door to the balcony often does not close. They can be returned to their place using a hexagon - they need to tighten or loosen the eccentrics.
- Loosening. If the handle dangles or wobbles, then you have not tightened the bolts or screws enough. To fix this, you need to remove the decorative panel and tighten everything well. You can easily do this yourself in literally 5 minutes.
Cases in which adjustment is needed
A misaligned door frame always leads to unpleasant consequences. Sometimes it is necessary to call a qualified specialist to eliminate them. But in the vast majority of cases you can cope on your own. Therefore, we will figure out how to adjust plastic balcony doors with our own hands. But before we give step-by-step instructions, we list the most common malfunctions:
- Cold air passes through the vestibule areas.
- The door handle is tight or does not close completely.
- It takes a lot of effort to cover the canvas.
- The sagging frame clings to the box.
Fixing these problems takes no more than half an hour, so there is no point in postponing the work until later.
If the problem is in the mechanical part, in order to provide access to the adjusting screws, remove the decorative trims from the hinges.
In the vast majority of cases, a No. 4 hex and a Phillips screwdriver are sufficient for the job. Less commonly, you may need a #3 hex wrench, sprockets, pliers, or a flat-head screwdriver.
Before starting work, we recommend that you pay attention to the relative position of the canvas and the box. This will avoid unnecessary actions and install the elements in the correct position.
To do this, close the frame and outline its perimeter with a pencil. The resulting contour should be parallel to the inner edges of the door frame. If this is not the case, you need to adjust the plastic balcony doors yourself.
We will describe the procedure for dealing with common faults.
The canvas is sagging and catches the threshold
This problem is typical for wide, heavy structures with double-glazed windows. Additional load can be created by heavy bags hanging on the handle, or children who like to ride on the door wings. Often it is after this that they begin to sag.
The lower hinge allows you to lift the sash. We insert a hexagon into it from above and rotate it:
- clockwise - raise;
- counterclockwise - lower.
This helps with even sagging. If only one corner catches, it is necessary to eliminate the distortion.
To do this, we use the lateral adjustments of the upper and lower hinges. We rotate the screw with a hexagon: when turning to the right, the blade moves towards the key, to the left - in the opposite direction.
If the range of movement with the adjusting screws is not enough, the geometry of the PVC frame is corrected with pads under the glass unit. It is better to entrust this work to qualified specialists. They dismantle the glazing beads and install calibrated wedges according to the diagram. If the technology is not followed, the load on the glass is distributed unevenly, and it may burst.
The canvas touches the edge of the box or is not covered tightly
This problem can be encountered in the autumn-winter period if the fittings were moved away from the corner as much as possible. The frame deforms slightly and engages with the axles. To fix the problem, you need to move the sash horizontally
It is important to do this evenly and avoid distortion. The mechanism is adjusted in two places: on the upper and lower loop
Before you adjust the plastic balcony door yourself, you need to open it completely. This will provide convenient access to the mechanisms.
Sequentially rotate the screws of the upper and lower hinges. We control the moment when the pins stop clinging to the door frame. After this, the adjustment can be stopped. But it is better to achieve a position in which both edges of the sash are equidistant from the inner edge of the installation box. This can be easily checked by tracing the outline of the closed canvas with a pencil.