From the author: Hello, dear readers! Today I want to share with you my experience in expanding living space. I'm sure they will be very useful to many!
I had been thinking about adding a balcony on the second floor of a panel house with my own hands for a long time, but I was confused by many questions: from how to formalize this legally to how to choose the right design for the future space. And yet, the opportunity to purchase additional square meters, arrange a small room and a place for drying clothes - won!
So, here's a step-by-step guide for you!
Balconies on the second and subsequent floors, suspended balconies
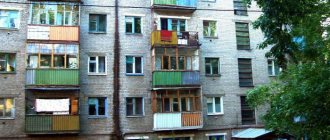
If the house has no loggias at all, and the owner of the apartment lives on the second floor or higher, this is a real problem.
In this case, there are three options:
- Build on metal supports (in this case, the structure will look like a sarcophagus, and the neighbors are unlikely to be happy about the metal “monster” under their windows);
- Build a suspended structure;
- The third option is the most difficult - to build a loggia for your neighbor (neighbors), partially or even fully paying for the construction.
The first option is used in cases where there is a need to build a large capital loggia on the upper floors. It weighs a lot; under no circumstances can you make it suspended (and if you do, a fine and a court decision on demolition are guaranteed).
In addition, there it will be necessary to make a metal foundation from beams, ask permission from all the neighbors below - a hassle and only if we speak extremely frankly. The option with a suspended balcony is optimal. What is such a structure? A metal balcony structure is attached to the front part of the house, and then it is as if sheathed, forming a structure.
This option is much cheaper than the first, and you won’t have to coordinate anything with your neighbors. There is only one important point: the design should be done using welding only by real professionals and under the control of utility services.
Suspended structures are cheaper, but they will have to be additionally strengthened
If you do everything carelessly, as they like in Russia, the balcony may simply fall. There is no need to further explain the possible consequences of such an incident.
Well, the option of building balconies is not even worth discussing with your neighbors: it is only possible if you have large financial resources. But there were cases when this happened even in remote settlements, this is a fact.
After all construction work is completed, a special act must be drawn up, which must be signed by a commission consisting mainly of representatives of utility services.
Representatives of the Ministry of Emergency Situations and local executive authorities can also check the condition of the new balcony. And only after signing the act of commissioning can you fully use the structure.
Types of balconies
The design and construction of such a structure can vary quite a lot. It all depends on the type, cladding and material of the house itself. It is extremely important that the style of the balcony does not stand out against the background of a private building. The most common options are:
- Concrete-based balconies.
- Wooden structures.
- Forged.
- French balcony.
Concrete balconies
Balcony with concrete floor Source pskb.ru
See also: Contacts of construction companies that offer house design services.
A fairly common solution is a concrete floor structure. It has a number of nuances:
- The supporting structures of one side must be attached to the wall of the building. Their connection is carried out using electric welding with pre-installed anchors. The strength of the entire structure will depend on the thickness of the surfaces. If the walls of the building, which must distribute the load, are not reliable enough, you will need to build spare supports.
- The depth and reach of the structure should not be more than 1 m.
- In brick-based houses, the slabs are built into the load-bearing surface along their entire length. They are connected to the lintel reinforcement by welding.
- The top level of the main support slab should therefore be approximately 100mm below the level of the floor surface.
- The floor of the balcony should have a slope of 2% from the main building.
- The concrete slab must be treated with waterproofing materials. To do this, a special protective material is installed on it, onto which a solution based on sand and cement will be poured.
- The parapet parts of the extension must be at least 1 m. For this, metal gratings based on handrails and racks can be used. The rack is installed using electric welding to the embedded materials of the slab, and the edges of the product are immersed in the load-bearing surface of the house.
- The threshold for the doorway should be installed 100 mm above the floor surface.
Wooden buildings
Wooden balcony Source balconymaster.ru
An open wooden balcony on the second floor in a private house is also quite popular. The nuances of its arrangement include:
- The load-bearing products of such structures are beams. For their production, wooden panels with a section of 10 by 20 cm are used.
- With a depth of at least 25 cm, the board is attached to the load-bearing surface and treated with solutions to protect it from moisture or lined with similar materials. The interval between beams should be 80 cm.
- The beams are fastened using angles or strips of steel.
- Wooden posts 4 by 10 cm are attached to the beams.
- After that, longitudinal ones with a size of 5 by 10 cm are also attached above the console panels. The interval between them should be 30-40 cm.
- To ensure increased rigidity, grooves approximately 3 cm deep are installed at the connection point between the longitudinal and console panels.
- The floor is also laid using 4 cm thick boards.
- The partition must be erected from panels with a section of 3 by 13 cm. They are attached to the racks using screws or nails.
- The wooden handrail should have a cross-section of 4 by 9 cm. It is attached with nails to the racks and installed in the supporting structure.
- All components of a balcony in a wooden house must be treated with a hydrophobic solution or oil, this will provide them with protection from rotting and deformation. Fences and handrails must be additionally lined with a frost-resistant compound in several layers.
Forged structures
Forged balconies Source art-kov.ru
This type of balcony has an attractive appearance, especially in a brick house. Its construction has the following nuances:
- The forged extension should not be larger than the size of the slab and the opening; this will eliminate the need to cut the lattice. Minor reductions would be welcome.
- When installing such a structure, it is necessary to take into account the condition of the slab, since metal materials will exert a large load. The surface of the base must be smooth without significant unevenness or damage.
- To restore the quality of the slab, you will need to process the embedded parts, to which the decorative grille will be attached during installation.
- To restore the reinforcement of the coating, the first layer of finishing is removed from it down to the base.
- If the slab is broken or deformed at the edges, the frame must be welded in such a way that it is possible to pour cement mortar without changing its shape. The frame is welded using metal.
- Iron mortgages are attached to the attached sections of the frame. They will help with the installation of the partition.
- After all the elements are welded, the formwork is installed and the slab is poured.
- The grating should be installed only after the cement mixture has completely hardened. The same applies to other construction procedures. The time for complete hardening will be approximately a month.
- If the slab has some damage, you should not use a composition based on cement and sand to restore it, as it will fall off quite quickly.
- To repair minor cracks, tile adhesive is added to the composition in an amount equal to cement. If the applied layer is no more than 20 mm, you can use only glue.
Developing a plan
During the construction process, you must strictly follow the work plan, technical documentation, and nothing else, because any arbitrariness threatens you with serious consequences, at a minimum - the indignation of your neighbors, at a maximum - you may lose your new building, and you will be held administratively liable. What should be included in the plan:
- collect all the necessary documents for official registration,
- consider options for existing balcony designs,
- draw up a room plan,
- calculate the estimate.
Let's start with the most time-consuming procedure. Only after assessing the scope of work on official registration, you can understand whether you have a chance to obtain permission for an extension.
How to obtain permission for an extension
As the experience of many apartment owners and builders shows, the most difficult thing is to obtain permission to extend the second floor. There are many reasons for this, but the main one is related to the possible threat to the integrity of a multi-story building and the load on the load-bearing wall. Let me note: this does not mean that it is impossible to obtain the necessary package of documents.
First of all, contact the planning inspectorate in your city, after a free consultation they will provide you with a list of documents that will be required to consider the case.
Let me note right away that there are a number of legislative points on which you will be immediately denied. What's included in this list:
- the house is included in the list of architectural monuments,
- the attached balcony will face the main street,
- the structure may compromise the integrity of the load-bearing wall of the house,
- the extension is located closer than two and a half meters to underground utilities, or they run along the wall of the house (for example, gas pipes),
- the technical design of the balcony does not meet construction standards.
Having made sure that the extension on the 2nd floor does not violate the listed points, you can safely collect the documents. What you will need:
- permission from the organization on whose balance your house is located,
- written consent of residents living on the left, right, above and below,
- ordering a balcony or loggia project from an architectural bureau,
- coordination of the finished project with the supervisory authorities (gas service, Gorvodokanal, etc.); if there is a need to transfer communications, then it is necessary to prepare the relevant documents and officially pay for the work of employees from the public service.
After you have collected the entire list of documents, we head to the construction department and the district administration. What you must provide:
- application on behalf of the apartment owner for redevelopment,
- documents confirming ownership of the apartment,
- certificate from the BTI,
- finished balcony project,
- documents for coordinating the project of the future balcony with utility services,
- written consent of the residents of the house,
- photo of the house.
I repeat that this procedure cannot be avoided, and any illegal extension is subject to demolition! After submitting all the documents, we arm ourselves with patience and wait 45 working days, during which time your application should be examined and an official response given. Having received a development warrant, you can safely begin purchasing materials and inviting builders.
I note that after completion of the work, you must invite a commission that will draw up an acceptance certificate and confirm that everything was done in accordance with the technical documentation. At the same time, this data must be recorded in the BTI and in the property right.
Construction of an attached balcony
As in the previous version, work begins with the purchase of materials and preparation of tools.
Unlike console structures, such structures are more complex to install and require more financial costs.
The stages of construction of the attached base are as follows:
- according to the project, markings are applied on the wall and in the places where the pillars are installed;
- for supports, pillars with a diameter of more than 140 mm are selected. They are treated with an antiseptic. The lower part of the pillars to the depth of installation in the ground is covered with bitumen;
- holes are dug or drilled. A sand cushion is placed at their bottom;
- the pillars are filled with concrete. For a closed balcony, the height of the pillars should be higher than the height of the ceiling;
- a wall support is attached under the door strictly horizontally along the entire length of the future balcony;
- at the level of the wall support, the pillars are tied with crossbars;
- the pillars are connected to the wall support with lathing, which is necessary for installing wooden flooring;
- arrangement is being made.
Useful video on the topic:
Design options and costing principles
Now you can safely begin construction. There are not so many options for proven balconies for the second floor; it all depends on your personal wishes and design features.
Not everyone decides to draw up a design for an outdoor space on their own, so if you have planned a small room and not a place for drying clothes, then it is better to turn to specialists. What they can offer you:
- install a balcony on a platform fixed to a load-bearing wall,
- erect the structure on supports (pillars),
- install an extension on the continuation of the beam structure of the interfloor ceilings,
- double balcony, addition of a second floor or construction of a balcony room on the outbuilding.
What will builders pay attention to, and what will the project and construction estimate depend on? Firstly, this is the age and condition of the house. Secondly, the thickness and integrity of the load-bearing walls and foundation. Armed with the house design documentation and technical passport, pay attention to what the wall is made of:
- brickwork - if it is at least 50 cm, and is solid and intact, like the foundation, then on the 2nd floor you can build any of the above-described balcony structures,
- timber - it is important that the size is at least 2022 cm, there is no damage by insects, interfloor ceilings and beams are in perfect condition, and the age of the house does not exceed 20 years and stands firmly on a solid foundation. Only if all of the above points are observed can you think about an extension on supporting pillars or in the form of an outbuilding,
- aerated concrete and foam concrete blocks - it is reasonable to consider the option of an extension on supports or in the form of an outbuilding,
- expanded clay concrete blocks or walls with a lightweight frame. An extension is possible only with the use of additional supports, pillars and a carefully thought-out load on them.
We recommend: Organizing and carrying out repairs of the boiler unit
The functionality of the project is calculated taking into account where the window opening opens. This way, you can immediately calculate where you will have access from the apartment to the new premises. If the yard space allows it, and the residents of the house do not mind, you can consider adding a porch.
Another important factor is the insulation of the balcony. At the construction stage, I strongly recommend that you think about insulation and ventilation, so as not to spend money twice on the work of builders.
Based on the information received, you can draw up an estimate and safely go to the construction site!
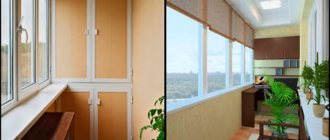
Extension of a hanging balcony
This type of extension is actively used on the 1st floor. Extension of a balcony with your own hands, the photo below shows it, even higher is possible.
Hinged type of balcony extension on the 2nd floor
How to calculate loads? How is the frame attached to the wall? It is better to entrust the solution to these issues and the manufacture of balconies to qualified specialists. Do-it-yourself extension is possible only if you have the appropriate skills.
Preparing the opening
The first step is to dismantle the window block, window sill and drainage system. We remove the glass in advance, and make cuts along the perimeter of the frames - this will make it easier to knock out the window block with your own hands.
Important: When carrying out work on the second floor, for safety reasons, use insurance and fence off the area.
Using a jackhammer, an opening of the required size is made in the wall, in the place of which a balcony door will be installed. A prepared balcony block is installed into the new opening, and the joints between it and the wall are filled with foam.
Making a frame with your own hands
For the balcony, you need to prepare supports in advance - metal corners with an additional stiffener or beams (optimal for the 2nd floor). Their number and dimensions are determined based on the drawing of the balcony and calculation of the loads. The corners are attached to the wall strictly parallel to each other (pictured below), the beams are deepened into the wall and concreted. The strength of the structure of the future balcony depends on the quality of the frame assembly.
Extension of a balcony begins with the installation of supports
The supports are coated with an anti-corrosion compound. Then steel sheets of the required thickness are welded or a wooden flooring is attached to self-tapping screws (a sheet of galvanized steel can be laid under it for additional protection of the structure). An insulated floor can be laid on this base of the extension.
As a rule, a new balcony installed with your own hands exceeds the dimensions of standard structures, since it is often mounted with an extension, and this requires the installation of a suspended roof. Metal corners should be attached to the wall - their pitch and size are smaller than those lying at the base. A layer of hydro- and vapor barrier is applied to them, and then a wooden sheathing is attached. The finished frame is covered with roofing material.
Using welding, we attach metal vertical posts and a horizontal beam (at the height of the future glazing) at the corners of the frame; it should be connected to the base with vertical elements, observing a step of 40-60 cm.
This is what the frame for a do-it-yourself extension looks like
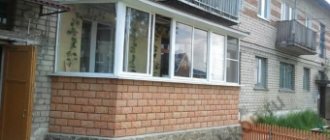
Exterior decoration
When the frame is ready, you can begin glazing and cladding it. Do-it-yourself exterior finishing is done with corrugated sheets or PVC siding.
Built and siding-lined hanging balcony on the first floor
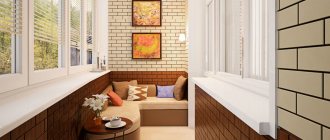
Interior decoration
If the balcony will be used in the cold season, then it is necessary to carry out thermal insulation work: insulate the floor, walls, ceiling.
It is better not to make the structure of a suspended balcony heavier, so light materials should be used for finishing: plasterboard, plastic panels, linoleum, laminate, etc.
Tools, materials - let's start construction!
Is it possible to do without involving construction companies and crews entirely? If you are one of those who trust only themselves and have construction knowledge, then it is quite possible to make the second floor yourself!
What tools will you need:
- marking and measuring instruments: spirit level, tape measure, plumb line, markers,
- power tools: screwdriver, drill and bits, grinder and set of wheels,
- auxiliary tools: hammer, pliers, hacksaw,
- spanners,
- welding inverter, brushes with metal bristles, protective mask for welding.
Depending on the chosen design, the list and quantity of materials will change - this is obvious, but I will still present an approximate list for you to review: lumber, support poles, cement, fine crushed stone and building sand, metal profiles and related materials, hardware and fasteners .
Tools, accessories and materials
General list of basic tools required for installation of an additional balcony on the second floor:
- Standard carpenter's set: hacksaws, axes, plane, hammer, chisels, pliers;
- Measuring and marking tools: building level, plumb line, squares, tape measure, metal rulers of different sizes, markers and pencils;
- Power tools: drill with drills for metal, wood and concrete, screwdriver, angle grinder (grinder) with a set of cutting wheels for metal;
- Wrenches for working with threaded connections.
If the project involves the installation of metal brackets or working with metal, then you will need a welding inverter, electrodes and welding tools - a mask, clamps, brushes with metal bristles.
To construct structures with separate support pillars or a separate foundation, a concrete mixer and excavation tools should be included in the list of required tools.
The list and quantity of required materials depends on the chosen option and will approximately include:
- Lumber, quantity and type depend on the size of the balcony;
- Metal profiles - angles, channels, rectangular pipes;
- Wooden, concrete or metal poles (pipes) for support;
- Screws (self-tapping screws), connecting threaded rods, nails;
- Electrodes for welding metal structures;
- Cement, construction sand and small crushed stone for installing support pillars;
- Paints and varnishes.
How to equip a balcony on the second floor
In general, the work plan will be as follows:
- Consideration and selection of possible design solutions;
- Design;
- Construction works;
- Preparation of documentation for the house.
There can be several options for equipping a balcony on the second floor of a detached house:
- Installation of a balcony on a platform fixed to the wall on the second floor with brackets;
- Extension of a balcony on the extensions of the interfloor floor beams;
- Extension of a balcony on separate supports (pillars) not connected to the walls of the house;
- Extension of a balcony as an upper room on the outbuilding. This option includes double balconies - simultaneously on the first and second floors.
The choice of possible solutions depends on the characteristics of the building structures of the house and the preferences of the owner.
To determine the capabilities of the load-bearing walls of a house, it is best to contact specialists from construction companies. But you can make a preliminary assessment yourself. The evaluation criteria will be:
- Material and thickness of load-bearing walls;
- Age of construction;
- Condition of building elements.
After inspecting the house, studying the design documentation, if any, and the technical passport, one can draw one of the following conclusions:
- If the house is built of brick, the thickness of the walls is at least 50 cm (two standard bricks), there is no destruction of the masonry, the foundation is without damage, then on the second floor you can attach a balcony of any of the above structures;
- If the walls of the house are built from timber measuring at least 20x20 cm, the house is no more than 15-20 years old, the timber is not damaged by grinding insects, the interfloor ceilings are in excellent condition, made of beams or boards, with a cross-section of at least 20x10 cm, the foundation is not is damaged, it is possible to build an extension on the extensions of the interfloor beams. Options with separate support pillars and an outbuilding are also relevant. It is advisable to make the same decision if the house is built from foam concrete or aerated concrete blocks;
- In a house with lightweight frame walls, as well as in the case of walls made of slag-cast (expanded clay concrete) blocks, a balcony can be added to the second floor only using schemes with separate support pillars or additional rooms on their own foundation (outbuildings or verandas).
After choosing an option, you need to make a drawing of the future balcony or the entire structure and calculate the required amount of materials. If there is no construction experience, then it is better to order a project from a specialized organization.
To facilitate further arrangement of access to the balcony, it is necessary to design its location where there is already a window opening on the second floor. Another excellent solution would be to add a porch and install a balcony supported by its roof.
Important! Before starting construction or installation work, you need to coordinate the redevelopment of the house with control authorities, such as the city architectural department or the housing inspection. It is possible that additional requirements for appearance will be imposed if the house is located with a facade on the red line of the street. In the future, the approval procedure will help to avoid difficulties with registering changes in documents for the house.
Construction of a cantilever balcony
Initially, the materials specified in the project are purchased and the tool is prepared. In addition, the project must include drawings with the dimensions of the parts. This will save materials and also simplify assembly.
IMPORTANT!
1. If an extension is being made to a house under construction, then the protruding floor beams are a good basis for the construction of a wooden balcony. In a built house, the best option would be to support it on pillars.
General installation procedure
For a balcony on brackets:
- Make a welded or wooden bracket structure. This action is performed on a flat surface with careful observance of dimensions and angles;
- Attach the brackets to the wall. The fastening must provide strength, so it is advisable to use anchor bolts for brick or concrete walls or connecting threaded rods. The vertical installation of the brackets and the plane under the balcony floor should be verified according to the construction plumb and levels;
- Fasten the balcony slab to the brackets (subfloor made of 50 mm thick boards);
- Attach the railing to the balcony slab and complete the final finishing.
Balcony attached to brackets
For a balcony on supporting pillars:
- Mark holes in the ground for installing pillars;
- Drill or dig holes and install support pillars in them strictly vertically. The installation depth of the pillars should be no less than the depth of the foundation of the house. In most cases, this value slightly exceeds the calculated soil freezing depth for a particular area;
- Fill the holes with installed pillars with concrete. Concrete is mixed in the following proportions: for 1 part cement (grade M400) - two parts sand and one part crushed stone (fraction 30-40 mm).
- Installation of pillars. It is better to install the pillars a little higher than required, so that it is possible to cut them to the required level if necessary. Before the concrete hardens, the pillars must be connected to each other and stretched with guy wires so as not to disturb the verticality;
- Check the quality of installation of the pillars with a building level and, if the upper cuts are not at the same height, trim;
- Mount a balcony slab or a metal frame made of corners on the installed supports, into which you need to lay a subfloor made of boards. Fix the balcony slab or frame to the walls of the house with anchors or threaded rods;
- Install fencing and do final finishing.
Balcony built on supporting pillars
Important! A balcony can only be built against a wall perpendicular to the interfloor beams;
For a balcony on the continuation of the floor beams:
- Disassemble a section of the floor on the second floor near the wall in such a way as to expose the floor beams to a length that exceeds the width of the future balcony by approximately two-thirds.
- Make openings in the wall to allow the continuation of the beams to pass through them;
- Place the extension beams into the holes and securely connect them two-thirds of their length to the floor beams. It is better to make connections on studs using metal plates or channels. After tightening, the nuts can be welded to the studs;
- Strengthen a balcony slab or subfloor made of boards on the beams;
- Install fencing and complete finishing work.
Balcony on the second floor, built on the continuation of the interfloor beams
We recommend: Gas boilers Ferroli (Ferroli): review, operating experience of wall-mounted and floor-mounted, single-circuit and double-circuit models, their technical characteristics, owner reviews and prices
Balconies on the roofs of outbuildings and porches are easier to install; it is enough to dismantle the roof, replace the rafters with stronger ones if necessary, and attach the subfloor of the balcony to them. After these steps, the installation of fencing, finishing and installation of the balcony door on the second floor is carried out.
Extension of a suspended balcony with your own hands
Before we begin the extension, we take a project for the future balcony and go to order balcony glazing and an internal window unit. We will not begin work until the company delivers the frames with double-glazed windows.
Installation of struts and base frame
The balcony structure will be supported by welded struts. You can make them yourself from a 50x50mm metal corner. One of the sides of the struts should protrude 50mm up and down; these will be additional places for fastenings. The distance between the struts should be about 100 cm, based on this we calculate the required quantity. Installation to the wall is carried out using anchors.
Extension of a balcony on the first floor: installation diagram of struts
Now we make the strapping, using the same metal corner for it. Don't forget to make jumpers across the resulting rectangle. The side that is adjacent to the wall is additionally secured to it with anchors.
Do-it-yourself hanging balcony on the first floor: how to attach a harness to the struts
Installation of the floor and glazing frame of the extension
Let's organize the floor. Due to the fact that the load-bearing capacity of the resulting base of the extension is limited, it will not be possible to pour a slab of solid concrete. You have two options:
First. We fasten metal sheets under the base frame. We fill the inside with a layer of expanded clay with a layer of 3 cm. Now we take the reinforcing mesh from the rod (5mm) and lay it on the frame. We tie the mesh to the jumpers with wire and weld it to the harness.
We lay a damper tape around the perimeter of the strapping and fill everything with liquid cement-sand mortar so that the reinforcing mesh is covered by 2 cm and leave it to harden. After the screed has dried well, we waterproof and seal the base.
Making balconies with your own hands: floor installation
Second. We lay any sheet metal into the base frame, lay a layer of waterproofing on it, and then boards. We fasten everything with self-tapping screws. Next, we attach the joists to the floor, lay a layer of insulation between them, cover it with a vapor barrier and lay the subfloor. We waterproof and then seal the joints of metal sheets along the underside of the slab.
We prepare the frame for the balcony glazing separately, on the ground, then install it on the base of the extension. We attach the side posts of the frame to the wall using anchors. We do the same with the top lintel adjacent to the wall. This will reduce the load on the base of the extension. Do not forget that the weight of the balcony insulation and finishing materials will also fall on it.
Suspended balcony on the first floor: how to make a parapet on an extension
Installation of a balcony structure
For your consideration, I offer options for installing balcony structures for the second floor.
Balcony on brackets
The first installation option - a balcony on brackets - is ideal for small balconies.
- We prepare a welded or wooden structure from brackets according to the dimensions specified in the project. As a result, be sure to check the dimensions and angles.
- We fasten the structure to the wall using anchor bolts or connecting threaded rods. We check the verticality of the installation using a spirit level and a plumb line.
- We strengthen the balcony slab or subfloor with brackets.
Tip: 50 mm thick boards are suitable for the subfloor.
- We build fences, walls and install window frames.
Balcony on supporting pillars
Steps for installing a balcony structure for the 2nd floor.
- We mark the ground to install support pillars according to the calculations in the project. We drill or dig holes, compact the bottom and pour crushed stone and make a sand cushion.
Tip: when calculating the depth of the post hole, be guided by the depth of the foundation of your house.
- We mark the height of the pillar; it is better to make it a little larger than the stated size and then, if necessary, cut it off.
- Having installed the supports in the pit, we connect them together using guy wires, this will make it easier for you to check the calculations. Now you can start pouring concrete.
Tip: concrete is mixed in the following proportions: 2 parts construction sand, 1 part crushed stone with a fraction of 30–40 mm and 1 part M400 cement.
Balcony on interfloor beams
For a balcony of this type, the installation instructions will be as follows.
- We disassemble a section of the flooring on the 2nd floor and expose the beam to the required length and width.
- We make openings in the load-bearing wall of the house for the “continuation” of beams to come out and in through them, then insert the floor beams into the holes. For maximum structural strength, it is necessary to connect them using channels or studs using metal plates.
Tip: builders recommend welding the nuts to the studs upon completion of the fastening work.
- We strengthen the balcony slab or subfloor from boards onto brackets.
- We mount the walls and install window frames.
Double balcony
Structures on the roofs of outbuildings, porches or as a superstructure on an existing attached balcony are much easier to install.
- We check the integrity of the foundation and walls of the extension.
- We disassemble the roof.
- We replace the rafters according to the expected load and lay the subfloor.
- We are completing the fencing and installing window frames.
If after reading you are not afraid of visiting offices and the amount of work, then your efforts will be rewarded with additional square meters.
Required documents
- Certificate of ownership of the living space on the territory of which construction will take place.
- Plan of the first floor of the house, certificate from the BTI.
- Permission from housing and communal services.
- Consent in writing from neighbors above, left and right with their signatures.
- The prepared project itself.
- Permits obtained from public utilities.
- Photos of the place where construction is expected to begin.
- Permission from the architectural department.
It is also necessary to provide documents confirming the transfer of land to the construction company, and a technical passport of the land. If you can’t get ownership of it, you can rent it or make a balcony on stilts.
Attention! Typically, collecting all documents takes from four months to a year, and the application is reviewed by the administration up to 45 days.
Can they refuse?
When coordinating the project, special circumstances may arise due to which it will not be possible to build a balcony on the ground floor.
Basic rules prohibit its extension if:
- Your home is an architectural monument.
- The side of the house where construction is supposed to begin faces one of the central streets of the city.
- An extension will spoil the appearance of the house or may damage the structure.
- The materials from which the balcony will be made or the technique for its construction are outdated and do not comply with accepted modern standards.
- During the construction process, it is planned to damage one of the load-bearing walls.
- The location of underground communications interferes with construction (they are closer than 2.5 meters).
Balcony finishing
The next step is finishing the balcony. For it, it is best to choose frost-resistant materials, for example, porcelain stoneware, which does not absorb moisture, does not swell or crack due to rapid temperature changes. Their anti-slip properties are also important and will come in handy when you go out onto the balcony in winter.
An important element of balcony design is also the design of the railing. Their height is determined by building codes, but must be at least 90 cm. Next, you can decide: leave the balcony open, or glaze it with plastic or wooden windows. They also differ in design.
Some important nuances
The majority of urban homeowners, regardless of any prohibitions, add small balconies, taking advantage of the ignorance of the city authorities. It’s good if you come across neighbors who are on the lookout. They will definitely report where they should, and a huge number of problems will fall on your head in an instant. But if you live quietly and peacefully, and you have friendly relations with your neighbors, then there is a high probability that you will live in an apartment with an attached balcony for the rest of your days, and no one will ever make any claims against you.
But you need to take into account this point - you will not be able to sell, exchange or give such an apartment. Forget about it, because you will first have to legalize this premises, that is, present it to the authorities. They may allow it to be left unchanged, or they may require its demolition and restoration of the apartment to its original condition. Of course, a fine will definitely be imposed on you, and all this will go through the court. The problems will be through the roof, so we recommend not to engage in self-construction, but to follow the letter of the law. However, this path is thorny, and it will not be so easy to go through it.
We recommend: Do-it-yourself gas burner for soldering: drawings, photos and videos
What are the options?
- Contact intermediaries with connections in government. Usually these are lawyers or law firms. Their service may cost you half the legal cost. But without problems, fuss and nerves, and the speed of obtaining the necessary permits will be 3-4 times higher.
- Solve this issue yourself. Remember that you will have to go around more than one government agency, stand in line, get signatures and seals. You may be driven from one door to another several times. So be patient.
How to independently obtain permission to extend a balcony
First of all, you need to collect the necessary documents that are presented to the city administration:
- Title document for your apartment. This could be a privatization certificate, an inheritance certificate, a purchase and sale agreement, or a deed of gift.
- Apartment registration certificate.
- Agreement between neighbors above and neighbors across the wall. This document must be certified by a notary. You will also have to obtain permission from all residents of your apartment who have reached the age of majority.
- A sketch that shows what you are going to do.
- A copy of your passport.
Corner extension
You write an application, attach the collected documents and hand it all over to the city administration. After reviewing your package, she gives a positive or negative answer. If there are no difficult circumstances, then the answer will always be positive. After which you must order a project for a new premises. This can be done in the architecture department or in a licensed design organization. The first option is better, because this department will coordinate the project with other government organizations - SES, Ministry of Emergency Situations, GorGaz, GorSvet, Vodokanal and so on.
But your torment is not over yet. You again submit the finished project to the city administration, where it will be reviewed by an interdepartmental commission - it is this commission that must give its conclusion. This commission necessarily includes the city architect, whose department developed the project, so there shouldn’t be any problems here.
So, you have everything in your hands - both the project and permission to build a balcony. Now you can start building it. Standard requirements include concluding an agreement with a construction company. It is not allowed to add a balcony with your own hands, and this will be controlled by the capital construction department of the administration, but it is still possible to reach an agreement.
The balcony built according to the project will be accepted by a commission, which will give an opinion in the form of a report on the readiness of the object for operation. This document must be approved by order of the administration. You will have to issue a new technical passport for the apartment and receive a certificate confirming your ownership.
This is the path you will have to go through to legalize the construction of a balcony on the 1st floor. Almost the same thing will need to be done for construction on the second or other floors. Please also take into account the fact that it takes a certain amount of time to review each paper—sometimes several months. And the cost of state fees and services will cost you a pretty penny. Perhaps this is why many do not bother with the legal construction of balconies.
Is it possible to attach a balcony to a wooden house?
Yes, it is possible to build it, but the technology will be slightly different from the methods described above.
Wooden balconies can be attached to the cottage in two ways:
- Either they will be adapted to the structure of the object (for example, wooden log houses) and form an integral part of it (for example, in the form of protruding logs);
- Or traditional reinforced concrete slabs will be used, which will be externally finished with wood or porcelain tiles, matched to the color and texture of natural wood.
You can also build a wooden balcony supported by wooden beams. Thanks to this design, you will avoid the problem of thermal bridges. The thing is that wood has a lower thermal coefficient compared to brick or concrete.
We previously wrote in our blog about how balconies are built in private houses. Therefore, we will not focus on this here.
Technical side of the issue
Unusual option
Now you can proceed to the construction of the balcony. On the ground floor it is, in fact, a full-fledged room, the elements of which carry all the loads acting on the premises of the apartment itself. Therefore, they build it like an ordinary house, erecting a foundation, walls and roof. The complexity will depend on the design of the object, so pay attention to the presence of a basement under the balcony. If according to the project there is one, then you will have to dig a pit, go deeper into the ground, and this is an additional expense. In addition, a balcony without a basement can be built on stilts, leaving open space under the floor.
But let’s not complicate the situation and consider a simple structure built on foundation blocks with brick walls. There are several positions that form the basis of the work:
- First, the dimensions of the balcony are determined, and the perimeter of the new room is drawn on the ground.
- Secondly, the height of the foundation should be level with the height of the foundation of the main building.
- Thirdly, the thickness of the brickwork should not be less than 25 centimeters.
- Fourthly, all elements of the balcony must be thermally insulated.
Let's start by installing the foundation blocks. First, you need to dig a shallow trench under them to determine where the blocks will be installed. A sand or gravel cushion is poured into it and compacted. Sometimes a small layer of concrete mortar is poured on top of the cushion, into the body of which a metal reinforcing mesh is placed. The result is a strong and reliable base that will hold the entire structure on the ground. Then the concrete blocks themselves are installed using a crane. Once the blocks have been installed and leveled, the hollow-core concrete floor slabs can be immediately installed. Here again you will need a crane, so it is advisable to carry out the installation work associated with the installation of heavy construction products in one working day.
Volume extension
After which you can build brick walls. Keep in mind that brick laying can be done from the outside, but you can get inside the balcony through the apartment. Therefore, act in parallel - raise the walls and make a passage through the window block in the room. Pay attention to one thing. The brickwork must fit tightly to the walls of the building without gaps, and they must be fastened to each other using reinforcing rods driven into the walls. They need to be placed every 5-6 rows of laid bricks.
Now, as for the roof. There are two options here:
- You can lay floor slabs on the walls and make a flat roof, covering it with roofing felt. You can also make a slight slope using certain roofing materials.
- You can build a roof on load-bearing beams made of wooden beams by installing a small rafter system.
Both options are used everywhere, and each has its own advantages and disadvantages. The only thing you should pay attention to is the height of the roof. It should not exceed the floor level on the second floor, so as not to disturb the neighbors above.
Arrangement of the balcony base
These works require special care, since the reliability, attractiveness and longevity of the balcony structure largely depend on them. These primarily include:
- Connecting the balcony frame to the wall.
As a rule, the frame of a wooden balcony is made of wooden elements.
Firstly, wood has high thermal insulation qualities, and secondly, it goes well with various architectural styles.
Typically, the balcony frame is connected to the wall using bars fixed vertically to the wall at the ends of the balcony base. The height of the bars determines the size of the fence.
The wall is most often covered with clapboard. The lining made of pine and larch looks good and is durable. If the balcony frame is large, then round profile boards are installed (block house). This wall has a distinct log look.
- Laying the floor.
The floor is mounted on the prepared sheathing. Forty-millimeter planed boards are chosen as the material. To prevent water from accumulating, they are laid with a gap of up to 2 mm.
Terrace boards have worked well for decking on balconies. They are durable, but at the same time easy to process. The corrugated surface of the boards is suitable for open balconies.
- Installation of fencing.
A good fence not only has an attractive appearance that matches the architectural style of the building, but is also durable and reliable. Turned or carved balusters give a wooden balcony an attractive look.
Railings are made from different materials:
- Forged railings turn the balcony into a work of art. The number of possible ornament options is practically unlimited.
Such fencing combines elegance with high strength.
- High safety and reliability are ensured by wooden railings. They are easy to manufacture and install. However, such railings have a short service life due to rotting under the influence of moisture.
There are certain rules that fencing for wooden balconies must comply with:
- the height of the railing is not less than 1.0 m;
- the distance between balusters is no more than 0.1 m;
- permissible horizontal load on the railing is not less than 100 kg/m;
- There should be no nicks or roughness on the surface of the railing.
When choosing railings, you must first of all be guided by the safety of using the balcony.
- Creating a canopy.
Not every wooden balcony requires a canopy. It is equipped to create comfort and protect the balcony from the destructive effects of natural conditions.
It is easy to construct a canopy as an extension of the roof slope. In this case, it is enough to have longer rafters.
The simplest design is tying the top of the pillars to support the balcony base. After this, a sheathing is made on which the roofing covering is laid.
There are polycarbonate canopies mounted on the wall. Light materials that can withstand snow and wind loads are suitable for the canopy.