All gardeners sooner or later face the need to build or purchase a greenhouse. Such a simple design raises many questions among both beginners and professionals. Greenhouses are used
There are different types of greenhouses, for example, cold, semi-cold and warm. Most often, cabbage, cucumbers or tomatoes are planted.
Read more about all aspects of growing plants in greenhouses in the article.
Why do we need greenhouses for seedlings?
To get high yields, experienced gardeners know that it takes a lot of effort. It all starts with growing good, healthy seedlings. It is necessary to create the most favorable conditions for the seedling.
It may be impossible to create suitable climatic conditions at home, which is why mini-greenhouses for seedlings, which are used for growing seedlings, become a salvation for many.
These are small structures that are easy to carry, lightweight and mobile. As a rule, they are installed on balconies, window sills or on the site.
Mini-greenhouses are used to grow fancy varieties of plants that love light and warmth. The following functions of a greenhouse can be distinguished:
- Protecting young shoots from wind, frost, rain or snow.
- Creates favorable climatic conditions.
- If you plant seedlings in open ground in a greenhouse, then the young shoots will be less susceptible to diseases. In greenhouses, adaptation occurs gradually, without stress for the plants.
- Caring for plants growing in a greenhouse is no more difficult than caring for other seedlings.
- Greenhouses are easy to install and store.
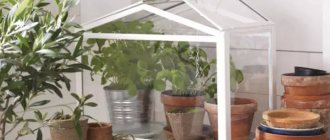
Home mini greenhouse for seedlings
It is worth noting that there are a number of differences between a greenhouse and a greenhouse. The colossal difference between these designs lies precisely in the creation of different microclimates and biorhythms. The greenhouse creates conditions that are as close as possible to the natural climate for plant maturation.
A greenhouse for seedlings is necessary to create a warm climate. During the day, plants are saturated with oxygen, and at night - with carbon dioxide. Plants feed only thanks to the soil.
Features and Benefits
The first greenhouses appeared in ancient Rome. A little later, with the advent of transparent materials, they already took on a more familiar appearance to modern man.
A greenhouse is a bed that is covered with a special structure that creates favorable climatic conditions
Features of greenhouses can be distinguished as follows:
- Compared to greenhouses, greenhouses are small in size. As noted above, there are mini-greenhouses that can be installed in an apartment without any problems;
- To create a warm climate, only natural sources are used - sunlight, energy from decomposed plant waste (compost, fertilizer);
- There are no complex construction installations. A greenhouse for seedlings is easy to install or dismantle;
- seasonality is due to the fact that greenhouses are used when there is a risk of frost or precipitation;
- You can care for seedlings or plants without going inside the greenhouse.
It is not necessary to install a separate heating system in the greenhouse. Most often this is not practical. In this case, it is better to build a greenhouse.
Among the advantages are:
- Greenhouses extend the growing season by almost 2 months.
- The seedlings grow stronger, more hardened, more stable and take root better in open ground.
- It is much cheaper to install a greenhouse than a greenhouse.
- You can make a greenhouse anywhere, even in an apartment, by installing a mini installation.
Greenhouses allow you to maintain moisture conductivity.
Greenhouses retain water, eliminating frequent watering. The installation, unfortunately, is not without its drawbacks, but in comparison with the advantages, they are very insignificant.
Main disadvantages
The main disadvantages most often include:
- insufficient wind resistance. At high wind speeds, there is a risk of structural destruction, which can lead to damage to plants;
- the height of the structure is relatively small, so it is not possible to grow tall crops;
- If the covering material deteriorates due to weather conditions, it becomes difficult to replace it. This is due to the fact that it is attached to the frame very tightly.
Of course, in order to work with a greenhouse, you need to study this issue well, so that only certain knowledge will help minimize the risk of possible problems.
How to choose a design
In order to choose the right structure, you need to clearly know for what purposes it is needed on the site. If you plan to plant tall crops, for example, tomatoes, then in this case it is better to purchase glazed equipment. For lower crops, unglazed walls are suitable.
Mini greenhouse for tomatoes
The structure must be durable. External attractiveness is, of course, good, but still, the strength of the structure should come first, since the quality of the plants depends on it.
The modern market offers designs of various shapes, sizes and prices. When choosing, it is recommended to pay attention not only to special sites, literature, or even reviews from friends. You can visit various agricultural exhibitions to evaluate all the designs yourself.
The most common devices are those with a dome-shaped structure. Wooden structures look prettier than cold metal. However, it is the metal frame that allows the greenhouse to last longer.
The same applies to the size of the greenhouse. Before purchasing, you need to take measurements on the site to assess how it will look on the ground.
The greenhouse must be ideally suited to the plants. It shouldn't be empty, but it shouldn't be overfilled either. Crowding will not allow the plant to gain the necessary growth.
What are we growing?
The choice is great and it depends only on your enthusiasm for selecting varieties of vegetables that can grow in a mini-greenhouse on the windowsill.
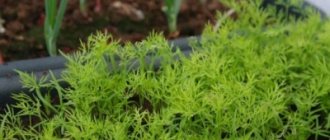
- greens - onions, dill, parsley, celery, mint, etc.;
- tomatoes of the Balcony Miracle variety - yield up to 2 kg per plant (the weight of 1 fruit is no more than 30 g), suitable for fresh consumption, canning and freezing;
- hot peppers. A bush with fruits can become a decoration for your interior, it looks so beautiful; leaf salads - watercress, arugula, spinach;
- early radish;
- seedlings
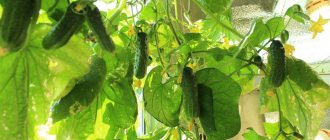
Some craftsmen even manage to grow cucumbers on their windowsills.
Types and their features in application
A greenhouse is an installation that does not use heating elements. The top of the structure usually has a transparent part that reflects light well, creating a warm, greenhouse effect. There are a number of different designs on the modern market, which differ in materials, designs and even purpose.
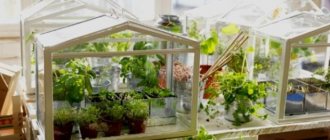
Mini-greenhouses for seedlings
Mini-greenhouses are universal structures that allow you to prepare seedlings for transplanting into open ground. This type is very convenient to place directly in apartments, since the size of the structure fits perfectly on the windowsill.
Many gardeners also adapt balconies during the period of growing seedlings.
The miniature version has several advantages:
- versatility - it is easy to grow plants of any crop in such a greenhouse;
- lightness, mobility - such greenhouses are very easy to move, rearrange, and store out of season;
- low cost. You can even make it yourself from simple objects, for example, from a plastic container;
- minimum waste of time. To build such a structure you will not have to spend a lot of time, a few hours at most.
You can also make a mini-greenhouse for seedlings with your own hands.
When making a mini-greenhouse at home, you need to consider the following points. Firstly, lighting. If the plants do not have enough light, they will remain weak and will not produce a good harvest. Secondly, humidity.
It is worth making sure that water does not stagnate in the greenhouse, as this can cause rotting of the roots.
Portable
Many gardeners know that if you plant the same crop in the same place every year, the soil becomes poor and unsuitable for growing healthy, strong plants. This directly affects productivity.
In this case, a portable greenhouse can be an excellent option, which, thanks to its mobility, can change location after each season. You can buy it as a ready-made greenhouse. Its cost can range from 5 to 7 thousand. The cost depends on the size and material. You can also purchase only the frame and choose the covering material yourself. But you can build the structure yourself. However, you should not make a greenhouse more than 100-120 cm deep. In this case, it becomes more difficult to care for the plants.
There are several types of portable greenhouses: wooden with a folding frame, made of plastic pipes and frameless.
The simplest technology is frameless. However, it is not without its drawbacks. To water the plants under such a greenhouse, it is necessary to completely remove the cover.
There are many ways to make a portable greenhouse with your own hands. Such a mobile shelter will save seedlings from precipitation and frost, and will also create the most favorable climatic conditions. It is much easier to buy a ready-made frame, but this is already decided based on financial capabilities and desires.
"Home"
This is a small design that easily fits on a windowsill or balcony. It is used for growing seedlings at home - hence the name. The design itself resembles large greenhouses, but it is made in miniature.
Home greenhouses have a number of advantages:
- such models are suitable for growing flowers much more than just flower pots;
- ease of caring for plants that grow in a mini-greenhouse;
- You can attach a small thermometer to the structure, which will allow you to monitor the temperature;
- mobility - it is very easy to carry, adjusting the light intensity.
You can make a good greenhouse with your own hands, but you must follow some rules:
- This structure should create conditions comfortable for plant growth. A microclimate will be formed in them, on which the quality of the plants will depend.
- When creating a design, you need to take into account the fact that it may be necessary to remove the plant or process the stem or leaves. Therefore, access to the plant must be 100%.
- The design must be durable, preferably reusable. This will reduce the cost of production.
It is also necessary to take all measurements so that the installation fits exactly on the window sill or shelf.
Such greenhouses allow you to grow even the most capricious plants. The necessary microclimate will be created inside the structure. Thanks to this, you can count on a beautiful, strong, healthy plant.
"Belgian"
The Belgian greenhouse is a structure with a flat roof, which is located at a slightly angle. It can be raised or folded down completely. The design does not contain any round, bendable parts. Essentially, this is a box that has a lid on top.
Such installations gained their popularity due to their convenience. It is the opening lid that allows easy access to the plant.
The benefits for many summer residents include:
- sizes - you can choose any of them, placing the greenhouse on any site;
- low cost - even if the greenhouse is not purchased ready-made, all the components for it do not have such a high cost;
- mobility - the greenhouse can be easily disassembled and then moved to another place so that the soil does not become accustomed;
- efficiency of use is achieved thanks to the hinged lid, so the gardener has the opportunity to gain access to any plant;
- If you have the opportunity to spend time and make efforts, then it’s quite possible to make such a greenhouse with your own hands.
The greenhouse must be installed in a lighted area.
Other plantings or walls of the house should not create much shade, and the soil should not be too wet. It is worth choosing a site that does not retain groundwater. Please also note that installing a greenhouse on the north side can harm the plants, because it is the northern winds that are considered the coldest.
Model "Butterfly"
This design also has a convertible top, but unlike the previous version, it provides access from either side, since the lids open both to the right and to the left.
This is a very versatile structure that is suitable for areas of different sizes. Mobility also allows you to disassemble and move the greenhouse to other places.
The design got its name because of the opening parts that resemble butterfly wings. The doors are easy to open, controlling the microclimate inside the greenhouse.
The advantages of this design are usually the following:
- High strength. Any bad weather conditions are easily tolerated.
- The greenhouse is easy to ventilate thanks to two doors.
- If high-quality materials are used, the service life can be very long.
- The greenhouse allows you to retain heat well inside. The quality of plants will depend on the microclimate.
- You can grow any crops in the Butterfly, both vegetables and flowers, as well as melons and any other seedlings.
Installation does not require a separate foundation; the structure can be made with your own hands, without high costs for materials
The disadvantages include the fragility of the hinges that are attached to the doors. With constant opening/closing, the hinges quickly fail. Also, if the covering on top of the structure is polycarbonate, the arcs may be deformed under the weight of the material.
Model "Breadbox"
The frame of the “Breadbox” looks like this: it consists of 3 main parts - the right, left wall and foundation. The microclimate can be regulated by lifting the flap on one side of the greenhouse. It was this method of opening the semicircular lid that gave the greenhouse its name.
Please note that when opening the sash, it is necessary to secure it with a wooden block. A strong wind can slam it shut, which will harm the gardener or damage the leaves of the plant.
The advantages include:
- independence of frame production. The drawing scheme is very simple, even a beginner can do it;
- assembly and installation is also very fast;
- It is possible to replace parts of the covering material separately. This allows you to extend the life of the greenhouse;
- it is also lightweight and affordable.
Among the disadvantages, absolute non-mobility is usually highlighted. Due to the fundamental part, it cannot be transferred after each season. It is also necessary to occasionally lubricate the opening hinges, as due to constant operation they may begin to creak.
Before installation, you must make sure that the distance to the nearest building is more than 5 meters. A distance of 8 meters must be maintained between the bathhouse and the greenhouse. If there is a septic tank on the site, it should be located at a distance of more than 20 meters.
"Shelf"
To build a greenhouse in the form of a shelf, you need to use an old or unnecessary cabinet or rack. To do this, you need to remove the back wall of the cabinet and stretch polyethylene or polycarbonate there. The door is usually a frame with the same material.
The greenhouse got its name due to the similarity of the design with the shelves in the store. It can also be classified as a home, portable greenhouse, since they are easily installed at home, for example, on a balcony.
The advantages include:
- ease of manufacture;
- low cost, because if there is a shelving at home, you only need to buy covering material;
- mobility. It can be transported depending on the desired climatic conditions;
- access to any plant. The door allows 100% of the space to be used, giving the gardener the opportunity to access any plant.
This design can also be decorated, and it will add beauty to any interior.
Model "Wall"
This is a small structure that is installed between the walls of outbuildings or between the walls of a house. It is very compact and suitable for small areas.
It is worth choosing the most illuminated side of the house so that the plants do not experience a lack of lighting
You can build it from any window frames. To install such a greenhouse, you do not need a back wall; it is the wall of a house or barn. The covering material can be polyethylene. Window frames have vents - this is a good advantage for ventilating seedlings or for treating leaves from pests.
Additionally, to protect against frost, you can use matting or roofing felt to cover the greenhouse from above.
The advantages include ease of installation, accessibility and low cost. And also the ability to install a greenhouse on a plot of any size.
Greenhouse lighting
If simple or homemade greenhouses are used, it is important to provide them with natural light. To do this, the structures are placed on the windowsill or near the window.
Such greenhouses also require additional light sources. Usually special devices are used. It is important to choose the optimal lamp color for plants:
- blue, purple. These colors promote photosynthesis. Thanks to this, crops grow actively and bring a good harvest;
- yellow green. They impair photosynthesis. This leads to the appearance of pathologies in plants. For this reason, these colors are not used for greenhouses;
- red, orange. Lamps with such shades are used during the flowering period of plants, the formation of ovaries, and the formation of fruits. However, red and orange colors are served in doses. Its excess can lead to the death of the entire crop.
LED seedling lighting
It is also important to choose the right type of lamps:
- incandescence. They provide high-quality lighting and heat the air. However, they are rarely used for greenhouses, since they promote leaf curling and cause burns on plants.
- luminescent. These lighting fixtures can be used for home mini-greenhouses. They are characterized by low heat transfer, low energy consumption, and moderate cost.
- ultraviolet. They have different wavelengths, which allows you to select a lighting device for specific crops.
- mercury. Used for photosynthesis, but in limited dosages. Usually used at the stage of fruit formation.
- LED You can use several ribbons of different shades to create the optimal color scheme for the crop. The devices are characterized by durability and low power consumption.
- infrared. Optimally suitable for plants. Their light is identical to natural light, which has a beneficial effect on the development of culture. In addition, infrared lamps heat the air.
Greenhouse lighting
Materials and tools for making a greenhouse
You can build a greenhouse for seedlings with your own hands in any shape. For this, improvised tools are used. This in many ways makes the creation process cheaper than buying a ready-made structure. Most often used:
- plastic;
- metal or wooden structures;
- polyethylene;
- polycarbonate sheets;
- glass or window frame.
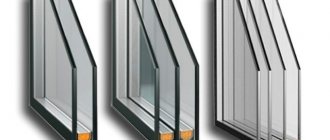
If it is planned to build an arched greenhouse, then the frame must be made of flexible materials. Most often these are plastic or metal elements. Wood is also a favorite material for many gardeners, but it is worth considering that it is subject to rot.
Polycarbonate is considered the most effective; it is used in store structures. Polyethylene and glass are also often used. Window frames are considered an ideal material for creating a greenhouse. The vents on the windows allow you to ventilate the greenhouse and control the temperature in it.
It is worth considering that glass makes the structure very heavy, so it is important that the frame is strong and can withstand pressure, and it will also be necessary to strengthen the foundation.
Polycarbonate is used to create models such as the “butterfly” or “breadbox”. Polyethylene is ideal for home structures. Tools you will need: hammer, saw, stapler, hacksaw, shovel, nails, tape measure, pencil, tape, cutter.
Installation of different types
There are different ways to build a greenhouse. Everything depends only on the supporting structures. There are step-by-step recommendations on how to build this or that structure. For simplicity, you can start with frameless structures.
Such greenhouses look like ordinary beds that are covered with polyethylene or other similar material. Seeds are sown in the prepared soil and then covered with material. To prevent it from flying anywhere, it is usually pressed down with bricks or other heavy objects.
Arched mini-greenhouse, instructions
To build a frame in the form of an arch, you must follow the following simple instructions:
- You need to prepare 5 or 6 plastic arcs in advance, also prepare a metal profile, polyethylene, several meters of wire and about 20-25 clamps.
- Make your own arcs. If not possible, they can be found in stores.
- Install them at a distance of 35-40 cm from each other. To strengthen the frame, stretch a wire between them.
- Cover the resulting structure with film, and then hook it on one side with clamps.
- On the opposite side, the film must be attached to a wooden beam. It is from this side that the greenhouse will open.
The sides of the structure must also be covered with polyethylene, and then it must be pressed to the ground with bricks or a wooden beam.
Portable polycarbonate, instructions
Portable greenhouses are very convenient, since the ability to change its location each time prevents the soil from depleting. However, building such a greenhouse from polycarbonate is much more difficult. To do this, you need to prepare the following materials: wooden beams, screws, a canopy and a handle.
To build a portable greenhouse for seedlings with your own hands, you must follow the following recommendations:
- First prepare the base. It should look like a box with a slanted lid.
- Make a frame from the slats. It will serve as a lid that will open to give access to the plants.
- Insert a sheet of polycarbonate into the frame.
- Next you need to make a support for the roof.
The final step is to attach the hook to the lid. All these construction methods provide the seeds with optimal climatic conditions.
A greenhouse allows you to grow a healthy, strong plant with good yield.
Greenhouse arranged on the window
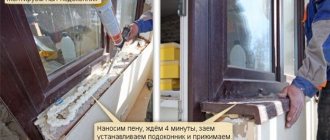
Sometimes, in conditions of insufficient living room space and a very great love for plants, a window sill is used to arrange a greenhouse on the window. The window sill is expanded so that its hanging part is above the central heating radiators.
Holes are made along the expansion area through which heat will flow into the greenhouse. The window serves as its outer side. On the opposite side there is a sloping glass roof that can be opened for ventilation. Instead of ordinary glass, you can use synthetic polymer plexiglass, which is less fragile and a little lighter. Inside such a greenhouse there are glass shelves that allow you to increase the area for growing specimens.
How to make a greenhouse for seedlings
There are almost 50 different designs from which you can build a greenhouse for seedlings. They are sold in stores, on the Internet, and some companies make them to order. Most often they are large in size, rather industrial, and it is difficult to install them on a real summer cottage. Therefore, cheaper and more compact options began to appear.
Almost 90% of summer residents use plastic bottles and tin barrels. These materials, as a rule, are available on any site, so the construction of such a greenhouse is inexpensive.
From plastic bottles
The simplest option for creating a greenhouse. It will take no more than 5-7 minutes to create. For this you will need scissors, bottles, the recommended volume is from 1 liter, but 5 liter bottles are best. Treat the materials in advance with a solution of potassium permanganate.
It is necessary to make a cut on the bottle with a knife strictly according to the height of the plant. Cut just above the neck, leaving straight edges. Treat the bottle again to reduce the risk of fungal diseases.
If you prepare only one bottle this way, then it can be considered a home greenhouse, but you can also create a larger greenhouse on your site. This will require a lot more bottles. They need to cut off the bottoms, and then string the bottles, squeezing them slightly.
Then all these bottles are stretched in two rows on a thread. The more tightly the bottles are pressed against each other, the stronger the structure will be.
From an old tin barrel
An old, broken barrel can be an excellent basis for a greenhouse. To do this, you need to make slits on the sides, and then attach polyethylene there. Fill the barrel with soil and plant the seedlings there.
Please note that the holes must be made at a level so that you can easily observe the plants and water them.
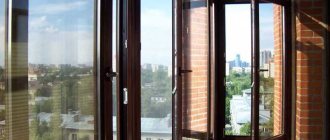
From the window frame
Creating a mini-greenhouse from window frames is very simple, profitable and convenient. There are several options:
It is necessary to make loops by which the frames will be suspended. This will make the opening/closing mechanism much better. When the doors are opened, it will be supported by a special support. This design is inconvenient if installed at home. Also, installation requires open ground and a large amount of light.
Glass transmits ultraviolet light, so most often gardeners use option 2. In this case, a window frame without glass is used, and polyethylene is stretched instead.
DIY greenhouse
What materials to make a mini-greenhouse or indoor greenhouse from depends on the size of the structure. For large greenhouses, any bookcases, shoe racks (sold at a hardware store) or a cabinet with glass doors are suitable. You can pick up a lot of blanks at IKEA. Wood blanks are convenient because they are not painted and can be coated with yacht varnish. Metal structures are not very convenient in this regard - they quickly rust from moisture. But you can use a galvanized profile.
Read also: Puff pastry that you can bake
The walls of the greenhouse can be made of glass, 2-3 mm thick, greenhouse film or transparent plexiglass.
Small greenhouses can be made from an aquarium, a transparent cake box (for seedlings), or a large plastic container made of transparent material. An option for an indoor greenhouse without any shelves is to fence off the window sill along the entire window opening from the room with a transparent greenhouse film. Between the glass and the edge of the window sill, greenhouse conditions are created for growing many indoor plants during the winter season. The film protects plants from the directed hot air of the batteries.
How to choose a suitable place for a greenhouse
The choice of location almost largely determines the effectiveness of growing plants in a greenhouse. This should be a universal place that will suit the lighting, wind direction, and soil moisture level.
If the greenhouse is installed in the wrong location, there is a possibility of complete ineffectiveness. Because of this, the level of productivity and plant endurance may deteriorate.
When choosing a site, you should focus on the following factors:
- Lighting is the most important factor. The greenhouse should not be shaded by trees or buildings. Experts note that it is best to position the greenhouse so that one end faces the west and the other faces the east.
- Wind is another item that can affect plant growth. It is best to place the greenhouse in a place that is protected from winds and drafts. It is best to place the greenhouse near a hedge or fence. In this case, the shadow will not interfere.
- Soil type, relief. It is best to choose flat terrain. If this is not possible, you will have to level the area yourself. If the soil is clayey, then first you need to add gravel to the soil, and only then fertile soil.
Try to place the greenhouse in a place convenient for you. This way you can access the plants growing there
Indoor greenhouse for growing plants
Indoor greenhouses are primarily intended for germinating seeds and cuttings for the propagation of indoor plants.
Such devices are well suited for the constant cultivation of plants in tropical climates: orchids, syningia.
Lilies of the valley, primroses and hyacinth bulbs are also grown in indoor greenhouses. In such structures it is easy to maintain the necessary humidity, temperature uniformity, and lighting conditions. An indoor greenhouse is constructed from glass and wooden frames that support the glass. It looks like a transparent house for plants, which stands on a cabinet or table on wheels for more convenient movement.
Heating, additional lighting, and an automatic temperature control relay are connected inside. Periodically, the greenhouse is ventilated and the glass is wiped to maintain cleanliness.
Biofuels in greenhouse construction
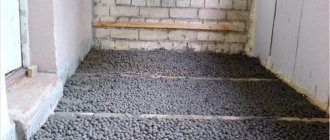
Sometimes there are situations when it is necessary to additionally insulate plants in a greenhouse. Biofuels can solve this problem. The process of such heating will be based on the decomposition of bio-additives. This heat will additionally warm the soil under the plants.
To do this, it is necessary to additionally dig a small hole when installing the greenhouse. Then the manure is mixed with straw, as well as with dry leaves. The resulting compost must be poured into the hole, watered with water, and then a fertile layer of soil must be added. And just notice you need to install a greenhouse.
Biofuel manure for greenhouse
Biofuel
Many gardeners often practice placing a heating element in the soil for a future greenhouse. Any organic material is suitable to provide heat:
- chopped stems and branches;
- manure;
- fallen leaves;
- mown grass;
- straw.
Phased arrangement:
- At the selected location, dig a trench or hole in accordance with the parameters of the mini-greenhouse.
- Fill the cavity with a mixture of organic matter to 2/3 of the height.
- Water generously and fill with fertile soil level with the ground surface. The soil layer should be sufficient for further planting.
- Install a greenhouse.
Related article:
How and with what to cover a greenhouse: 5 types of coatings and their features
During the process of rotting and decomposition of organic residues, heat will be released for accumulation inside the structure.
Preparing soil mixture for a greenhouse
The soil under the greenhouse must be structured, absorb and retain moisture well, have good air exchange, and also contain a sufficient amount of nutrients.
If the soil is poor in organic or mineral components, you can add them yourself.
Such soil can be prepared by adding individual components to the soil mixtures. Most often it looks like the following proportions:
- land with peat, manure and sawdust in a ratio of 40/40/10/10;
- earth and rotted manure - 25/75;
- earth, peat, manure – 20/50/30;
- earth with manure and sand - 30/60/10.
Preparing the soil for seedlings
Features of planting seedlings in a greenhouse
Before planting seedlings, you need to familiarize yourself with some tips:
- The soil should be warmed up to 12-15 degrees. It is not safe to plant plants in cold soil.
- Don't add too much nitrogen. Many gardeners think that the more manure, droppings or humus, the better. However, in this case, you can only get large tops without juicy, tasty fruits.
- There should be about 65-70 cm of distance between seedlings of tall crops.
- For low varieties, 20-30 cm is enough.
- The remaining medium-sized plants are planted at a distance of 35-40 cm.
It’s easy to make a greenhouse with your own hands; this design can be either portable or installed. At the same time, the time and financial costs are very minimal.