Man was created to live on the earth and cultivate it, and many of us still have a desire for gardening. The only problem is that those who live in multi-storey buildings do not have a plot of land, or it is located outside the city. You can satisfy the desire to grow fresh vegetables for your table in another way - use a loggia or balcony for this.
First of all, you need to glaze it, and then think about how to make a greenhouse on the balcony.
The main purpose of balcony greenhouses
A full-fledged greenhouse or a small greenhouse for a balcony can solve many issues of running a modern economy. Especially if you are a connoisseur of a healthy lifestyle, proper nutrition, and natural products.
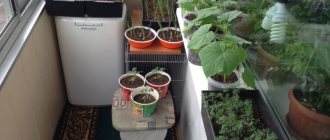
Micro greenhouse on the balcony
By making a balcony greenhouse, you can immediately solve several important problems:
- Growing seedlings with your own hands for further transplantation into open ground.
- Savings when purchasing planting material for a garden on the balcony.
- Creating a place of relaxation in an apartment with evergreen heat-loving plants.
- Possibility of growing decorative flowers, early vegetables, herbs (read more in the article “greens on the balcony”).
- Year-round consumption of natural products grown in your own garden.
- Creating a winter garden on the balcony.
The type of structure and construction technology are selected based on what vegetables, flowers, and ornamental plants will be grown in a greenhouse. Often, homeowners buy ready-made greenhouse and greenhouse installations. In some cases, greenhouses for balconies consist of several levels and boxes. Additionally, special soil is purchased and a light source is installed.
Heating the loggia plays an important role. All this must be taken into account if you decide to create a greenhouse or greenhouses for a balcony with your own hands.
Options for balcony greenhouses
A glazed and especially insulated balcony is a greenhouse in itself. There is no need to equip it with additional film-coated structures. To grow plant seedlings, shelf structures placed along the walls or in other convenient places are sufficient, so that they do not block free passage.
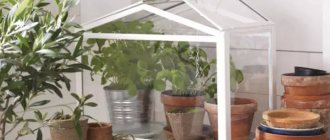
Ready-made balcony greenhouses for seedlings and growing greenery
What kind of greenhouse can be installed on a loggia?
Equipping a greenhouse on the balcony with a film or other cover is required only for open loggias.
Greenhouse options:
- portable with film coating;
- stationary structures made of wood, metal corners, pipes;
- collapsible polycarbonate structures.
Vertical polycarbonate greenhouse
Each of these structures can be made independently and used either only at a certain time of the year - in the spring for growing seedlings, or throughout the entire spring-autumn period for growing flower or vegetable crops.
Portable greenhouses with film coating
Greenhouse-torpedo under agrofibre
Buying a greenhouse for seedlings on the balcony is not difficult. This is the most mobile and simple design. Commercially available modifications share a number of advantages:
- ease of construction;
- ease of assembly;
- resistance to corrosion;
- mobility;
- maintainability;
- small amount of storage space in winter.
The frame of mobile greenhouses with film coating consists of thin-walled steel or aluminum pipes, painted with enamel or coated with a polymer material. The elements are fastened using molded plastic brackets or bolts.
Film greenhouse with metal frame
The greenhouse cover is a polyethylene film equipped with zippers or Velcro fastening strips. Easy opening of either side of the greenhouse guarantees good ventilation and the absence of excess moisture.
Some models of mini-greenhouses may have electrical equipment for drip irrigation and plant lighting. The presence of such automation significantly affects the cost of a mini-greenhouse.
Ready-made greenhouse with ventilation
Advice! It is better to buy a greenhouse for seedlings on the balcony without additional equipment. If necessary, you can install the “bells and whistles” yourself and much cheaper.
Miniature portable greenhouse
How are greenhouses different from greenhouses?
Gardeners use two types of greenhouse structures - greenhouses and greenhouses. Similar pieces of furniture for growing seedlings are used on loggias. Their main task is to create optimal conditions for certain types of crops, protect plants from climatic temperature changes, and grow vegetables and herbs that are not adapted to a particular area.
Greenhouses are small racks with simple installation, covered with glazed window frames and frames with polyethylene. Their height is small. Heat enters the greenhouse from the sun and fertilizers scattered inside.
Other features include:
- rapid heating of the air due to its small size;
- relevance of use for growing early crops;
- germination of strong seedlings before transplanting into open ground;
- the possibility of year-round cultivation of greens (spinach, sorrel, arugula, parsley, dill, etc.);
- lack of heating;
- design mobility;
- ease of installation and manufacturing;
- minimal costs when creating a greenhouse with your own hands;
- relevance of use in spring.
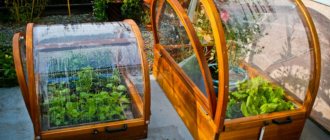
Greenhouses began to be used by gardeners before greenhouses. The prototype of such an outbuilding is a greenhouse. Modern designs are covered with polyethylene film. A durable frame can be plastic, wood, or metal. Polycarbonate and spunbond are also used as alternative materials.
Mini greenhouse for loggia
Other design features include:
- expanded functionality (can be used both for germinating seedlings and for year-round cultivation of crops without transplanting into open ground);
- large sizes, variety of configurations (height up to 5 meters, industrial greenhouses can be even higher);
- obtaining heat from sunlight, artificial light sources, heating can be electric or water, which is important when growing exotic crops;
- the ability to use automatic installations to maintain the required soil moisture, air temperature, etc.
As a rule, greenhouses are designed for growing plants with a full development cycle (from seed germination to harvesting). A solid foundation is pre-organized.
We organize a greenhouse for the balcony with our own hands: a greenhouse without leaving home
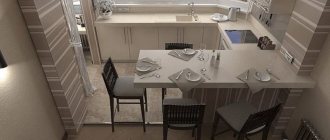
If you want all your plants on the balcony to be in one place, then a greenhouse is simply an indispensable assistant. A balcony is an excellent place to create a greenhouse or greenhouse in an apartment. Many gardeners prefer this particular room to grow flowers or seedlings. This option is especially suitable for residents of cities who do not have their own garden plots.
How to properly prepare a place for a greenhouse on the balcony
To create a greenhouse on the balcony, you need to take into account several nuances.
If your balcony is located on the south side, then you are very lucky: the plants will receive enough heat and nutrients
Things to consider:
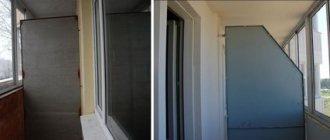
- Make the room glazed. Therefore, people who had an open balcony should take care of installing double or even triple glazed windows.
- Measure the air temperature regularly. This way you can easily set the temperature.
- You need to make sure that the plants receive enough sunlight. In autumn or winter, it is advisable to add additional lighting to the room.
- It should be remembered that all plants need fresh air, so the balcony must be ventilated.
- And the last important factor for creating the right conditions for a greenhouse is to regularly monitor the soil moisture. By the way, there are many stores specializing in the sale of humidifying structures and materials for making a mini-greenhouse yourself. One of them is the online store – Leroy Merlin.
If the balcony faces the north side, then it is considered the coldest part of the apartment, so for such a room it is recommended to carry out additional insulation.
Balconies located on the east side are considered an excellent place to create a mini-greenhouse. In the mornings, they receive a lot of light, and this has a beneficial effect on plant growth. However, here it is necessary to provide sufficient ventilation and additionally make a little darkening.
When the greenhouse is planned on the west side, you don’t have to worry about the heat of the room. Here the setting sun will support it perfectly.
Such balconies are very well suited for growing plants in greenhouses or greenhouses.
It is better not to organize a mini-greenhouse on open balconies: the result will be much better on a closed balcony
As for the south side, this option for creating a greenhouse is undoubtedly the most optimal. After all, all the flowers and seedlings on this side always receive the amount of heat and sunlight that is necessary, although there must be good ventilation here.
Greenhouse in the interior of a balcony (video)
Advantages of mini-greenhouses and greenhouses
Such buildings for growing plants are distinguished by their compact sizes, for example, some have 4 shelves (about 50x50x157cm), while others have 6 shelves. But in any case, having chosen the required option, there will be no problems with assembling it on your own.
Mini-greenhouses stand out due to their positive reviews among consumers. They are distinguished by their accessibility and practicality. After all, a gardener can grow a large number of plants, despite the small space of the balcony.
The building itself is most often represented by racks, which are equipped with a special transparent film.
You can quickly install the structure and also dismantle it. Moreover, another advantage of a mini-greenhouse is its compactness. When assembled, it takes up little space and is relatively light in weight (maximum 5 kg).
It is not necessary to purchase a mini-greenhouse in a store: you can make it yourself at home
Today, various greenhouses can be purchased in gardening stores. The frame on which the polyethylene covering is fixed is sold disassembled. Moreover, these structures also provide for plant care; for this purpose, the canvas on one side of the building can be folded back, which is indispensable for watering them.
The greenhouse on the balcony is distinguished by its aesthetics and attractive appearance. After all, with its help, all seedlings and ornamental plants will be placed in a structured manner in one place. Undoubtedly, such a solution for decorating a balcony is much better than storing flower pots on window sills.
Types of greenhouses for apartments
Do not forget that such structures are a smaller copy of a large greenhouse. They often have a metal frame covered with film. The most popular today are greenhouses with 3 shelves (50x70x127cm). Many people use this option as a greenhouse or to decorate a balcony.
There are mini-greenhouses:
- Mobile . They have several tiers and come in different sizes. Greenhouses are easy to make with your own hands, but such buildings provide only the desired temperature regime. The gardener must take care of ventilation, regular watering and additional light.
- Automated . With the help of a special automated system, all processes necessary for plant growth are regulated. This greenhouse is often used in different rooms, and it has a function for automatically installing lighting suitable for the plant. The size of the greenhouse is approximately 4 square meters, and when using such greenhouses, the gardener’s work is limited only to planting seedlings.
An automated greenhouse is more expensive than its mobile counterpart, but by purchasing such protection for plants, you will lose many hassles and worries.
Some people prefer to decorate the balcony with a showcase greenhouse. The building is represented by an autonomous structure, which must be covered with transparent material. It has an open part – the façade area.
Here a rack corresponding in size to the window opening is assembled, and plexiglass shelves are installed. You can install a light bulb above this structure.
Many gardeners prefer to make a greenhouse for the balcony themselves rather than purchase it in stores. But how to make such a building?
Proper production of a greenhouse for a balcony
Before starting work, it is necessary to make a drawing of the future structure. It will give the exact dimensions of the greenhouse.
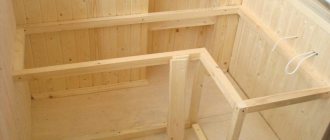
To make a wooden structure, you need to use boards and nails. With their help, a rack is made; it should be put together taking into account the dimensions given in the drawing.
Please note: How to remove the battery to the balcony: sequence of actions
The most durable and high-quality material for a greenhouse is reinforced polyethylene
The next step is to attach transparent polyethylene to the back of the greenhouse. It is better to use a special stapler, as well as staples. Some people prefer glass instead of film. The choice depends on the preferences of the gardener.
It is advisable to install at least one lamp (fluorescent) on each shelf; with their help, the plants will receive the right amount of lighting and heat. Similar material is sold in many stores, so purchasing them will not be a problem.
After the above work, you should start planting the necessary plants. Experienced gardeners recommend soaking the seeds and preparing the soil for planting.
At the bottom of special boxes, sand is placed in layers first, then drainage and finally soil. To get rid of mold, you can use ash, mix it with sand. To provide additional soil fertilization, some people prefer to use minerals.
When the soil is ready, all that remains is to plant the seeds in the prepared boxes and then place them on the greenhouse shelves. On average, one rack can accommodate up to 10 boxes in which the seeds will grow, although the capacity of the greenhouse depends on the number of shelves, as well as on its height.
All that remains is to attach film or glass to the front of the rack; this will help ensure the desired air temperature inside the structure. By the way, some people, on the contrary, leave this part of the building open, which happens in cases where the lamps can provide the conditions necessary for the growth of seedlings inside it.
How to make a mini-greenhouse for seedlings with your own hands (video)
So, a greenhouse on the balcony will be an excellent place for growing any indoor plants. Due to their compact size and ease of use, many gardeners prefer such structures not only for growing seedlings, but also for creating a real living corner in this part of the house.
The process of making a greenhouse for an open balcony
On open loggias, standard construction technology is used on the principle of outdoor greenhouse structures. First, a detailed drawing of the future greenhouse on the balcony is created, and a frame is made. And only after this a reliable shelter is created.
Instead of a self-made structure, you can use factory models that look like a profile shelf covered with thick polyethylene. But it is cheaper and more profitable to make greenhouses for the balcony with your own hands, taking into account individual sizes.
Preparation of the drawing
The first thing you need to pay attention to is the sketch of the future bookcase. First, the dimensions of the room are measured and the location of the greenhouse is determined. When planning and sketching a drawing, the following important points are taken into account:
- the location of the greenhouse for growing seedlings and cultivated plants should be convenient for loosening the soil and watering;
- exact dimensions, which will affect the durability of the rack or one-story greenhouse;
- compact and ergonomic design that does not create problems when using the loggia for other purposes, for example, drying washed clothes;
- creating a competent drainage system and installing trays, which in case of excessive watering will prevent water from reaching the neighbor’s loggia;
- freedom of movement for the safety of any work;
- stability of the greenhouse structure to prevent injury and damage to carefully grown plants.
A suitable place for a greenhouse on a loggia would be the far corner.
If you plan to use the open area exclusively for growing vegetables, then the greenhouse can occupy a large area with rational use of the ceiling and floor. For example, you can grow arugula on a loggia and other greens if you use a multi-tiered greenhouse structure. And for seedlings of vegetable crops, single-tier greenhouses are preferable.
Frame manufacturing technology
For the frame, a metal profile, plastic pipes, and wooden beams with low thermal conductivity are often used.
The simplest version of a greenhouse design
Conventionally, the production of a frame base can be divided into the following stages:
- Two frames are made from profiles, pipes, bars with a cross-section of 4 cm, which will serve as side parts.
- The arrangement of transverse bars at equal distances, which will become the basis of the shelves.
- Connecting frames with horizontal crossbars of the established width of the greenhouse.
- Strengthening the crossbars at the level of the transverse bars of the side frame elements.
- Laying slats for shelves where boxes with seedlings, herbs, flowers, etc. will be placed.
After this, the greenhouse is installed on the loggia (pre-prepared place). The floor is pre-leveled so that the structure is stable (read more in the article “how to level the floor on a balcony”).
Creating a Shelter
It is better to use film as the main covering material. A special cover is cut out that easily fits the frame. To do this, the pattern is increased by 3 cm (tolerances on each side). The front fabric is made of two layers. The structure is connected with a zipper, simplifying access to the plants. All parts are connected with tape or stitched.
Greenhouse made of plastic pipes
Polycarbonate is used by gardeners and plant growers to create fixed parts of film shelter. For example, for the back wall and side parts. The very principle of manufacturing protection does not change. The front sheet film is attached to the polycarbonate parts with double-sided tape.
How to install a stationary mini greenhouse on a loggia
Equipping a comfortable greenhouse with your own hands opens up a unique opportunity to safely grow any crops on your balcony - vegetables or berries, exotic plants.
To construct a greenhouse with opening doors, you will need to stock up on thin boards, wooden blocks, and metal hinges. Glass will be needed to make the sashes, but it is safer to replace it with polycarbonate. Do not forget about fastening elements (screws, corners, nails), as well as thermal insulation material (if desired).
Frame installation work
- Taking into account the planned dimensions, cut the bars. They will be needed for the base frame of the future greenhouse, as well as the doors and lid.
- Make a frame for a floor box from the bars and attach a solid bottom made of boards to it.
- Mount 4 vertical posts (two on each side) on a locally installed wooden box.
- Make shelves of the required size and quantity from the boards; they will be inserted into the grooves equipped on the racks.
- Cover the greenhouse structure with the prepared lid, fixing the joints with corners, and hang the doors on their hinges.
Preparing the cover, installing the doors
To make the lid and side walls of a home mini greenhouse, stock up on plastic film. Experts consider reinforced polyethylene sheets or cellular polycarbonate sheets to be the most durable, high-quality material.
How to build a cover:
- If polyethylene is chosen, a panel prepared to size is attached to the top of the greenhouse structure. The film is secured to the wooden frame with staples using a construction stapler. The front panel should be opening, similar to the mobile version of the greenhouse.
- When choosing polycarbonate to cover a stationary greenhouse, the front surface is made of rigid material, similar to hinged doors. Blanks are cut out of sheet polycarbonate according to the dimensions of the front perimeter, and they are attached to the frame beams with a special tape.
Creating a greenhouse on an insulated balcony
The insulated glazed loggia itself acts as a greenhouse, so there is no need to build auxiliary balcony greenhouses. The entire room is dedicated to growing seedlings, vegetables, and flowers on the loggia.
Greenhouse on a balcony with high glazing
With panoramic glazing of the balcony, you can make a greenhouse structure directly on the floor. It is on this that the boxes with plants will be placed.
It is important to initially create a reliable waterproofing layer of the floor covering (read more in the article “Waterproofing the floor on a balcony”).
The procedure for constructing a greenhouse will be as follows:
- Creating a small elevation on top of the concrete balcony slab (10-15 centimeters).
- Construction of a pedestal taking into account the width and length of the “beds”.
- Manufacturing a wooden frame, the height of which should not exceed 30 centimeters.
- Drill holes from the front of the frame and maintain a distance of 40 cm. The diameter of the holes at the bottom should be approximately 2.5-3 cm. This will be a drainage system with drains.
- Laying waterproofing material on top of the cement. An excellent option is roofing felt covered with polyethylene.
- Installation of tubes in the drain holes, sealing the joints with sealing material.
- Laying out drainage materials in boxes. The layer is approximately 10 cm. For this, crushed brick, expanded clay, and coarse sand should be used.
- Filling with soil suitable for the crop being grown.
The rest depends on the destination.
If you are making a greenhouse structure for vegetables, then sowing the seeds is done in early spring. The emerging sprouts with leaves are plucked and planted. Caring for plants is no different from what is used when growing in open ground.
Greenhouse on a loggia with parapet glazing
Panoramic glazing of a loggia is not as common as parapet glazing. A greenhouse for this type of balcony is built slightly higher so that sunlight penetrates the plants. The structure rises to the level of the window sill. This is done quite simply.
A frame is made in the form of a table, which should be 30 cm below the window sill structure. The width and length of the product will depend on the size of the intended bed.
Metal or wooden beams are used as the starting material. The frame is equipped with a plastic box up to 30 cm high. The lower part is drilled. The holes made will serve as water outlets for drainage. The bottom is covered with film. The holes are equipped with plastic tubes and are reliably sealed. Since the loggia is warm, this allows you to grow delicious vegetables and herbs all year round.
The main thing is to optimize lighting and temperature. Fluorescent lighting technology that emits heat is suitable for organizing artificial light.
How to properly organize watering and lighting
Seedlings of some types of vegetables or exotic plants cultivated on the balcony may suffer from a lack of daylight. To achieve maximum illumination, you will have to install artificial lighting, choosing the most suitable system.
Optimal lighting option
Winter and early spring are a period when the plants of a greenhouse located on a balcony do not have enough lighting for full development. The problem will be solved by choosing LEDs as the most economical option for additional lighting. LED devices allow you to create your own lighting of the desired spectrum by combining color shades. Using a phytolamp with a set of LEDs, it is possible to adjust the lighting power taking into account the area of the greenhouse plantation.
Choosing a watering method
Drip irrigation scheme.
In addition to favorable lighting, young seedlings need constant moisture. When watering by hand, you will have to follow certain rules so as not to break the still weak shoots. A more convenient and safe method of irrigation will be a drip system, which will save time in caring for the inhabitants of the greenhouse.
Explanation. The main advantage of drip irrigation is the automation of the irrigation process without the influence of the human factor. Water, enriched with the required composition of mineral fertilizers, is supplied directly to the roots of plants, without moistening the leaves and soil.
On the balcony, you can build a drip irrigation system for a small greenhouse yourself. To implement the idea of manual watering, a container of water is placed above the seedlings. You can automate the process of moistening the soil using a small pump immersed in liquid. In the space of the glazed loggia you will successfully combine a relaxation corner with a place for growing not only flowers and seedlings, but also vegetables and berries.
Purchased mini greenhouses
If the homeowner does not have the time or desire to build a greenhouse structure on their own, you can buy a ready-made option for your home. Mini greenhouses for balconies can be placed in any convenient place due to their compact size.
The advantages of such designs are obvious:
- compact size, ergonomics;
- ease of installation, assembly and dismantling;
- low cost of products;
- the ability to grow several types of seedlings in a small area;
- mobility of structures.
Mini greenhouses can be used not only for germinating seeds, which, after the emergence of strong seedlings, will be planted in open ground, but also for growing heat-loving decorative flowers and arranging a winter garden on the balcony. In the summer, mature crops can be placed on the windowsill.
Features of mini-greenhouses
Such structures are built like shelving, covered with a transparent greenhouse film. They often have several shelves designed to accommodate boxes and pots. In warm weather, greenhouses are dismantled. When assembled, such a rack does not take up much space.
Advantages of portable greenhouses with film coating
The convenience of a home mini greenhouse is the compactness and lightness of a small structure. The structure, purchased at a low price, is not difficult to assemble, and if desired, you can make it yourself. The presence of several shelves on larger racks allows you to conveniently place different types of plants or seedlings, and dismantling the shelf for the summer season is not difficult at all.
What vegetables can you grow on the balcony?
When you want fresh greens in winter, or you simply don’t have a summer house with your own garden, grow vegetables and create improvised beds on the balcony, building a special greenhouse or hotbed.
The following vegetable crops are suitable for growing on a glass loggia:
- Cucumbers growing quite quickly (7-9 weeks) after planting. An inexperienced apartment owner can easily cope with this task. The main thing is to find recommended cucumber varieties. Any self-pollinating early ripening hybrids are suitable for a balcony garden. They must be shade tolerant. Such varieties as “Marinda” F1, “Masha” F1, “Connie” F1, “Debut”, “Gribovchanka”, “Babylon” have proven themselves well. Read more in the article “Cucumbers on the balcony”.
- Hybrid tomatoes suitable for home gardening. Tall varieties are not suitable for a loggia. But low-growing varieties, for example, “Balcony Miracle”, “Alaska”, “Japanese Indoor”, “Bonsai”, “Pinocchio” tomatoes are suitable for growing on a windowsill in a constructed greenhouse. Preference should be given to small-fruited tomatoes.
- Eggplants are another great option for balcony growing. Preference should be given to low-growing and medium-growing varieties. For example, “Slim Jim”, Red Ruffled, Mixed Patio. You should immediately take germinated, strong seedlings, since growing from seeds is not an easy, time-consuming undertaking, and requires a lot of experience. Eggplants on the balcony, the cultivation of which requires a “gardener,” turn out tasty, receive enough light and do not burn like in a regular garden bed.
- Sweet bell pepper . The southern juicy vegetable takes root well in balcony greenhouses. Perennial plants will delight you with ripe fresh fruits for 2-3 years. For growing peppers on the balcony, early-ripening universal hybrids with self-pollination are more suitable. For example, sweet pepper varieties “Patio-Ivo”, “Oda”, “California Miracle”, “Swallow”, “Winnie the Pooh”.
- Broccoli is a heat-resistant vegetable that thrives in warm greenhouses. And the fruits look quite aesthetically pleasing if grown on a windowsill next to flowers. But not all varieties are suitable for a balcony garden. For growing broccoli on the balcony, the “Vitamin” and “Tone” varieties are suitable. Early ripening vegetables are famous for their high yield.
Also, on a glazed or open loggia with a constructed greenhouse, you can grow hot peppers, carrots, beans, peas, zucchini, and beets. The main thing is to provide the cultivated plants with optimal conditions. Many people prefer to buy ready-made seedlings right away.
But it happens when summer residents germinate seeds in balcony greenhouses for further planting of strong seedlings in open ground. In this case, you should use simple recommendations for organizing this process.
Preparing the site
The first step is to prepare the area on the loggia or balcony. It is better to immediately install windows with double triple glazing to maximize insulation of the area.
After installing windows, it is recommended to control the temperature. It is important that the plants get plenty of sunlight and do not get frostbite in the winter. After all, our winters are frosty, but I want to see a blooming garden all year round.
In addition to the temperature regime, it is important which side the balcony faces. Since not all plants will grow well on the east side. Too much sun heat can be harmful. Therefore, it is better to think about the possibility of shading the greenhouse, as well as provide ventilation.
Balconies on the west or south sides are ideal for creating a greenhouse, greenhouse or greenhouse.
In autumn, when it begins to get dark early, the greenhouse requires additional lighting. Fortunately, in modern times there are no problems with lighting. There is a huge selection of different artificial lighting options, such as phytolamps and others.
Imitation of daylight cannot replace natural lighting and fresh street air, so you should not get carried away with artificial lighting. It is advisable to consider the possibility of regular lighting and ventilation of the room.
Another important point when preparing a room for creating a greenhouse is humidity. In hot weather, plants should not need moisture. There are many special designs for automatic watering, air humidifiers and other devices that make the life of gardeners easier.
How to grow seedlings on a heated and unheated balcony
If the room is heated, you should make a convenient rack (read more in the article “how to make a rack on the balcony with your own hands cheaply and beautifully”), where you will place boxes with soil for germinating seedlings. Manufactured or purchased containers are covered with a film on top, which is removed after germination. Watering, lighting, complementary feeding, and temperature are selected taking into account the characteristics of the crop being grown. Difficulty may arise when a glazed heated loggia faces the north side. In this case, you will have to make lighting on the balcony (lights with fluorescent lamps).
If the loggia is not heated, then you will have to pay special attention to temperature conditions. In order for the seeds to germinate, containers with seed material are first kept in a heated living room. As soon as the seedlings appear, they can be transferred to the loggia. The second solution is to create a greenhouse with optimal temperature conditions. The emerging shoots, together with the boxes, are moved into a constructed shelf under polyethylene or a purchased mini-greenhouse.
The main thing is that the shelter is reliable and retains heat well. A fluorescent lamp is hung above each seedling. If necessary, the greenhouse is ventilated.
Homemade garden bed with arugula and spinach
Arugula on the balcony
The caterpillar plant (also known as arugula) is a type of plant in the cabbage family. Gourmets eat the fleshy and jagged leaves. The piquant taste is appreciated by chefs all over the world. So, having such a culture at home is not a bad idea. Its peculiarity lies in its almost 100 percent germination, which makes it stand out against the background of basil and parsley.
The most suitable varieties are “Rocket”, “Rocco”, “Poker”, “Euphoria”, “Sicily”.
How to grow arugula on the balcony:
- Choose well-lit window sills (which is important in the summer). In winter, you will have to take care of additional lighting for the balcony greenhouse.
- Getting a rich harvest is possible only from May to September. It is recommended to plant new portions of seeds on the loggia at intervals of two weeks.
- Use fertile soil - ready-made substrates for growing seedlings, universal soil mixtures.
- Water the beds regularly. If there is not enough water, the vegetation will be disrupted along with the nutritional value of the arugula leaves.
Any boxes, pots made of plastic or wood can be used as containers for planting. The soil layer should reach 15 cm. Before planting the seeds, special holes are made in the soil. The distance between the rows should be about 3 cm. The buried seeds are sprinkled with a layer of fertile soil.
Arugula on the balcony will delight the gardener with the first shoots after 3 days. The first week it is worth spraying the soil with a spray bottle.
A simple greenhouse made of arcs under film or spunbond
It also makes sense to secure a block on both sides along the edges of the film. To do this, the film is cut to a length greater than necessary, a block is wrapped in the excess and the film is secured to it. Now you have a piece of film with bars attached to its short sides. Leave one on one side, throw the second on the other. Now you don’t need to press the film to the ground with stones: the block holds it well. It is also convenient to open the greenhouse for ventilation; wrap the film and place it on top.
The mini-greenhouse is not suitable for most loggias and balconies.
How to secure the arches
Take a piece of paper and write down what additional parts you will have to buy: lamps, a water tank, a mat for additional heating.
Cover the boxes with seedlings.
Note: The main advantage of such a greenhouse is that the optimal microclimate is maintained automatically. The system is configured to supply nutrients, water and turn lamps on/off.
Most often you want fresh herbs, vegetables and fruits when it’s frosty outside. Let's look at how to make a mini greenhouse right at home. In addition to vegetables and fruits, you can grow flowers in it, which will pleasantly please the eye.
Using plastic pipes to create a greenhouse
Oddly enough, plastic pipes are simply ideal for making a greenhouse for a balcony. When used in this way, plastic will have a number of advantages:
- All structural elements can be purchased at a hardware store;
- Plastic is resistant to a variety of weather conditions, rotting and corrosion, so the design is guaranteed to be durable and have a good appearance;
- The plastic is very light, so no extra load will be placed on the load-bearing tiles of the balcony;
- The average assembly time for plastic paint for a greenhouse is 1-2 hours.
Some difficulties may arise when welding plastic pipes and attaching them to each other. This issue can be solved in three minutes by watching the video below: “Connecting pipes without a soldering iron.”
Shelves in a greenhouse can be made from any materials that are available, but the best option is to purchase special plastic trays designed for planting plants that will look great in a plastic structure. The shelves can be secured using conventional fittings.
Almost any structure can be assembled from plastic pipes.
What are the requirements for greenhouses?
By choosing the right greenhouse or greenhouse, you can turn your balcony into a full-fledged vegetable garden. It has been experimentally verified that even on a small balcony of a high-rise building you can grow from 150 to 200 plants at the same time.
To make a greenhouse or mini-greenhouse on the balcony with your own hands, you need to take into account a number of factors:
- Frame dimensions. Large loggias and verandas allow the installation of voluminous structures, but on a typical city balcony of 3 m² there is not much room to expand, so preference should be given to mini-models.
- Product form. If there is not enough space for the standard option, you can consider vertical models designed like cabinets. A large number of shelves allows you to place many containers with plants, while using a minimum of space.
- Frame material. Despite the lack of wind, the base must be strong, since the total weight of pots and containers with soil can reach hundreds of kg.
- Covering material. The main qualities of film, glass or polycarbonate, which are most often used for the manufacture of greenhouses, are transparency and tightness.
If you plan to increase the efficiency of growing crops, then when drawing up the project you need to think about the installation of artificial lighting, ventilation or irrigation.
In winter, the vacated greenhouse shelves can be occupied by heat-loving indoor plants
Dacha owners should take a closer look at mobile models that can be easily disassembled and transported. If necessary, they can be quickly transported to a dacha or village.