In old rooms, finishing ceilings to perfect smoothness is difficult and expensive. Differences between floors and crevices may be too large to be sealed with building mixtures. Such repairs will take a lot of time and effort. The problem will be solved by an Armstrong-type suspended ceiling. This type of finishing has many advantages and few disadvantages. And although the installation of the system seems complicated at first glance, it is actually carried out quite quickly. The main thing is to carefully study the manufacturer’s instructions and advice before starting work.
What does the Armstrong ceiling consist of and what does it look like?
This type of finishing appeared a long time ago - the prototype was created back in 1960. It was invented by Thomas Morton Armstrong. Mounted structures of this type are also called modular, cassette or raster.
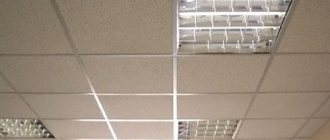
Armstrong is a system of metal slats that form rectangular or square cells into which panels are inserted. The supporting part is attached to the main ceiling, and can be partially visible or completely hidden. In the second case, it seems that the slabs are attached directly to the ceiling. The location of the structure is adjusted by the height of the suspension.
Armstrong ceilings are suspended. The difference is in the method of attaching the frame. In this case, the load-bearing elements are fixed on the base plane, forming a minimum gap. This finishing method is used if the condition of the ceiling is not critical, and there are no communications under it that need to be hidden.
Armstrong ceilings have a simple design and consist of five main elements:
- Hangers - used to attach the frame to the ceiling.
- Guide corners - mounted around the perimeter of the room.
- Transverse and load-bearing profiles form a base in the form of a lattice for mounting panels.
- Panels (cassettes) - inserted into frame cells.
- Lamps and ventilation grilles - have a cell size and are placed in a section between profiles in the same way as panels.
Preparatory work before DIY installation
Before installing the ceiling, Armstrong prepares the room. To do this, furniture and other items are taken out of it to ensure free movement around the room and access to any part of it. In addition, tools and materials are prepared.
Required Tools
The following tools are prepared to perform the work:
- a hammer drill, it is needed if the walls and ceiling are concrete, in other cases a drill is used;
- bubble level, but laser level provides greater accuracy;
- screwdriver or screwdriver;
- hammer;
- roulette;
- construction pencil;
- pliers or pliers.
To perform the work you need a hammer drill.
In addition, you will need nails, screws, dowels, and connectors.
Advantages and disadvantages
Armstrong ceilings have many advantages over other types of finishes:
- low cost - from 205 rubles/m2, including frame;
- perfectly flat surface;
- masking imperfections in the base ceiling without expensive and time-consuming repairs;
- the ability to use any number of lamps;
- quick and simple installation, especially if the work is performed by professional craftsmen;
- variability: thanks to suspended structures, surfaces with different geometries are created - inclined, curved, multi-level;
- hiding utility networks, height correction;
- ease of maintenance: if you need to repair communications, you do not have to dismantle the entire finish - just remove a few panels;
- versatility: you can combine structural elements of the system from different manufacturers.
- variety of design: it’s easy to choose an option for any interior style - classic, industrial, modern, minimalism, etc., colors, texture, texture;
- low weight of the structure;
- maintainability: damaged slabs can be easily replaced with new ones, without dismantling the entire coating;
- practicality: systems are installed in buildings with increased requirements for hygiene, sound insulation, fire safety, acoustics;
- savings: thanks to high light reflection and thermal insulation, it allows rational consumption of heat and electricity.
The disadvantages of Armstrong ceilings include:
- reducing the height of the room by 8–10 cm;
- low moisture resistance of most panels;
- some design limitations;
- low strength of the classic ceiling;
- questionable environmental friendliness (formaldehyde may be used in production).
Advantages of Armstrong ceiling panels
If we consider the main advantages of the finishing material, namely Armstrong slabs, we can highlight the following points:
- this building material is ideal for all premises, regardless of size and total area;
- due to the fact that the tiles are light in weight, you can avoid unnecessary load on the base of the structure for installation;
- it is possible to hide all existing defects on the ceiling surface;
- Armstrong ceiling tiles are excellent for those rooms where it is necessary to hide the communication system from prying eyes - electrical wires, ventilation system, hood, cables and much more; in addition, if there is a need to carry out repair work, it will be enough to remove one element without disassembling the whole design;
- if there is damage to one or more elements, there is no need to disassemble the entire ceiling;
- installation does not require special knowledge or construction tools;
- Thanks to the wide product range, it is possible to choose the appropriate option of the required size;
- a wide range of textures and colors allows you to choose finishing materials to suit any design style;
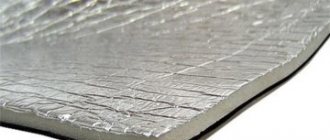
- in the space that is formed between the main surface of the ceiling and the tiles, insulation can be installed if necessary;
- excellent for finishing rooms with high humidity levels;
- Modern products are quite easy to care for; in addition, they do not attract dust;
- All products undergo mandatory certification for compliance with quality standards.
During operation, Armstrong slabs do not fade under the influence of direct sunlight, maintaining their original appearance.
Specifications
When choosing Armstrong ceilings, pay attention to the following indicators:
- Light reflection - in some models of slabs the level reaches 85%, which allows you to save up to 25% of electricity on lighting. Smooth white slabs Plain, Retail Board, Scala Winter reflect light best.
- Sound absorption means the transformation of sound energy into thermal energy (divided into classes A - E). The highest indicator is characterized by low-density OR slabs;
- Thermal conductivity - 0.056 W/m*°C.
- Sound insulation (sound distribution) - reduces sound transmission between adjacent rooms by 43db. Acoustic ceilings are especially effective.
- Moisture resistance - 70-99%. For rooms like the kitchen and bathroom, panels with an indicator of at least 95% are chosen. This ceiling does not deform and remains flat. Duna Supreme, Newtone, Bioguard panels have increased resistance to moisture.
- Fire safety - from KM0 to KM3. Their use depends on the class of the room. Ceramoguard and Newtone products are completely non-flammable and are installed even on escape routes.
- Air permeability - there are two classes of products: A (high) - up to 25x10-3 kg/m² hour Pa and B (low) - more than 25x10-3 kg/m² hour Pa.
Most technical characteristics are indicated in the panel certificates.
Criterias of choice
When purchasing such a suspended ceiling, take into account the following parameters:
- Thickness of tiles. The most commonly used plates are 12 mm thick. Reducing this indicator reduces the cost, but negatively affects performance. A thin plate will sag under its own weight, therefore ruining the appearance of the ceiling. Products in the mid- and premium price range have a thickness of 15 mm or more.
- Size. Tiles of 60x60 cm are considered standard. At the request of the customer, plates with other dimensions are made.
- Texture. For general purpose rooms, smooth plates or those with random embossing are suitable. When installing them, they do not select a pattern. Depending on the design of the room, matte, glossy, perforated and other modules are chosen.
- Price. Economy class includes cheap, but not always high-quality products from Chinese manufacturers. European brands such as Armstrong, Rockfon produce inexpensive, good quality products, as well as mid-price and premium products.
In what rooms is it recommended to install
Armstrong tiled ceiling can be used in almost any building. The scope of their application is determined by the properties of the panel material:
- in swimming pools, hospitals, baths, warehouses, terraces, laundries - moisture resistant;
- in restaurants, clinics, hotels, auditoriums and concert halls - acoustic;
- hygienic - for medical institutions, kindergartens, catering units, etc.
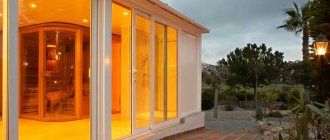
This type of finishing is also found in residential premises - most often in the bathroom, but it is also installed in the kitchen and balcony.
What about the disadvantages?
It would be great to consider a suspended ceiling structure to be ideal, but it is not. It does have a few drawbacks:
- No floods. If in an office the probability of flooding is minimal, in a private apartment it increases significantly. Even moisture-resistant boards are not able to stop the flow of water. Thus, if dubious neighbors live above you, and you are not sure of the quality of their plumbing, you will have to look for an alternative. For example, a slatted ceiling or even a cassette ceiling.
- No temperature changes. When the room temperature fluctuates, this does not have the best effect on the durability of Armstrong slabs. Mineral slabs quickly deteriorate and can even change color from snow-white to yellowish. By the way, this also applies to changes in humidity.
- No hits. It is enough to open the champagne unsuccessfully once - and a characteristic mark will remain on the stove. Armstrong slabs do not like sharp shocks and impacts. In this case, we recommend keeping 3-4 stoves in reserve in the house. So, just in case, fireman.
Types of slabs
Plates for Armstrong suspension systems are made from different materials:
- mineral fiber;
- PVC plastic;
- wood;
- gypsum;
- metal (rack, mesh, Grilyatto, cassette);
- glass, mirrors (design systems).
Mineral panels are made from clay and mineral wool. Additionally, various additives are used - starch, gypsum and others. Another component is latex, it determines the water resistance of the panel. Minslabs can be soft or hard. The second type is more resistant to mechanical stress.
You can choose not only the material of the plates, but also the color, up to black, golden, chrome, etc. The textures are different - matte, glossy, satin, with an embossed surface, reminiscent of decorative plaster, etc. Acoustic models have perforations of different diameters.
Texture Features
The slabs have the following choice of textures:
- with embossing;
- with perforation;
- general geometric pattern on the entire ceiling;
- additional decorative elements.
The plates come with embossing and perforation.
Perforated modules are well suited for different rooms. They look beautiful and are inexpensive, and this is often important when arranging medical, public and other buildings.
Dimensions of plates and types of components
For raster ceilings, square and rectangular panels with an aspect ratio of 1 to 2 are produced in several standard sizes:
- 600x600 mm;
- 1200x1200 mm;
- 600x1200 mm.
By agreement with the customer of the Armstrong ceiling, the dimensions of the tiles may differ from the standard ones.
The panels come in different heights - 7, 12, 14, 15 mm. The thermal insulation characteristics depend on this parameter: the greater the thickness, the warmer. The choice is determined by the dimensions of the room: the more spacious it is, the more massive the slabs and the heavier the frame. The systems use rectangular slats (slats) measuring 300x1500 cm, 300x2500 cm.
The slabs are produced with several types of edges, which determine the parameters of the suspension system.
| Edge name | Form | System parameters |
| Board | Rectangular (height 12, 14, 15, 19 mm) | 24 mm |
| Tegular | With step (step height 6.5 mm, total edge height 14, 15, 19 mm) | 24 mm |
| Microlook | With step (step height 8 mm, total edge height 15.18 mm) | 15 mm |
| Microlook BE | With step for design systems (step height 8 mm, total edge height 15.18 mm), with bevel on the edge of the panel | 15 mm |
| Vector | It is installed on the frame from below and hides the load-bearing elements, creating the impression that the panels are attached from the ceiling itself | 24 mm |
The Armstrong ceiling frame consists of several types of suspended aluminum or galvanized steel T-shaped slats:
- universal bearings - main supporting ones (up to 3600 mm);
- transverse - secondary, inserted between universal ones, allowing you to create a cell of the desired size (600 mm, 1200 mm).
The planks are attached to each other using locks or hooks. The connection type can be:
- locking type XL (for transverse elements) - made of high-grade steel and stamped separately using a precision method, it is more durable and economical compared to solid stamping of end elements for overlap joints.
- TL - has a stamped hook for precision and ease of installation when connecting butts.
- TLX is a patented hook-type technology that uses a composite material. Gives a strong and fireproof butt joint.
Slots are provided in the carrier and long slats. Secondary elements of the suspended ceiling are inserted into them. They are compatible with any type of connection. The profile provides a fire compensator for temperature deformations.
To attach the frame to the base ceiling, several types of suspensions are used:
- wire ones are inconvenient, not always reliable, but you can make them yourself;
- straight rigid - made in the form of a corner, which is attached to the base floor;
- adjustable single - consist of a bar and a rod that maintains mobility, which allows you to adjust the height of the system mounting in a limited range;
- double adjustable - resembles a single model, but contains a pair of rods, and allows for even more precise adjustment of the height of the structure.
Another component of the system is wall molding. This is a rail bent at a right angle, installed along the perimeter of the ceiling. The wall corner can be:
- simple shape in the form of the letter G;
- stepped - for slabs with an edge.
If the system uses shaped molding, its step should be the same as the slab edge notch.
Armstrong ceilings require the use of ventilation grilles for effective exhaust and air flow. This type of panels is available in a standard size of 59.5x59.5 cm, which allows them to be used in a system of any configuration. They come in the form of perforated plates or diffuser type.
Armstrong systems come with modular luminaires. The devices are cell-sized panels that use fluorescent elements or LEDs. The latter are beneficial in that they reduce energy consumption by 2-3 times and do not flicker, therefore they protect your eyesight and allow you to better concentrate on work. Spotlights are also used with Armstrong systems.
Installation stages
In order to do the job efficiently and avoid mistakes, the correction of which would require the dismantling of individual elements or the entire structure, adhere to the developed instructions and consistently carry out all stages.
Measurements, markings and breakdowns
First, take measurements of the room:
- determine the height of the room, do this in all corners, the smallest indicator will be the main one;
- measure in the selected location 15 cm from the ceiling; if ventilation is installed, the distance will be increased;
- Using a level, apply the corresponding marks in the remaining corners.
To install the ceiling, you need to take measurements of the entire room.
At the next stage, markup is performed:
- determine the center of the room, this will be the point of intersection of the diagonals from the corners;
- draw a line across the room through the resulting point so that it is perpendicular to the wall;
- From the resulting line, parallel lines are drawn on both sides of the room at a distance of 1.2 m.
Installation of guides
The guides serve to fix the ends of the supporting rails, which ensures the strength of the structure. If they are L-shaped, then they are mounted so that the short shelf is perpendicular to the wall. U-shaped ones are fixed in such a way that a profile is inserted between parallel shelves. The guides are fastened every 40-50 cm.
Installation of hangers (brackets)
The method of fixing the hangers depends on the type of surface on which they are installed. The most difficult thing will be if it is concrete. In this case, to fix the brackets, it is better to use the PTs-52-1 gun and DG-4 dowel nails. Depending on the load-bearing capacity of the frame, hangers are fixed along the line at 120, 150, 180 cm. The distance between the lines is 60 cm.
Installation of hangers depends on the type of surface.
Connection of supporting profiles
If the length of the slats is not enough, they are connected to each other. To avoid the formation of a break line, do this in a checkerboard pattern.
Attaching the guides to the suspensions depends on the type of the latter. L-shaped rods are inserted into the holes on the guides, then bent with pliers.
If they are hook-shaped, then profiles are simply placed on them. The brackets are fixed with screws or bolts.
Mounting the crossbars
Using cross bars, cells of the same size are formed. They are installed perpendicular to the load-bearing ones. The distance between these planks is 60 cm. The connection is made with locks or auxiliary elements, it depends on the type of profile used.
The mounting of the transverse strips occurs perpendicular to the supporting strips.
Assembly of lighting devices
It is recommended to additionally reinforce the places where the lamps will be mounted with crossbars. The Armstrong ceiling design can support even massive chandeliers, but this option is only suitable for individual projects; it does not fit well with standard panels.
Laying ceiling tiles
Regardless of the type of ceiling tile, its installation is carried out in the same way, on the protrusions on the longitudinal and transverse profiles. The modules are brought through the cell into the ceiling space, then lowered onto the shelves of the slats.
Ceiling tiles are laid on the protrusions of the profiles.
Weight of the assembled structure per square meter
According to the group of surface density in accordance with GOST R 58324-2018, four types of panels are distinguished (kg per 1 m² of coverage):
- Ultralight - up to 1.5.
- Lungs - 1.5-3.0.
- Average - 3.0-5.0.
- Severe - more than 5.0.
The greatest load is created by slabs of wood and metal, the least by mineral products.
The mass of the entire structure depends on how many elements will be used:
- guides;
- corner profiles;
- suspensions;
- lamps;
- gratings, etc.
On average, the weight of an Armstrong suspended ceiling with components per 1 m² is 2.5-8 kg.
Material calculation
To calculate materials, you need to know the dimensions of the room - length and width. They are used to calculate the required number of tiles and profiles. The calculation includes several stages.
Formula for calculating the area of a rectangular ceiling
- Determine the required number of tiles. To do this, calculate the area of the room by multiplying its length by its width in meters. The result obtained is divided by the area of one tile; for a standard size of 60x60 cm it is Sp = 0.36 m. The result is rounded to the nearest whole number.
Example : for a room 3.5x5 m, the area of the room is Sк = 3.5x5 = 17.5 m. The number of tiles Nп = 17.5/0.36 = 48.6. After rounding, the total is 49 pieces.
- Calculate the number of wall profiles. To do this, determine the perimeter of the room by adding the lengths of all its walls, and divide it by the standard length of the corner profile of 3.0 m.
Example : room perimeter Pk = 3.5+5+3.5+5 = 17 m. Number of wall profiles Nsp = 17/3 = 5.66 pieces. After rounding up you get 6 pieces.
- Find the number of supporting profiles. They are usually placed along a short wall at a distance of 0.6 m from the wall and 1.2 m between the profiles. The number of profiles in a row is found as follows: divide the width of the room by the standard profile length, equal to 3.7 meters, and round the result to a larger integer. The number of rows is determined by dividing the length of the room by the installation step of the supporting profiles of 1.2 meters, rounded to the nearest whole number. The number of profiles in a row is multiplied by the number of rows.
Example : for the example room there will be one profile in a row, since the width of the room is less than the standard profile length. The number of rows is 5/1.2=4.16 rows, after rounding – 5. Total – 5 load-bearing profiles.
- The number of longitudinal profiles is found as follows: the length of the room is divided by the profile length of 1.2 m and rounded up; The width of the room is divided by an installation step of 0.6 m and rounded down. The results are multiplied.
Example : the number of rows of longitudinal profiles is 5/1.2=4.16, after rounding it is 5. The number of profiles in a row is 3.5/0.6=5.8, after rounding down it is 5. Total required 5x5= 25 pieces.