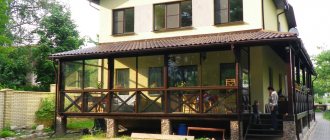
Verandas are usually used in the warm season as additional usable space. Based on the type of construction, they are classified into attached and built-in. The first ones are built after the construction of the house is completed. The presence of built-in ones is provided for at the design stage of a residential building. Also, verandas can be with or without glazing. In the second case, the site is essentially a terrace equipped with a canopy. Verandas with glazing can be used not only in bad weather in the summer and without fear of rain or wind, which previously interfered with quiet gatherings, but also in the winter if they are heated. In this regard, the premises are similar to attics, into which cold attics are converted. In the south, the veranda is most often used as a gazebo or dining room. On the hottest nights, you can set up a bedroom here, where the coolness of the night comes in abundance. In the outback, equipment for a summer kitchen is moved here if there is no free separate building for these purposes. A veranda can be called not only an extension to a house, but also a separate room on the site in which a greenhouse or a hall for receiving guests (formerly for dance evenings) is equipped.
The fashion for such spacious “gazebos” came from France. And the word “veranda” itself is of Bengali origin, which in principle is not surprising if we recall the close ties of Old Europe with the countries of South Asia. Balconies and loggias, in fact, are also verandas, but they belong to city apartments in multi-storey buildings. Suffice it to remember that they are also divided into “warm” and “cold”. We will consider options for glazing verandas in private houses.
Features and Benefits
Glazing a veranda is that rare case when, among the many advantages, the disadvantages are lost. The room can be warm or cold. In the first case, it can be used in winter as a residential space. If the glazing is cold, then the temperature inside the veranda will be only a couple of degrees higher than the temperature outside, that is, the difference is insignificant. This veranda can only be used in summer. The advantages of glazing a room include:
- Protection from wind and rain (for both cold and warm options).
- Noise insulation.
- Possibility of arranging a separate room. In the case of cold glazing we are talking about a “summer residence”. With warm glazing, the room can be used all year round, that is, another full-fledged room is added to the living space on a “permanent basis”.
- Possibility of connecting to heating and using the room in winter (only for warm glazing). It is quite possible to arrange a bedroom, a small guest room, a winter garden, a storage room and a kitchen or dining room here. The choice of functional purpose depends entirely on the size of the veranda itself and its capabilities.
- Creating a stylish, unusual element of the interior and exterior of the house. Glazing can be different, and original solutions will emphasize the creativity of the design of the entire building as a whole.
If we mention the features of the glazing of the veranda, then it should fit well with the design of the house. This is a mandatory and most important condition. Next, you should pay attention to the area of the translucent sheet in order to provide it with proper support in the form of frames and at the same time not reduce the strength of the entire structure. The next stage is the choice of material for the frame, but we will talk about this in detail later. Modern glazing systems offer great opportunities for owners:
- Partial roof covering with sheets of heavy-duty glass.
- Exact repetition of the shape of the veranda.
- A variety of door and window opening systems.
- Adjusting the width and height of open door and window openings.
- Possibility of installing mosquito nets.
Now let's talk about the types of glazing, their disadvantages and advantages.
Types of verandas and their characteristic differences
What types of verandas are there:
- building on the ground floor at the entrance;
- multi-level models around the cottage allow all residents to enjoy nature;
- corner building, located along the wall or surrounds the cottage from different sides;
- a structure on the roof that allows you to enjoy the sun.
Important! Two-story structures can be erected where an exit from the first level is needed for household purposes. needs, the second level is intended for relaxation. Thanks to new technologies, you can build an extension by moving it in height and adapt it to any terrain (for example, if you are in a village).
Open verandas are usually used in the summer and are considered economical solutions. A platform without a roof or walls is most often made of planed timber; chairs and a table can be placed on it.
Open models without fences are installed on the ground floor. If the structure is raised above the surface, a railing made of metal and transparent polycarbonate is required to prevent anyone from falling. A cottage with an open terrace is furnished with plastic or metal furniture so that it does not deteriorate due to rain and snow. Sometimes the view is covered with fabric canopies, vegetation, and the roof is formed from lattice or beams.
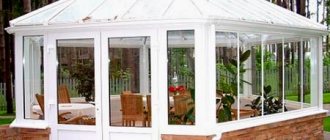
A closed veranda to the house with plastic windows can serve as additional space for residents. It is better to build protected buildings in the north, where it can be very cold. The terraces are enclosed with light walls on the left and right, and one vertical plane is glazed.
The walls of the veranda are erected from brick, plastic or wood, raised to the height of the structure or made only halfway. Fences help protect from rain on the ground floor and from other precipitation on the upper levels.
The roof is made of metal profiles, ondulin, slate, profiled sheets on metal beams or purlins made of thin logs with sheathing. The most popular are sliding glass panels.
Types of glazing
There are quite a few classifications of glazing depending on its features:
- Warm and cold, which were already mentioned above.
- Frameless and with frames.
- Full and partial.
- Swinging and sliding.
Panoramic glazing can be included in a separate category. Let's talk about each type in more detail.
Cold and warm
Cold glazing is used when the owners have chosen “seasonal use” for the veranda. Suitable basic materials:
- Plastic single-chamber double-glazed windows.
- Aluminum profile as a frame, which also weighs very little, unlike heavy wood.
- Panoramic windows.
Cold glazing looks stylish and practical. At the same time, double-glazed windows reliably protect the veranda from precipitation, dirt and dust. In summer, the room can be used as a study, relaxation room, summer kitchen, and in winter it can easily be converted into a pantry for storing pickles or “gifts from the garden.” Warm glazing is usually carried out using plastic double-glazed windows that have special air chambers.
They act as a “buffer”, trapping heat in the room and preventing cold from entering from the street. Window sashes fit hermetically to the frames. Glass consists of several transparent sheets, the spaces between which are filled with a special absorbent that absorbs moisture. Such glazing does not allow cold, moisture and wind to enter the room. It reliably protects the veranda from the external environment and allows you to convert it into a full-fledged living space. If we talk about cost, then you will have to pay more for double-glazed windows, but this option provides many more advantages.
Full and partial
Depending on the functional purpose of the veranda, its glazing can be full or partial. The first option allows you to create warm or cold glazing, that is, the openings are completely closed with double-glazed windows and there are no “gaping” windows left in the walls of the room. Partial glazing is a simpler and cheaper option. It is appropriate in cases where, for example, the room needs to be protected on the leeward side. This veranda can only be used in summer.
Frameless and with frames
Glazing with frames is a popular and already quite hackneyed option. Sheets of glass are placed inside a special frame, which provides the structure with strength and stability. Relatively recently (just a couple of decades ago), the fashion for frameless glazing came to us, when the facade consists entirely of sheets of heavy-duty glass, which are sealed at the joints. The illusion of a completely open space is created. Sheets of glass are fixed with aluminum profiles at the floor and ceiling. This option cannot be called budgetary, but relaxing on such a veranda will truly take your breath away. It is appropriate to use frameless glazing only in cases where the room offers a beautiful view (of a garden, field, meadow, nearby river or sea coast). Although the structure looks fragile from the outside, in fact it will outperform any other double-glazed window in terms of strength. For frameless glazing, only tempered glass is used, which is almost impossible to break.
If a blow of enormous force nevertheless damages the surface, then it will only be covered with small cracks, but will not shower everything around with fragments. The design is equipped with additional protection against accidental opening. The only disadvantages that can be noted are low noise insulation and difficulty in maintenance. In order for the glass to retain its transparency and “gloss,” they should not be washed with substances with an abrasive effect that leave small scratches on the surface. You will also have to forget about the old “grandmother’s” method using crumpled newspapers instead of a sponge.
Panoramic
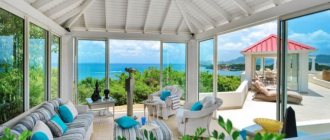
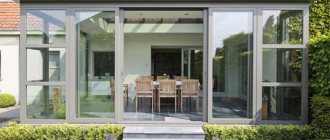
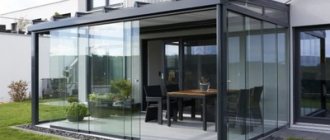
Panoramic glazing is carried out along the entire facade, that is, the windows occupy the entire space from the ceiling to the floor. This is a stylish, original solution that originates in the European traditions of decorating windows facing the garden. The veranda will offer a magnificent view of the nearby beauty. Panoramic glazing can be frameless or with frames. This option is popular not only for verandas, but also for glazing balconies and loggias in high-rise buildings with a slight difference: there the system is necessarily supplemented with a protective frame that prevents a person from falling onto the glass.
The only disadvantages noted are the rapid fogging and freezing of the transparent fabric in winter.
To avoid this, you must either install an additional heat source in which hot air flows are directed at the windows, or regularly lubricate the glass with a glycerin solution.
Sliding and hinged
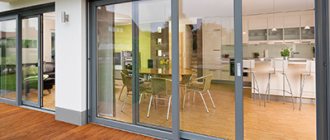
The swing opening system is familiar to everyone: window or door sashes, after turning the handle, open inward (usually 90 degrees). Plastic double-glazed windows use a more complex swing system, which additionally allows windows and doors to be partially opened from above by pulling them towards you. This option is ideal for ventilating the room. Hinged glazing provides good tightness. With its help you can create both a cold and warm room. The sliding system works on a completely different principle: the doors are moved to the sides on special guides located below and above. They can only “drive” in a straight line (as in sliding wardrobes) or fold “accordion-style”.
In the latter case, we are talking about panoramic glazing with frames, when large “window-doors” are compactly assembled against one of the walls of the veranda. Sliding systems cannot provide complete tightness, therefore they are used only for cold glazing.
Installation of walls and roof
So, how to install walls and roof:
- Depending on whether you are building an open or closed veranda, racks for supports are attached to the components of the fundamental part or the supporting pillars are laid in brick type.
- Install side railings; if an open model is being built, brick walls are laid; if the veranda is closed, then stone is used. Fences of closed buildings can also be erected using panel-frame techniques.
- Attach the rafters to the wall structures or support posts. They can be made from wooden beams 100 by 100 (150) mm.
- Install the roof. Pay special attention to the places where the roofing material of the veranda meets the wall of the house.
Construction materials
The glazing frame can be made of plastic, wood and aluminum. The materials are arranged by popularity, starting with the most popular. Of course, at first plastic began to be used everywhere in the glazing of city apartments. Gradually, it migrated to private homes, but wood and aluminum here continue to stubbornly hold their own. This is especially good for wood, which is involuntarily associated with the warm atmosphere of a country house and fits perfectly with the design in the chalet, country, and Provence styles that are so often used in the outback.
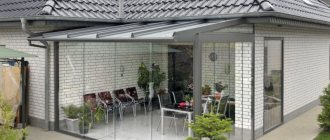
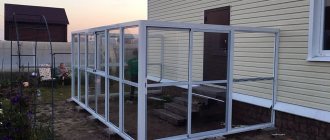
Aluminum
The main advantage of aluminum is its light weight. The material allows you to make the structure much lighter, but without compromising its strength. In terms of cost, aluminum also outperforms its main competitors. For comparison: the price of plastic glazing is twice as high as installing a similar aluminum structure. Unfortunately, the material did not become widely used due to its main drawback: the design retains heat very poorly.
A veranda with an aluminum profile can only be used in summer; in winter, it is most logical to install an “outdoor freezer” here. Although now manufacturers offer a rather expensive solution to this problem - thermal inserts and special liners that retain heat and create additional sound insulation. The aluminum profile is fireproof, so the risk of the structure igniting is reduced to zero, which becomes another advantage of the material when compared with wood.
Tree
Previously, only wood was used for glazing houses (not only verandas). With the advent of alternative options, this material began to be slowly forgotten, but its advantages did not fade. Wood has high noise and heat insulation. Although, of course, the glass itself receives the main “blow” in terms of heat conservation, a lot also depends on the frames. Unlike plastic or aluminum, wood does not need additional thermal liners, since the material itself prevents cold from entering the room and warm air from escaping outside. Wood has micropores, which allows it to “breathe”. Manufacturers of plastic double-glazed windows state in their characteristics that the maximum minus for the material is 30 degrees below zero. At this temperature, PVC loses strength and becomes brittle.
For wood, there is also a frost resistance limit, but this figure is so sky-high (minus 120 degrees) that even in the conditions of the Far North it is impossible to verify it. From this we can conclude: wood is the warmest material. The wood is environmentally friendly, but it will catch fire when in contact with an open flame. The material is pre-treated with special impregnations, which increase its fire resistance and moisture resistance. Contact with liquid is dangerous for wood. Material that is not properly processed can become deformed, rendering the double-glazed window completely unusable. And the main advantage of wood lies in its beauty, which neither aluminum nor PVC has. Warm, homely, “cozy” material will ideally highlight the design of an Alpine chalet, simple country, French Provence and rustic Russian style.
Plastic
Contrary to misconceptions, high-quality plastic does not emit harmful substances during operation. PVC retains heat perfectly, thanks to special rubberized inserts around the perimeter of the window and door sashes, the veranda remains airtight. Plastic windows provide good sound insulation. They are ideal for warm glazing, but are heavy, so they are not recommended for use in dilapidated dachas or old country houses. PVC cannot be called fire-resistant, but upon contact with an open flame, they do not catch fire, but begin to melt, releasing caustic substances.
Perhaps the main disadvantage of plastic glazing is its high cost. If you need to install one or two windows, then the purchase and installation will not hit the budget much, but for a panoramic double-glazed window you will have to spend a lot of money. Wood and aluminum leave PVC far behind in this regard, luring buyers with tempting prices.
Double-glazed veranda design
A room made of double-glazed windows can be made in one design or another.
Swing
The most popular design. Requires high-quality hinges and space for turning the sashes, which is not always convenient when space is limited. Rotary. This design is relatively rare, as it is not the most practical or convenient. The doors can be opened slightly by turning around the longitudinal vertical axis.
Recommended reading
How to install doors in aerated concrete
More details
Sliding
Sliding double-glazed windows for the veranda are the most successful design in terms of ergonomics and space saving. The sashes move along the glazing line without requiring space outside the plane of the opening, which is very convenient for users and does not threaten various troubles. The weak point of this design is the lower guide profile, which must be cleaned quite often from dust, dirt and moisture.
Sliding
This is a type of sliding frame, but with slightly expanded functionality. Sliding doors can be moved to the side (or in both directions), creating an open veranda if the situation requires it. Each frame has its own profile; when moving, it grabs the sash on the adjacent profile, that one grabs another one, and so on. Usually there are three doors in one direction and three in the opposite direction, which in total provides a wide open opening.
Coupe
This is also an option for sliding frames, but in this case large doors are used, from floor to ceiling, allowing for a larger glazing area of the veranda.
Removable
The option for double-glazed windows is rather dubious, since the specific design allows the frame to be removed from its socket and installed back. Double glazed frames are quite heavy, and carrying them to a storage location creates the risk of damaging the glass while driving.
Choosing one option or another is the task of the home owner, but the main criteria most often become reliability, practicality, price and the ability to repair it yourself. For euro-windows, achieving all these goals at the same time is unlikely, since most work with them requires the participation of professionals.
Sliding and sliding types of construction are popular. The quality of fittings and mechanisms is constantly improving, making it possible to use them in northern latitudes without problems with materials.
https://youtu.be/aih42G7PJjs
Glass materials
The transparent canvas occupies the lion's share of the area of the glazed area, so its characteristics have a greater influence on the quality of the structure than the features of the frames and profiles. On verandas, not only “classic” glass is used, but also other materials that also ensure free penetration of sunlight into the room and at the same time protect from bad weather. Let's look at their varieties and evaluate the profitability of using them in veranda glazing.
Glass
For glazing houses, it is better to use special materials that have increased strength. All of them are produced in the form of sheets and belong to the large category of sheet glass. The following types are suitable for glazing the veranda:
- Tempered. Ordinary sheet glass undergoes special treatment: the mass is heated to high temperatures, followed by rapid cooling. The technology makes it possible to create strong glasses that can withstand heavy loads (compared to ordinary ones) and are absolutely safe for humans, since when hit hard they are showered with small fragments with blunt edges that cannot injure, even if the pieces fall on open areas of the skin.
- Laminated or triplex. Belongs to the group of tempered glasses with increased strength. Triplex is a layered “pie” of several sheets that are glued together. There are two types of such glass: cast and film. In the first case, gluing of sheets is carried out using a laminating liquid, and in the second - using a special film. When hit hard, triplex does not crumble like regular glass, but becomes covered with cracks sealed between two protective layers.
- Energy saving. A new product on the double-glazed window market, which so far only wealthy home owners can afford. Externally, glass is no different from ordinary sheet glass. It even has a standard thickness (no more than 1 cm), but from the inside its surface is covered with a special coating. It “repels” heat, redirecting it indoors, thereby preventing it from leaking out into the street.
- Stained glass. Glass is a decorative composition that is assembled from pieces of different colors enclosed in a metal profile. Previously, this option was widely used to decorate cathedrals and rich palaces in Europe. Real masters put together small pieces using the mosaic principle to create whole pictures that will become the highlight of the veranda interior. They have only one drawback - they do not transmit sunlight well, so they are often used in conjunction with ordinary transparent glasses and play the role of accent decor.
In addition to glass, there are several other transparent materials that are actively used for glazing verandas and gazebos on sites.
PVC film
PVC film is better known as “soft glass”. It is used only for cold glazing, since the material cannot cope with the vagaries of the domestic climate and harsh winter conditions. PVC film is sold in rolls and can have different thicknesses and colors. It is ideal as an alternative to expensive glazing due to its low cost. The material can be given any shape. Soft glass is often used as “flexible curtains”, which are rolled into compact rolls and secured in this position with ribbons. If it starts to rain or the wind rises, the curtains are lowered, but the street can be seen just as well as without them. The film is durable. With constant contact with sunlight, it can be used for up to five years. If operating conditions are more gentle, then this period is doubled.
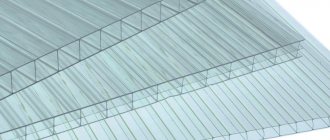
Polycarbonate
Polycarbonate is often used for glazing greenhouses, summer greenhouses and gazebos. The material is flexible and light. It is classified into two types:
- Monolithic. The sheets are more like glass, transmit light well, and have high transparency.
- Cell phone. The sheets consist of two layers of material, which in cross-section are similar to “honeycombs”, that is, the surface of the polycarbonate is decorated with “stripes” formed due to the cells inside. The material transmits light well, but it cannot be classified as transparent. Suitable for verandas that need to be hidden from the view of passersby.
From an aesthetic point of view, monolithic polycarbonate looks more solid and noble. From a distance it is generally difficult to distinguish it from sheet glass. Cellular material benefits in cost, as it is more accessible. Naturally, such glazing is not suitable for warm verandas.
Creation and approval of the project
Determined by location, purpose, design of the extension. Then they begin to design it. An insulated veranda is a structure with a foundation, walls, and roof. This is not a light gazebo, but a full-fledged living space. Therefore, its design is carried out in accordance with the required technologies.
What is important to consider when creating a project:
- choose the appropriate type of foundation, which should be located without reference to the main structure, leave a gap of about 5 cm between them, otherwise the monolith of the house will pull the light base of the extension with it, especially with heaving complex soil;
- choose suitable materials for the floor, walls, roof;
- provide thermal insulation of the room;
- the roof structure on the side is made of a single slope, and on the front side it can be gable;
- for insulated verandas, the installation of heating appliances or fireplaces will be required;
- Choose plastic windows with good thermal insulation characteristics and suitable opening methods (hinged, sliding, turning mechanisms).
The developed project will have to be approved by the relevant institutions. Therefore, it is better to prepare it in advance. Drawing up the necessary documents for a building permit takes more than 2 months. It is better to plan all paperwork in winter. When is the wrong time for construction work? And then, with the onset of spring, it will be possible to add a veranda.
How to choose a glazing method
The choice of type of glazing for the veranda depends entirely on the functional purpose of the room. The first thing you need to decide is the time frame for its use:
- End of spring, summer, beginning of autumn.
- All year round.
You can already build on this when choosing the type of structure and materials. For “winter” verandas, durable wooden frames or plastic double-glazed windows, tempered glass or triplex are ideal. For cold glazing you can use aluminum, polycarbonate, and soft glass. Of course, a summer veranda will cost much less, but a “warm” one provides more opportunities.
Veranda attached to the house: stages of construction
Regardless of the materials used or the type of structure (open, closed), its construction is carried out according to standard regulations. It helps to break down and organize all the work into steps, think through the ordering of building materials in such a way as to reduce costs, and also eliminate other problems. Therefore, a double-glazed veranda attached to the house would be suitable (adjusted for the unique characteristics of a particular project).
Design and decoration of terraces
The design of the veranda is selected to match the stylistic design of the house. The interior of this room should not stand out from the overall composition. Most often, verandas are used as a relaxation room. A wide sofa, armchairs, and a coffee table are placed here. The outside walls are covered with hops, grapes or ivy, and the windows are hung with light curtains. When the dimensions of the room allow, its interior is complemented with a couple of shelves with books and a cozy fireplace. If a loft is chosen as the main direction, then brick prevails in the decoration, and it is better to choose glazing with aluminum profiles. Similar designs are suitable for high-tech and modern style. Provence, modern, classic, chalet, and a number of ethnic styles are more impressed by wood. Plastic is universal and can be combined with any modern styles, but it is not suitable for luxury apartments, where every element of the interior should be associated with luxury.
Marking and excavation work
First of all, you need to do everything sequentially:
- Using twine and pegs, mark the outline of the veranda.
- Remove the top fertile soil layer over the entire area of the building.
- Mark the locations of the supports of the fundamental structure.
- If you plan to link the created and newly constructed foundation, then nail the support beam to the wall of the cottage. Its lower edge will become the upper level of the fundamental part.
- Make an excavation for the buried part of the foundation.
The nuances of self-glazing terraces
You can glaze the veranda yourself only if you plan to use wood as frames. You must first carefully take measurements and create design drawings. The glass is inserted into special grooves in the timber, which are cut out in advance. No matter how good a craftsman the owner is, his work will still be much inferior to ready-made double-glazed windows, which are produced in factories and undergo strict quality control.
Foundation installation
Next, we move on to installing the fundamental structure:
- Place the load-bearing components of the foundation.
- The vacated pit must be backfilled. If the parent type soil allows water to pass through well, for example, it consists only of sand, then backfilling is done with crushed stone (screenings, sand). If the soils are clayey (loamy, peat, etc.), then filling the space should be done with clean clay. It should be wetted and kneaded to a paste, and compacted during laying.
- Under the veranda, along columnar or pile support structures, frame it with a reinforced concrete grillage or a frame of beams.
- Place a moisture-proofing layer on the foundation concrete structure.
- Additional timber beams may be required on which the flooring will be mounted in the future.
How to build a gazebo from old window frames with your own hands
DIY gazebo made from window frames. Step-by-step instructions with photos
Master class “Do-it-yourself gazebo from old window frames”
Master class on building a gazebo.
Feng Shui gazebo Author: Natalya Aleksandrovna Ermakova, Teacher, Municipal budgetary educational institution of additional education for children “Children’s Art School named after A. A. Bolshakov”, Velikiye Luki, Pskov region. Description: the material can be useful to everyone who is interested in creativity, gardening and landscape design, to all those who love their garden and are engaged in its improvement. Purpose: the gazebo will serve as a wonderful relaxing place for the whole family, creating its own unique design and a wonderful mood. Goal: creating a gazebo from old window frames. Tasks: build a gazebo from scrap materials, create a resting place for the whole family from old frames, protected from wind and bad weather. Hello, dear guests! The veneration of nature and the perception of it as part of man himself was previously manifested in pagan religions. But in Slavic countries, pre-Christian religions have long since died out. But the Chinese still believe that any tree, blade of grass or stream can influence a person’s destiny, giving him positive energy or, conversely, taking away part of his vitality. The harmony between people and nature is called geomancy, and Tibetan monks live by its laws. In the West, only one branch of geomancy is known - Feng Shui. This direction deals with the arrangement of a person’s personal space - his home, plot and even wardrobe. It is believed that a feng shui garden helps a person live in happiness and attracts the necessary energies (love, fame, etc.). And the more carefully you arrange every corner of the space, the faster you will achieve your goals. Today we will talk about such an important element that must be in your yard or dacha, and to be more precise, this work will be devoted to an ordinary, but so necessary gazebo. A beautiful gazebo on a summer cottage can become its main decoration and main highlight. Since ancient times, people have built small cozy houses in gardens, which allowed them to admire the beauty of nature. When positioned correctly on a garden plot, a gazebo can attract positive energy.
Gazebos can perform various functions. This could be a small cozy building in the depths of the garden, conducive to contemplation and reflection alone. And there are others, those who are able to gather the whole family under their roof on a day off. There you can easily drink aromatic tea and have fun communicating with loved ones. Depending on the sector in which the gazebo will be located, its shape is selected: -North-round and octagonal gazebos; -Northeast-square, rectangular, round; -East – square, rectangular; -Southeast-square, rectangular, octagonal gazebos; -South - octagonal, square; -Southwest-square, rectangular; -West-square and round; -Northwest-square and round gazebos; -In the center of the site - octagonal. Each direction of the world is responsible for a certain aspect of life: wealth, longevity, love, creativity, career, family and children.
The size, shape and methods of decorative design of the gazebo depend solely on the imagination and wishes of the owner of the site. The optimal place to place a gazebo is a space that is closed from the noise and dust of the street, from which there is a view of some decorative element or a composition pleasing to the eye. If there is a reservoir of artificial or natural origin on the site, then it is better to locate this structure on its shore. It is advisable that the gazebo be protected from the wind by a hedge of bushes or a group of trees. It would also be useful to place flower beds, alpine slides, suitable garden sculptures and everything that will make this corner of the garden attractive to all family members. At the same time, we should not forget that all the details must be combined with each other and create a complete picture. When installing a gazebo, you should take into account its lighting. It must be selected in accordance with its purpose and future functions. If you plan to gather in the gazebo in the evenings for any activities - board games, handicrafts or reading - then the lighting should be bright enough, but not blinding. If you want to give this corner of the garden a romantic look, you should illuminate the path to the gazebo and place sconces with dim light on its walls. According to an ancient Chinese proverb, a person has three main things: fate, chance and feng shui. Fate gives us a chance to get acquainted with Feng Shui to improve our health and our lives. Everyone has their own destiny. We cannot change our origin, gender, nationality or date of birth. But every person has a chance to get acquainted with Feng Shui in order to change and improve not only their health, but their entire life. Feng Shui is a unique folk wisdom that has collected centuries-old observations of nature, its changes and signs.
1.Don't sit on the corner. “Seven years without reciprocity,” you say? If only that! According to Feng Shui, a protruding corner aimed at a person, be it the corner of a table, cabinet or any other, sends “poisoned arrows” at the poor fellow, which will leave him not only without reciprocity, but also without money, health and luck. 2. Don't say goodbye over the threshold. “You’ll quarrel,” they say. That's right: the threshold is an energy barrier separating two worlds. On one side - “ours”, on the other - “strangers”. The invisible border prevents contact from being established, and things and energy transferred “from world to world” are lost for both worlds. So it turns out that the connection between the “contact participants” is destroyed. 3. Don't cook when you're in a bad mood. This is what mothers and grandmothers teach novice housewives. The older generation is absolutely right: food absorbs the surrounding energy, and we, by absorbing this same food, receive the corresponding energy charge along with calories and vitamins. Borscht and cutlets, “charged” with a quarrel, news of another terrorist attack, or emotions generated by a television “horror” movie, are quite capable of poisoning a family. 4. Don't stand behind someone's back. - we say, shivering chillily, even if there is someone quite close and dear behind us. And the point is not in the ancient instinct that makes you fear a creeping enemy, but in the fact that the unprotected rear itself poses a threat. Feng Shui considers the lack of support and support from behind to be the weakest energy position. Moreover, this is equally important for both the person and the home. There should always be a wall or at least a screen behind you, and the rear of your house should definitely be protected by a high hill or at least a neighbor's house. 5. Don't paint yourself into a corner. Another extremely unfavorable position according to Feng Shui. The corner is considered a place that can drain energy from a person - a kind of domestic vampire. It’s not for nothing that a child who has been naughty for a long time is put with his nose in a corner - so that he loses the excess of hooligan energy (the main thing is not to overexpose your beloved child there...). 6. Don't look in a cracked mirror. According to Feng Shui, not only cracked mirrors are harmful, but also mirrors with a pattern, mirror tiles, and other surfaces that break or crush the reflection. All this fragments and destroys energy, which will affect, first of all, health. 7. A mirror in your pocket will protect you from the enemy. We still believe that when meeting an ill-wisher, a mirror placed in your pocket helps - of course, with the reflective side out. It will reflect all his bad thoughts and intentions. And also - all the negative energy directed against you is commented on by Feng Shui. And he advises hanging a mirror above the door or window to protect your home from adverse influences. 8. Don’t show it off on yourself. We warn a person who talks about someone’s illnesses. According to Feng Shui, the mechanism of the evil eye in this case is as follows: by pointing with a finger, we send an energy charge. At the same time, naming the disease, we give this charge the appropriate “coloring”: we fill it with accurate information about the diagnosis. 9. Don't come back halfway. - “there will be no way.” Of course, says Feng Shui! Remember what we told you about the threshold? All these leaps “from world to world” are quite energy-intensive - this is probably known to avid travelers who often cross state borders. If you had to return, restore your strength: sit down (get some strength at home), look in the mirror (reflecting, your energy doubles). 10. Run under the rainbow - you will be happy. Of course, those who remember physics understand: it is in principle impossible to do this. But even seeing a rainbow - a symbol of the Gates of Heaven - is considered a good sign. And Feng Shui recommends “taming” a rainbow and placing it in your own home. That is why arched openings are so favorable - when passing under them, each time we “step under the rainbow” and receive the protection of Heaven. Materials and tools: - old window frames - wooden beams 50:50 (6 meters 13 pieces) - tape measure - hammer, nails 3, 2 * 50, 3.5 * 80 - screwdriver, wood screws 3.8 * 32 - impact drill (metal drill) - water-based stain (lemon), water-based emulsion, brush - red enamel (terracotta) 6 kg, white spirit (solvent), brush - cement, construction sand, river sand - bucket for cement mortar, 2 buckets from under mayonnaise, trowel - shovel - saw - perforated fasteners and corners - stepladder - stapler, fabric paintings (painting on fabric) Cement mortar is made in a ratio of 1:4. That is, for 1 bucket (mayonnaise) of cement you will need 4 buckets of sand. The sand should be sifted, or simply by hand, and that’s exactly what I did, remove large stones, sift the sand through your fingers. A construction bucket requires 2 buckets of cement, 8 buckets of sand and 2.5 buckets of water. When all the ingredients are poured into the container, they must be mixed using a hammer drill with a concrete mixer screwed into it, literally 7-10 minutes, until smooth.
Progress of the master class:
We begin work by preparing materials. The beam needs to be cut in half, three meters each, leaving one beam unsawn. Then the beams must be covered with stain to preserve the wood and ensure longer service life. The timber has dried and we begin construction of the walls of the gazebo. We connect two large frames together using timber. We nail the timber to the frame from the bottom and top sides with large nails (80*). My area is very small, so I immediately place the finished wall at the intended location.
I'm not a builder, but I really like to make something useful out of unnecessary things. Therefore, I don’t have a specific construction plan; everything is a work in progress. As they say, appetite comes with eating! I paint the frames on the inside with the remains of water-based paint diluted with yellow gouache. In order for the background to have an even character, the color is applied by a kind of slapping of the brush on the glass. In the art of Feng Shui, the color yellow indicates cheerfulness, cheerfulness, and brilliance. It symbolizes the hot and shining sun, a warm sunny day, gold, longevity. Light yellow color is best suited to create an atmosphere of friendship and creativity. Yellow and gold are the colors of the earth. They can provide a sense of stability, hope and happiness. Next, I determine the place where the corner of the gazebo will be, and we will begin construction from there. Let me get ahead a little, I will secure each pillar with fragments of brick and subsequently fill it with cement. We moisten the ground with water and pour in cement; the post should be left motionless for about a day.
Then you need to assemble the second wall of the gazebo, it is assembled in the same way as the first, we knock down the frames using a beam. This side will consist of three frames, smaller in size, but of the same height. Then two finished walls need to be installed at the first pillar in the shape of the letter “L”. And fasten them to the base of the post using large nails driven from the edges of the frames. First, we nail one frame to the post, then the second, do not forget to monitor the level of the walls so that their edges are at the same height (1). Near the end of the second unpainted wall, we dig a hole for the second post, place the post there close to the frame and nail it together with large nails (2). For greater connection strength, we use perforated fasteners for the timber. We attach them using wood screws and a Phillips screwdriver. The part of the gazebo where the yellow-painted frames are located will be lower, the opposite side will be higher. This is necessary for the roof so that there is a good slope of water. For the lower part we need three beams, you need to immediately measure the length that suits you, and saw off the excess timber with a saw.
Now we move to the other side of the gazebo. We also dig a hole, install timber, and fasten it to the frame with nails. Next, we will continue the wall with the frame from the interior door. At the required distance we dig a hole for the fourth pillar. First, we knock down the outer beam with the door with nails, then install it in place. We fasten the frames together using perforated fasteners (an iron plate with holes), wood screws and a screwdriver in several places on the inside and outside of the gazebo.
Using timber we measure the third side of our building. The line can be marked using a shovel, drawing a guide line on the ground.
This is how the frame turned out. The top beam is secured with nails and fasteners. The gazebo has an L-shape, with a sofa located near the sides protected from the wind, and a large family hearth in the middle. Since our family loves fire very much, and a big fire is an integral part of our family evening, two walls must be left open. The fire pit was laid out with stones and cement a year ago, but has not yet been fully completed.
Now I want to give the gazebo a look, let's paint it. The color I chose was terracotta; according to Feng Shui, this is the color of earth, confidence and stability; it is considered very pleasant for human perception. Terracotta color is suitable for people who cannot imagine their life without vivid emotions and impressions, who are gambling and passionate, who adore adventure. Let's break it down into its tonal components! The red hue is considered aggressive and ardent, but becoming clayey, it calms down a little. If the scarlet color can be compared to the beauty of a young girl, then terracotta is a mature femininity. From orange he got energy, unabashed joy, and the ability to cheer up with just his appearance. And from brown there is a certain balance, dimension, depth. With all this, terracotta is a natural color associated with nature, rocky mountains, sunsets. For those who cannot afford frequent rest, this shade can become a kind of pill from a routine lifestyle. There are so many emotions hidden in it that you can comprehend this color for a long time. But don’t forget one simple thing: loving a color and feeling comfortable in its environment are completely different things. Terracotta color in details is suitable for a romantic and sublime interior; terracotta color practically does not combine with cool tones. It is believed that this color is pleasant to the eye and can enhance the feeling of security and safety and goes perfectly with white and its shades (roof-white metal). Feng Shui recommends using terracotta color in paintings placed at the entrance to the room if you are afraid of theft in your home or workplace.
Since there was no construction plan, the material for the roof had not yet been purchased. Now we need to measure the size of the gazebo, I got the size of the gazebo 3 by 4 meters. We calculate this footage by the size of the corrugated sheets (1.5 by 1.2) - in total, we need 6 sheets. While we are waiting for the delivery of corrugated sheets, we continue the construction of the walls of the gazebo. Let's make the area near the sofa more sheltered from the wind. We will work on the same principle as with other walls. First, we fill the bottom and top of the frame with timber, then we connect the frame with the corner beam.
We dig a hole under the timber on the other side of the frame and fasten the parts with nails.
Near the door frame we will also make a small extension of the wall using the same principle. Then we will completely paint the gazebo and the posts for the roof frame. In some places there is no glass in the frames; I will disguise these voids using fabric paintings (painting on fabric) and a stapler. This is how the picture gallery turned out. Moreover, all the paintings are placed in accordance with Feng Shui recommendations. Rules for placing paintings according to Feng Shui.
Using the remaining canvases we create a tablecloth for the table in the gazebo area. It's time for the roof. We lay out a sheet of corrugated board and beams on the ground; we need to distribute them evenly over the entire area of the sheet. Then you need to fasten the timber with sheets of corrugated board. This can be done using self-tapping screws, this method is more expensive (screws are sold individually). First, a hole is drilled with a drill (a metal drill), then a self-tapping screw is screwed in. If we use large nails, they must be bent on the other side using a hammer. To cover the roof, the sheets must be arranged in two lengths. The second sheet is attached to the beams with an overlap on the first sheet (1.5-2 centimeters).
For the roof we need three composite sheets. Using a tape measure, measure out the same length, attach the timber well to the corrugated sheet, and cut off the excess timber with a saw. Pay attention to the location of the beam, the sheet in the middle (2) has four beams - it is central. The other two sheets (1 and 3) each have three beams, and the fourth beams are already nailed to the base of the gazebo and make up its frame. We will nail the timber to the corrugated sheets immediately on the gazebo, thereby securing the roof. We lay the first sheet on the roof frame. The corrugated material is lightweight, but placing it on top alone is difficult given the large height. Ask someone to help, the work is easy and will take no more than 5-10 minutes.
Then you need to secure the sheets, nail them to the beam along the edge.
For greater strength, we tighten the beams of the roof and the body of the gazebo with corners. Each sheet is fastened to each other and to the frame of the gazebo using nails and fasteners on all sides.
To make it easier to throw the sheets up, we used a low, stable table. The construction is almost finished, all I have to do is give the gazebo a beautiful external background. Inside the gazebo, I will remove the top layer of soil with a shovel. Then I will cover this entire area with river sand. Since childhood, I have loved walking barefoot, besides, it is healthy, and river sand is surprisingly soft and pleasant to the skin, just like sea sand. It turns out to be a wonderful foot massage with water procedures. There is sand in the gazebo, followed by paths of smooth pebbles, then a pond, and back along the pebbles into warm and gentle sand.
We place the layer of soil that was removed from the area inside and near the gazebo on its outer part, this will allow us to create a flower garden there next spring.
Well, that's probably all. As for lighting, we are lucky that there is a city lamp inside the garden; in the evening and at night our garden is illuminated and mysterious.
Creativity and imagination have no boundaries, so in terms of decoration, you can hang flower pots, use old tulle as a mosquito net, hang shelves, and place vases. Thank you all for your attention and have a great mood!
We recommend watching:
Why plant flowers DIY stone waterfall and concrete pond Flowers in the garden. Photos and descriptions DIY people made from plastic flower pots. Master class with step-by-step photos
Similar articles:
Main soil types