Conversation between two friends:
— I installed new “breathable” double-glazed windows.
- Well, how?
“Yesterday, in 20-degree frost, they inhaled and exhaled so much that my cat was frozen to the radiator.
A life anecdote, isn't it? Many consumers face the problem of draughts coming from slopes or blowing from under the sill of a plastic window. The causes of the defect must be clarified and definitely corrected, otherwise in the cold season the street will be heated, and not the living space.
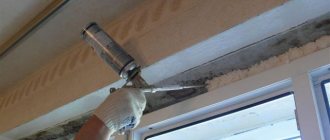
Finishing a window opening - how to plaster under the window sill?
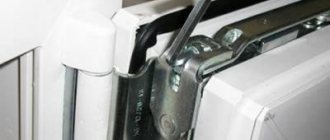
The new plastic window pleases with its appearance.
Aesthetic appeal comes first for literally every consumer. A neat window system made of polyvinyl chloride can be easily installed in almost any window opening. However, after this, additional finishing is required. The question arises of how to plaster under the window sill and install high-quality slopes. The most common problems after installation:
- installation of new slopes;
- installation of window sill panels;
- garbage collection and so on.
High-quality window construction is ready to serve for many years, so contact (Moscow) by phone or +7 (964) 640-20-03.
Sealing cracks under window sill panels.
Some installation teams quickly install slopes. As a result, they do not meet all the requirements for reliability and practicality. In addition, another significant problem is the hole under the window sill. Some specialists refuse to seal it, since such work is not their responsibility.
What to do in such situations?
It is necessary to get rid of the ugly hole by any means necessary. To do this, you will have to hire craftsmen for a fee or do this work yourself. Nobody wants to pay extra money, so you need to read the recommendations of experts.
For finishing you will need the following tools and materials:
- polyurethane foam;
- insulation (if necessary);
- spatulas;
- knives and other cutting tools;
- plaster and putty.
The easiest way is to use polyurethane foam and available putties. Usually this does not take very much time, so completing the task will not be difficult.
Finishing window sill cracks after installation.
Experts say that the main problem is to provide protection against freezing of slopes during the cold season. If you use cheap materials without seals and heat insulators, then as a result condensation and frost will form on them.
Serious results can be achieved if you follow the advice of real professionals:
- clean the cracks under the window sill (remove loose pieces and debris);
- seal the hole with cement or building mixtures of the appropriate type;
- use insulation if necessary;
- filling cracks with polyurethane foam;
- plastering the wall under the window sill.
Polyurethane foam is the main material for sealing cracks around the window structure. However, in some cases it is better to use thermal insulators, such as mineral wool. Also cover everything with an even layer of plaster and paint.
What can help
There are a lot of ways to hide the polyurethane foam so that it doesn’t damage it or interfere with its aesthetics. A common one is to putty.
This method is simple. One thing, BUT, these materials do not fit together, so plaster is applicable in 2 cases:
- If fire safety is at the forefront. Then apply a layer of plaster, which is 80 mm. In this case, use putty only with fire-fighting foam, which resists fire for 120 to 240 minutes. Although the fire inspectorate will still have complaints;
- For decorative purposes. In this case, putty is not so much protection, but as an aesthetic coating. This is the way to finish the work, making it aesthetically pleasing and pleasing to the eye.
Lack of protection
If additional protection from mechanical stress is provided, plasterboard sheets are used. The seams between them are plastered, the foam is hidden. Then they are not afraid of damage and shedding of the plaster.
How to seal a gap between a window and a sill
To seal the gap between the window and the window sill, use sealant. Before applying it, the surface is cleaned, degreased and dried. The composition is applied in a thin layer. To obtain an even, aesthetic seam, use a medium-sized coin.
An easy way to seal cracks
The seam is smoothed out with a coin and the work is completed as quickly as possible. The slightest delay can result in a crooked seam. A hermetic composition will remain on the coin; you will need to use it for its intended purpose: seal other cracks.
After the seam is finally formed, you will need to clean the “tool” used. During the work process, part of the product will harden on the surface of the coin, as well as on the frame. This is normal, but you will need to remove any remaining sealant. All work can be completed in 10 minutes.
The advantage of the method is that the product ensures tightness for 1 - 1.5 years. However, it has a drawback: it partially comes off over time. This mainly happens during wet cleaning. After 5 - 6 months, the sealant darkens, creating the impression that the window opening is dirty.
Another option
In this case, the same sealant is used, but a plastic profile is used to insulate it. The work is carried out in stages.
- Prepare the part (it is recommended to use a bathroom profile of a suitable size; it should match the length of the window or be 2 cm longer).
- Remove the perforated area of the profile.
- Holes are created in the corners of the window sill; their size should not exceed 1.5 cm. A profile will be mounted into these holes.
- The area where the frame meets the window sill is cleaned and then dried.
- The gap is “closed” with a hermetic compound (it is recommended to apply it evenly).
- A large seam is cleaned, but a small one is not. A coin is used to remove excess applied product.
- The end of the plastic profile is placed in the inner corner (where there is already a composition), after which the second end is carefully pressed and secured.
Important! If you cannot fix the profile, you need to lightly press it down and wait until the product dries.
It happens that the profile forces out a small amount of sealant. Then the product is carefully removed and the same coin is used. This method of insulation has more advantages: the window acquires an aesthetic appearance, the corner lasts longer and is not exposed to moisture.
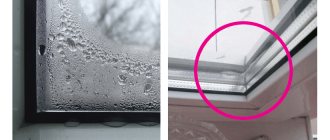
Causes of condensation on the windowsill
Even after such work, condensation often appears on the window sills. The cause of the problem may be poor ventilation or high humidity in the room. Condensation is observed in the kitchen, in a room where temperature changes occur.
The reason may also be incorrect installation of the window or defects that appeared during the process of insulating the slopes. To get rid of condensation, you need to install a convection valve. In some cases, it is enough to remove third-party objects from the windowsill, as well as your favorite flower pots. To prevent condensation, it is necessary to regularly ventilate the room.
Lack of drafts is the cause of condensation
When you start fighting against the blowing of double-glazed windows, everything turns out like in medicine: you treat one thing, but you cripple the other. It’s the same here: as soon as the blowing stops, condensation appears on the glass.
The tightness of the PVC window can cause condensation on the glass
The reasons for this are:
- Lack of air circulation;
- Increased humidity in the house;
- A wide window sill that prevents warm air from entering the glass from the radiator;
- Low indoor temperatures;
- Poor quality installation.
To avoid this trouble, you need to ventilate the rooms more often, clear the window of everything unnecessary, and change the radiator.
Blowing from under the windowsill - how and with what to seal the cracks for the winter
Winter, cold wind, as a result, drafts and blows from the window, neither the owners of new plastic nor the owners of old wooden windows are immune from this. Insulation of windows in an apartment or private house should extend to the spaces above and below the window sill, because there may be cracks into which it will blow.
What to do if it's blowing from under the windowsill? How to identify the cause and eliminate the gap?
If the window was recently installed, you should contact the company that performed the installation. If the warranty period has expired or you did the installation yourself, you need to consider ways to solve the problem yourself.
Blowing from under the window sill is possible if it is installed incorrectly, or if the mounting foam that foams the space between the window sill and the wall sag.
Methods for insulating a window sill depend on which unit is the source of the blowing.
Blowing between the window sill and the window - how to eliminate the gap
Laying a blanket over the windowsill The simplest, but not very aesthetically pleasing way to eliminate drafts is to place a barrier between the source of the draft and the room.
The method is good as a temporary measure until repair work is carried out to eliminate the blowing.
How to seal a gap between a window sill and a window
Seal the gap with sealant
Seal the gap between the window sill and the window with sealant To ensure tightness, it is enough to purchase a transparent sealant, clean the area where it is applied from dust, degrease and wipe dry, then cut off the tip of the tube nozzle and squeeze out the sealant in a thin layer.
Note that when decorating a sealed seam above a window sill, you need to do the work quickly, in one movement, so that the seam turns out beautiful and not intermittent. In this case, part of the sealant that will accumulate on the coin will be consumed in those places where there is not enough of it, and after the seam is formed, the excess sealant is removed from the coin.
During the process of forming the seam, it is possible that part of the sealant will accumulate behind the edges of the coin and harden on the frame and window sill. There is nothing wrong with this; after hardening, the sealant can be easily removed.
The advantage of this method is that the work can be completed in just a few minutes. However, the seam provides complete tightness for 1-2 years after application. This is due to the fact that the sealant gradually moves away from the plastic base or paint during cleaning, in particular washing the window sill. In addition, over time it becomes darker, and one gets the impression that the window sill where it meets the window frame is dirty.
Close the gap between the window sill and the window with a profile
The method consists of forming additional protection for the sealed seam with a plastic strip (profile).
Protective agent application technology
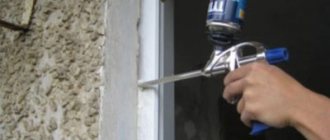
Foam treatment must be carried out at all stages of double-glazed window installation. From the street, the material is protected from snow and rain, as well as from condensation and steam. If the budget is limited, then you can use sealing tape, which is glued to the frame before installation in the prepared opening. If we are talking about old houses, then it is better to use a diffusion tape, which works like a membrane. The product perfectly protects from condensation inside the room and from moisture outside.
To significantly extend the durability of the foam, you need to choose the right putty. The mixture is prepared in strict accordance with the manufacturer's instructions. All proportions are indicated on the packaging of the purchased mixture. The prepared solution should have a thick, uniform consistency. Distribute the solution perpendicular to the seam, since only in this case can optimal filling of all cracks and cracks be achieved.
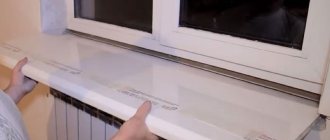
How to seal a window sill after installing plastic windows
A plastic window is a modern and common way to keep heat in the house. However, poor installation and subsequent processing leads to a decrease in insulating properties. They know how to properly process cracks and seal window sills so that the window will serve for a long time and retain its qualities.
How to insulate the gap between the window sill and the wall
The gaps formed in the window do not allow the structure to perform its full function. In addition, it will not look aesthetically attractive. If the installation of slopes is an integral part of the installation of new double-glazed windows, then sealing the cracks under the window sill is often forgotten.
Most often, polyurethane foam is used to seal the cavities formed between the wall and the glass unit. This is a universal tool that allows you to insulate in a short time. However, when working with this material, it is necessary to take into account some nuances.
Features of working with polyurethane foam
If the space between the wall and the window sill is large, you should not completely foam it. In this case, you need to act like this:
- Treat the cavity around the perimeter with polyurethane foam.
- Install insulation. This may be polystyrene foam or another type of material similar in structure.
- Fill the remaining cavities with foam.
It is important to remember that it is necessary to fill the space with foaming sealant strictly to three-quarters of the cavity. This is due to the expanding ability of the material. The common assertion that excess foam can be cut off is completely wrong. This compromises the structural integrity and causes the seal to fail.
Algorithm of actions
The sequence of cavity treatment must also be strictly observed. Neglecting these rules can reduce its performance and lead to destruction of the insulation.
- Treatment of surfaces against contamination.
- Moistening the work surface. Necessary for better adhesion of the material.
- Application of polyurethane foam.
- Installation of insulation (if necessary).
- Sealing the remaining cavities.
Within 2-3 hours the foam will dry completely, but it is better to let the structure stand for 24 hours. When processing the space under the window sill, it is important to make it as heavy as possible. This is necessary so that the foam during the expansion process does not lead to deformation of the canvas. To create resistance, you can use packs of ceramic tiles, bags of plaster and other heavy objects, evenly distributing them over the surface of the window sill.
How to hide the imperfections of foaming
It happens that the polyurethane foam, after drying, catches the eye and spoils the overall appearance of the window opening. With regard to the window sill, this problem is also no less relevant.
To hide foaming errors you can use:
- Polyurethane sealant.
- Plaster.
- A mixture of sand and cement.
- Liquid plastic.
- Acrylate paint.
- Putty.
Polyurethane foam protection
To hide the mounting foam, any of the existing types of putty is convenient. However, the preparation process and the proportions of dilution of the mixture depend on the choice of manufacturer and specific model.
Puttying foam
After mixing is completed, the mixture has acquired a thick, uniform consistency; it is applied to the polyurethane foam.
They make a small, protruding excess, which is then eliminated with a spatula, but you should not go too deep, otherwise you will get a notch, a depression, which will have to be eliminated again.
The excess, when it dries, is simply wiped off using sandpaper or a special construction mesh, which is used for finishing work with plaster.
Begin washing after the putty has completely dried. In this case, the chances of causing damage are minimal; moreover, apply force to erase in order to quickly obtain the desired result.
How to seal the gap between the window and the sill?
Very often a situation occurs when a small crack appears between the frame and the window sill.
This seemingly minor defect can cause quite significant inconvenience.
Most often these are cold drafts, and sometimes with heavy slanting rain and water leakage. You should not endure the inconvenience; you should try to find out the cause and, if possible, eliminate it.
Why do cracks form? Reasons for appearance.
In the vast majority of cases, gaps appear due to violations of window installation technology:
- choosing the wrong material for spacer pads;
- insufficient number of frame attachment points;
- poor-quality sealing of ebbs;
- incorrect execution of the window sill-window opening-frame conjugation unit.
If any of the listed mistakes are made, then most likely over time the frame will sag and the foam sealing the joints will become deformed. In this case, the formation of through cracks is almost inevitable.
Another possible reason why the tightness of joints may be compromised is subsidence of building structures. Fortunately, it is extremely rare and in this case it is necessary to think not about sealing cracks, but about major repairs of load-bearing structures.
What to do if there is blowing from the gap?
In cases where the gap is small and only cold air enters through it, minor repairs can be limited.
To carry out the work you will need the following materials and tools:
- silicone window sealant;
- gun for applying sealant;
- profile for tiles “internal corner”;
- construction knife;
- masking tape.
The profile is sold in standard lengths of two meters. This is too much for a regular window. To work, you need a piece that exceeds the length of the frame by 1.5-2 cm.
The perforated part of the corner is cut off. The edge along the cutting line is slightly sharpened with a knife. This is necessary to facilitate the installation process. It is much easier to drive a wedge into a narrow gap.
The joint between the window sill and frame is cleaned of dust and dirt. Using a knife, the gap is slightly widened. Small holes are made in the slopes to install the profile.
In order not to create unnecessary problems for yourself, strips of adhesive tape are glued to the frame and window sill. They will protect the surface from excess silicone.
Then, using a gun, a layer of sealant is evenly applied along the entire length of the joint. This must be done so that the maximum amount of it gets inside the gap. The pointed wedge of the profile is also covered with a layer of sealant.
The most important and difficult operation is installing the corner. First, it is inserted into the holes in the slope. Then it is carefully tucked into the slot and pressed for a few minutes.
After the sealant has set slightly, remove the tape. Silicone that gets on the corner is carefully removed with a rag soaked in alcohol.
The feasibility of treatment with construction foam
This insulation is a high-quality sealant, the main task of which is to efficiently fill all voids and bond surfaces together. Polyurethane perfectly connects two surfaces, which can include brick, natural wood and even concrete. This material can be used as a reliable waterproofer and a means to combat extraneous noise.
High density and strength appear only under certain operating conditions. Due to exposure to rain, snow and bright sun rays, the final performance will gradually decrease. After several years of use in improper conditions, the foam will simply begin to delaminate, and voids of different diameters and cracks will form in the seam.
This situation is fraught with complete resolution. That is why experts recommend sealing the seams with special solutions. After final hardening, the foam acquires a characteristic light beige tint. If the material turns brown after some time, then the process of gradual destruction can be considered complete. In such a situation, it is necessary to again clean the window opening from the previously used sealant and carefully close all the seams.
Sealing joints
Sealing joints indoors
To implement this construction task, it is necessary to use the same technologies. To achieve optimal results, you can use aesthetically pleasing drywall. This material will hide foam seams from prying eyes, and small slabs can be protected with emulsion or covered with wallpaper.
There is only one drawback - drywall is susceptible to high humidity, which is why it is not intended for the street side of the building. The material can be easily attached to the surface using standard size dowels and self-tapping screws. A craftsman can create a truly ideal surface with his own hands at an affordable price. Once the panels are in place, they should be coated with a quality primer for optimal adhesion to the upcoming finish.
Important! Drywall sold today can be processed in any way, but at the first stage you need to fill the cracks, holes, and screw caps.
To install drywall, you need to build a durable profile made of natural wood. If the walls are smooth, then you can get by with classic lathing. In this situation, the panels are simply placed on a special glue, which greatly simplifies and speeds up installation. Thanks to this, during many years of use, users will not encounter various unpleasant moments.
Otherwise, leaks, drafts, the growth of ice crusts, as well as uncontrolled growth of mold on those surfaces adjacent to the frame and wall opening cannot be ruled out. The standard service life of a foam joint is 17 years if all construction procedures were carried out correctly. But the final figure depends on the factory, operating conditions, as well as the degree of compliance of the completed construction work with established standards.
Using putty inside the house
Preparatory work
After installing the glass block, the space around the structure needs to be prepared. The complete drying process takes a day. Throughout this period, the foam continues to expand, filling the voids inside the frame.
Remains of polyurethane foam are removed from the surface of the window immediately after installation. The wet mass can be easily wiped off with a wet rag or pry off with a piece of plastic, for example, an old bank card. If the material has already hardened, then acetone will help remove defects. Special removers for cleaning equipment (“Macroflex”, “Cosmofen”) can cope with severe contamination.
Preparatory work Source zen.yandex.com