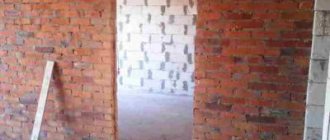
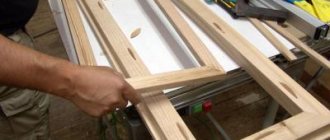
The construction of an internal demarcation element made of brick is still popular. Although the installation of partitions made from this material takes longer than the installation of plasterboard, plywood or plank partitions, brick walls are much stronger and provide better insulation of heat and sound. The main practical advantage of such a bulkhead is that it is quite strong and can support hanging shelves, cabinets and other similar elements without additional support reinforcement.
How to make a brick partition in an apartment: bricklaying
The technology for creating a brick partition depends on its mass - the floor slab must support the partition.
What masonry options are possible:
- On the edge. A similar method is used if the floors are not designed for a large mass. Such a bulkhead does not “eat up” square meters. But this option is not suitable for a high wall; it will simply fall apart.
- In one brick. A fairly robust design with a large mass. Used quite rarely. For such a wall, the load-bearing slab is additionally strengthened.
- One and a half bricks. Such a structural element has a significant mass and is erected only in industrial buildings.
- Half a brick. This option is perfectly resistant to load-bearing floors. Bulkheads are also built to insulate walls, most often in houses made of concrete panels. A false wall is erected with a gap, which is filled with insulation.
You also need to choose the right brick for the construction of partitions correctly. Two types of clinker are produced - silicate and ceramic. The first is obtained by mixing sand, lime and special additives in the required proportions with further processing in an autoclave. The second one consists almost one hundred percent of clay fired in kilns.
The standard, most convenient brick for laying has dimensions of 25x12x6.5 cm.
Clinker, depending on the area of use, can be: construction, facing and stove. The first is used for the construction of both main and interior walls. The second option is needed for external cladding work. Fireproof fireclay is used to create stoves and fireplaces.
The heat-protective and noise-insulating qualities of a building depend on the presence of cavities in the brick blocks. Since thermal insulation properties are not so significant for an interior bulkhead, when selecting material for the construction of false walls, it is better to prefer clinker without voids with excellent sound insulation properties. When using used bricks for masonry, you can always finish with facing clinker or special tiles.
The construction of a partition element made of brick is carried out in the following order:
- Mark the walls and floor taking into account the width of the bulkhead along with the plaster layer. Vertical lines are drawn on the walls using a level. This will facilitate subsequent work on the construction of the bulkhead.
- A layer of waterproofing material must be laid under the starting row, then a solution is applied to it. To control the evenness of the masonry, a rope is pulled between the intermediate walls. Since the bulkhead is covered with a plaster compound, the seams do not need to be particularly leveled, but vertical evenness must be constantly monitored. The reliability of a wall depends on the accuracy of its construction at a vertical level.
- The solution is applied to the previous row with a thickness of approximately 20 mm and a distance from the edges of approximately 30 mm. The clinker is placed on the mortar and pressed down, while moving it forward. The laid brick with its end edge removes part of the mortar, filling the vertical seam. Using a similar method, the seams are not completely filled, which is perfect for further plastering.
- A groove up to 50 mm deep is cut vertically in the load-bearing wall, into which the outermost blocks of the bulkhead are placed. This will help securely connect the structure to the main wall.
- The interior partition is not a load-bearing structure, so you need to leave a compensation gap of about 20 mm from the last row to the ceiling. The seam is covered with felt and coated with a plaster mixture. Usually the last row is filled with crushed clinker, due to the fact that a whole brick does not fit.
In one day, the bulkhead is erected to a height of no more than 1.5 meters. The mass of the brick partition is significant, and the mortar has not yet completely hardened, and doing large volumes at a time can cause deformation of the wall.
Standard size range, weight and marking
The GOST dimensions of reinforced concrete lintels are as follows:
- length from 103 to 596 cm;
- height from 12 to 44 cm;
- width from 14 to 38 cm.
The weight of these structures directly depends on the dimensions and can range from 20 kilograms to 2 tons.
Reinforced concrete lintels are mounted on cement mortar. Cutting of these structures for the purpose of adjustment is not permitted. If the wall thickness is large, the opening is covered with several timber lintels, laying them parallel to one another.
Special markings help you understand the wide range of these products. It consists of three groups of alphanumeric symbols separated by a dash.
The first digit indicates the GOST number of the section. It is followed by two letters indicating the type of jumper and two numbers of its length (in decimeters). The second group of numbers contains information about the design load in kN/m. The third group of marking symbols is service and contains data on the degree of concrete density, the presence of mounting loops, the degree of seismic resistance or the class of reinforcement.
For example, let’s decipher the standard designation of a reinforced concrete jumper: 2PB22-3-p:
- 2 — section number (indicated in the GOST table);
- PB – bar lintel;
- 22 – length in decimeters (220 cm);
- 3 – bearing capacity (design load, 3 kN/m);
- p – the product has mounting loops.
To increase the load-bearing capacity of lintels, prestressed reinforcement is used. Such structures can be distinguished by the type of reinforcement indicated at the end of the marking. For example, 5PB21-27-AtV. In this case, AtV is a type of prestressed reinforcement.
Construction of brick partitions: how to lay a brick lintel
Brick partitions, if they are not built in the form of a ledge, are always equipped with a door or arched opening. To design it, you definitely need a jumper. It prevents the upper brick rows from collapsing and serves as an additional ligament that increases the strength of the bulkhead.
The lintel elements can be made of metal or reinforced concrete, but they can be made from the brick itself.
The laying of this element in a brick partition is carried out in such a way that it is able to withstand the pressing mass of the upper part of the partition.
According to the installation technology, lintels can be ordinary, wedge and arched. What is the difference:
- Privates. They are used when the width of the openings is no more than 2 m. The masonry is made in height in 6–9 rows, observing all the technological features of the dressing. To create such a lintel you need formwork. It is also necessary to reinforce it with a rod placed on its bottom and poured concrete. After the composition has gained the required strength, the brick wall continues to be built.
- Wedge-shaped. The construction of such jumpers requires V-shaped seams. The construction also requires formwork. The width of the lower part of the wedge is 0.5 cm, the upper part is up to 2.5 cm. Brick blocks are laid on both sides towards the center of the lintel element.
- Arched. Brick blocks are laid similarly to the wedge technology. The location of the top seams is at right angles to the arch and the outside of the bulkhead. All the others are shaped like a wedge: they taper downwards.
For brickwork of wedge and arched lintel elements in partitions, a mortar of grade M-10 and higher is used, for ordinary mortars - no less than M-25. Waste masonry is considered unacceptable. The seams must be filled with mortar. Only brick blocks of strength grade M-75 and higher are suitable for lintels. They must be carefully checked for cracks and other defects.
Features of aerated concrete
Aerated concrete is a fashionable and in-demand building material, used primarily in private housing construction. It belongs to the family of cellular concrete, porous materials with specific parameters. In this group, aerated concrete stands out for its most balanced set of qualities, which make it a leader among all alternative types. The reason for this success was the composition - the components for making aerated concrete are the same as for ordinary, traditional material. The basic components used are Portland cement and sand, to which lime and aluminum powder (gassing agent) are added. When water is added, a chemical reaction begins (aluminum powder and lime in the presence of water), during which active gas evolution is observed. The structure of the material becomes porous, replete with small (2-4 mm) bubbles of carbon dioxide. This is the fundamental difference between aerated concrete and other cellular concrete, which is a mixture of ordinary concrete with porous granules from one or another additional component.
The pores of aerated concrete make it a light and warm material, optimal for building a private house. However, it is not suitable for the construction of multi-storey buildings or industrial structures. This was one of the reasons for the rejection of aerated concrete when it appeared on the market. Builders are accustomed to working with durable and reliable materials and treated aerated concrete as ordinary rigid insulation. Only in the 90s of the last century, when active construction of private houses and cottages began, aerated concrete again became of interest to developers. Its working qualities turned out to be the most balanced and allow for considerable savings during construction and further operation.
Advantages and disadvantages of aerated concrete
The advantages of aerated concrete are:
- light weight, making it possible to reduce the power and size of the foundation and reduce construction costs;
- laying aerated blocks can be done with your own hands, without the participation of lifting equipment;
- low thermal conductivity, providing savings on heating the house;
- smooth and precise block geometry with minimal tolerances, ensuring fine-seam masonry (joint thickness 2-5 mm),
These advantages (except for the geometry of the blocks) are also characteristic of other cellular concrete. However, aerated concrete is superior to them in terms of a combination of parameters. In addition, it is cheaper than other materials, which becomes an important selection criterion for developers.
However, aerated concrete has many disadvantages:
- low strength and load-bearing capacity. This fundamentally distinguishes the material from traditional concrete, which can withstand enormous loads. The pores of aerated concrete collapse under pressure, and the material sags. This is unacceptable when carrying out serious and responsible work, therefore, a restriction on the height of buildings has been introduced for aerated concrete (up to 3 floors);
- hygroscopicity. This quality is common to all types of concrete. However, the porous structure here becomes the main risk factor - moisture is absorbed into the array and begins to accumulate in the pores. When the temperature drops, it freezes and begins to expand, destroying aerated concrete from the inside like a slow explosion;
- inability to resist multidirectional loads (bending and stretching). This is a common disadvantage of concrete, requiring reinforcement of building structures.
Often, the advantages of a material simultaneously become its disadvantages. For example, the low thermal conductivity of aerated concrete, which provides a comfortable microclimate and savings on heating, often becomes the cause of harmful phenomena - the appearance of cold bridges. These are areas whose temperature is lower than the rest of the wall. Cold bridges can be seams that are too thick (hence the importance of precision and care during installation), masonry elements made of ordinary concrete or metal, and other parts with high thermal conductivity. The appearance of such an area is an extremely undesirable event, since condensation begins to settle on it. Aerated concrete gets wet, and the consequences of this process can be very sad.
Installation of a brick partition: installation of a reinforced concrete lintel
The installation of brick lintels in a partition is, from a constructive point of view, a complex process. An inexperienced person is unlikely to be able to assemble it on his own the first time. In terms of bending strength, such a structure cannot compete with a reinforced concrete lintel. They are usually used when constructing brick walls independently in houses and apartments.
You can purchase a ready-made element. But if it is not there, it is realistic to cast a concrete lintel in formwork with four pre-laid reinforcement bars, which must have a cross-section of at least 10 mm. The rods are connected using metal wire into a frame. It is necessary to ensure that the thickness of the lintel matches the height of the rows.
Process
The arrangement of lintels, with the formation of a unit and taking into account support in the wall, must take place according to the rules described in SNiPs. Since reinforced concrete lintels are used most often in modern buildings, the process of their installation consists of the following nuances:
- For laying, a ledge is made with a width of at least 25 cm, and on each side of the opening, the length of the structure should exceed this width by 50 cm.
- For installation, use a truck crane to lift the lintel - it will lift and lower it to the desired support point, onto which uncured concrete mortar has already been applied.
- With prefabricated options, formwork is arranged, formed along the width of the opening, a reinforcement cage is knitted and the lintels are poured in a monolithic manner, leaving them until completely dry.
Metal jumpers are lightweight. Presented in the form of channels and various forms of rolled steel, their advantage is that during operation they can be cut to the required length.
This option is also suitable when other types of lintels are categorically unsuitable for the wall of a particular opening, or a new one made from other materials cannot be installed (the old opening is expanded or a new one is cut out). Metal can bend, so supports are made to support them. In the rest of the process: concrete is poured, as with reinforced concrete.
Brick lintels are mounted to the main wall along the top of the opening , and then connected to each other using a shelf from which clamps hang, placed in vertical seams. The clamps reliably reinforce the lintel, and it turns out strong.
Experienced craftsmen choose longitudinal, wedge, beam or vaulted installation methods. Concrete mortar for laying is mixed in small portions so that it does not harden quickly.
Recently, in most cases, builders have placed the professional BAUT reinforcement system into brick lintels.
A simple and reliable way to install a brick lintel - in the video:
How to install beacons before plastering a brick partition
Such beacons are required to ensure that the partition is perfectly level. They are produced in thicknesses of 0.6 and 1 cm. If the wall is plastered with a thin layer, or if the beacon is removed at the end of the work, an element with a thickness of 0.6 cm is used. A similar option is used when preparing the partition for painting or wallpapering.
If the part is not removed, its anti-corrosion properties are lost over time, and rust emerging through the decorative coating becomes the reason for new repairs.
If the wall is supposed to be covered with ceramic tiles or plastic panels, centimeter-thick elements are used. They can be left in the plaster. They are more resistant to deformation and are very easy to install.
But it is important not only to choose the right beacons, you need to install them correctly. How to do it yourself:
- We fix the level on the rail with masking tape. This is necessary so that the instrument’s eye is located at a comfortable height, and you do not have to constantly bend down or stand on the stand.
- We prepare the partition for installation of the guide elements. Using a brush with stiff bristles or a broom, remove sand chips and dust from the surface, knock off the remaining solution and moisten with water.
- We check the verticality of the bulkhead with a rack with a level attached to it. This way you can identify exactly where you need to apply more plaster mixture under the lighthouse.
- We make vertical marks at the installation points. Using a spatula, we spread cakes of plaster mortar over them, the size of a handful and a diameter of about 30 cm. First, you need to install the lighthouse elements at a distance of 15 cm from the corners. The plaster cakes should adhere tightly to the surface of the partition.
- We apply a beacon to the plaster and press it down on each piece of cake one by one.
- We attach a rail to the beacon element and gently press on it, while simultaneously monitoring the level indicators.
- If a distortion is detected, press harder to ensure correct installation of the beacon. Once verticality is achieved, remove the lath and adjust the plaster mixture on both sides of the beacon element with a spatula to securely hold it after setting. Remove excess solution.
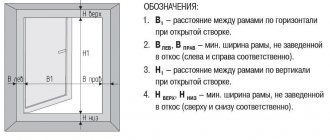
When checking the accuracy of installation, keep in mind that no deflections or gaps are allowed between the rail and the beacon element. Only if these conditions are met can correct installation be achieved.
Organization of the masons' workplace.
How to hang kitchen cabinets on the wall 80 photos mounting on a mounting rail on a plasterboard wall in the kitchen
When performing masonry work, the productivity of masons is greatly influenced by the correct organization of the workplace. The organization of the workplace should eliminate unproductive movements of workers and ensure the highest labor productivity. Therefore, the workplace must be within the range of the crane, have a width of about 2.5 m and be divided into three zones: a working area 0.6...0.7 m wide between the wall and materials, in which masons move; a materials zone about 1 m wide for placing pallets with stone and boxes with mortar and a transportation zone of 0.8...0.9 m for moving materials and the passage of workers not directly involved with the masonry.
Number of pallets with
stone and boxes with mortar and their alternation depends on the thickness of the wall or structure, the number of openings in a given area and the complexity of the architectural design.
Since the greatest height, and which is still rational for laying, is 1.2 m, then all stone buildings and structures are divided by height into tiers of the same size. Therefore, when the masonry reaches such a height, it is necessary to stop work and install (or rearrange) scaffolding. In order to coordinate the process of installing scaffolding and ensure constant employment of masons, the building or structure is divided in plan into sections and plots. Captures are areas of a building or structure under construction in which the labor intensity of the work is approximately the same. The grip is allocated to a team of masons. Each plot is divided into plots, which are sections of masonry allocated to a team of masons. The work is organized as follows: after finishing laying a tier in one section, masons move to another section, and in the first section they install or rearrange scaffolding or mount floors.
The execution of work when laying walls is closely related to a number of related and auxiliary works. Thus, transport workers ensure a continuous supply of materials to workplaces. After finishing the masonry, carpenters install scaffolding to the height of the tier. Upon completion of the floor laying, the installers begin installing the floors, staircases, and partitions.
The work of teams of various specialties must be organized so that there is no downtime. This is achieved using the flow-grabbing method, when the building under construction is divided in plan into parts of equal labor intensity - grips, and in height - into tiers.
So, if the building is divided into two sections, then on one of them brickwork is carried out, and on the other at this time prefabricated reinforced concrete floors and stairs are installed or the scaffolding is rearranged (this can be done in the second shift). Procurement of part of the bricks at workplaces is possible in the third shift or in the second with the installation of scaffolding. The rest of the brick, as well as the mortar, is supplied continuously during the laying process.
When organizing work in a continuous manner, it is necessary that the laying of the walls of one floor on the first section is completed in the same time as required for the installation of floors and scaffolding on the second section. This makes it possible for masons and installers to switch places after completing their work on the grips: the masons move to the second grip for laying the walls of the next floor, and the installers move to the first for installing floors on the finished walls.
If you put the required number of masons on the block, the laying of one tier of walls can be completed in one shift. In this case (if the scaffolding is rearranged in the second shift), the laying of one floor on the landing is completed in 3 days, and the laying of one floor on the entire building is completed in 6 days.
Installation work must be completed within the same amount of time. If this fails, change the number of grips or increase the duration of the masons’ work on the grip tier.
Construction of a brick partition: plastering
Before you start plastering, you need to clean the wall of dust and mortar protruding from the seams. Guide rails are installed on the wall to determine the thickness of the plaster layer. The distance between the beacons is taken to be slightly less than the length of the rule.
Before applying the plaster composition, wet the surface. And near the partition they spread a plastic film to make it easier to remove the plaster falling on the floor.
The dry mixture is mixed with water (the ratio is indicated on the packaging by the manufacturer). The solution is applied to the bricks as follows: using a trowel, scoop up the plaster and forcefully throw it onto the wall.
To level the surface of the plaster layer, a rule with a length slightly larger than the distance between the guides is used.
Applying putty will be the final stage of preparation for decorative finishing. After puttying, the partition structure can be painted or wallpapered. As an option, use plaster with a decorative effect.
Reinforced concrete
To strengthen the opening in the load-bearing wall of a house, reinforced concrete lintels are most often used. A preliminary calculation allows us to determine which element will be most suitable in this case. Such reinforcement of the opening can be made directly on site using formwork, reinforcement and liquid concrete.
To speed up the process, already cast elements are most often used. In order to secure them in the load-bearing wall, it is additionally recommended to use reinforcement to strengthen the sides of the opening. In other words, the metal is laid on those areas that are in direct contact with the reinforced concrete part.
The main requirement in this case is compliance with the installation rules. The lintel must completely cover the opening and extend approximately 25 cm into the wall. The exact requirements are determined by the specific type of structure. For each type of lintel and its relationship with the width of the opening, special standards have been developed.
Finishing after installing a brick partition
The clinker wall does not need to be finished at all. A partition without a decorative covering, with correctly selected interior details and lighting, creates coziness in the room, adds romance to the room and saves money.
But for all its originality and simplicity, such a bulkhead has a number of disadvantages:
- You cannot leave all the walls in the room unfinished. Otherwise, there will be no comfort - the room will resemble a basement.
- Untreated seams of internal brick partitions become clogged with dirt and dust, so it is better not to leave an unplastered wall on the working side of the kitchen.
- A brick bulkhead without plaster needs properly organized lighting.
If plastering is done, the finishing can be varied: wallpapering, painting with water dispersion and other composite compositions.
You can mount a frame for sheathing with plasterboard. Bulkheads made of silicate brick blocks, painted with thick white paint, look interesting and stylish.
According to master masons, the construction of interior partition structures, especially half-brick ones, is not the most difficult process. If you follow the technological rules of masonry and take into account all the nuances, even a beginner can handle the construction of a partition.
Calculation of a lintel in a wall
Exact calculations are performed during the project preparation process. To do this, you need to take into account the specifics of the building material, the potential load exerted on the opening and the features of the structure itself. The main parameters in order to make the final calculation of the reinforcement of a doorway in a load-bearing wall are:
- strength: 1.12 * part strength * material strength;
- deflection: standard moment * design length of the jumper / (10 * moment of inertia * modulus of elasticity of the material) = 1/200;
- load, including from the top masonry and floors: thickness of the opening * width of the opening * height of the masonry * specific gravity of the material;
- moment of resistance: design load/8/design material resistance;
- moment of inertia: depth of support of the jumper * moment of inertia of the material * design length of the part / (10 * modulus of elasticity of the material).
Calculation of reinforced concrete lintel in the wall
All parameters necessary to perform the calculation should be found using formulas in a certain sequence. Data for some of them can be obtained by analyzing the properties of the materials used and design data for the opening and the house as a whole.
Based on these indicators, you can get the final result, which will show all the necessary parameters for arranging a lintel for the opening of the load-bearing wall of the house. If the standards are observed, the building will not sag and will be completely safe for its operation.