Installing a plastic window with your own hands is not as difficult as it might seem at first glance. Of course, without special preparation the result is unlikely to be ideal. But if you have the minimum skills, get down to business with confidence.
The idea for this master class came completely unexpectedly. It all started with the fact that I was offered to “shelter” a plastic window. The previous owners had minimal complaints about it: “it blows a little and the sash hurts,” but they decided that “rather than fixing the old one, it’s better to buy a new one.” And so they did. For them, the “old” window turned out to be unnecessary, but for me... as they say, in the “kulak” economy everything will do.
Windows, which are commonly called plastic, from the point of view of re-installation, have one unpleasant feature: it will not be possible to fit them to the window opening at home. You have to adjust the opening to fit the window, and this is not always possible. However, I was lucky here: the dimensions of the frame “fit” into the dimensions of my country house. But here it is necessary to make some digression.
Almost all houses can be divided into three types: for simplicity, let’s call them “stone”, “logged” and “plank”. Punching new openings in “stone” ones, that is, made of cement blocks, bricks, monolithic concrete and similar materials, is difficult and labor-intensive. “Chopped” ones, made from logs or timber, are more convenient in this regard: in most cases, widening the opening is possible, it will not affect the strength.
My house is of the third type, “plank”, or rather frame-fill. This is a typical option that was widely used in summer cottages until about the mid-90s. (By the way, in Soviet times there was a clear limitation on the size of buildings: it was not allowed to build permanent houses on dacha plots - only light “summer” buildings. Of course, not everyone followed this rule, but that’s another conversation). The frame is made of hewn logs and beams, the walls on both sides are sheathed with ordinary roofing felt and boards. The backfill is sawdust soaked in copper sulfate. Of course, this is “outdated” technology. But, firstly, the dacha appeared in my family about 60 years ago, and, secondly, the house was built in the early 90s.
To complete the picture, I’ll add one more touch - I built this house myself, with my own hands. First as an assistant, and then independently, alone. The interior decoration was entirely mine. There were few tools: a woodworking machine, a saw, an ax and a blowtorch. For interior decoration, I used unedged boards: I cut them on a machine, jointed them, then burned the jointed side with a blowtorch, after which I selected quarters on the machine, chamfered them, and then adjusted each board in place. This is how I had fun when I was 16-17 years old.
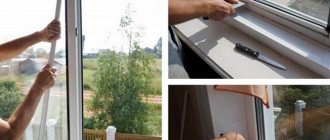
The window that stood earlier (photos 1, 2), by the way, was not new - in those days they treated everything with care, they even tried to use things that had served their purpose again.
A few years after the house was completed, I updated the windows - instead of single glazing, I made double glazing. Although the house has a stove (of those called gas generators), it is used only as a summer stove. Insulating it is quite possible and not even very difficult.
Many of my neighbors do this: they replace the windows with plastic ones, insulate the walls with mineral wool, cover them with siding - and get buildings in which they can spend weekends in the winter. But for winter trips I have a brick kitchen, it is smaller in size and has a major brick oven. So I decided to install a new window more for fun.
Required Tools
The task of installing a new window in my case consists of three stages. First you need to widen the opening in the wall, that is, tear off and cut out everything that is not needed. Then carry out the rough work - make a “frame for the frame” (it’s called a frame or casing) and fix the plastic frame in it. The last step is finishing work: window sill, slopes, trim.
I will list the main tools used (photo 3).
A circular saw . It is needed at all stages - from cutting the opening to the final finishing. The accuracy of the “circular” is sufficient for most types of work. Chain Saw . An electric one is sufficient here. The tool is not very precise, but it is capable of making a “blind” cut to a great depth. The main thing is that there are no nails on the cutting line - they cause the chain to “sit down” instantly. Reciprocating saw . Like the chain, the saber is useful when carrying out dismantling work, especially when cutting materials with nails. Also used for “finishing” in difficult places behind a circular saw. I use it quite rarely, but every time I understand that without it it would be more difficult. Electric planer . It is mainly needed at the final stage - for precise adjustment of the width and thickness of materials. Fraser . It was useful for processing the edge of the window sill and the joints of the platbands. Hammer and nail puller .
Other tools were also occasionally used: a drill (it also worked as a screwdriver), a jigsaw, and even a compressor with pneumatic tools.
Conclusion:
There is such a saying. If you want to do it well, do it yourself. This statement best describes window installation.
If you install plastic windows yourself, then such installation will be much better and cheaper. The approximate price of three types of tapes is 1000 rubles. The cost of installation from the company according to the “bungle-blunder” principle is 2500-3000 rubles. Total direct savings for self-installation will be 1500-2000 rubles.
At the end of the article, I suggest watching two videos on this topic.
Preparing to install a window
There is no point in describing the dismantling work step by step. The strength frame of the house is made up of vertical posts located two meters apart; they bear the main load. An additional one was installed between the “power” racks, which needed to be cut out. This will have virtually no effect on strength. The inner boards were carefully removed, the outer ones were cut without removal from the house and removed along with the sawn part of the stand.
Then came the turn of the second stage: the boards were selected and installed, which became the “frame for the frame.” There is no need to process these boards - they will all be “covered” by others. Photo 4 – lower right (when viewed from the inside) corner. The bottom board is a support for the window sill; its width corresponds to the thickness of the wall with sheathing. A stand rail is laid on it (a similar element can be used when installing ordinary plastic windows; it is called a stand profile). The width of the slats is “the thickness of the plastic frame”; the height is selected so that in the future the window sill will cover both it and the gap between it and the frame. I had a wide and thin plastic window sill included in the kit; a stand rail was not required with it, but I decided that a narrow window sill made of wood, but of greater thickness, would look more beautiful.
It is highly advisable to place the bottom board strictly horizontally, level. The remaining casing boards can be set during the “trying on” process.
As can be seen in the same photograph, the distance between the window and the inner wall of the house is a matter of centimeters. If it had been larger, I would have made this frame stand also “the thickness of the wall” (like all the others), but here it turned out to be more expedient to make it “the width of the frame.”
Photo 5 – “trying on”. The casing boards are installed flush with the outer skin. With this installation, there is no need to make slopes. A drip drain to drain rainwater is also not needed: the one that covers the skirt (vertical cladding boards) copes with the task quite well. If the house were covered with siding, both slopes and flashing would be needed.
How to take measurements
There are two window configuration options. Panel houses often have frames with a quarter (double-sided side). In brick buildings, the opening is formed by a pair of rectilinear planes perpendicular to the walls. This design does not provide for a quarter. For both options, there are diagrams and drawings demonstrating the process of taking measurements. They need to be carried out from the outside. If the room has a balcony, measurements can be taken by going out onto it.
If the opening has a quarter , the height of the window is determined by measuring the distance from it to the bottom point of the opening. Add 2 cm to the result so that the product goes slightly overboard. If the windows will have a window sill and drainage, you need to provide 3 cm for the support profile. Then 3-6 cm under the mounting foam is subtracted from the result.
According to the standards, windows should extend beyond the quarter by 3-6 cm . So their width should be less than the full size of the opening, but greater than the distance between the sides. Add 4-6 cm to the last parameter. In this case, there should be a gap under the foam. It is not worth recessing the structure in a quarter to an excessively great depth - this complicates the installation of the mesh.
About "nuances"
For houses made from logs or timber, shrinkage must be taken into account when installing the frame. It is invisible to the eye, but if you simply nail a vertical board to a log house, next year gaps will form between the logs. To prevent this from happening, they make a sliding connection without fastening with nails - a tenon on the logs and a groove in the posts of the post (or vice versa). The height of the entire window opening also decreases during shrinkage, and the top board begins to put pressure on the frame, which can lead to its deformation - up to the impossibility of opening the windows or even cracking the glass.
They deal with this differently: between the top board and the log they leave a completely free space of several centimeters high. It will shrink after shrinking. In this case, the frame boards have a very complex shape and are connected to each other on tenons - ideally, there is no need to nail any additional boards to them: put it in the log house, install the window - and you can cover it with platbands.
In a good way, any log house must be built for at least two years: the first one is built with a log house, the second one is finished, including windows. And even after this, the shrinkage will continue for several more years, and the house will need to be caulked from time to time, closing the gaps between the logs. But this is not always done - today they often build immediately “turnkey” from material of unknown moisture content, and the builders do not care what happens in years to come. Moreover, you still need to see the cracks, but if they are covered with finishing materials and insulation, this will not be possible. Just feel it - heat loss in such a house will increase noticeably.
For “stone” buildings, the problem of shrinkage does not exist. In fact, they usually don’t even need a pigtail at all (although options are possible).
The second “nuance” concerns the size of the resulting window opening. It should be slightly wider and higher than the window frame. When ordering a window “into the opening”, this is taken into account during manufacturing. Since, on the contrary, I had to adjust the opening under the window, I made the gaps minimal - within 10 mm on each of the four sides. This was enough to insert the tip of a foam balloon into the resulting gap. A larger gap is also acceptable.
What to look for when installing windows yourself
Do-it-yourself work has its drawbacks: manufacturers do not provide a guarantee for products if measurements and installation were carried out by unprofessional craftsmen.
It will be possible to replace a window unit or a broken element only if employees of the manufacturer or certified service departments participated in all stages. Window systems are not subject to strict standardization; they can be of any size, shape and design. Therefore, you need to measure a specific opening for installation extremely carefully and more than once. An error of even a few millimeters will result in the window simply not fitting into the opening or being too small. Specialists can correct minor flaws, but if you do not have experience, it is better not to risk it.
Installation of a plastic window frame
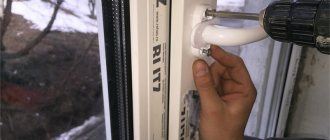
Everything is quite simple here. Usually the frame is secured from the sides with anchors - two on each side is enough. Or even screws, if there is casing. A couple of small shims are placed on the stand rail to provide clearance between it and the frame. Then they drill holes, install fasteners, check the side gaps and foam them. The window is fixed not only on the fasteners - the foam provides such a strong connection that the fasteners, by and large, are needed only for fixation while it dries.
Now - in more detail. The holes in the frame were already drilled (if they weren't there, I would have simply secured the frame with screws). The remains of the anchors were also included, but they were disposable and could not be restored. I had to go to the store for new anchors and polyurethane foam. Moreover, I took only two anchors - “for fun” I decided to experiment and make two more fastening elements myself.
Photo 6 shows standard anchor screws. The issue price is 8 rubles per piece. The same, but “in a blister” - 25-30 rubles per pair. A container of the first available foam costs 160 rubles; branded brands of the same volume can now cost between 300-400 rubles. I don’t exclude, however, that they “give more foam.”
Photo 7 shows the procedure for making a pseudo-anchor.
In my household I found a stainless steel tube with a diameter of just 10 mm. By holding two pieces of board in a vice and drilling a hole in their joint with a diameter equal to the diameter of the sleeve, I got a “pipe clamp.” I put a tube in it, cut off the required length, cut the tube lengthwise and spread the “antennae” a little with a screwdriver (photo 8).
The length of the tube is such that it extends several centimeters into the rack. The depth of the hole in the rack was selected so that the tube was recessed almost flush with the frame. It will sink a little more after tightening the screw.
When screwing in the anchors, you also need to be careful that they do not “shift” the frame to the right or left.
You can use temporary pads that are placed in the gap between the post and the frame. By the way, it is better to tighten the screws in the anchors with a hand screwdriver; this provides more precise control (photo 9).
I can also note that I liked working with homemade anchors more than with factory ones.
When might it be necessary to dismantle and replace?
Removing a window from the wall structure of a house is an important part of the life cycle of home ownership. The need to implement such a process occurs when the following events occur:
Natural wear and tear of window elements, due to which the original characteristics of PVC windows have changed in a negative direction.
The window became a source of cold, moisture and noise entering the premises, creating an emergency situation in them, which the repair of the old block is no longer able to correct.- Mechanical defects have arisen, for example, the main frame has burst, after which subsequent operation of the PVC window is impossible.
- The owner of the house decided to install a new modern energy-saving window.
- The window is not able to perform its functions because the installation technology was violated during its installation or the measurement of the window opening was performed poorly.
- The window was stored and transported in violation of the rules, as a result of which the frame was distorted.
- When opening/closing the doors there was strong pressure.
- If, during a major renovation of a house, the owner decides to replace outdated window structures.
According to statements by professionals, dismantling plastic windows is one of the most labor-intensive jobs, most often exceeding in volume the process of installing new blocks.
Foaming the gap between the window opening and the plastic window frame
It can be done later - after installing the glazing. The process is simple, but, as usual, not without “nuances”. For a window with a perimeter of approximately 7 m, one cylinder with a volume of about 400 ml is more than enough.
Foam that accidentally gets on clothes cannot be washed off with almost anything; if it gets on the skin, it will “go away” for several days. If foam falls on any surface, do not try to remove it until it dries completely.
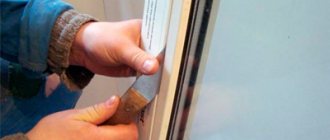
First, the gap between the frame and the jamb must be moistened generously. For this purpose, a “sprinkler” is suitable, which offers various household chemicals. I used a more productive tool - a “moving” gun attached to a compressor (photo 10). In general, such a “bundle” is also suitable for the garden - it successfully replaces a garden sprayer.
Before use, the container can be slightly warmed up in a water bath (no more than 30-40°C), so the foam yield will increase. When working, hold it with the tip down (photo 11). The balloon must be moved at such a speed that the foam fills approximately a third of the gap volume. When dry, it will expand and cover it completely. I removed the pads under the frame after “passing” the perimeter, and I also foamed the gaps from them.
You need to take a break from working until the foam dries completely. Before this, under no circumstances should you close the gap with any materials - if the foam has nowhere to expand, it is quite capable of even bending the frame. Excess dried foam is cut off with a knife. The foam can be painted. And it is even necessary if it is exposed to direct sunlight.
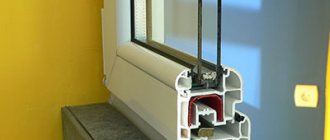
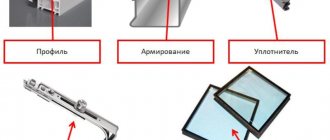
What does a double glazed window consist of?
Internal components:
- Glass cloth.
- Sealed air space.
- Frame or profile.
- Plastic glue.
- Molecular sieve.
- Sealed components.
Replacement of glass unit
A double-glazed window is a sealed type installation consisting of two or more glasses. They are separated by a corresponding number of air chambers.
An important detail is the spacer frame. The part is responsible for preserving the air inside and does not allow condensation to accumulate. The main function is to maintain a distance between the glasses inside.
The molecular sieve is made of a material with drying properties using granular elements. Designed to protect against condensation.
Window trim
For the interior I used the same boards that were previously removed. There were plenty of them to spare. You can see how the finishing looks from the inside in the photo at the beginning of the article. There is only one new board here - the window sill. I didn’t “darken” it - in a few years it will darken on its own. Another new one is a few wooden corners (instead of platbands) and a rail under the window sill. They were found in stock - they had been lying around for a long time and were just the right color.
Here I will draw attention to two points. The first is the design of the right side of the window. It seems that either the window is uneven or the wall is “crooked”. The second option is correct: even when installing the frame, this corner post was placed with a slight slope (carpenter's mistake). It was not possible to completely disguise this, so I went a different route - I “pushed out” the slope. How this is done is clear if you look closely at the lower right corner: the joining of the two boards is not made at a right angle (photo 12).
The one that is adjacent to the window is slightly “turned” (its thickness was changed using a plane, plus linings were laid), the one that is near the wall is attached more or less evenly. At the top, on the contrary, the board next to the wall is “turned inside out.” In addition, it is a centimeter narrower on top than on the bottom. Both of these boards were made from the same board, so the pattern is the same: the line of their joining is almost invisible. In total, all this gives a feeling of “something incomprehensible.” The idea is not new - something similar was used, for example, during the construction of the Prague “dancing house”.
The second trick relates to the installation of external trim. Practice shows that even a simple joining of their boards at an angle of 45 degrees is difficult - if you make a slight mistake, a gap appears. To minimize it, you can do this: attach the top board to the wall, lay the side board on top of it and mark it (photo 13).
Then remove the side one, cut it, fasten it again - and mark the one under it. Or take a hacksaw and make a cut without removing the boards. Using a circular saw with a set cutting depth of “one and a half boards” is even easier, but such work requires qualifications and the presence of scaffolding - it is impossible to work with it while standing on a ladder, according to safety regulations. The easiest way to attach external trim is with screws - it’s convenient to adjust and remove later, for example for painting.
Possible difficulties and errors
If the performers neglect the recommendations and roughly and carelessly dismantle the window unit, the consequences of this step will be quite negative and will lead to large financial costs that will be required to restore the normal technical condition of the window opening.
Basic mistakes in dismantling a window frame:
- the workplace is not prepared and the necessary safety measures have not been taken;
- the work is carried out by one person, although according to the requirements there must be at least 2;
- the frame is dismantled incorrectly, with the window sill and ebb installed;
- the sashes are not removed from the window correctly;
- the sashes are removed from their hinges incorrectly without releasing the plastic covers; correctly, you first need to remove the top hinge, pull out the rod, and then tilt the sashes to remove it from the bottom hinge;
- the block is removed without trimming the mounting foam;
- the frame cuts were not made correctly with a hand saw;
- preliminary dismantling of the fittings was not carried out.
Installing glass in a plastic window
Installing turn-and-turn and tilt-and-turn windows assembled with double-glazed windows on hinges is not a difficult problem; the design may be different, but everything is easily understood in place. There are subtleties when installing the double-glazed windows themselves. You should know that they are placed not just in the frame, but on small plastic spacers: at least two on the bottom and one on each side (photo 14).
The glazing beads that press the glass unit are adjusted very precisely at the factory. When removing them, it is advisable to mark each bead and not confuse them. If this has not been done, you can try to take a closer look at the marks on the glazing bead and window frame - small scratches that occurred during use or during removal will always be found.
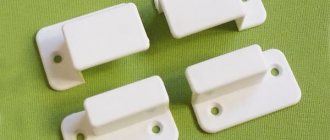
To make it easier to install the bead protrusion into the frame groove, you can lightly lubricate it with any colorless lubricant - silicone, WD‑40 or even soap. Installation is carried out “from the edges”: long beads are first inserted from the corners, then clamped “towards” infrequently. But making it more difficult for dacha thieves to break into a house is quite logical. To protect windows, I use wooden panels on latches. A new shield had to be made for the new window. Even three (photo 16).
The work is simple - wooden blocks with boards stuffed on them. Moreover, these are boards that were left after installing the window. On the left are those that were on the wall from the inside, on the right are the former external cladding, the boards in the middle are the shield that covered the old window. They are fixed at the top with latches, at the bottom, so as not to make holes in the window sill, the design is slightly more complicated: a wooden block is used, reinforced with an aluminum profile, the latches fit into the holes in the side slopes. It is quite difficult to break such a shield while outside. Protection, of course, is not absolute, but sufficient.
Preparatory work
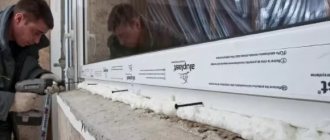
Before installation, you can lay a waterproofing layer along the entire length of the opening. This is especially true in wooden houses. It may be necessary to restore the original size of the opening using a cement screed.
If the edges are irregularly shaped, they need to be smoothed using putty or sealant.
You should also clear the work area of foreign objects, and cover nearby furniture; for this you can use a suitable fabric or thick film.
Basic insertion rules
To install the product without errors, you must follow the established rules :
- Select installation time. The warm season is the optimal time for this process. It is best to plan it in the summer - from May to September.
If a move or an unexpected breakdown still forces you to postpone the work to another time, then it is allowed to install double-glazed windows at an ambient temperature of no lower than -5°C and no more than 28°C.- Take measurements carefully. The tightness and efficiency of the new package depends on the quality of measurements.
- Attach the glazing beads strictly to the place from which they were removed.
If the size of the product is large, then it is necessary to work only with a partner to avoid possible damage. For those who are dealing with product installation for the first time, working together will be much more useful.