SHARE ON SOCIAL NETWORKS
FacebookTwitterOkGoogle+PinterestVk
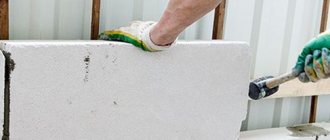
Mounting wedges have been around for quite a long time and are actively popular among professionals who are involved in repair work. The capabilities of the products are quite extensive, so thanks to them it is easy to solve a lot of problems in leveling surfaces and attaching a finishing coating to them. Let's consider the types of these mounting elements and the features of their use in repair work.
Mounting wedges are indispensable assistants in construction and repair.
What are mounting wedges and what are they used for?
The main task of mounting wedges is high-quality leveling of surfaces. Despite the fact that you can use a variety of available materials for this, it is much more convenient to use specialized elements. This approach greatly simplifies the work and allows you to less scrupulously select the thickness of all parts. In addition, this eliminates the risk of drying out and settling of the substrate, which is often encountered in the future.
Most often, mounting wedges are used to level surfaces.
Plastic mounting wedges are completely free of this drawback. Despite their simple design and unassuming appearance, they are an excellent solution to many problems. The plastic from which such wedges are made is very durable; it has a fairly long service life, practically not inferior to the service life of other materials.
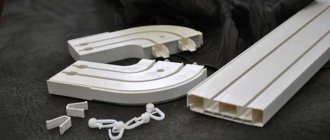
Each wedge has a cross-section in the shape of a triangle with a right angle. In this case, the length and height of the mounting element are determined by the legs of a given triangle. The wide edges have a ribbed surface. Thanks to the presence of special protrusions on the wide sides, two wedges laid side by side do not move apart even under the influence of significant load.
The technology for laying such products involves folding them into one rectangular block, which levels the surface. At the same time, you can easily adjust the height of the block by moving the wedges apart and bringing them together. Therefore, the adjustment can be quite precise, as a result of which the supporting surface will not be distorted.
Mounting plastic wedges: types and features
The classification of these elements is very simple, since there are only three main standard sizes of wedges:
- small, designed for a load of 200-350 kg;
- medium – 1500-1700 kg;
- large – 2200-2500 kg.
Plastic wedges are produced in various sizes, which are designed for different loads
Mounting plastic wedges, the dimensions of which comply with the standards, can easily withstand such loads and not deform. Numerous stiffening ribs and a honeycomb structure are responsible for this. If you look closely at the surface of the wedge, you can easily see flat and hollow areas. They are located in such a way that the area of their contact during the process of bringing together and spreading is as large as possible.
Important! The loads indicated by the manufacturer are only valid for wedges that are completely adjacent to each other. Adjusting products reduces their endurance in proportion to the contact area. This must be taken into account, since in most cases the wedges converge no more than 2/3 of their length. Therefore, the passport data does not always correspond to reality; usually the pads can withstand 60-70% of the declared load.
If you move the plastic wedges inside the pad, you will hear clear clicks. This is due to the movement of the ridges in the grooves. This is normal because each click means the block has moved one notch. The height of the largest part of the wedge is 15 mm, the adjustment range can be 15-22 mm, and one step can be 0.5 mm. To achieve greater height, a third element can be inserted between the two, adding an additional 15mm of height.
Typically, a plastic wedge has another interesting feature - a cellular structure. This makes it possible to use these elements to work in those places where the insulation contour will be located. The thermal conductivity of the insulating material is increased due to the cellular structure, so this is an excellent solution, for example, when installing plastic windows.
Large mounting wedges are designed for a load of 2.2-2.5 thousand kg
There is one drawback that is worth being aware of: due to constant vibrations, the wedges under the floor covering can move slightly. The technician can eliminate this danger during the installation process by using through fastenings through the blocks. Additional fixation is never superfluous, and if you are not confident in the reliability of the structure, it is always better to use auxiliary fasteners.
Mounting plastic wedges: technical characteristics, advantages and disadvantages
It was previously mentioned that completely different elements can be used as homemade spacers. These can be either wooden or metal products of suitable size. This solution has a serious drawback: wood can react negatively not only to high humidity, but also to dryness. Drying and swelling of a homemade wedge can reduce all efforts to zero. In addition, wood is a breeding ground for insects and microorganisms.
Naturally, choosing a wooden element of the right size may require a lot of time and effort. This is not a very practical solution, especially if we are talking about a full repair, and not about selecting one sample.
The main technical advantage of parts specially designed for such purposes is not this. The plastic spacer wedge, if selected correctly, does not deform even after time. But wood often sags. The result is warped windows and doors, and gaps in the floor. Among other positive characteristics of these parts, it is worth noting the following:
The main advantage of plastic wedges is that they do not deform over time.
- characterized by high temperature resistance - from -45 to 85 °C, resistance to sudden temperature changes and the ability not to react to it;
- it is possible to adjust the height of the wedges as accurately as possible (down to millimeters); do not absorb moisture;
- do not deform under permissible loads;
- do not rot, do not mold;
- You can fix the elements with anything: self-tapping screws, nails or screws;
- due to inertness to the mounting foam, the wedges are secured very securely;
- the service life of such products has no restrictions;
- in terms of thermal conductivity, the mounting wedges fully correspond to the windows, so that after installation the overall thermal conductivity coefficient does not change;
- the sufficient width of the elements allows the window and stand profiles not to slide off;
- wedges are characterized by even angles and can be used in odd numbers.
All these characteristics allow us to rightfully consider plastic mounting wedges the most correct and practical solution when it comes to the need to level the surface. Their cost allows you to give up thinking about saving, so you don’t need to make elements of the appropriate size yourself.
Mounting wedges: features of use when laying floors on joists
Leveling the floor joists is one of the main abilities of this type of element. Mounting wedges for joists allow you to accurately select the required height of the future surface, eliminating unevenness and defects in the subfloor. But it is worth knowing about one nuance: the hard plastic of such wedges often negatively affects the properties of the concrete surface to which it is attached. Over time, as a result of loads, the concrete may begin to crumble, and the wedges will sag.
Wooden and plastic wedges are suitable for laying floors on joists.
In order to avoid this, longitudinal logs are additionally attached along the surface. Then they mark the installation axis for the transverse floors. Laying is carried out by inserting medium or large sized blocks at the intersections of the beams. Then the logs are further leveled.
To consolidate the achieved result, each block is coated on the side with a small amount of ordinary polyurethane foam. Thanks to this, shifts in the lag over time are excluded. About a day after applying the foam, all that remains is to drive screws of the required length into the joists or fasten the beams together using metal corners.
For rooms with a small area, this is an ideal option. For long logs, this is not a very good solution, since due to the long length the wood will sag. Therefore, in large rooms it is preferable to use laminated timber for logs. This will make it stronger and more reliable.
Materials
The material for production is a special polymer. It is resistant to temperature changes and the negative effects of atmospheric phenomena. The service life is unlimited.
Wooden products are also used in the work. They are significantly inferior in their technical characteristics to plastic ones.
Wood substrates are made independently using improvised means. Over time, they dry out and change their original size. The service life of such material is short.
We should also mention the metal mounting wedges. They are used when installing heavy window structures with several sections.
How to use mounting wedges for windows
Plastic mounting wedges for windows are used everywhere, since it is often simply impossible to do without them. This is due to the fact that the load is usually distributed unevenly in the window frame, so the wooden window substrates become twisted and deformed over time. This negatively affects the heat and sound insulation properties of the window. In addition, there are serious concerns that the fittings will not work properly.
When installing windows, it is impossible to do without mounting wedges
Helpful advice! The heaviest load in the window falls on the areas located under the imposts. Therefore, a block must be installed in such places.
As a rule, small and medium-sized wedges are used for installing windows. They are placed along the frame, subsequently covering the pads with a thin layer of polyurethane foam. Depending on the situation, use one of two types of installation:
- under the impost;
- at a distance of 10-20 cm from the center, on both sides.
The second option involves using fasteners through the frame to provide additional fixation of the pads. However, the first method is no worse, since static loads do not lead to divergence of the wedges, and wind loads will not harm due to fixation with polyurethane foam.
For an average window, the recommended foam joint thickness is 25-30 mm. To do this, a height of 2-3 wedges is sufficient, which should touch 80-90%. First, the frame is fixed on folded blocks, and then the upper corners are set with temporary fasteners. They are placed in a plane and aligned vertically. Only after this do they move on to mixing and spreading the pads themselves.
Wedges are used when installing not only windows, but also window sills
After everything is done, the frame must be finally secured and foamed. Thanks to this technique, you don’t have to worry about possible shifts and violations. To temporarily fix the window, you should also use pads. The main thing is not to forget to remove the mounting wedges for PVC windows after the foam has dried. The voids are filled with the same foam.
Advantages of plastic wedges
The significant advantages of using a polymer mounting angle during installation include:
- increasing the productivity of installation teams;
- the use of a factory spacer made of material that is resistant to moisture, temperature changes, microorganisms, and loads;
- reduction of complaints from customers related to misalignment of frames, jamming of sashes, cracks in seams, etc.;
- ease of use, adjustment, fixation of corners;
- possibility of purchasing the required number of wedges in packages.
The use of modern components is an integral part of the company’s image in the eyes of employees, clients and partners. The use of unreliable materials during installation increases the financial burden and negatively affects the trust in the brand among potential customers.
Spacer wedges for doors: technology of use
Another area in which these elements are actively used is the installation of doors, and they are used for both interior and entrance structures. The only difference is the number of sides of the vestibule.
Entrance doors, which usually have four-sided blocks, if installed on spacer wedges, do not require additional screed preparation. But the required number of wedges is selected depending on the mass of the door frame to be worked with in a particular case. Based on this, small or medium elements are used.
Hollow honeycomb doors can get by with two blocks of medium-sized wedges. Heavier items will require larger wedges. However, this makes it easy to level complex structures that have significant weight. To do this, just use a pry bar to slightly raise the edge of the threshold, and then adjust it using a level and install the block correctly. If everything is smooth and the support remains motionless, you can safely proceed to the final fixation.
It is advisable to use spacer wedges for installing interior and entrance doors
Separately, it is worth mentioning how spacer wedges are used to adjust a door with a three-sided rebate. In this case, the installation of two leveling blocks is required - vertically on the box.
Important! It is of great importance whether the door is installed on a finished or subfloor. In the case of a subfloor, the block must be assembled from wedges, the thickness of which will approximately correspond to the thickness of the finishing coating. To do this, you can glue several pads together.
Installation instructions
Mounting wedges are installed before attaching the window block to the wall opening with fasteners. Landing
the side blocks should be tight, but not exert a force on the profiles of the boxes. The distance and size are selected depending on the design of the product being mounted. The installation diagram is shown in the figure. Moving the wedge over the wedge, align the mounted part at the required level. Mounting wedges are placed along the window block.
After fixing (aligning) the mounted product, the installation seam is sealed with polyurethane foam and vapor barrier tape.
Mounting plastic wedges: GOSTs and standards
Special GOST 30971-2002 regulates the technology for installing window openings, so it is worth considering it in the light of how spacer wedges are used for windows according to established standards. According to this GOST, there are certain restrictions regarding possible deviations for windows vertically and horizontally. This is 1.5 mm per 1 m of length, but on the condition that the total deviation should not be more than 3 mm over the entire length. According to GOST, the technology for measuring errors and methods of fastening have remained virtually unchanged in recent years.
Separately, it is worth mentioning the use of elements such as a wedge. Plastic windows rest on them, which provides additional thermal insulation due to special voids. In addition, they are more reliably protected from moisture, last longer and allow for faster installation than using wooden ones.
Installation of windows using wedges is regulated by GOST 30971-2002
Note! In training videos dedicated to repairs, you can see how mounting wedges are used for a window sill. This is very convenient and practical, as they allow you to level its surface in the shortest possible time with a minimum of effort.
Modern construction wedges interact well with polyurethane foam, so there is no need to exclude it from the installation procedure. On the contrary, this sealant can be effectively used for additional insulation and thermal insulation. Foam, as usual, should be filled with voids, regardless of the installed wedges.
Related article:
Soffits for roofing: sizes, prices and a brief overview of varieties
Existing types. Popular models, their characteristics. Materials used for making soffits. Review of manufacturers.
Types and advantages of using foam for installation
After installing polyvinyl chloride windows, the installation seam is hidden with a special construction sealant.
The polyurethane foam mixture contained in the cylinder comes out under the influence of gas and interacts with moist air. During the day the mass hardens. In this case, there is a significant increase in volume by 50-200%. Polyurethane foam fills voids, providing reliable thermal insulation.
On the Russian building materials market, consumers will find the polyurethane foam that is most suitable for a particular case.
Types of polyurethane foam:
- semi-professional and professional;
- consisting of one or two components;
- fireproof;
- seasonal (winter, summer, for all seasons).
Why is the use of polyurethane foam so common?
The widespread and popularity of using foam as an insulating material is due to clear advantages:
- Low price.
- Excellent thermal insulation characteristics.
- Good compatibility with almost all building materials.
- High degree of sound insulation.
- Possibility of painting.
Correct use of polyurethane foam is the key to high-quality sealing of installation joints and provision of heat and sound insulation.
How to use polyurethane foam when installing a plastic window:
- The working surface must be thoroughly cleaned and degreased.
- Wet the surface with water for better adhesion to the foam.
- The container with foam must be preheated to 20 degrees and shaken for a minute or two.
- Apply foam moving from bottom to top.
- During and after completion of work, thoroughly ventilate the room, avoiding drafts.
The Pilot online store offers a huge selection of anchor plates, mounting wedges and construction sealants at the lowest prices in the Ural Federal District. Also, our managers are always ready to advise on any issue related to our products.
How to use spacer wedges for laminate flooring
Wedges of this type are used directly for laying laminate flooring and are designed to provide the necessary gap between the floor covering and the wall - approximately 10 mm. This allows the laminate to expand freely when exposed to moisture and then contract again. This is due to the high hygroscopicity of this material and its ability to change its size under the influence of environmental factors.
Wedges provide the required gap between the wall and the laminate
Using plastic mounting wedges for the floor, you need to leave a gap along each wall, and also make an indentation from all built-in structures, for example, stairs, pipes, heating devices. Otherwise, this may negatively affect the coating: it will deform quite quickly. There is no need to be afraid that the gaps will ultimately spoil the appearance of the floor, since they will be covered with a plastic plinth, and in places near the pipes you can use a rosette.
Helpful advice! In order to close the gaps between the walls and the laminate, it is recommended to purchase a plinth after completing the installation work on laying the floor. Otherwise, there is a risk of purchasing a skirting board that is not wide enough, which will entail additional costs.
Why are these elements necessary in the process of laying the floor and are they really necessary? Let's take a closer look at each aspect:
- They help maintain the required distance between the wall and the edge of the laminate.
- Thanks to the wedge-shaped shape, as well as the presence of stiffening ribs, they allow for optimal adjustments. This makes it possible to avoid slipping during installation.
Use mounting wedges to ensure a 10mm gap along each wall
Metal wedges are also sometimes used for working with floors, but their characteristics in most cases are not justified when it comes to a material such as laminate. Spacer wedges for plastic laminate flooring more than cope with all their tasks. If the size is correctly selected, these elements do not require additional reinforcement at all.
What is an anchor plate
An anchor plate is a metal flat piece with holes made from a sheet of thin galvanized steel to secure a plastic or wood window to brick, block or concrete walls.
Types of plates:
- Rotary. During installation, the plate is rotated into place on the wall for a more secure fixation.
- Fixed. This type of plate requires installation at different angles.
- Fixed plates with a hook. A special ring on the part promotes stronger adhesion.
- Plates for wood. Specially created fastenings for wooden structures.