Icer
12730 1 0
Icer September 20, 2016Specialization: master in the construction of plasterboard structures, finishing work and laying floor coverings. Installation of door and window units, finishing of facades, installation of electrical, plumbing and heating - I can give detailed advice on all types of work.
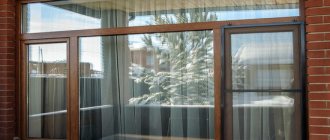
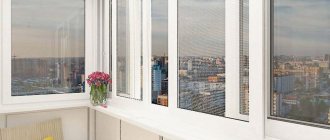
If for one reason or another conventional windows are not suitable or you are looking for a cheaper option, then this review will suggest an interesting solution. You can make regular or sliding windows from polycarbonate with your own hands; the material is easy to work with, weighs little and has an affordable price. Let's figure out how to organize the workflow and what you should pay close attention to.
In the photo: polycarbonate comes in different types for different purposes.
Polycarbonate windows are cheap and practical
Polycarbonate has distinctive features that make it suitable for making windows. This material is capable of transmitting light through its surface, blocking the flow of ultraviolet radiation and withstanding pressure and impacts of varying strength. In addition, its cost is quite low.
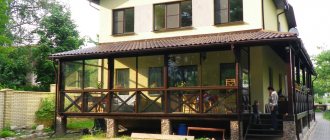
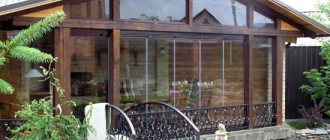
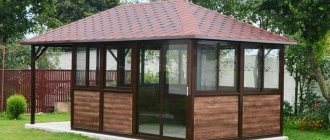
DIY structures for a gazebo or veranda made of this material can have any form or be placed in a plastic, wooden or metal frame. Frameless structures can be easily bent, allowing for curved shapes.
What types of polycarbonate for windows are there? Highlight:
- cellular polycarbonate,
- monolithic systems.
The first type, shown in the photo, is distinguished by a high level of noise and heat insulation. It has a high density, which is why the room can be very dark. Thanks to its attractive appearance, this material will harmoniously fit into any interior, and you will have the opportunity to create new design ideas. Using cellular polycarbonate, you can decorate an office, a balcony, and also form canopies and roofs for a gazebo or veranda.
A monolithic block, as in the photo, has a higher cost, but it stands out due to its high strength, low weight, safety during operation and high ability to transmit sunlight.
To make polycarbonate windows with your own hands, you need to ensure that you have the following consumables:
- polycarbonate sheets of the required color, size and type;
- protective tape;
- several end and connecting profiles;
- a sufficient number of screws, anchors and self-tapping screws;
- sealing washers for sealing;
The following tools should also be available:
- a hammer drill, which is necessary for drilling holes;
- pliers – will be necessary during installation;
- screwdrivers, screwdrivers - will be needed to screw in anchors and screws;
- stationery knife - will be needed during installation work, as well as to remove excess polyurethane foam after it has hardened;
- building level - necessary to correctly set the location of windows during their installation;
- nail puller, crowbar - will be used when removing the previous frames;
- saw – needed to straighten the edges of the frame;
- a tape measure will allow you to correctly take all measurements for the frame;
- polyurethane foam will be used to seal the structure;
- circular saw - to cut polycarbonate sheets.
Manufacturing and installation of polycarbonate windows: step-by-step instructions
For self-assembly, you will have to purchase cellular or sheet polycarbonate, as well as additional consumables and tools:
- wood, aluminum or plastic for making frames;
- profiles for ends and junctions;
- sealants;
- fasteners;
- roller mechanism or guides;
- jigsaw or hacksaw;
- screwdriver;
- perforator;
- pencil and tape measure.
Before starting work, you need to measure the window openings and draw up a drawing with precise dimensions. The next stage is making the frames. Wood or metal is cut at an angle of 45% in accordance with pre-made measurements. Then the parts are fastened with self-tapping screws and flat window corners. You can avoid installing screws from the outside by making a groove of the required depth around the perimeter of the frame and inserting glazing material into it. The frames must be assembled very firmly, all parts are carefully adjusted to each other. Only in this case will the window be reliable, beautiful and durable. For additional strength, sealant is applied around the perimeter.
A very convenient option is ready-made plastic frames. They can be purchased in the form of blanks and assembled yourself, following the attached instructions. In the store you need to choose frames with a roller mechanism or reliable guides. There are products on sale in different colors that look beautiful in combination with tinted or transparent polycarbonate. Plastic frames do not require additional processing; they are strong, durable, do not lose their attractive appearance and do not dry out.
If wooden frames are chosen, they must be impregnated with an antibacterial composition, covered with stain or painted
Windows treated in this way do not deform and tolerate excess moisture and temperature changes well. If the polycarbonate sheet has been rolled into a roll, it is carefully unwound and the material is laid out on the floor to straighten it. It is advisable to protect polycarbonate from direct sunlight
It is convenient to cut polycarbonate sheets with a construction knife. First you need to outline the dimensions, checking a pre-made drawing. To make the lines even, the contours of the future insert are outlined using a ruler. Then the sheet breaks easily. The ends are sealed with a special tape coated with silicone.
The most crucial moment is the insertion of polycarbonate blanks into the frames. The simplest way is to mount it from the outside with self-tapping screws. Polycarbonate will hold securely, but the appearance of the frame from the inside will not be the most aesthetic. A window in which a polycarbonate sheet is inserted into the grooves of the frame and reinforced with glazing beads looks more beautiful. Flexible polycarbonate is easier to insert than fragile glass; even beginners can do the operation.
Features of window installation depend on the material of the veranda. To install windows on a wooden frame, self-tapping screws are needed, concrete and brick are drilled with a hammer drill, and anchors are used for fastening. First, guides or roller mechanisms are installed, and then the frames are strengthened. If the measurements are taken correctly, the finished profiles will fit exactly into place; polyurethane foam will help fix them.
Varieties
There is a huge selection of materials on the market, so everyone can choose a specific type for themselves:
- plastic with single glass - simple design and easy installation. Single sliding frames are used. Durable and protects against many external factors;
- plastic construction with double-glazed windows;
- sliding windows – create comfort and a pleasant warm atmosphere;
- aluminum structures - installed in a room without heating;
- soft curtains are an excellent design option for getting rid of weather conditions and insects;
- polycarbonate is an inexpensive replacement for glass;
- wooden windows - allow fresh air to pass through and play an important role in thermal insulation;
- Products without frames can only be manufactured and installed by professionals. But the result will definitely amaze you.
All options have their advantages and disadvantages. When choosing, you need to rely only on personal preferences.
What tools and materials may be needed
DIY garden swing for adults master class
At the preliminary stage of installation work, it is recommended to prepare the necessary set of tools and additional materials that may be needed to resolve this issue. This set will be formed depending on the specifics of the work.
In most cases it will look like this:
- electric drill with drills;
- self-tapping screws;
- thermal washers;
- polycarbonate sheets;
- metal corners for tightening the frame;
- measuring devices (tape tape, building level, square);
- knife;
- beam;
- awnings.
Canopies are required for attachment to the door frame. They will help create the most stable and reliable structure. The polycarbonate sheet is selected depending on the size of the doorway. In addition, you can additionally take care of installing a partition.
If you install a frameless door variation, you can limit yourself to using canopies and polycarbonate sheets. The door base is cut out and secured using self-tapping screws.
back to contents
Types of polycarbonate
Sliding polycarbonate windows for gazebos can be made from two types of material. Cellular and monolithic polycarbonate are available on the market.
- The cost of the material is low. Therefore, the total price of the finished structure will be several orders of magnitude less than similar plastic products with an aluminum profile. This makes polycarbonate glazing more affordable and popular;
- If damaged, replacing a piece of polycarbonate is not difficult. To do this, you do not have to disassemble the entire window structure;
- The material does not support combustion and is completely fire safe;
- It is highly resistant to various external influences. Thus, polycarbonate does not deform from direct exposure to sunlight, and it does not burst due to freezing. At the same time, high-quality material does not darken over time and does not fade. Therefore, monolithic polycarbonate will maintain the original level of light transmission throughout the entire operational period.
It should also be noted that sliding windows are easy to maintain. They can be easily cleaned using ordinary household chemicals.
How to make sliding windows with your own hands
Glazing of gazebos with polycarbonate is carried out gradually and includes several of the above stages. Do-it-yourself glazing of a gazebo with polycarbonate begins with the installation of a profile. It must be strong enough to support the weight of the structure. The frame is mounted on the installed profile.
It is recommended to use wood to make the frame. It is more aesthetically pleasing than metal. In addition, wooden frames are easier to manufacture and install yourself. During work, the frame should be aligned with the frame of the gazebo in both planes - horizontal and vertical. For the work itself and control over its accuracy, you need to use a level and wooden wedges.
If there are no deviations and the frame is mounted correctly, it is secured to the frame using steel anchors. This fastener is ideal for polycarbonate sliding glazing.
But the resulting structure will inevitably remain cracks and gaps. Windows in the gazebo made of polycarbonate should serve for insulation and sound insulation. Therefore, the gaps must be removed. This is done using polyurethane foam.
The movement of a fragment of material occurs due to guides that are installed together with the frame. If you are planning a window sill, then it must be installed at the stage of attaching the frame to the frame.
The remains of the polyurethane foam should be cut off, and the slopes can be covered with plastic or wooden panels.
When performing such glazing, you need to understand that polycarbonate retains heat worse than plastic glazing. After all, polycarbonate sheets do not have such air spaces. Therefore, significant heat loss will be inevitable.
Accordingly, if you plan to have a year-round gazebo, you need to provide a heating source. this could be an open hearth or stove. These elements must be provided at the planning stage of organizing the gazebo space. Subsequently, it will not always be possible to install them. After all, they require a monolithic foundation.
For winter gazebos, the most preferable option is one with glazing over a wooden fence. Wood will better retain heat inside the gazebo. Since the main heat loss will occur in the glazed part of the gazebo, their volume will be significantly reduced.
The highest heat loss will be with continuous polycarbonate glazing from floor to ceiling. In this case. it is necessary to provide more serious heating for the winter period.
Which double glazed window to choose
Single-chamber and double-chamber double-glazed windows are in greatest demand. One chamber means that the window structure consists of two glasses, between which there is an air gap. It prevents the penetration of cold air. Single-chamber glass can be installed in a gazebo that will not be used in winter.
If you plan to create a year-round gazebo, then it is best to use double-chamber glazing. Such canvases include three glasses, between which there are two air spaces. It is this design that will provide the best protection from the cold.
Such a gazebo with sliding windows will be functional and comfortable.
Gazebo made of plastic windows
A gazebo with plastic windows may involve the use of such windows as a frame. This means that the structure will not have classic support pillars. All its walls will be represented exclusively by plastic windows. Sliding windows into this type of gazebo are also possible.
- Such buildings have certain features that need to be specified in more detail:
- Plastic gazebos need a foundation. After all, plastic windows themselves with a PVC or aluminum profile cannot serve as support for the entire structure. They cannot simply be installed on the ground or secured in any other way;
- The configuration of gazebos with glazing can be any - rectangular, square, with six corners, and so on. But creating a round gazebo will not work, since the profiles will inevitably create many angles. But outwardly such a design will be very similar to a round one;
- Plastic windows must be installed on a solid foundation. For this you can use a wooden beam. Such logs are laid directly on the foundation. They are strong enough to support the weight of the structure;
- When constructing such gazebos, it is necessary to make the foundation correctly. The durability of the building and its stability will depend on its strength.
You need to know that the base for the gazebo must be larger than its boundaries. That is, the dimensions of the base should exceed the dimensions of the gazebo by 50 cm on each side. At the same time, gazebos made of plastic windows are very beautiful. They let in a lot of light and leave room for decorating the interior space with decorative elements. At the same time, a gazebo with sliding plastic windows retains heat perfectly. If you build a hearth or stove inside, the building can be used in any weather.
Installation of windows in a polycarbonate gazebo
The glazing can be continuous. In this sense, the use of polycarbonate should be noted. This material can simultaneously act as glazing and as the walls of the gazebo.
The construction principle will be standard. It is necessary to attach polycarbonate fragments that were made in advance to the support pillars.
Such gazebos have a number of significant differences. They need to be described in more detail:
The important elements will be the floor and foundation. To construct the foundation, you must use columnar technology. They consist of erecting low brick columns, on which wooden logs are subsequently laid
The columns should be raised above the ground level by 30 - 40 cm; In addition to the foundation, serious attention should be paid to the construction of the floor. The basis will be horizontally laid timber logs
Boards and moisture-resistant plywood are laid on the indicated logs; Supports for fastening polycarbonate are attached to horizontal joists using angles and brackets.
Installation of windows taking into account the roof
Since plastic windows or aluminum profiles cannot withstand high pressure, heavy roofing materials should not be used. It is not recommended to use metal tiles or natural tiles.
Polycarbonate or soft roofing is ideal. If you plan to install natural tiles, you should make a strong top trim from timber. It will be able to withstand the load of a heavy roof and protect the frame made of plastic windows from damage.
In this case, glazing can be combined with wooden fencing. It can reach one and a half meters in height. An aluminum profile or plastic windows are installed on this fence as a frame.
Windows are installed using construction foam. This is a universal option for such designs.
Advantages and disadvantages of polycarbonate
Polycarbonate still belongs to the category of new products; its properties are not known to everyone. Let's consider the pros and cons of the material. The advantages include:
- Strength.
- Light weight.
- Elasticity.
- Transparency.
- Resistance to loads, the ability to withstand impacts of a certain force without destruction.
- The material melts but does not support combustion.
- Ecological cleanliness, absence of harmful emissions.
At the same time, some disadvantages are inevitable:
- The surface of the material is not resistant to scratches, which must be taken into account when working or caring for plastic.
- The material changes its linear dimensions when heated; when designing polycarbonate structures, it is necessary to leave gaps to compensate for linear expansion.
- Instability to ultraviolet radiation. The material itself does not transmit UV rays, but under their influence its structure changes. At the same time, manufacturers have already resolved the issue; a film is installed as an outer protective layer, protecting the material from exposure to the sun.
The list of advantages of the material is much longer, and the disadvantages are rather features. But the most important advantage of polycarbonate should also be mentioned: for all its positive qualities, it is also quite cheap, which greatly increases its attractiveness for users.
Material properties
Polycarbonate has excellent insulating properties. In addition, it is distinguished by very high strength. According to this indicator, glass is approximately 200 times inferior to polycarbonate. This material is not afraid of any loads from wind or other adverse weather conditions; it can withstand any mechanical stress.
The big advantage of this material is the fact that even if the material is damaged, sharp chips and fragments should not be observed. This provides a high level of security. In the case where the object is located on the ground floor or is a separate building, polycarbonate glazing is the most practical and economical solution.
Polycarbonate has excellent characteristics, which include:
- Increased fire resistance. If fire has a direct effect on the material, then the material does not ignite, but melts. The material does not emit harmful substances when melted.
- Ease. The use of polycarbonate is possible even when installing glass is inappropriate due to its fragility.
- Flexibility. Polycarbonate can take any shape, which allows you to create original designs. At the same time, it will not break or tear.
- Good light transmission. The saturation of the room with light is ensured when polycarbonate is used for glazing.
- Chemical resistance. This factor is highly capable of ensuring safety.
- Long service life. During the entire period of use, all qualities will remain in their original form.
- Resistance to ultraviolet rays. Polycarbonate is coated with a special protective layer.
- Resistance to atmospheric pressure.
- Easy to install and unpretentious in transportation.
Preparatory process
There are two types of terraces: straight and arched.
Straight - the roof is supported by columns, pillars, walls. The roof is a system of slings with beams with a cross-section of 50×100 mm, lathed for the subsequent installation of panels.
Arched - semicircular or oval. The supporting structure is made of a metal profile and requires additional supports and jumpers.
You have to choose the type of terrace before starting the design - the type of materials used in construction depends on this.
Prepare materials and tools in advance:
- polycarbonate sheets;
- bars;
- boards;
- metal profiles, other connecting elements;
- mastic;
- scotch;
- building level;
- hammer;
- axe;
- saw;
- screwdriver;
- screws, self-tapping screws, nails.
Installation of a sliding structure
In the process of installing a window profile and its glazing, you will need the following materials, tools and working equipment:
- polycarbonate sheets;
- protective perforated tape and end profiles;
- connecting detachable profiles;
- self-tapping screws with thermal washers, roofing screws, screws and anchors;
- insulation, polyurethane foam;
- construction tape, level, marker;
- a circular saw, electric jigsaw or fine-toothed wood saw for cutting material;
- drill with drills of various diameters, hammer drill;
- screwdriver, screwdrivers, pliers;
- saw, mounting knife, sandpaper;
- silicone glue and a gun for applying it.
Now let's move on to the installation algorithm for polycarbonate sliding windows:
- Clean the work surface from dust and debris. Cut the polymer fabric, taking into account the material’s tendency to thermal expansion.
- Then clean the embedded structure to install the window frame. Treat the surface with special protective agents.
- Using anchors, attach the profile to the frame and install the window frame on it. Using a level, level the structure in horizontal and vertical planes.
- Install the window sill, which is fixed under the bottom of the frame. Attach the window sill with metal anchors.
- Adjust individual elements. Recheck the horizontal and vertical lines. Fill the gaps between the frame of the gazebo and the window frame with foam.
- Treat the ends of the polymer plastic with perforated tape and end profiles.
- Install the split profile base. Install the polycarbonate, secure the sheet with self-tapping screws and thermal washers.
- Close the profile with a protective cover.
Polycarbonate glazing of the gazebo requires minimal maintenance. Timely cleaning of panels from dust, debris and various types of contaminants will significantly extend the service life of the window. The warranty period for polycarbonate glazing of garden gazebo windows is 10–15 years.
Metal-plastic windows
Metal-plastic products are suitable for heated verandas. They are distinguished by excellent sound insulation properties, durability, and attractive appearance. Such windows are recommended for cold regions with harsh winters. Among the disadvantages is the significant weight of the structure; metal-plastic should not be used for light wooden buildings.
It is better to entrust the installation of metal-plastic windows to specialists. If this is not possible, you need to carefully measure the window openings, order profiles of the appropriate size, and then install them yourself.
Sliding structures go well with panoramic glazing. If desired, you can mount a combined tilt-and-slide system from metal-plastic profiles. Such windows not only slide to the side, but also tilt towards themselves. This function is used for micro-ventilation; the movement of the door can be controlled using the handle.
Accessories
Do-it-yourself gluing of ceiling moldings, master class with photos
Locks of this type are distinguished by the type of bolt, made in the form of a hook, which in this case is pulled out by turning the key. The sliding door handles are made in the form of “shells” that form a recess in the door leaf.
Due to their unique design, sliding portuns require only a strictly defined type of fittings. Handles and locks for such planning solutions differ in many ways from standard ones. A characteristic feature of the handles is that they are recessed into the canvas. This is done so that the doors can slide to the side without any problems and, if necessary, enter the designated niche. Castles, in turn, are also interesting. If you compare them with standard locks that everyone is used to seeing on many doors, you will notice that their mechanism is designed for vertical latching.
The fittings are usually supplied complete with the canvas
However, if there is a need to install locks and handles yourself, then you should pay great attention and carefully select them. The best option would be to contact a specialist so that the latter can help you or search using the catalog number
Advantages of polycarbonate
For the construction of the roof, tiles, slate, profile sheets, etc. are traditionally used. But only polycarbonate will give the terrace reliability, durability, aesthetics, reduce installation time, and save the budget.
Polycarbonate, produced in the form of sheets, can be cellular or monolithic.
Cellular polycarbonate - with cellular voids - has the following advantages:
- lightweight – allows the use of lightweight load-bearing elements during construction;
- flexible – easily takes the desired shape without heating;
- durable - withstands loads in the form of snow;
- light transmission capacity – 80%;
- reliably protected from ultraviolet radiation;
- shockproof;
- incombustible.
Disadvantages:
- can be scratched easily;
- exposed to aggressive environments.
Monolithic polycarbonate, consisting of a homogeneous material, has the following advantages:
- transmits 90% of light;
- high strength;
- heat resistant;
- fireproof, will not release highly toxic substances during combustion;
- bends easily.
The disadvantage is the fact that the material requires thermal molding to impart curvilinearity.
When choosing a material for a terrace, you should focus on the characteristics of the supporting structure and the influence of various factors during the operation of the structure.
How to make doors for a veranda
Reliable DIY wooden staircase for a porch master class Video and step-by-step instructions
A rather successful solution for glazing a veranda with your own hands is to install sliding doors, which make the room lighter and visually more voluminous.
Sliding doors can be made from:
- Polycarbonate glass.
- Plastic.
- Wooden doors to the veranda.
- Aluminum.
The glass on the doors can be used with additional decoration or even made tinted, which makes it possible to regulate the degree of illumination inside the room, creating coziness and comfort in it. The use of “rails” for mounting the structure allows you to install a mosquito net on the inside of the door, which reliably protects the terrace from the penetration of a variety of insects.
The sliding door for the terrace includes the following components and parts:
- Ramu.
- Door panels.
- Control device.
- Accessories.
- Double-glazed windows.
- Threshold.
Instructions for installing a door on a veranda include:
The material for production is selected. For this:
- the dimensions of the door leaf are determined, which depends on the dimensions of the opening;
- the canvases are framed by two vertical and three horizontal parts;
- The bottom sheet is made from a solid board of boards that are used for flooring;
- the upper part is intended for window sash; it is pre-assembled.
Assembling a wooden door
- The strapping elements are assembled from slats measuring 3x65 millimeters, tightly glued together.
- The prepared shield is carefully adjusted to the required dimensions of the door portal. In this case, the excess length of the elements is sawed off.
- Longitudinal and vertical parts are assembled using the tongue-and-groove method. The dimensions of the place for fastening are chosen to be 12x12 millimeters and the length of the spike is 4 centimeters.
- The boards forming the shield for the lower part of the door leaf structure are connected.
- The manufactured shield is placed in the frame frame.
- The previously assembled window frame is inserted into the upper part of the same portal.
- All parts are coated with special glue, including the spikes on the parts, and the final assembly of the device is performed.
The video in this article shows in detail how wooden veranda doors are assembled. A correctly and efficiently installed front door protects the veranda from the cold and decorates the house.
Advantages of aluminum structures
The material is resistant to mechanical damage and atmospheric conditions. It is these qualities that are valued in aluminum sliding systems. It does not fade or be damaged by ultraviolet radiation, and most importantly, it is resistant to rust. In addition, such designs have the following advantages:
- Cheaper production. The structure does not need to be reinforced with reinforcement and other devices, which makes its production cheaper.
- Sophistication and simplicity. For translucent structures, thin frames are used, which are several times smaller than wooden and plastic structures. Such systems transmit light perfectly.
- Possibility of glazing large openings. The lightness of aluminum allows you to glaze very long windows and doors. At the same time, the light transmission and sophistication of the systems are maintained.
- Wide color palette. Aluminum can be easily painted with various coatings of various colors, so choosing a structure to match the color of the facade will not be difficult.
- Possibility of production according to room standards. Structures made from such material are produced according to individual customer requests.
- Easy to use. Sliding windows of this type need to be washed periodically and the fasteners inspected for preventive purposes.
However, such windows also have their disadvantages:
- Slight spread. Few companies produce such structures. You may have to order structures from another city, which will increase their cost.
- High price. Installations with single glass units are cheap. The same cannot be said about windows with triple glass; they are an order of magnitude more expensive than PVC structures of a similar configuration.
Thanks to aluminum structures, unusual design ideas can be realized. Windows of this type are optimal for use on cold verandas, greenhouses and balconies.
Manufacturing technology
Before writing this review, I decided to see what other resources had to say about this. As a result, I saw that all the articles on this topic were rewritten from one source, and the people talking about how to carry out the work have no idea what the process actually looks like. Therefore, we will deal with you from beginning to end, since there is nothing worthwhile on the Internet anyway.
Preparatory stage
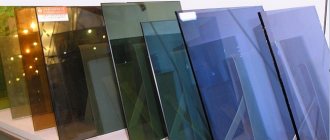
Before starting work, you need to carry out a number of important activities and understand many nuances. First, you must decide what kind of polycarbonate will be used.
There are two main options:
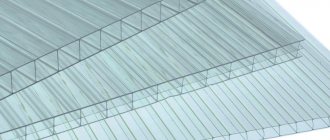
- Cellular polycarbonate consists of two polymer sheets, between which there are ribs that give the material strength . Due to the air channels inside, this option has good heat and sound insulation properties. The standard sheet width is 2.1 meters, length is 6 meters, thickness is 6-10 mm, more is not needed for windows, the price of a sheet with a thickness of 6 mm is about 3000, and a sheet with a thickness of 10 mm is about 4300 rubles;
This type retains heat well, but does not transmit light very well.
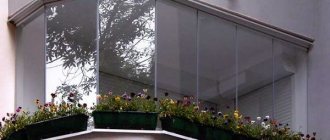
- Monolithic polycarbonate resembles glass, it is completely transparent, but it also has a number of additional advantages - the material is flexible, impact-resistant and can have different colors . The thickness varies from 2 to 8 mm, which allows you to choose the best solution; standard sheet dimensions are 2.05x3.05 mm. The only negative is the high price, a sheet with a thickness of 3 mm will cost about 7,000 rubles, and if the thickness is 6 mm, then you will have to pay 13-14,000 rubles;
If not for the high cost, this material would be extremely popular
Both options bend well, but the monolithic one can be bent in any direction, and the cellular one only across the ribs; if you bend it lengthwise, it will break.
In addition to the polycarbonate itself, other materials are also needed:
| Materials used | Description |
| Material for making frames | In general, if you already have windows and you want to change only the glazing, then you can use old frames; they are perfect for our purposes. If you are assembling a new structure, then the manufacturing material can be wood, aluminum, plastic or metal elements. It all depends on your capabilities and structural features |
| Profiles | If the sheets will be connected, then a special strip is needed; there are also other components for the ends and junctions. You can do without them, but then the result of the work will not be very neat. Alternatively, you can use regular wooden glazing beads; they also hold the sheets in place well. |
| Sealing materials | The voids of cellular polycarbonate get very clogged with dust and dirt, and condensation can also form there, so a special perforated vapor-permeable tape is used to protect and strengthen the ends. If you don’t have it, then at least buy silicone sealant; in any case, you need to close the ends |
| Fasteners | Polycarbonate can be fastened using special self-tapping screws with rubber washers, or it can be pressed with strips. Frames and other structures need to be assembled and installed, so stock up on self-tapping screws of the required length |
A special tape will protect the material and strengthen the ends
Source: obustroeno.com
Features and nuances of choosing sliding elements
A veranda is an open or glazed room with no heating. Verandas are widely used in houses with a small number of floors and are used at the entrance. The location is ideal for hallway and corridor options. In the summer, it can be transformed into a bedroom or office.
Since the key expression here is “no heating,” the thermal insulation properties when choosing a material are not given primary attention.
Profile material
A plastic version or sliding windows for a terrace with an aluminum profile are suitable. Summer is also not always warm; the picture is spoiled by wind and rain. Windows must be able to withstand such loads; the best option is profile systems made of wood and aluminum, capable of withstanding high-speed winds - up to 20 m/s.
Number of cameras
It is best for the double-glazed window to be equipped with 2 or more cameras due to the possibility of increasing stability. If the windows face the sunny side, it is worth using energy-saving windows coated with a thin layer of silver oxide, which has a mirror effect and can reflect heat flows. Such windows must have a special orientation and reflect bright sunlight. Using an integrated approach will allow you to achieve a pleasant microclimate on the terrace.
Selection of accessories
The safety of the veranda is one of the key factors in choosing materials. Therefore, it is necessary to choose fittings that can resist burglary and the possibility of opening from the outside. Give preference to handles and other elements that have a durable frame and plastic lining, which will protect the metal rod from corrosion. Glass must also have anti-burglary features. You can choose laminated options or hardened products.
Strained glass
Many people know what tempered glass is, but not everyone has an idea of the basic technology for their manufacture. Tempered glass is durable and cannot break even under heavy load. It can withstand heavy weight and large-scale impacts, so it is not afraid of rain or hail.
Laminated glass
Laminated glass is better known as triplex. The product has a complex design consisting of several glasses, thanks to this, the glass receives advantages: the absence of the likelihood of breaking under heavy loads, a high level of stability.
High-quality laminated glass in plastic double-glazed windows with a sliding mechanism.
Choosing a terrace design
Verandas are usually made of wood, but Art Nouveau styles suggest the use of other materials in accordance. In order for the interior and exterior of the house to be combined as closely and accurately as possible, it is necessary to make part of the terrace from double-glazed windows. But experts believe that the most suitable option in this case is sliding terrace windows. The modern materials market offers two main options.
Parallel sliding structures or re-sliding products
In parallel, there is a sliding glazing structure for the veranda.
The main advantage of the possibility of installing such doors is the large glazing area. As a result of such coincidences, the room will receive a large amount of heat and light.
Sliding wooden windows on the veranda of a beach house.
Thus, sliding windows/terrace doors are the optimal solution for all occasions. Competent and high-quality use of structures guarantees the comfort of owners and guests during their stay in this interesting room.
Cozy panoramic terrace with double sliding windows.
ATTENTION! ONLY UNTIL THE END OF THE MONTH!
Glazing of gazebos with painted brown aluminum for the price of white!
Painting glazing frames and sashes increases the cost of the product and production time. We offer glazing of gazebos, including in brown color, without increasing the cost! In addition, all flashings, trims and flashings will be painted the same color!
Options for “cold” glazing of gazebos, terraces and verandas with aluminum windows
Double-slide aluminum sliding system “Provedal” for glazing gazebos and verandas
The window sashes are arranged in 2 rows and slide to the side along special guides (rails) located at the top and bottom of the frame. An ideal option for making both windows themselves and entrance doors!
The cost of this profile is from 2,200 rubles
Three-rail sliding aluminum system “Provedal” for glazing gazebos and verandas
In this sash system, the windows are arranged not in 2, but in 3 rows. That is, if there are 3 sashes in the frame, each of them will be located on a separate rail, without interfering with the others. This makes it possible to move all the sashes to one edge of the frame and get a larger open light opening than in a two-slide system. In addition, this profile system is somewhat stiffer and stronger than a two-rail system and allows the production of larger structures.
The cost of this profile is from 3,800 rubles
Hinged aluminum system “Provedal P400” for glazing gazebos and verandas
The name speaks for itself. Right! In this system, the doors do not roll to the sides, but swing wide open. This is a good alternative when you need to make, say, a swing door to a gazebo, terrace or veranda. In this case, the door can consist of either one or two parts (a hinged door).
The cost of this profile is from RUB 5,045/m²
Which is better, polycarbonate or glass?
If we compare these materials, we can note the elasticity and impact resistance of polycarbonate. A broken window is a very dangerous area; the fragments can cause serious problems. When using polycarbonate, you can forget about this.
In addition, bending a sheet of plastic is very simple; curved surfaces coated with this material are found everywhere. On the contrary, bending a sheet of glass is very difficult and requires sophisticated equipment. It is impossible to make curved glass with your own hands at home or in a summer cottage.
The transparency of cellular polycarbonate is much lower than that of glass. In this regard, opinions are divided: some believe that this is a big plus, since through the windows you cannot see what is happening inside. In addition, the sun's rays, passing through a plastic barrier, are partially scattered and do not dazzle as much as with conventional glazing. Others believe that opaque windows limit the view and deprive the owner of the opportunity to contemplate the beauty of the surrounding world. Both sides are right in some way, so you just have to accept the situation as it is.
Video “Closing the veranda with polycarbonate”
From this video you will learn how to cover a veranda with polycarbonate with your own hands:
When glazing a veranda, if you want to have transparent windows, install sheets of monolithic polycarbonate, and if you want to be in a warm room, choose cellular polycarbonate.
At the preparatory stage:
1. Select the design of the veranda windows:
- opening or swinging;
- sliding;
- deaf.
2. Decide on the type of polycarbonate sheet - structured or monolithic.
3. Find out the sizes of the sheets you will purchase. For glazing, a material with a thickness of 8–10 mm is preferable.
Before using polycarbonate as windows, you should determine the thickness of the polycarbonate sheet
4. Knowing the dimensions of the veranda, the dimensions of the polycarbonate sheets, make a sketch with the dimensions of all elements of the structure: foundation, roof, racks, lintels, window frames, etc.
5. Prepare materials:
- sheet polycarbonate;
- tape or adhesive tape to protect the surface of the material;
- connecting profiles for polycarbonate as elements of the supporting structure;
- special washers for self-tapping screws and screws;
- fasteners;
- polyurethane foam.
6. Prepare your tools:
- hammer drill or drill;
- pliers;
- screwdriver;
To install polycarbonate glass you will need a screwdriver
- screwdrivers;
- stationery knife;
- building level;
- jigsaw;
- file;
- hacksaw for wood and metal;
- roulette
Possibilities of glazing the veranda with double-glazed windows
All of the above designs can be considered both for glazing standard verandas and for designing more non-standard solutions. Often, owners prefer that the veranda or terrace be made in the shape of a triangle, in a corner style, or in a semicircle. Lifting and sliding mechanisms will come in handy in this situation, because such systems are becoming increasingly in demand due to their high strength and external design features.
Among other features, several nuances can be highlighted.
An increased level of tightness of the products means that no moisture, dirt, or debris will enter the room, and drafts will not penetrate.
The roller system allows the structure to open and close as quickly as possible.
Thanks to the use of products, the room is protected from freezing during the cool season.
Thus, sliding windows to the terrace at the dacha are the best option for your convenience and comfort.
“Cold” glazing of gazebos, verandas and terraces from RUB 2,200/m²
“Cold” glazing of gazebos with Provedal aluminum profile is designed to protect the room from wind, precipitation, debris and foliage. You can install even upholstered furniture in the interior of the gazebo (terrace, veranda) without fear that it will become unusable due to weather conditions. Yes, “cold glazing” is not able to maintain the same air temperature as in your home. However, if there is a barbecue area inside (a fireplace or a summer kitchen), even in winter the gazebo will be warm and cozy!
Advantages of “cold” glazing of gazebos and verandas:
- You will not need to additionally strengthen the parapet for glazing, because... the whole structure is very light.
- Saving space for gazebos (verandas, terraces) when using sliding rather than hinged sashes in windows.
- Easy to care for. You can easily remove the sashes yourself to wash them or completely free the window opening of the gazebo in the summer heat.
- Durability. Aluminum frames, with proper handling and care, will last for decades!
Glass roller shutters
A unique type of transparent roller shutters are products with slats made of glass (glued with 8 mm thick triplex film). Structures of this kind, which protect from wind, rain and snow, can be used on a terrace, gazebo or balcony.
The maximum dimensions of the glass sheet are 4000 × 4000 mm. The width of the lamellas can vary over a fairly wide range, so choosing the appropriate option for a particular case will not be difficult.
Since glass lamellas are heavy (about 25 kg/m²), and it is extremely difficult to lift the sheet manually, a built-in electric drive with a power of 300–700 W is used for control. By the way, the heavy weight of the structure can create some problems. So before ordering roller shutters, you should make sure that the walls of the building can withstand such a load.
The price of glass roller shutters averages from 1300 to 2200 rubles/m². All other things being equal, they cost approximately twice as much as polycarbonate ones.
Door options
First you need to decide what kind of doors you intend to make. So, they can be of two options:
Figure 2: The hanging door mounting system can support a door weight of up to 80 kg.
- rail (Fig. 1);
- hanging (Fig. 2).
In the latter option, the entire load generated by the cabinet doors falls on the rail installed in its upper part. Rail doors, on the contrary, affect only the lower part.
Aluminum profiles are used for all types of wardrobes. They will be needed in order to install a new frame on which the doors will later be installed. If you have never encountered the need to install doors for a sliding wardrobe before, then it would be best to start by not making this frame yourself, but ordering it from professionals. In this case, you will need to provide all the dimensions of the cabinet yourself, including the estimated dimensions of the doorways.
Purchasing material
In order to use a reliable material as a material for a frame, it is necessary to select it efficiently and carefully. So, first you will need to purchase profile guides, the length of which is 6 m and 4.5 m (vertical and horizontal, respectively). All this affects the process of transportation and processing of materials. The guides (both lower and upper) must be sawn off in accordance with the width of the opening. In this case, you need to reduce approximately 1 mm. Be sure to measure everything as carefully as possible.
Project and calculations
Figure 3. Drilling diagram for vertical profile parts
The length of the horizontal strapping is set depending on the width of the vertical strapping used. Therefore, you need to calculate the entire width of the compartment doors with your own hands and subtract the double vertical width from this value. So, if you are calculating the width of a doorway, you will first have to measure the width of the doorway of your closet. After this, the width is divided by the number of sashes. So, if in your closet the length of the opening is 160 cm and there should be two sashes, then divide 160 by 2. It turns out that the minimum size of the sashes will be 80 cm. After this, you need to add 1 mm to each side. Next you will need vertical indicators, which can take different values. So, for example, their width will be 3.6 cm. As a result, you need to double this figure, it turns out 7.2 cm. You need to subtract this figure from 80 cm. So, horizontal straps in length are calculated using the formula:
Lg=W-2xWv, where Lg is the length of the horizontal strapping, W is the width of the verticals, Wv is the width of the verticals.
80-7.2=72.8 cm.
Figure 4. Wardrobe doors can be complemented with mirrors or prints.
Next, you need to move on to drilling the parts of the vertical profile (according to the diagram in Fig. 3). The level and dimensions of drilling vary depending on the technology used to make the profile itself, because it comes with special fasteners. Therefore, if the openings you made do not coincide with the fasteners, you will have to purchase new ones or re-make the frame.
After this, you need to take care of what material you will use for the most
For these purposes, laminated chipboard is used, the thickness of which is 0.8-1 cm. If you want to insert mirrors into the doors, you must first install polyethylene soft inserts in the doors. They should be purchased with a small reserve, especially since this material is sold by the meter. As a result, such a seal will securely hold the mirror.
https://youtube.com/watch?v=-sVrld2JFfo
The final stage requires attaching end expansion joints and bumpers. They are glued to the front sides of the wardrobe. The result is a comfortable, beautiful and practical piece of furniture, without which not a single bedroom can do (Fig. 4). Despite the fact that this is the last stage, it is better to purchase such elements at the initial stages of door repair. Thus, in order to build sliding wardrobe doors with your own hands, you need to make a design in advance, where all measurements will be taken into account. This applies to the opening in the old cabinet, its height, the width of the vertical and horizontal guides. You can implement the cabinet project with your own hands from a metal profile and LSDP.
Translucent doors
Polycarbonate can be inserted into hinged swing doors, or as a filler for folding or sliding doors. The former are attached to the slopes using hinges, the latter move on rollers along a guide rail located above the opening or mounted in the floor.
Making door leaves from polycarbonate, possibly frameless. In this case, it has no frame, and all the fittings are attached to the polymer page. It is clear that if there is no frame, then the polycarbonate itself must ensure the rigidity of the structure. In such cases, only a monolithic version with sufficient thickness is used.
This door is not cheap, but it looks very solid. Pages with a honeycomb structure are less durable and too light for frameless doors; therefore, they are used only for filling plastic, aluminum or wooden frames.
Fabrication
Making a frameless door from polycarbonate so that it looks decent in the interior is virtually impossible at home. Perhaps it will be a sliding door in a closet or pantry.
If you give preference to the frame method, then only the wooden option is suitable for independent work. Polycarbonate also plays the role of glass, and is inserted into the frame using the simplest method, by attaching fragments cut to size with a glazing bead.
For the most part, our readers are interested in the question: “How to make polycarbonate doors in a greenhouse?” To do this, you just need instructions for installing this material, which can be easily found. In principle, it will be needed if the entire greenhouse is made of polymer pages. As for the door, the main task here is to correctly manufacture the door frame so that it fits exactly into the opening.
For better rigidity, it is better to divide the frame of the door leaf in the center with a cross member, or even two.
So, if you do not have a single sheet of polycarbonate that matches the frame in size, the door trim can be assembled from two pieces and joined at the center. Using hinges, the frame of the greenhouse door leaf is hung on the racks, the latches are screwed on the inside and outside - that’s the whole door.
How to make a radius wardrobe
Let's consider the manufacture of a built-in radius sliding wardrobe. To do this, you need to measure the height of the ceiling and the width of the walls between which the cabinet will be located. Next, decide on the type of radius cabinet: convex, curved, wavy or concave. Design the cabinet, using a special program or manually. Prepare your tools for the job.
Tools for making radius sliding wardrobes:
- pencil,
- square,
- drill,
- screwdriver
Materials for the manufacture of a built-in radius sliding wardrobe:
- drawings of the future cabinet,
- furniture board 18 mm thick,
- doors, pre-made or ordered,
- internal contents: drawers, hangers, handles and guides,
- accessories: wheels, profiles, guides, screws and dowels,
- side, top and bottom trim panels.
Instructions for making a radius sliding wardrobe with your own hands:
- Using a pencil and a level, we take measurements and draw the future location of the built-in wardrobe. On the wall we mark the place where the vertical posts will be located, and on the ceiling - profiles;
- Mark the height at which the shelves will be fixed and drill a hole for the dowels. Using a hammer, hammer in the dowels;
- Shelf profiles are attached to the wall. For reliability, install lower shelf holders;
- Apply markings for installing the mezzanine shelf. Attach the shelf using self-tapping screws;
- measure the distance from the ceiling to the floor where the side wall is installed and cut the part according to size;
- start installing the side profile;
- According to the cabinet drawing, install the filling for the radius sliding wardrobe: shelves, drawers and clothes hangers;
- when the installation of the internal filling is completed, proceed to the installation of false panels;
- false panels should be prepared in advance; their shape fully corresponds to the radius of the cabinet;
- using a screwdriver, attach the false panels to the side wall, ceiling and floor;
- cut and bend the lower and upper profile. When installing the lower profile, insert one positioner or stopper on each door;
- attach the lower and upper profiles using screws to the false panel;
- The cabinet door is made according to the radius of the profile fastening. It is better to entrust this matter to professionals;
- if the door is not decorated, use self-adhesive film or other suitable material for decoration;
- Attach vertical profiles to the sides of the door using screws. Install a silicone or rubber seal;
- then secure the upper and lower door frames;
- install the upper and lower rollers;
- First insert the upper guide and then the lower guide rollers onto the rails;
- check that the door slides correctly. Use a hex wrench to adjust the slide;
- If desired, stick on pile to protect the doors from impacts.
How to measure the dimensions of a window frame for a balcony
Sliding window systems are manufactured in a factory according to dimensions taken by a craftsman at the site of their future installation.
To ensure that the installation does not complicate the work, and the window is securely installed, it is necessary to indicate 3 parameters in the application with an accuracy of mm:
- width of the balcony;
- window height;
- the depth of the protrusion from the base surface.
In addition, you will need to determine:
- the width of the wall, ebb and window sill;
- take into account all kinds of protrusions and sagging of the top plate.
When taking measurements, it is enough to use construction tapes or metal meters, and the results should be immediately recorded on paper.
How frameless canvases are attached
Sliding systems are designed for installing monolithic polycarbonate panels with a thickness of 8-12 mm. There are two types of structures based on the method of connection with polycarbonate.
- Clamping. In it, the panel is grasped with two long jaws, after which they are clamped with a screw located above the canvas.
- Point-clamping. The lag screw passes through the panel in which a hole is pre-drilled.
All systems for frameless doors are produced only with upper rolling rollers.