Blog > Windows > Simple wooden windows - pros and cons. Expert recommendations.
25.10.2021
Despite the availability of plastic windows, Soviet woodwork continues to be very popular. Old wooden windows, unlike modern ones, are made from solid timber with single-glazed windows and high-quality fittings. This makes them not only stylish, but also a reliable solution for every home.
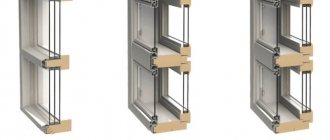
Two types of double windows in the old building
Double window units.
This is a common box, with two rows of frames. The thickness and depth of the box can be any; we often do it according to the previous window. In standard production it is 130 mm. Windows are made in different configurations, but the main rule is to repeat and maintain the previous appearance of the window. Windows require painting, this is one of the important points, because in old houses all the windows are the same color and the color of the new window must match the others in this house.
Two single blocks, through a wall.
Old houses often have very thick walls, so two single windows are installed at some distance, through a partition. It is necessary to carefully calculate these blocks so that the doors of one, when opening, do not rest against the other. Often found in pre-revolutionary houses. This option requires sewing up the slopes between the windows. Slopes can be made of plaster. Sometimes double-glazed windows are installed in one of the blocks.
Wooden windows in Stalinka
Myth 4. Wooden windows are difficult to care for
Regardless of the material used to make the window structure (wood, plastic, aluminum), maintenance is necessary in any case. Mostly the maintenance procedure boils down to regular washing and adjustment of the fittings. It is also recommended to periodically lubricate fittings and seals. Frames are periodically checked for defects, and any deficiencies are promptly eliminated.
Caring for plastic and wooden structures is completely identical. This doesn't require any special effort. It is enough to carry out preventive maintenance of windows every year and take all necessary measures. In this case, you should use special means that will not harm the window covering.
Examples of prices from orders. Common sizes.
Wooden window. Width 1200 height 1500.
A common size in old wells and in low-rise buildings of the Soviet era.
The cost of the window itself
Product for self-installation. The size of the window opening. With glass. 27500
RUB
Window cost including installation! Full construction!
Product with low tide with delivery, installation 37500
RUB
The cost is quite accurate, but we will announce the final price after measurement.
Wooden window with transom. Width 1200 height 1800.
A common window size in older areas of the city. Petrogradsky, Central, Vasilyevsky and other districts of the city
The cost of the window itself
Product for self-installation. The size of the window opening. With glass. 32000
RUB
Window cost including installation! Full construction!
Product with low tide with delivery, installation 42700
RUB
The cost is quite accurate, but we will announce the final price after measurement.
Video!! Installation of a wooden double block in an old apartment
Two windows installed in parallel, across a partition. Shir. 1200 at altitude 1800
A common option for windows in houses built before the revolution, in the old foundation.
The cost of the windows themselves
Product for self-installation. The size of the window opening. With glass. 36300
RUB
Cost of windows including installation! Full construction!
Product with low tide with delivery, installation 47800
RUB
The cost is quite accurate, but we will announce the final price after measurement.
By preserving the historical appearance of old houses, we preserve our history, our great history of a huge state.
Video! Wooden window with transom in an old house
Double window unit for an old apartment. With transom.
Malfunctions and ways to eliminate them
No matter how reliable wooden Soviet windows were in their time, they still need repairs. The distortion of the window frame (sash) is one of the most common woodworking problems, which can be quickly and reliably eliminated by strengthening special corners on both sides of the frame (in the corners of the frame). This method allows you to easily eliminate the distortion of Soviet wooden windows - repairing them using sizing of the window frame will require more time and certain skills.
There is no doubt that for the long-term operation of old window systems, it is recommended to carry out their periodic repairs, which, however, will cost much less than purchasing modern glazing systems.
Double wooden windows with different glazing options
For large window sizes, it is customary to divide the glass in the sashes; this is done for safety and to create a pattern and style. When the height is high, a transom part, a transom, is added to the window.
We offer double wooden windows with the common glazing. This means high windows with a transom at the top, where there is a stylized repetition of the glazing as in the sashes. Such windows have been used for a long time in Russia, installed in many houses, and adherence to old styles looks harmonious. The glazing is designed for large window sizes, but it will look beautiful for any window size.
Variants of glazing often found in old buildings.
Deglazing, casements in windows, in historical buildings.
If you have a different one, we will make yours. It is important to preserve the architectural heritage. The glazing can be worked out individually, but the style is set. It is good to install glass with edges, but it is expensive, you can also install colored glass, for example, bronze color. We install 4 mm transparent window glass as standard.
Windows with glazed transom
Two double-leaf windows with transoms, in which a small frame is made. The window dimensions are 1220 wide by 1790 high and cost 27,400 rubles without installation.
Antique windows, individual, carved.
These windows are installed in historical buildings, in palaces, in manors and apartment buildings of old. Custom-made windows sometimes require carved parts. There are many arched windows and windows of complex shapes. It is also common to find entire window walls consisting of many products combined into a single structure. They take a long time to make, are difficult and are very expensive. Solid oak is often used, but pine is also not uncommon. The glass is also selected individually, sometimes stained glass is installed, sometimes with edges, but as a rule they try to maintain the appearance and internal structure of the previous product. It is also customary to save parts of the replaced product and install them on a new one, for example, fittings, carved elements, glass and stained glass.
Wooden double windows were installed in old-style apartments back in the last century. Today, almost all of them have fallen into disrepair. Cracks, drafts, mold, mildew somewhere, loose hinges and handles. All this requires attention and financial investment from the owner of the apartment or office space.
Window with small glazing. In an old building.
Window with small glazing, checkered. Three-leaf with transom. Its size is 1740 mm wide by 1890 mm high. The product cost 44 thousand rubles with imposts.
Various styles of glass windows
English windows with turning opening
Dutch style windows
Windows in Scandinavian style
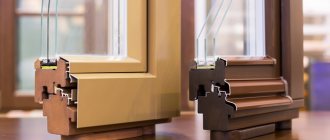
Features of wooden windows in the old building
First of all, this is their size. Window openings in buildings of those times were significantly larger in size than modern standard structures.
The second point is the façade of the building. Windows of different layouts are not allowed here, and even the frames must have the same color on all windows. Most of the old buildings are located in the center, where the state closely monitors the preservation of ancient classical St. Petersburg. And all innovations in its appearance must be in harmony with the general architecture of the street where this building is located.
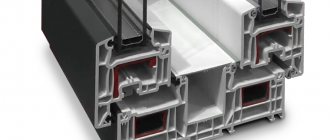
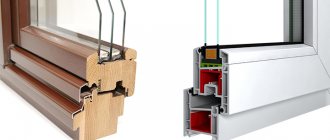
The now popular metal-plastic windows, despite all their many advantages, in some cases are not suitable for installation. Even despite the variety of external coatings for the profile and its plasticity and ability to take any shape, they do not provide a 100% match with conventional wooden frames. Therefore, in houses belonging to the “old stock” category, budget frames made of simple wood are sometimes the only possible solution.
Today this is not the same profile as it was many years ago. Better processing and protective modern coating significantly extend their service life.
Double sash windows. From wells, St. Petersburg courtyards.
Two double-hung windows with transoms, one wider. Installed in the old part of the city of St. Petersburg.
Types of wooden windows in old houses
The window opening in old houses is high, wide and deep. The usual option of two doors is not suitable here. The window will be very large, heavy and not safe for use. Therefore, they are often divided into several smaller fragments.
A window frame may have two or three sashes. There is usually a transom on top, most often blind. Depending on the original design, the glass can be lined with grooves that divide its surface into smaller squares. In addition to aesthetics and maintaining a certain style of the building, this “trick” gives the glass more strength.
Triple-hung window with transom
Triple-hung window with transom and vent. Bound for symmetry.
Conclusion
manufactures double wooden windows of standard type and to order. With any devitrification option according to the customer’s sketch. Instead of ordinary glass 4 mm thick, you can install in individual elements: double-glazed glass, colored, mirror, tinted or frosted glass.
Working in old buildings requires certain skills from specialists so as not to damage other elements of the building and wall coverings. Therefore, only qualified specialists can perform such work efficiently.
Our company will do the installation of double wooden windows, sealing the partition between them and any additional work on painting and finishing the opening carefully and on time. Call.
Frames and windows are of EXCELLENT quality, ENVIRONMENTALLY CLEAN, BEAUTIFUL!!
Old technologies - old windows
What is the Soviet “carpentry” with which apartments and houses throughout the vast country were equipped? Soviet-style wooden windows are window structures whose frame is assembled from solid planed timber. The glazing was made of single silicate glass. The fittings used, despite their unsightly appearance, were distinguished by their functionality and long service life.
The large tolerances allowed in the manufacture of wooden Soviet windows inevitably led to the need to “insulate” in winter - to seal the cracks with paper or cloth soaped with laundry soap. Spring came - and with it the need to remove homemade thermal insulation and paint the windows. Cheap but effective.
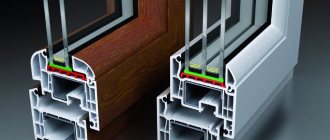
A careful examination of Soviet-style wooden windows reveals that they were conceived in accordance with the technologies that existed at the time of design. The execution, of course, let us down. In the house construction of those times, Soviet-style wooden window blocks of two groups were used:
- separate - with glass in separate sashes;
- with paired binding - 2 frames, each with a single glass, fastened with bolts.
All Soviet glazing systems have a place for sticking a seal, and in the case of paired frames, the degree of pressing of the sashes to the seal is regulated by turning the handle to close. By and large, paired frames are an analogue of double-glazed windows, made at domestic woodworking plants (at that time, each regional center and large city had its own house-building and woodworking plant).
The heat and sound insulation qualities demonstrated by outdated glazing systems depend on a number of characteristics that Soviet wooden windows have - the thickness of the sash and glass, the condition of the seal between the window frame and the sash, the quality of the locking mechanisms, the correct installation of the window block in the wall opening. The sash thickness, standard for models of those times (40 mm), did not allow for multi-profile milling, and therefore, the creation of several contours for joining the frame with the seal.
Such simple window designs faithfully served the tenants, and the thickness and design of Soviet wooden windows made it possible to repair them with your own hands, without special equipment and the involvement of qualified labor.
How to update old window blocks with your own hands?
They plan to carry out restoration work in warm, dry weather; the maximum ambient humidity should not exceed 65%. In case of precipitation, the frames are carefully covered with rain film.
Before repairs, a thorough inspection is carried out and a list of necessary operations is established. Typically, the main operations are :
- dismantling;
- disassembly;
- removal of glass and fittings;
- restoration of wood parts;
- putty;
- grinding;
- painting;
- replacement of accessories;
- installation of a leaf window;
- installation of frames in the technological opening.
Restoration of window blocks begins only after thorough drying of the wooden frame.
Removing from hinges
Before starting to dismantle the window, first cover the floors and furniture with protective film.
Next, they begin the first stage of restoration—removing the sash. This process is different for old and new modifications of window blocks - for old-style frames, just open the sash and remove it from its hinges.
For a tilt-and-turn mechanism, open the sash and set the handle in the folding position, lift the sash so that the pin comes out of the hinge below. Next, they take a special steel scissor bar that holds the sash at an angle and simply unfasten it.
Modern wooden frames with double-glazed windows are removed in the same way, regardless of the tilting mechanism. To do this, open the sash, remove the protective cover from the top hinge and then remove the pin by pulling it down. After which the sash is removed from the lower hinge by moving it upward.
Restoration of the frame and its surface
After the frame is removed from its hinges, remove all glazing beads and glass. For further work on restoring the frame, you need to completely remove the old paint from it. There are two common methods for this :
- using a hot hair dryer, the most effective option;
- using chemical surface treatment.
When working with a hairdryer, hot air with T = + 250 C is directed onto the paint layer, the paint melts and chars, after which it is easily removed with a regular knife.
Kerosene is used as a chemical solvent , the frame is disassembled into individual parts, wrapped in rags and placed in a tank with kerosene, leaving in this position for 2-3 days in a fireproof and dry place.
Take out the wooden parts one by one and remove the softened paint from their surface with a knife. If the product is left in the air for a long time, the kerosene will dry out and the paint will dry out again.
Remains of paint on the surface are removed with sandpaper or a sander.
Removing rotten parts
If the rotted area of the frame is small and not deep, it is restored with epoxy wood putty .
To do this, the damaged area is freed from layers of paint and rot is removed. Next, putty is applied, carefully filling chips and cracks, forming a smooth surface.
It should protrude slightly above the main surface, since it will subsequently be sanded. The treated frame is left to dry, then the surface is sanded with a grinder until it is even with the base.
This option for reconstructing the frame is not durable, so in case of large amounts of damage, the part is completely replaced with a new one.
Putty, primer and sanding
Next, putty the remaining small defects of cracks and chips on the frame. Mark them with a marker and apply a primer to the marked areas, and apply latex or oil putty on top with a rubber spatula. All excess deposits are removed immediately . The work is carried out in two layers, giving each layer plenty of time.
Drying and sanding
Leave the frame to dry for at least a day. Then the entire surface is sanded again. Cleaning it with a dry brush each time to check the quality of the sanding.
Working with glass
Restoration of glass involves carefully inspecting it beforehand. Those sheets with cracks and chips are rejected, and new sheets must be cut out instead. On old glasses without defects, remove paint and dirt, wash thoroughly and prepare for installation.
Glazing sealing
Clean glass must be installed in the frame using sealant. It comes in different colors and is chosen according to the color of the window.
Procedure for installing glass on sealant:
- squeeze out a little sealant under the inner corners of the frame;
- insert a sheet of glass and fix it with small nails;
- remove excess sealant with a rag soaked in vinegar;
- The sealant on the nails is not removed; it will protect them from rust.
Installation of glazing beads
Next, the glass must be covered with wooden glazing beads; they are pre-cut to size and painted to match the color of the frame. Allow it to dry, then cut the corners at 45 degrees. Install on sealant or secure with small nails .
Treatment with impregnations and antiseptics
Before painting, the wooden frame is impregnated with antiseptics. The most famous and inexpensive antiseptic is drying oil. It is applied in 2-3 layers after the previous layer has completely dried. The drying oil is applied while heated. You need to work carefully wearing gloves to avoid getting burns.
This type of wood protection is enough for 3-4 years of use, almost until the next window painting.
Installation of seal
In order for wooden double-glazed windows to be warm, it is imperative to perform thermal protection, the main function of which in the block is performed by the seal in the frame sashes.
First, the attachment areas of the sashes and glass are treated with silicone sealant . After this, the seal is placed in a special groove.
If there is no such groove in the frame, then it can be made around the perimeter of the sash by using a milling cutter to select a 5 mm recess with an angle of 45 degrees. Next, it is thoroughly cleaned of chips and a PVC seal is inserted into the resulting groove, while avoiding unnecessary tension on the product.
Replacing broken fittings
Before installing the fittings, they are carefully inspected, worn out and damaged ones are rejected, and the rest is thoroughly cleaned of dust and paint.
Rejected fittings must be replaced , it is better if it is a modification of the same type; if the required brand is not available in the retail chain, then they are chosen by size.
The work of replacing the fittings will only take a couple of minutes, and the tools you will need are a Phillips screwdriver. The most difficult work lies in replacing the handle. To do this, you need to rotate the protective cover at the base 90 degrees. The screws securing the handle to the window will then open.
When replacing the handle, when installing an opening limiter, install a limiter plate for the regulator.
Coloring
The reconstruction of wooden window blocks is completed by painting, for which special dyes for exterior work are used that can withstand precipitation and temperature changes: oil and alkyd compositions.
Apply paint in 2-3 layers , each subsequent one is applied after the previous one has completely dried. The thickness of the paint varies for each layer, from a thinner state for the first layer, this will create a more even layer.
It is best to paint the frame without glass; in this case, you will not need to remove paint stains on the windows afterwards. If the glass is already installed, they are protected at the junction with the frame with masking tape.
Installation in the opening
Before installing a restored window, the opening must be well prepared, cleaned of protruding pieces, dust and dirt. Next, all cracks are sealed with cement mortar, and the surface treatment is completed with primer.
The finished wooden block must be brought into the opening, installed on support blocks and aligned horizontally and vertically, followed by fixation with spacer blocks.
Installation can be done in two ways:
- With unpacking of the block . In the first case, through holes are drilled in the frame and anchor bolts are driven into the wall through them. This is the most preferred method, especially for multi-storey buildings and in operating conditions with high wind loads.
- Without unpacking the block . In the second option, the frame is secured with special anchor plates. In this case, it is worth choosing reinforced, wide modifications of the plates.
Adhesive seal
The seal is a thin rubber profile of a round, rectangular or other shape. On one side it has an adhesive surface, which is covered with film. To insulate a wooden window, you need to remove the film and glue the seal around the entire perimeter of the sashes (preferably along the perimeter of the window frame, if the window design allows it). When the sash is closed, the rubber will compress, closing the gap between the sash and the window frame.
Before gluing, the surface of the wood must be washed using a soap solution and degreased with acetone or, preferably, alcohol.
A properly glued seal lasts quite a long time (3-4 years). That is, it does not need to be changed annually, plus it allows you to open the doors for ventilation.
Window putty
The joints between the window profile are sealed with putty, which is similar in consistency to plasticine, except perhaps a little harder. The places where the glass adheres to the window frame are also covered. This method of insulating wooden windows has been around for many years; our grandparents used it. However, it is still relevant.
You can buy putty at a hardware or building supply store. Or you can make it yourself by mixing chalk powder and linseed oil in a ratio of 4 to 1. But it’s easier to buy, and it’ll be cheaper.
The disadvantages of using putty include its absolute lack of aesthetics - the windows will not look the best, to put it mildly. In addition, the putty must be changed every season.
But there are also advantages - using putty is an effective and cheap way of insulation. It is available to everyone.
The first time is always difficult
The hardest part is yet to come. The window frame is painted with such a layer of paint that there is not even a crack. They poked around from all sides.
It turned out that there was a platband stuffed inside, and after removing it, you could try sawing the box. The husband decided to cut in the middle, right next to the windowsill. Only now the frame went deeper.
A successful hook with a hammer still turned out the lower part. My husband lifted it, and I pushed the chisel further and further and held it. They filed it down a little more.
Thus, the frame was simply trashed. At the corners the box was glued, spliced and nailed at the same time. The twisting method helped, although not as quickly.
The window sill turned out to be the most difficult
It was expected that the window sill would be easily removed, but Soviet craftsmen did everything for many years. Even when the entire box was taken out to the trash, the window sill held onto the concrete.
With great effort, the two of us finally tore it off. And what did he rely on? These were ordinary nails. I would like the same quality in a new window.
With our joint efforts, my husband and I managed to cope without outside help, and not a single cat was harmed by concrete fragments.
Then all that remains is to bring a few blocks of aerated concrete, cut them and put them on cement, but that’s a completely different story.
A little preparation
While one of us was working, the other was on duty at home, since we live on the second floor. And in the evening they slowly tried to break out the unnecessary wooden frames.
We didn’t have any special tools: an old rusty saw, a chisel, a hammer and four inexperienced hands. I didn't have much help, but I was a good leader. Which the husband, however, was not very happy with.
Just in case, there was an orange rope strung across the yard. Rags were hung on it at intervals so as not to accidentally injure passers-by.
A piece of the slope can always break off, or a part of the window frame may even fall. In fact, it didn't help much. Someone regularly slipped under the fence, but that was their problem.
On our part, all measures were taken.
The process has begun - the main thing is to have more physical strength
My betrothed is an office plankton and does not understand anything about everyday issues or repairs. He wanted to pull out all the remaining glass and unscrew the frame.
You should have seen his eyes when I simply lifted the sash up from its hinges and it came off. He clearly did not expect such a turn of events.
Window tape
Window tape acts on the principle of putty, that is, it temporarily closes existing cracks, preventing cold air from entering. However, this method is much less effective, since the adhesive tape has almost zero thermal insulation value. Therefore, if you decide to insulate the windows with tape, then first fill the cracks with cotton wool, tow or other similar material. And only after that stick the tape. Such insulation will be much more effective.
The disadvantages of insulating windows with tape are as follows:
- It doesn't look nice.
- The procedure must be repeated annually.
- When the tape is peeled off, the paint on the window will be damaged, which will lead to accelerated deterioration of the wooden profile.
There is only one plus - low cost, the necessary materials will cost very little. Putty and tape also have one common drawback - if you seal the gap between closed doors, you will no longer be able to open them for ventilation.
Recessed seal (Swedish technology)
The embedded rubber seal is not glued to the surface of the window, but is inserted into a pre-made groove. The groove is also milled along the entire perimeter of the sash and/or window frame. It is recommended to add silicone sealant to the groove before inserting the seal. This way the seal will hold better and any possible cold bridge will disappear.
The advantage of a mortise seal is that it lasts much longer than a glued one. If you install a good one made of high-quality rubber, then you can not change it for 7-8 years.
However, it is very difficult to install it, especially to make an even groove with a milling cutter. If you are not confident in your abilities, then it is better to order from professionals. Otherwise, you risk damaging the window.
Please note that insulating windows using a sealant will not eliminate the gaps between the glass and the frame. Cold air will still leak out of them. Therefore, you need to insulate the glass separately using putty, tape or glue (this will be written about below).
Installation of a standard window
Before installing a plastic window, you need to clear a few meters of space next to the window opening: remove furniture, remove everything from the room that can become dusty.
The work begins with dismantling the old window, which is the most dusty and messy part of the procedure. Next, all unnecessary elements from the window opening are removed and construction waste is removed. The new window structure is secured to several anchors or bolted connections. All gaps and seams are filled with polyurethane foam and sealed. Excess foam formations are removed.
Window sashes are installed, their correct opening is adjusted, the tightness of the closure and the functionality of the fittings are checked. Protective stickers are removed from the glass unit and plastic surface, and the entire structure is cleaned with a special chemical solution.
My conclusions
I have seen more than once how healthy men, with the help of one crowbar, turn out wooden windows in a matter of minutes. I'm surprised how they can do it. We spent a total of two evenings on the whole process.
As a result, the family budget remained intact. Now I know that you don’t always need to run to special companies and pay a lot of money for simple work. Ingenuity and level hands decide everything.
I heard that boxes are simply cut into pieces with a grinder and everything is quickly removed. However, I didn’t want to buy an expensive instrument for the sake of experimentation.
I think it would have been more effective, but we did it ourselves. Would you continue to look for contractors or do everything yourself like we did?