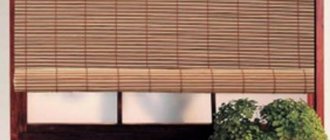
This type of curtain will fit perfectly into any interior style: from classic to modern, hi-tech and minimalism to bright pop art. They can be combined with regular curtains, tulle, or left alone. This is a functional solution for a country cottage, townhouse, apartment in the center of a metropolis, youth studio, workspace.
Today, most rooms have PVC windows, so it will be useful to learn how to attach stylish Roman blinds to plastic windows of any configuration.
Each type of room requires its own stylish and functional design, and they already have their own type of “rim” installation. Also in the images we will clearly show how this or that method of installing Roman blinds on metal-plastic windows and balcony doors is visually different.
Mounting methods
One classification is based on the method of fastening.
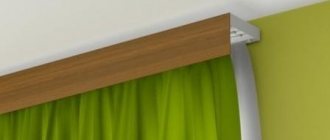
- Mini cornice. The curtain is attached directly to the window frame. Such a mount saves space and is especially often used in small apartments, as well as in apartments decorated in a minimalist style. With this type of fastening, the window sill is not covered with a curtain, but remains free, and can be used as a desk, bench, shelf for books, flowers, or in any other way.
- Classic mounting option. Large curtains are attached to such a cornice (standard size 1.5 x 1.8 meters). Mounted on the wall above the window. A lowered curtain is adjacent to the wall and takes up less space in the room than a traditional curtain.
- Difficult. For dormer or arched windows, a special design has been developed with a beveled or curved cornice. For this type of window, using Roman blinds is an excellent decoration solution.
Look at other options for attaching curtains to the cornice.
Types of mechanisms
Another classification is based on differences in the operation of the mechanism that allows the product to be lowered and raised. In accordance with this, cornices are divided into:
- option with manual lifting mechanism,
- option with electric lifting mechanism.
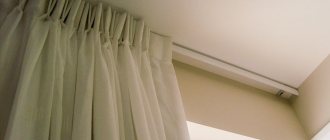
This is usually how curtains with cord lifting are attached.
The photo on the left is an open control system, the photo on the right is a closed one.
When decorating a window with a Roman blind, you need to imagine how convenient it will be to use. And to evaluate this convenience, a classification based on the particular details of the lifting mechanism is suitable. In accordance with it, mechanisms are divided into the following types:
- Rope, also known as cord lifting mechanism. This is the most practical and economical type. Used in cases where the fabric from which the curtain is made is not too heavy. Very dense and heavy materials can damage the mechanism.
- The chain-rotor mechanism is based on rotating blocks and a dense cord; the structure is driven by the movement of the chain. This allows you to stop the mechanism in any position; accordingly, the curtain can be fixed at any height, which is very convenient.
- An automatic control system is the most convenient, but at the same time the least expensive type. By pressing a button on the remote control, you can open or close the curtain without leaving your seat.
Design
Roman blinds have many advantages over regular ones, but only if you choose the mechanism wisely to suit your needs. And to make the right choice, you need to have a good understanding of how this mechanism works and what parts it consists of.
Any cornice, regardless of the type of lifting mechanism, contains:
- profile (usually made of metal),
- plumb line for canvas,
- lifting mechanism,
- pulling mechanism
- additional elements (hooks, chains, Velcro - depending on what pulling and lifting mechanisms are used).
Various versions of Roman blinds can be additionally equipped with the following systems:
- An open lift with a chain mechanism that ensures tight winding of the curtain fabric onto the shaft; fixation occurs using hooks on the sides and plastic hooks, which are included in the package.
- A spring mechanism for lifting the canvas with open or closed guides, used for inclined windows, for example, in attics.
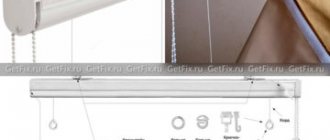
In the photo on the left is the design of a chain-cord lifting mechanism, in the photo on the right is the design of a chain-belt mechanism.
Main characteristics
Varieties of Romanesque style models with a lifting mechanism:
- Classic. They consist of a continuous textile element, which, when lifted, forms uniform horizontal folds in the lower part. This model is most often used for interior decoration. Curtains are mounted on a frame consisting of tubes, slats or plates.
- Cascade. The defining feature of the design is the folds of the material that form even if the fabric is unfolded. The cascade model is considered a more elegant and elegant option, relative to the classic one.
- Frameless curtains. No slats are needed for sewing and hanging. In this version, folds are formed on the sides with “ears”. The frameless model was the very first to be created and became the prototype for the creation of the Roman classical curtain, but these days it is used less often than other types.
Classic option.
Romanesque style cascading curtains.
Frameless model of curtains for the kitchen and dining room.
Recommendations for selection
Due to the fact that the design of the Roman blind is significantly different from the usual version, it is necessary to take these differences into account when choosing fabrics for the curtain, its width and height.
- It is not recommended to use curtains more than two and a half meters wide, since a mechanism of such a length will not withstand constant loads and will quickly break.
- A curtain that is too long will have a lot of weight even if fairly light fabrics are used, so in two-light rooms of your own houses you should not use one cornice for two window openings - the length of the curtain cannot be more than 4.5 m!
- Very dense and heavy fabrics should be used only if the cornice has the necessary strength and reliability.
When decorating a window with a Roman blind, the main task is to choose the right cornice, and you need to select it depending on what kind of fabric will be used. Its strength must be such as to withstand the weight of the lifting mechanism and the canvas, and also have some strength margin. Strength can be increased by using an additional attachment point installed in the middle of its length. This will distribute the load evenly and reduce sagging.
Advantages
Let's look at the main differences between Roman blinds and regular curtains to understand why they have become so popular.
- Curtains can be fastened almost anywhere, even very narrow ones. They are suitable for the design of all types of windows - non-standard openings of any geometry, convenient for windows in bay windows, and for roof windows there is simply no alternative.
- Roman blinds in the interior will not only help create a unique atmosphere, they are also able to provide complete blackout if you decide to arrange a home theater in the room, reliably protect the bedroom from morning sunlight, and at the same time do not interfere with the access of daylight if raised them completely.
- The canvas can be made from any type of fabric: organza, cotton, silk, wool, velvet, tapestry, velor. Synthetic fabrics and even film products are also used.
Ready-made curtains or made to order
Usually, after such lines, massive arguments from the interested parties are given. But if objectively, then... The price will be in favor of ready-made curtains. This is the result of flow production, which makes the product cheaper. Of the minuses:
Standard options for cornice sizes, which is inconvenient if your window is not standard.
Typical fabric size by height. Which, again, is inconvenient for non-standard window sizes or options for playing with dabbing.
Limited colors, prints, textures.
Accessories and tunings, such as a visor, are not provided or must be completed independently.
If the listed disadvantages are not significant for you, and the price is important, then the ready-made option will suit you. Ready-made Roman blinds are sold in construction hypermarkets, specialized stores, and online stores.
Tailoring to order is the production of curtains according to the customer’s wishes and the exact parameters of the room. The pinnacle of tailoring to order - designer curtains . But this definition needs to be understood in more detail...
Where are Roman blinds attached?
The task is standard - protecting the room from ultraviolet radiation and privacy from ill-wishers. But if we are talking about Roman blinds, you can implement it by hanging them:
- On the window sash. In this case, when the window is opened, the entire window opening that this sash covered opens.
- On the window frame. This means that you won’t be able to open the shutter unless you fold the Roman blind.
- On the wall. In this case, the presence of a cornice is assumed. The entire opening is closed, including the slopes and the window sill.
- To the ceiling. Roman blinds become a decorative element that is attached to the ceiling and can extend all the way down to the floor.
Each type of fastening has a number of features. There is nothing complicated, but basic knowledge and construction skills are required.
Instructions for proper installation
Whatever method is chosen, the main thing is to correctly and evenly mark the fastening points so that the Roman blinds hang vertically, perpendicular to the ceiling and floor. There is no clear answer to the question of how Roman blinds are attached. The technology depends on the chosen method.
The photo shows a diagram of how to attach the product to a ceiling or wall.
How to attach with self-tapping screws?
The technology involves screwing the structure directly to the ceiling or wall with self-tapping screws. The curtains are attached according to the step-by-step instructions:
- The guide is applied to the surface, and marks are placed at the locations where the fasteners are installed.
- Holes are drilled according to the markings. In this case, their diameter should not be greater than the diameter of the screw thread.
- The screws are screwed into the mounting sockets. In this case, you need someone to hold the curtain along the markings.
Installation instructions are also included. After completing the procedure, you need to check the lifting mechanism.
How to hang on mounting brackets?
In this case, the algorithm of actions looks like this:
- The level determines the horizontal line on which the places for drilling are measured using a tape measure. To maintain the correct geometric shapes, the strip is drawn parallel to the window sill. The points for the holes are marked with a pencil, pen or marker.
- Using a drill with a drill, holes are drilled for the screws. A special feature of concrete structures is the use of a hammer drill and a drill with a pobedit tip. It is important not to hit the fittings. Brick, wood and other less durable materials can be drilled with conventional tools.
- Self-tapping screws are screwed into the plastic dowels placed in the holes, which come complete with Roman blinds, which are attached using special brackets.
If you don’t have the desire or ability to hammer into a wall or make holes in it, you can abandon this technology and use other methods.
No-Drilling Mounting Options
There are special brackets on sale that allow you to attach Roman blinds directly to the window sash. And some models of Roman blinds are supplied with special Velcro.
Installation using universal fastenings for opening sashes
In this case they are attached like this:
- Markings are applied (on the sash and curtain guide).
- Universal fastenings are installed.
- Magnets are attached to the curtain guide with glue.
- The entire structure is suspended with magnets.
The advantages of this method are ease of dismantling for cleaning curtains from dust and washing windows. The downside is the impossibility of installing heavy, massive curtains.
An alternative to this method is to use a stapler. In this case, the curtains are shot with staples directly to the sash. But in this way they are attached only to wooden structures. A construction stapler will not penetrate metal-plastic material.
How to hang a curtain with Velcro?
To do this, you also need to pre-mark the attachment points. After this, the step-by-step procedure looks like this:
- One strip of Velcro, cut to the size of the curtains, is attached to the surface of the wall, ceiling, frame or sash using a construction stapler.
- Another strip of textile Velcro is sewn to the Roman blinds. The main thing is that the stripes match. You can do this across the entire width of the strip.
- The curtains are attached by pressing two Velcro components.
The advantages of the method are the same - easy installation and dismantling during the period of major cleaning of the room.
Where to place
There are three accommodation options:
In the window opening
on top of it
On the frame
In the first case, the curtains are usually hung flush with the opening or with a slight indentation inward. In this case, space is saved, but it will not be possible to open the window completely. This option is suitable for cramped spaces where the window sill serves as a working surface and the window is opened only for ventilation. The size of the curtain is selected so that when lowered it is 1-2 cm shorter and narrower than the window opening.
The curtain can also be hung over the window, then the cornice is attached to the ceiling or wall. If you fasten the curtain high enough, you can open the window completely. Additionally, when the fabric is lowered, the window appears larger. The size is chosen so that the curtain covers the window sill and the edges of the opening. They add at least 10 cm in width, although more is possible - for example, so as to hide a heating pipe. Heavy curtains - made of thick fabric or with automatic opening - are best hung from the ceiling.
Attention! If the ceiling is suspended or suspended, a place for the cornice must be provided before installation. A mortgage is attached to the rough base - a wooden beam that can support the weight of the cornice and curtains.
When mounted on a frame, the window sill remains accessible even with the curtains drawn. But if you open the doors, the curtains will not protect you from excessive light or prying glances. This option is suitable for small kitchens if the windows do not face the sunny side or a nearby house. This method of fastening is also compatible with classic curtains - the curtains do not interfere with their moving and sliding.
Non-standard options
Often in the kitchen there is a balcony door next to the window.
It can be beautifully decorated in two ways:
The same Roman blind, but the size of the doorway
One-sided curtain that can be assembled with a tie-back attached to the wall
Important! In the first option, you need to choose the location of the cornice so that the curtain does not interfere with opening and closing the door.
Roman shades work well for bay windows. This architectural detail is not typical for apartment kitchens, but is found in combined kitchen-dining rooms of country houses. I hang a separate one for each window. Then the windows can be closed, and the space is not separated from the total area.
In very small kitchens (for example, in Khrushchev-era apartments or compact studios) only Roman curtains or blinds are used - there is not enough space for other options. But blinds give the apartment an “office” look, and fabric curtains look homely.
Very wide windows look better if you cover them not with one curtain, but with several narrower ones. It is more convenient to install them, and then raise and lower them.
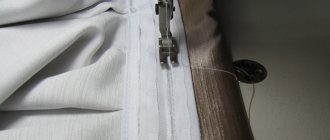
How to assemble a Roman blind?
In any case, the already assembled Roman blinds are attached. This means that before starting fastening work, you must do the following:
- The strips are installed, including the lower weighting.
- Rings are sewn in places where the strips are installed.
- Above each row of rings, guide rings are attached to the kenriz bar.
- The threads are threaded through rings and collected into one rope.
When finished, a locking knot is tied or a carabiner is installed. This is to prevent the rope from jumping out. Work must be done on a horizontal surface, as if Roman blinds were already installed, so that the threads have the required length.
Window decoration with a Roman blind is most often used in cases where it is impossible to hang ordinary curtains. And then the cornice is attached directly to the window opening along its outer side.
It is best to attach the cornice to the frame using special Velcro; in this case, you will not need additional tools and materials. Thus, we see that the Roman blind is the most versatile option for decorating any type of window in any interior. They can not only decorate the room, but also increase the functionality of the use of windows and the space surrounding them.
How to hang
Regardless of the location of the curtains, there are two main types of fastening: with and without cornice.
On the cornice
Ready-made curtains are sold complete with a cornice. They come in manual, mechanical and electrical control.
They also vary in size:
Classic (for standard windows and curtains from 1.5 to 1.8 m)
Mini (most often used for frame mounting, also suitable for a small window)
Skos (for non-standard windows: dormer, arched and other unusual shapes)
Installation begins with marking the location using a tape measure and pencil. It is important to correctly calculate the place so that the curtain allows you to open the window. You also need to make sure that the marks are level and the curtain will not warp.
A drill is used to drill holes in the frame, wall or ceiling. Brackets are attached to them with self-tapping screws.
Then the curtain is put on and secured with clips or Velcro.
Without cornice
You can avoid holes in structures if you choose an alternative method. Velcro is suitable for this, which is glued to the surface or stapled onto an existing curtain rod for ordinary curtains.
The disadvantage of this method is that the adhesive tape will only support a light curtain. But it is easy to remove for washing.
If you already have a cornice and you are sewing the curtain yourself, you can make a drawstring at the top. A cornice-pipe is then threaded into it. But for washing you will have to remove and disassemble the entire structure.