Increasing the living space of an apartment due to a balcony or loggia is increasingly gaining momentum, so you need to know for which types of work it is necessary to obtain permission and approvals, and for which it is unnecessary.
In this article, we will look at what redevelopment is and how to obtain permission to redevelop a balcony or loggia.
Is balcony glazing a redevelopment?
Glazing a balcony or loggia is often considered a rather controversial issue. Glazing entails an increase in the weight of the entire building structure, which is why a permit is required.
If there is planned glazing, when developing a building project, the apartment owner will not need to obtain permission. If this type of redevelopment was not taken into account during construction, then it is impossible to do without the coordination of construction actions.
In some cases, it will not be possible to glaze the loggia, and unauthorized work can lead not only to administrative punishment, but also to dismantling at your own expense. This will happen in the case of unauthorized glazing of loggias located in houses of cultural and historical value.
The legislative framework
Decree of the State Construction Committee of the Russian Federation No. 170 dated September 27, 2003 does not contain such wording as redevelopment of the loggia; however, permission can be obtained: different manipulations are possible here, and regional regulations can express different positions.
Today the following transformations are strictly prohibited:
- If they entail a change in the façade of the architectural complex.
- If the process involves load-bearing walls.
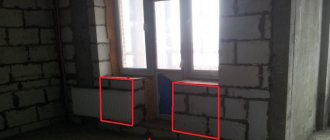
- If the loggia redevelopment project involves moving a heating radiator to its area.
- If it is planned to eliminate the threshold.
- If the thermal circuit is damaged.
Problems arise with the facade if the house is classified as a cultural heritage site. In other cases, there is a chance to get approval. But you will have to seek permission for redevelopment from an additional authority - the city architectural department.
Extending the balcony - reconstruction or redevelopment?
Increasing or reducing the existing area of the apartment is considered refurbishment. The desire to enlarge the loggia with the help of an additional extension will most likely remain a pipe dream.
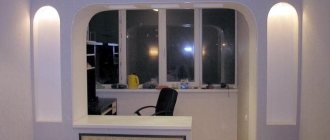
The only way to expand the area of a loggia is by combining a glazed balcony with a living room. This type of annexation is considered by law to be a redevelopment.
In order to expand the glazed balcony, it is necessary to submit documents in advance and obtain proper permission to redevelop the apartment.
I want to remove the window unit + balcony door
I’m not sure that they are fooling around with the redevelopment, but we can clarify. Aluminum sliding doors do not retain heat!
They install plastic, and even a five-chamber one. The battery cannot be carried. Silver is here. Awww, Silver! The window sill section can usually be removed, but the threshold cannot.
And aluminum can be non-retractable, but quite warm
For example Sсhuko or TATprof. I won’t say anything about the battery, I know that they unwrap it, but don’t move it. I’m embarrassed to ask, but what’s stopping you from removing the threshold?
The other day they made a sliding door in place of the balcony block, glass from floor to ceiling. The customer did not talk about any problems with redevelopment, moving the battery, etc. The threshold, by the way, was demolished to the vigorous hair dryer.
Well, many do just that, without agreeing on anything.
Is combining a balcony with a room considered a redevelopment by law?
When combining a room and a loggia, you should know what is considered the main prohibitions when remodeling:
- According to the law, it is considered illegal to remove radiators from rooms or provide additional outlets from them;
- It is not allowed to insulate floors by connecting the system to central heating.
Insulation must meet fire safety standards. When combined with a room, it is considered acceptable to install electric floor heating.
Before carrying out the reconstruction, the main requirement is the preparation of preliminary calculations on the thermal properties of the apartment after the merger. Complete demolition of partitions is often unacceptable. In panel houses, the glazed window unit can be dismantled, but the panel itself cannot be removed. With any remodeling, doors must be installed to separate the two areas from each other.
Transferring the battery to the loggia
It is strictly prohibited to move the central heating battery to a cold room outside the house circuit. And the point is not even that you will illegally heat extra square meters. The entire heating system in the house is disrupted, and therefore, at a minimum, it will become colder for the neighbors, and at maximum, the heating system will not withstand the overload, and an accident will occur.
Advice:
The battery can be moved to the wall next to the window. A solution would be a vertical battery on the wall between the room and the balcony.
—
Interested in posting an article on Fields' blog?
Write to [email protected]
What changes cannot be legalized when remodeling a balcony?
- elimination of the window sill block, which is part of the facade of the house;
- transferring the heating radiator from the dismantled wall to the balcony;
- redevelopment resulting in the width between the wall and the end of the balcony being less than 1.2 m;
- dismantling the threshold on the balcony, which is part of the structure for holding the balcony slab;
- violation of construction and sanitary standards, fire safety rules;
- an increase in the load on supporting structures that exceeds the permissible values (heavy partition materials, placement of additional equipment, balcony floor screed, etc.).
Remove the door redevelopment
By removing the window and door, you disrupt the heat exchange system. 1.2. Yes, you need to approve the redevelopment. 2. Is it possible to remove the door and window to the balcony?
We recommend reading: How long can you return a technically faulty gas stove?
Is this a redevelopment?
2.1. Is it possible to remove the door and window to the balcony?
Is this a redevelopment? Yes, this is a redevelopment and it needs to be legalized through the court, but if you live a long time, then do whatever you have in mind. 2.2. Good evening. If you put in a window on the balcony and a door, the same is not a redevelopment; redevelopment is when you can wall.
Good luck. 3. The kitchen door was removed, this is considered a remodel.
3.1. no, it doesn’t count, Sergey. 3.2. Hello! In accordance with Part 2 of Article 25 of the Housing Code of the Russian Federation, redevelopment of a residential premises is a change in its configuration, requiring changes to the technical passport of the residential premises. By removing the door and dismantling the door frame, you prevented the configuration of the living space from changing.
The process of approving the planned redevelopment of a balcony or loggia and submitting documents
- In order for everything to be legal, you need to contact the city (or district) department of architecture at the immediate location of the apartment with a written application.
- After receiving permission from the architecture department, you need to enter into an agreement with a design organization that has a license to develop special redevelopment projects to provide you with services.
- When ready-made project documentation is received, it will need to be agreed upon with the local authorities of the Ministry of Emergency Situations, the department of urban planning and architecture, the gas service and the sanitary and epidemiological station. All of the above organizations must issue you permits on their letterhead, certified by the signature of the managers and a wet seal.
- Having completed the collection of all permitting documents, you can go to the architecture department (to which you initially applied with the application) and pick up a warrant that gives the right to carry out reconstruction work.
- With your own hands, or with the help of invited professional builders, carry out the redevelopment of the agreed object in the apartment in accordance with the plan issued to the design organization. It should be noted that be careful when carrying out the restructuring; if you do not do it as indicated in the prescribed plan, you will have problems when handing over the object to the selection committee.
- The commissioning of the “new building” takes place in the presence of an invited selection committee with representatives from the city council, utility service and design organization. After all representatives of the services give the go-ahead, an act of putting the facility into operation is drawn up and signed by all members of the commission.
- When all the necessary documents are in hand (ownership of the property and its technical plan, warrant, permission for redevelopment, act of acceptance of the object after redevelopment), you need to make changes to the documents on ownership and the apartment plan, in accordance with the new documents. Previously, all this was done in BTI, today - by the organization that replaces it.
Dismantling the window sill block
Later, glass doors were installed in place of the dismantled window sill blocks. , redevelopment project, photo: What will be required of you to prepare such a redevelopment? First of all, to understand the possibility of implementing this planning solution, you need to get advice, since the installation of “French” glazing is not always consistent.
Get advice on the possibility of dismantling the window sill block in your apartment. You can do this at the housing inspection office, at a multifunctional building in your district, or at any design organization that has an SRO license. There you will also be provided with complete information related to coordinating the dismantling of the window sill block and other work.
must meet certain construction requirements, and preparation for redevelopment, as well as the execution of the work itself, must be carried out only by certified specialists (with expertise in construction and design).
Liability for illegal redevelopment of a balcony
But what awaits a citizen if he does not complete all the above steps and remodels the balcony without permission? In this case, a lot depends on the severity of the changes and the presence/absence of unpleasant consequences in the form of collapses or flooding.
If no one was injured as a result of the violation, the citizen will be held administratively liable and must pay a fine. The size of the latter may also vary depending on the social status of the perpetrator. For the first violation, individuals must pay from 2 to 2.5 thousand rubles. For legal entities, the fine is much larger, ranging from 350 thousand to 1 million rubles.
In addition, the violator will receive an order from the inspector to legalize the redevelopment or return the layout of the premises to its original form.
For repeated violations, the fines increase. If a citizen persistently does not comply with the instructions or, moreover, continues illegal redevelopment, the housing inspection may go to court. The latter has the authority to evict an uncooperative tenant and sell his apartment at auction. Moreover, in exceptional cases, the violator may be limited in his ability to travel abroad.
What is considered redevelopment in an apartment?
It is strictly prohibited:
- Obstruct the operation of ventilation ducts.
- Increase the load on heat, electricity and water supply systems;
- Combine living rooms with gasified premises;
- Violate the integrity and strength of supporting structures;
This premises is classified as a non-residential area, so it is important to comply with the following restrictions:
- Prohibited.
- You cannot place the kitchen above living rooms (with the exception of the first floors of apartment buildings);
The kitchen must be at least 6 square meters.
If the owner receives a negative answer, he can go to court.
It is allowed to create special niches in studio apartments, but on the condition that there is an electric stove in it. If the kitchen has gas equipment, then there must be a tight door to adjacent rooms. You will also have to agree on the replacement of an electric stove with a gas one and vice versa. Ventilation ducts should not be allowed to be combined with living rooms.
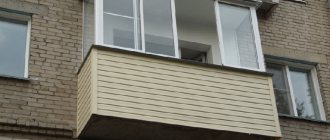
Preparing the balcony for glazing and insulation
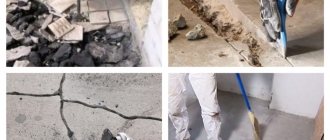
First of all, it was necessary to dismantle the old glazing of the balcony, which once, about 20 years ago, they themselves made from the lumber that they could then get. And today, old wooden frames and single-layer glazing are no longer something that did not solve any insulation issues, but even at any moment they could simply fall apart.
After the old glazing was removed, it was necessary to resolve the issue with the wall that divides the balcony into two unequal parts between different apartments. That's the kind of house project. But what’s interesting is that the project did not provide for a capital dividing wall. And the function of dividing the balcony was performed by a two-centimeter sheet of chipboard, which we installed ourselves at one time.
Gas silicate blocks for the construction of partitions
To build the wall, they decided to use gas silicate blocks 10 cm thick. To secure the wall more securely, in approximately every third of the masonry they walled up a 12 mm rod of reinforcement, which was buried in one part into a hole in the main wall of the house. The upper part of the wall was also additionally secured with steel corners, since it was not possible to properly lay the mortar between the upper blocks and the balcony slab, and they did not rely much on foam, although they foamed a small gap on top.
The partition on the balcony was built, the upper edge was additionally reinforced with corners
Work order
When working on connecting a balcony to a kitchen or room, the main attention should be paid to insulation. It will be necessary to insulate all parts of the structure except the inner wall. Use the most efficient materials, otherwise the entire room will be very cold in winter. Also, when installing glazing, you will need to pay special attention to the junction of the frames and the wall - lay it with a vapor barrier material. It will block access to warm air from the room, preventing the formation of condensation.
Preparatory work
First you need to destroy everything to the ground, and then... build everything anew. In general, the order of preparatory work is as follows:
- Dismantling of old glazing and finishing materials on the balcony/loggia (we leave the window unit in place in place for now). A metal fence remains on the balcony, and a thin standard partition, if there is one, on the loggia. If there is no partition on the loggia, only a metal frame remains. It is necessary for work safety.
Removal of old glazing and finishing materials - Leveling the floor where the wall is installed. After dismantling old finishing materials, the balcony slab along the edge can be very uneven. Since a wall will have to be installed along the edge of the slab, the base must be level. The pits are concreted with ordinary M300 mortar.
If the edge of the balcony slab is uneven, it is concreted - Erection of a wall to a given height. Today, aerated concrete is considered the best option for building a wall on a balcony. The thickness of the blocks used is 100 mm (read about laying partitions from aerated concrete blocks here). It is warm, easy to style, and weighs little.
If the standard finishing of a balcony or loggia has been removed, in parallel with the construction of the wall, it must be sheathed on the outside with the selected finishing material. Usually - siding. Why are wooden blocks attached to the outside and siding attached to them?
At the same time, they are cladding the outside
The finishing of the balcony from the outside should be carried out at this stage. Then you will need to call industrialists, and their services are not cheap at all. In the meantime, there is no glazing, you can get insurance and do everything from the balcony.
Glazing and insulation
Gradually, the concrete platform sticking out on the wall takes on a different look. Now you can believe that not only birds can be here. Glazing is carried out in parallel with insulation. And it’s better not to skimp on insulation. Otherwise, the room will be very cold, and heating bills will be high.
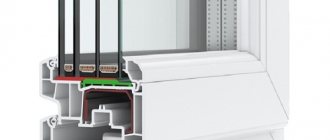
- Installation of window blocks. For glazing it is necessary to use double-glazed windows. Their area will be large and single-chamber ones will not be able to provide the proper degree of thermal insulation. A profile for windows should also be taken with a large number of cameras - at least five. Although the profile has a smaller area, heat flows through it greatly.
Windows are usually installed by a campaign - Removal of the window block, if necessary, destruction of the window sill wall, measures to strengthen the walls and window beam.
Dismantling the window block - Laying electrical wiring, installing mounting boxes for sockets, switches, bringing out wires for installing lamps. To increase safety, wires can be laid in a special non-flammable corrugated hose.
Electrical wiring - Insulation of floors, ceiling walls. The most common type of insulation is between the wooden battens of the sheathing. For insulation, either extruded polystyrene foam or mineral wool mats are used. Expanded polystyrene is used more often because, with the same degree of thermal insulation, it has a smaller thickness and is not afraid of getting wet (condensation). For Central Russia, the thickness of polystyrene foam should be 70-100 mm. The insulation is laid in two layers with the seams overlapping. They are secured with special plastic umbrella dowels or glued to polyurethane foam.
Insulation of all cold surfaces - A layer of metallized insulation (such as penofol). It additionally retains heat.
Laying penofol - Laying heated floors (if provided).
- Covering with finishing materials. This can be plywood or gypsum board, followed by puttying and wallpapering or painting.
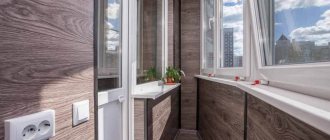
In fact, the combination of the balcony can be considered complete after laying the penofol. Next, finishing work begins, and it greatly depends on whether the room is connected to a balcony/loggia or to the kitchen, as well as on the design of these rooms.
Balcony ceiling decoration
They decided to line the ceiling of the balcony with wide white plastic panels. The first step was to make a sheathing around the entire perimeter of the ceiling, to which the ceiling panels would be attached. The main thing here is to maintain the horizontal position of all the sheathing bars.
Along the perimeter of the balcony ceiling they made a sheathing of 30x40 bars | Along the perimeter of the balcony ceiling they made a sheathing of 30x40 bars |
To fasten the bars, dowel-nails 80 mm long were used.
Dowel nail
Be sure to vacuum up all dust from the hole before driving in the dowel nail.
After installing the sheathing, it is necessary to attach a plastic corner around the entire perimeter for mounting plastic panels. First, we mark the corner to the required length and, using, for example, a hacksaw and a miter box, we saw off the corners of the required length at 45º. You can attach the corners to the sheathing using a stapler or simply nail it with small nails. The panels are attached in the same way.
They decided to make the ceiling from wide white plastic panels | Plastic panels were secured with staples and nails using a stapler |
Using a miter box and a hacksaw, we sawed the corners strictly at 45 degrees. |
If you plan to make additional lighting on the balcony, then the necessary hole for the lamp is first cut out in the plastic panel.
Finishing of the balcony ceiling with plastic panels is completed
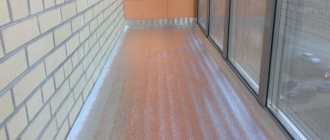
Leveling the floor on the balcony
After which we began to level the floor of the balcony , since it has a completely natural slope towards the street. We decided to level it using a thick self-leveling self-leveling floor, since the difference in height between the floor of the kitchen and the balcony is quite significant and we still needed to compensate for it.
Dry mixture of thick self-leveling self-leveling floor | The self-leveling floor was poured. Now the balcony floor is aligned horizontally |
The thickness of the screed was about 3 cm. There were no special problems with pouring and the screed stood tightly. A container for the solution - a plastic basin of 30 - 40 liters, a hammer drill, a stirring attachment and the actual flooring mixture itself - that's all that was needed.
We make a self-leveling floor to level the surface of the balcony floor
Now it's time to order the installation of new balcony glazing. We decided to make the glazing of the balcony quite standard - a four-chamber PVC profile with a two-chamber double-glazed window (3 glasses). But here it is worth mentioning one important point. The main feature of our balcony glazing is the absence of a main parapet wall . On our balcony, this role is played by a steel pipe with a diameter of 8 cm, tightly embedded in the walls of the house and a corrugated galvanized sheet.
There could be options here:
- it would be possible (and this is correct in many cases and this is how it should be done) to build a wall parallel to the galvanized sheet to the level of the pipe, for example from the same foam concrete blocks, and install glazing on this wall;
- install the glazing almost directly on the pipe (as we did on the loggia);
The first option is higher quality and more reliable, but it involves a loss of 10 cm of usable area, which we would like to avoid. Therefore, we decided to do the same as when glazing the loggia (the option turned out to be quite viable and everything was fine with the glass on the loggia).
A steel angle was welded onto the parapet pipe
A steel corner was welded onto the pipe (this was done by the guys from the company that will do the glazing), which created the necessary surface for installing the glazing. And while our order for glazing was being fulfilled, we had time to start insulating the balcony .
Finishing the balcony floor
Unlike the loggia, they decided not to install an electric film heated floor on the balcony, but by winter, if it is really necessary, install a regular wall-mounted electric convector with the ability to maintain the set temperature. A thin laminate was used as a floor covering, i.e. not an ordinary one (the most common), the thickness of which is 10-12 mm, and the thin one - 3-4 mm.
A thin laminate was laid on the balcony floor | Special set for laying laminate flooring |
Before laying the laminate, we cut it to size and laid a regular substrate under the laminate made of foamed polyethylene. In the store, complete with laminate and underlay, we also bought a set for laying laminate flooring, it was inexpensive, but it really helped to quickly lay the laminate flooring.
If you are going to lay laminate flooring yourself, I advise you not to skimp and buy a special kit for laying laminate flooring. This set will help you quickly and efficiently lay laminate flooring, even if you are doing it for the first time.
The laminate installation kit includes:
- 15 plastic wedges providing equal clearance from the walls;
- plastic block - a block for tapping panels, with the help of which the gaps between the laminate panels are completely eliminated and at the same time the groove made in it prevents damage to the panel tenon when tapping;
- a special mounting bracket that allows you to tightly fit the laminate panels against the wall.
And the final element of finishing the balcony floor was the installation of a plastic plinth with a flexible edge, which ensures a tight fit of the plinth to the wall surface. All that remains is to glue the plastic corners to visually straighten the corners on the balcony and hide all the gaps between the corner panels.
A plastic plinth was attached along the perimeter of the floor | A plastic plinth was attached along the perimeter of the floor |
The finishing of the balcony floor is complete. The laminate was laid, and all the cracks were covered with a plastic skirting board. | |
But the project to combine the balcony and kitchen is not over yet . At the same time, we decided to replace the linoleum in the kitchen . We chose semi-commercial linoleum, which was laid directly on top of the old soft one. The old linoleum remained in good condition and the new hard linoleum complemented it perfectly, as a protective layer and updated the entire look of the kitchen. And we got the ideal option - wear-resistant linoleum on top with increased resistance to mechanical stress, and thick household linoleum on the bottom, the backing of which is an additional heat and sound insulating material.
Upon completion of all work on the balcony, new linoleum was laid in the kitchen | Fabric roller blinds (roller blinds) were installed on each balcony window. |
After a general cleaning of the entire balcony, removing all the protective films and washing the windows and frames, it was decided to make the final touch - install fabric roller blinds on the balcony windows , or as they are also called fabric roller blinds, because until 12 o'clock it is on the sunny side.
We've had these roller blinds on our loggia for a year now and they do an excellent job protecting from sunlight. Moreover, they are inexpensive. True, this time they decided to choose not such a dark color as on the loggia, but a lighter beige. Dark blue roller shutter fabric excessively shades the room, to the point of twilight.
What can be done
Next we will mention several times a design called the “French window” or “French door”. Let's tell you what it is.
A French door to a balcony is a structure on a frame with sliding or swinging glass doors. The doors are single-chamber double-glazed windows.
The frame rests on the floor and the top of the wall. It is made from metal profiles. The strength of the profiles is sufficient for the frame to form a supporting structure instead of a disassembled window sill block.
The second purpose of a French door is to keep heat in the apartment. That is why the exit to the loggia is closed with a double-glazed window that has at least one chamber, that is, two glasses separated by an air gap. The housing inspectorate will not approve a redevelopment project if, instead of a disassembled window sill block, doors with single glasses without a camera are installed.
The option when the window-door unit is removed, leaving the window sill unit, will not be approved. They will be accused of violating the parameters of the heating circuit of the house. But that's what they do. If the apartment is going to be sold, the window unit is put in place.