The modern market for interior doors has a wide variety of options and types of these designs in its assortment, and it happens that it is extremely difficult for the consumer to make a choice in such abundance.
There are several gradations for interior door devices: they are distinguished by the type of opening, by the material of the leaf and, of course, by the type of structure itself. What are the main types of doors that exist on the modern market?
Choosing doors with a quarter
Main varieties
Today there are three main types of structures:
- Massive devices. Made from solid natural wood. The peculiarity of the design is that it has absolutely no cavities inside, therefore, it has significant weight - wood is a rather heavy material. It is usually made from particularly valuable wood species, and therefore has a high market value. The undoubted advantages of a solid wood door device are strength, aesthetic appeal, and long service life.
- Semi-massive structures. The difference from solid wood is the presence of small cavities that are hidden under dense sheets and the purpose of which is to lighten the solid weight of the door frame.
- Semi-massive devices filled with hardboard and other “honeycomb” materials. This type of interior design is very popular among modern consumers. The essence of the device is that the voids in the wood are filled with hardboard or other filler with similar properties.
- Paneled and smooth doorways. The difference between them is that in paneled fabrics the structure has various notches and cuts, while in smooth ones it remains perfectly smooth.
- Under glass. This type is easily distinguished by the presence of a cutout in the canvas, into which the glass insert is actually attached. For a long time, it has been one of the most popular types of doors in the design of residential premises, since a wide selection of glass inserts allows you to combine the design with any style - from strict classicism to ultra-fashionable high-tech.
There are also the following types and types: blind, single-sided, double-sided, left-sided, right-sided, veneered and laminated.
Installation of doors from the inside.
The mounting plates are attached to the inside, so in this case, fastening with anchors is used. Since the doors are installed near the inner surface of the wall, it is better to make the doorway from strong and reliable materials.
The advantages include: the door can be opened more than 90 degrees, the door is protected from possible precipitation.
The disadvantages include: the door opens into the room, which limits the usable area.
Design options for interior doors
In addition to the main gradation, there is also a separate division of interior doors. Let's look at their classification in more detail:
- A swing interior device is characterized by a certain method of opening - swinging, hence the quite eloquent name. Such structures can open in one or two directions, because their line includes single-leaf and double-leaf subtypes. Most often, swing devices made of solid wood or their cheaper plastic version are used in the design of residential premises.
- A folding interior door structure is necessary in those rooms where you need to save every meter of free space. The material for their manufacture is various types of plastic, and therefore folding doors are most affordable for the consumer.
- An interesting variation in the design of a doorway is the installation of a compartment structure. Such a device can be of two types - sliding (there is only one door leaf in the base) and sliding (consists of two leaves). Most often, designers use compartments for zonal division of the interior (for example, in the design of a one-room apartment or studio apartment). Sliding doors are one of the most expensive subtypes of interior door devices.
There are also rarer subtypes for decorating interior spaces - saloon doors, swing doors. They are good for arranging the design of an entertainment venue, but are absolutely not practical in a residential area.
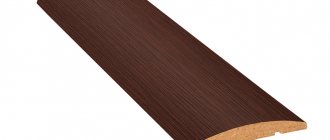
One of the unique door devices is interior doors with a quarter (photo). What it is and how such a door differs from a regular one – we will try to explain in detail in this article.
Interior doors with a quarter: what is the originality of the design?
It is visually quite easy to distinguish a regular door leaf from a design with a quarter: the latter have a minimum of gaps and gaps between the frame and the leaf. The reason for this is a special “influx” that blocks the gap between the canvas and the box. In this case, the original device provides increased soundproofing characteristics and reliably protects the space closed by the door from the penetration of dirt and dust particles.
The useful properties do not in any way affect the aesthetic qualities of interior doors and quarters: they will perfectly complement the apartment design of any stylist (photo).
What are the advantages of sash doors?
The advantages of such solutions are not limited to increased tightness. They are able to offer:
- correcting installation defects. Were there any mistakes made during the installation process that resulted in uneven gaps? The protruding fold will help eliminate them. The neat appearance speaks in favor of door leaves with a quarter;
- classical respectability. If one can argue about the appropriateness of products in urban interiors, then everything is obvious: they fit perfectly with traditional compositions. A solid product with panels and a vestibule will decorate a space in the spirit of empire, “cabinet” classics, and country.
Measurements
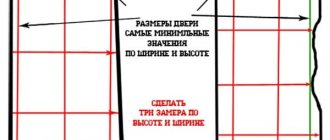
The quality of further work depends on the thoroughness of the measurements. The door opening, even after finishing, may have deviations from the vertical and horizontal, and the frame will have to be adjusted in height and width. To save yourself from unnecessary work, measurements should be made as follows:
- Using a tape measure, measure the width of the opening at a height of 10-15 cm from the floor and repeat the measurements at a height of about 20 cm from the top of the opening. If a difference is found in two measurements, then the smaller value should be taken as the width.
- In the same way, measure the height of the door: at a distance of 10-20 cm from the side walls of the opening. Take the smaller value as the height.
When purchasing ready-made doors, it may turn out that there is no model that exactly matches the size of the opening or that the door you like is not large enough. In this case, additional elements will be required that will help narrow the opening a little.
Features of the fittings used
Due to the design features of such doors, it is necessary to select special fittings. First of all, we are talking about loops. Since their axis moves slightly outside the vestibule, the following models would be appropriate here:
- Corner card hinges - they look like corners attached to a hinge element; they are attached in the same way as simple straight hinges: one part is fixed on the edge of the door, and the second is screwed to the edge of the canvas and the inside of the vestibule.
- Screw-in hinges are a good alternative to card hinges; they consist of two screw-in pins and a hinge, one part is screwed directly into the box between the rebate and the platbands, the second pin is inserted obliquely into the canvas, touching the rebate.
Screw-in and corner card hinges are well suited for rebated doors
Screw-in hinges are only suitable for durable materials that will not crack under such load.
If a door closer is used, special settings should be made for rebated doors. It must be taken into account that part of the leaf will touch the frame from the outside, so the movement of the door should be smoother at the end of closing.
Rebated doors are an excellent solution for the home, not only from a decorative point of view, but also in terms of useful functionality.
What are the conclusions?
has a wide partner network, including in cities such as Moscow, St. Petersburg, Novosibirsk, Voronezh, Saratov, Samara and another 120 cities in Russia and the CIS countries.
www.torex.ru is the official website of the Torex company. This website is for informational purposes only and under no circumstances constitutes a public offer as defined by the provisions of Article 437 of the Civil Code of the Russian Federation. To obtain information about the cost of Torex products, please contact official dealers.
Prices in showrooms may differ from prices on the website. For current information on the cost of Torex doors, check with official dealers in your city.
The manufacturer reserves the right to make changes to the list and specifications of products at any time. For valid product information, please contact authorized dealers.
* All fields are required
By clicking on the button, you consent to the processing of your personal data User Agreement
Source
What should be the opening for Torex doors?
Specialists from the Torex plant recommend installing entrance doors taking into account a minimum gap of 1 cm and a maximum of 5 cm. To correctly determine the parameters of the opening and the possibility of expanding/narrowing it, it is better to contact a specialist. Moreover, when purchasing Torex doors, calling a measurer is free.
If in your case it is impossible to modify the opening, you can order Torex entrance doors of a non-standard size.
Features of fittings
The technology for installing a door with a rebate is no different from the usual one, with the exception of the hinges. Here the fittings have distinctive features when the axis moves when turning. The following hinges are used for rebated doors.
- Card corners. These are mounting plates curved at an angle of 90°. They are installed similarly to straight hinges: one part is fixed on the edge of the hole, and the other is attached to the edge of the canvas.
- Screw-in. Such hinges consist of two hinges, each of which is secured with a screw-in pin and a pin. They are attached obliquely to the canvas.
- Hidden hinges are a complex structure containing hinges covered with a metal casing, a lever and a screw connecting the moving elements. The fittings are invisible when the door is closed. The canvas opens to a wide angle. The insertion is done carefully, using a router saw. Hidden hinges may contain a closer.
How to determine the required door leaf size?
Now that you know the dimensions of your opening, you can move on to choosing the parameters of the door leaf. To do this, subtract 10-15 mm
, and then find the appropriate value in the table.
Standard sizes of Torex door leaves
Doors to the apartment
Delta
Super Omega
| height, mm: | 1970; 2000; 2030; 2050; 2100, 2150*, 2200* |
| width, mm: | 860; 880; 950; 1000, 1030 |
Ultimatum | |
| height, mm: | 1970, 2000, 2030, 2050, 2070, 2100, 2150*, 2200*, 2300* |
| width, mm: | 860, 880, 900, 950, 1000 |
Professor | |
| height, mm: | 2000*; 2030; 2050; 2070; 2100; 2150*; 2200* |
| width, mm: | 880; 900; 950; 1000 |
CyberDoors to a private houseSnegirDomani*size increases due to extensions If the specified dimensions do not suit you, you have a non-standard doorway. But don’t be afraid, you can always order the front door according to your dimensions or adjust the opening to the standard. | |
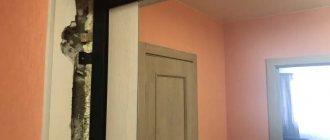
Door installation
The frame is installed in the same way as with ordinary doors, only special hinges are screwed into its post. Their thread must completely fit into the body of the box. They can be adjusted in the future.
The mating parts of the hinge are screwed into the door leaf. Then the hinges on the post and the door leaf are aligned, and the opening and closing of the door is checked. Afterwards, the border of the canvas is marked on the rack, taking into account the gap that should be between the canvas and the floor (at least 10 mm). Then the box is mounted in the opening and the canvas is hung. The gaps between it and the box are adjusted by unscrewing the hinges. Their special design with an offset axis allows the door to open freely. In this case, the door leaf rebate will not rest against the frame.
How to correctly measure a doorway?
We talked in detail about how to correctly measure a doorway yourself in the article How to measure the entrance doorway?
Measure the width, height and depth of the doorway
Measure each indicator at three points outside and inside the apartment
Fix the smallest size
When taking measurements, be sure to take into account the curvature of the walls. The door must be level, otherwise the opening will need to be modified.
If the distortions are minor, the size of the door is selected taking into account the distortion so that the structure is level. To do this, you will need the help of a specially trained surveyor who is familiar with the nuances of different openings. Depending on the material and thickness of the walls, the characteristics of the opening, the specialist will select the necessary option for finalizing the opening and help calculate the correct size of the entrance door.
Sealing junctions: slopes and platbands
The next day after installation, when the foam has finally hardened, its remains are cut off flush with the door frame with a mounting knife. On the side opposite to opening, you also need to clean the small groove on the back side of the pillars.
If the wall thickness exceeds the dimensions of the frame, slopes are formed on the inside of the door. For this purpose, it is most correct to use extensions for interior doors that match the color of the door leaf coating. Decorative design of interior doors should be carried out only after the flooring has been laid and the walls have been finished. There are two ways to install slopes:
- You can pre-plaster the slopes, observing their required dawn. In this case, after grouting, you should carefully clean the installation groove of the stand using a piece of trim. After the plaster has dried, it is primed and the MDF panel is glued onto liquid nails.
- If the cavity under the panel is small, the extensions can be attached to mounting adhesive foam.
In both cases, you need to be able to trim the extensions correctly and prepare spacers in advance, which are installed every 30–35 cm closer to the outer edge of the slopes. The slope panels are installed in the same position as the standing boxes: the top one covers the side ones. First, the top panel is cut longitudinally, driving it to the required width, taking into account the curvature of the door block installation relative to the plane of the wall. The cutting line should be located on the side of the door in order to hide in the groove of the pillar. Then the edges are cut obliquely so that in the wide part the plank fits tightly into the opening.
Having temporarily fixed the top panel, you need to take the dimensions of the side panels. First, a longitudinal cut is made so that the edge of the extension becomes flush with the plane of the wall, then the part must be driven in length. At the bottom, the panel is cut at a right angle to ensure a tight fit to the floor covering. An oblique cut is made in the upper part; for this, the height is measured in two places: close to the pillar and along the outer corner of the slope.
Glue or foam should be applied with a thin bead along the outer edge of the extensions and in a fairly thick layer, retreating from the edge by about 2/3 of the width. The point is that a thick bead of glue forms a support for the lever: pressing on the outer edge of the panel ensures that it is pressed tightly against the side of the mounting groove. The installation of the extensions is carried out in this order: first, the top panel is glued, which is supported by two side panels. After this, 4–5 horizontal spacers are inserted into the opening so that the extensions are tightly glued along the edges.
It is best to attach the platbands to mounting nails, applying a thin bead of glue along the edges. To fix the linings, you can press them with your hands for 3–5 minutes, or use clamps after first removing the doors. There are certain subtleties in trimming platbands. They should be installed with a distance of 2–3 mm from the corner edge of the pillar or the rounding of the extension.
There are two types of platbands: with a straight and rounded profile. In the latter case, the edges are cut at 45° in a miter box. When installing straight platbands, first install the side strips, which should protrude 2 mm above the crossbar in height. The horizontal casing should be cut at 45° along the plane and glued between the vertical overlays. Exposed glue can be immediately removed with a damp cloth or wiped off after drying with the hard side of a sponge.
List of tools and materials
To perform installation work, you do not need a huge set of tools or consumables. If you are dealing with a door block, then the consumables are included in the kit . You will have to purchase polyurethane foam.
Before you begin installation yourself, check the availability of the following devices:
- hacksaw with short teeth along the edge,
- level for construction,
- marker and measuring tape,
- screwdriver,
- hammer,
- bit.
Anything that might be useful
Small pieces of wood for spacers are also useful, because the door can easily jam after applying foam. Under the influence of air masses, the polyurethane foam becomes a couple of times more voluminous. To prevent the jambs and the fabric from starting to lead, it is advisable to insert wedges at different points in advance for the period of hardening of the adhesive joint.
Final work
The loot is covered with masking tape. Fill the gaps between the ends of the opening and the frame with polyurethane foam. After drying, remove any remaining product. Cement-sand mortar can be used for such purposes.
The surfaces are leveled and sealed with plaster and putty. The slopes can be painted or covered with wallpaper. If additional additions are needed, they are installed and platbands are installed.
Remove the masking tape or protective film.
Attach the handles to the door and lubricate the hinges with silicone grease.
The door leaf is hung after all finishing work is completed.
Source