Home » Type » House
DesignHouseBuildingDIY
Alyona
15308 Views
The pediment of the house must be strong and reliable. Therefore, this issue should be given special attention. In this article you will learn about the features of the robot, patterns, materials and finishing methods. And the main thing is that it’s all possible to do it yourself, everything exactly the way you want. Read about all this and more below.
What it is?
The pediment (from other Greek: Front - forehead) is a natural continuation of the end wall of the building. It is located above the cornice, which coincides in level with the ceiling between the top floor and the attic. Usually this is a plane limited by the roof slopes. More often they are simple triangular or polygonal broken in shape, sometimes semicircular or bow-shaped (reminiscent of the bend of a stretched bow). There are also other configurations, for example, in the form of a trapezoid.
The pediment is a natural continuation of the end wall of the building
Since the ancient times of Ancient Greece and Rome, the pediment began to be used as an additional independent architectural element decorating the building. In this capacity, it was widely used in palace and temple buildings, small architectural forms - rotundas, triumphal arches, etc. Coats of arms, wreaths, emblems, cornucopias, allegorical figures of Muses or Geniuses of glory were placed in its field.
Pediment: this is the finishing touch in the construction of buildings, a variety of configurations
Although in the minds of most people a pediment is associated with a triangular or pentagonal element, design variations are not limited to these two forms. Photos of pediments amaze with the variety of configurations. Modern architecture represents the following types:
- Keeled. In this case, the name speaks for itself. Despite its elegance, in modern architecture such a solution is used quite rarely, since such a roof element reeks of antiquity.
- Semicircular. This option, like the previous pediment, is currently also practically not used in construction. However, the reason for the low popularity lies in the complexity of such a design.
- Trapezoidal. It resembles a trapezoid, the larger side of which is located at the bottom. This design has found wide application in the construction of half-hip roofs.
- Triangular. The presented type is perhaps the most common today. If the roof is symmetrical, the triangle, accordingly, will be equilateral.
- Male. It is made of logs in the shape of a triangle and is a continuation of the crowns of the gable walls.
- Interrupted. The horizontal cornice of such a pediment is interrupted for the purpose of inserting one or more windows.
- Luchkovy. Its shape resembles a semi-oval bow. If the degree of steepness of the bend increases, it takes on the appearance of a semicircle.
The pediment can be keeled, semicircular, trapezoidal, triangular, arched
In addition, today you can also find stepped structures, the side parts of which are made in the form of steps-ladders, and the roofing is made without creating front overhangs.
Structural diagrams
From a constructive point of view, the pediment is an attic wall that protects its interior from atmospheric influences - wind, dust, rain and snow. This part of the facade can be solid or it can have a dormer window - round or semicircular.
A dormer window is required to equalize the pressure inside the attic and outside the building. The dormer window should open, especially in summer. A wooden house without this device will constantly creak and deform. In brick - due to the rigidity of the structures, cracks may appear in them, which can very easily turn into emergency defects that will require a considerable investment of funds to eliminate.
From a constructive point of view, this part is an attic wall
Briefly about the main thing
The gable of a gable roof is a rather complex structure that affects the operational characteristics of a country house. Therefore, all its details, including a dormer window, a protective canopy and a storm system, are worked out at the design stage of the roof frame.
The gable part of the roof can be made of a frame, followed by cladding, or made of the same material as the walls. An important role is played by the canopy and the window structure, which is installed in the opening equipped for it. The ebb is mounted along the length of the pediment; It is recommended to do this before starting work on the sheathing.
Material for production
For a brick or wooden house with unforeseen additional external finishing, it will be better if the material of the enclosing structures matches the material of the pediment. That is, for a brick unplastered house it should be brick, and for a wooden frame it should be made of logs, and for a plastered house it should be plastered. At the same time, the thickness may differ from the thickness of the walls to a lesser extent.
Advice Don’t get carried away with using different materials for this part of the wall and the enclosing structures. If this was not specifically intended by the architect or designer, in most cases this may indicate bad taste.
Beautiful country house design
Varieties by order of construction
Based on this feature, end elements are divided into two groups:
- Installation of the pediment is carried out before assembling the rafter system (when using bricks, blocks, timber, logs). The construction process is more difficult to organize; it cannot be done without temporary or permanent support. You can work from both sides, but precision in calculation and construction is required so that the roof does not turn out skewed.
- Installation after assembling the rafter system. The method is common in private construction, especially in the case of a frame gable. It is suitable for walls made of any material. It is not recommended to erect the gable frame before installing the rafters: strong winds can knock down the unsupported structure.
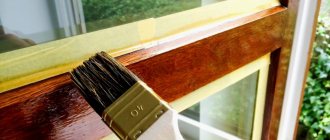
Finishing methods
Often the house design provides for additional finishing of the facades, often combined with insulation, and this can be:
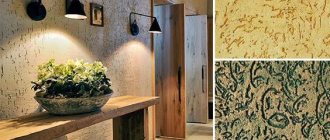
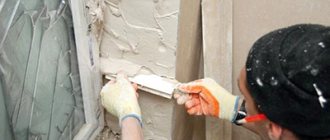
- simple or decorative plaster;
- facing with ceramic, artificial or natural stone tiles;
- covering with plastic, fiber cement, and other types of sidings or panels;
- use of the so-called ventilated facade. This allows outside air to pass freely under the cladding and remove excess moisture. And also make the building less cold in summer and cooler in winter.
Timber building
In this case, the material and manufacturing methods may differ from how the walls are constructed. So, for example, the walls can be made of brick, and the gables can be made of foam concrete blocks or wooden panels. After uniform finishing of facades and frontal parts, they can look like they were built in the same style.
Decorative stone as a facing material
This method of cladding a pediment is considered one of the most expensive and is used quite rarely. He is quite difficult to deal with. However, it can be found in photographs of the gables of houses designed by the world's leading architects.
Decorative stone forms a very active and attractive texture, which, when properly combined with other materials, can look very impressive. It interacts well with different types of plaster, brick, and classical design elements.
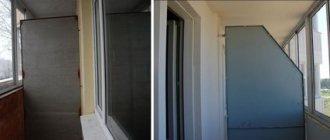
Insulation of the gable
When the attic space is adapted to accommodate an attic or mezzanine, and the thickness of the front wall is less than the thickness of the front walls, this part of the house must be insulated. Thermal protection is best done from the outside. There are two reasons for this:
- maintaining the useful volume of the attic space;
- inclusion of the gable wall in the thermal protection system.
Red brick finishing
The insulation must be protected from mechanical damage. Therefore, thermal insulation is usually combined with sheathing or cladding. It is performed using a wooden or metal frame in the form of slats, fixed with screws to the wall at a certain pitch and interval. The cells that are formed between the frame lattice elements are filled with mineral wool mats or foam sheets before cladding.
Before installation, the insulation is wrapped in a film with waterproofing and water-repellent properties. At the same time, it allows steam to migrate through the walls, resulting from human activity and changes in internal and external temperatures. A vapor-permeable film or membrane does not allow the thermal insulation to become saturated with water condensate and, as a result, lose its protective properties.
To prevent soaking when installing the covering, a roof overhang is installed. It is supported through the lathing on fillets - figured boards that protrude beyond the façade at a distance of up to 40 centimeters or more.
Wood never goes out of style
Pediment for the roof from Ondulin
If you choose a roof gable for a private house that is not too complicated to install, then you can easily handle installing it yourself . Especially if you choose high-quality and non-capricious ondulin as a material. Its installation is accessible even to a novice builder, and the light weight of the sheet will allow you to work without the involvement of a team. In addition, the attached instructions and additional elements will help you understand the system.
Let's go through the steps of self-cladding the gable roof of a private house with ondulin as the most affordable option.
- Install the sheathing using boards.
- Try on a sheet of ondulin taking into account the upward direction of the gutters in order to correctly form the cut.
- The sheet is attached to the sheathing with special screws.
- The sheets should be fastened with an overlap in one wave. Applying to already installed parts. The overlap will save the house from leaks.
- At the bottom of the pediment, mount the ebb from appropriately sized pieces of material.
- Cover the upper corner of the structure with a separate piece.
In this simple way, you can sheathe the gable of your house yourself.
Construction of window or door openings
Window or door openings can be created by expanding the dormer window to the area required for a comfortable stay in the room. If the pediment is solid or “blind”, the openings are made in the standard way. For brick - a horizontal groove is cut at the level of the upper part of the opening, into which a concrete or metal lintel is inserted and secured. The underlying masonry is then removed to install window or door infill.
Beautiful home decoration with a pediment
Determination of area and installation of frame pediment
The calculation of the area is carried out at the design stage, based on the initial design data; this data is then used to purchase construction materials. The easiest way to find out the area of a triangular structure is by linear parameters. To do this, multiply the height of the figure (at the ridge point) and the length of the base, and divide the result by 2.
Calculation of the pediment area Source blog-potolok.ru
Decorative finishing of pediments
Most houses have a pronounced cornice, that is, a widening of the outer wall at the level of the attic floor. It is sometimes additionally decorated with molded moldings - rods, cuts, etc. It is recommended that the so-called frontal boards be made in the same way, that is, elements that complete the inclined or curved parts of the pediment, so that the parts limiting it are the same. An end wall that turns into an attic fence when there is no cornice is called a gable wall.
Brick pediment
A brick gable or gable may be decorated with a turned brick design, for example in the form of imitation brackets to support a cornice slab.
These protruding and sinking alternating parts are called crackers. The brickwork is reinforced every 3...4 rows with a wire mesh with d = 4...6 mm.
German style house
When the house and the gable are plastered, the color of their surfaces most often matches in color, but sometimes designers recommend contrasting tones to create the color scheme of the structure.
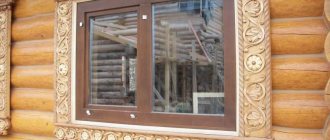
Wooden pediment
When finishing wooden houses, they are sometimes sheathed with clapboard, that is, a cottered board with a thickness of 1...1. 5 cm. Sheathing is done vertically, horizontally or obliquely - herringbone or other type of pattern . Cornices and front boards of gables, as well as platbands and window frames are often decorated with carvings. And on the ridge they install a weather vane with a flag or a silhouette of some totem animal.
Large panoramic windows let in a lot of light
Wood is a combustible material, as well as an organic substance, with low resistance to biological pollution. Therefore, wooden elements and structures must be adequately protected before use.
For biological protection against fungus, rot, mold, borers and bark beetles, wood is treated with antiseptics in water-soluble form or added to the varnish primer. Fire retardants are used to reduce fire hazards. These are substances that increase the flash point and also, when heated, release substances that prevent combustion.
Pediment cladding: variety of materials used
When talking about what to cover the pediment with, many experts advise giving preference to siding. The presented technology involves the use of special panels that are designed to decorate the facades of buildings. Externally, they look like plank sheathing and are conveniently fastened to each other using an end lock.
Siding is good because it does not require additional decorative finishing and can retain its original appearance and technical characteristics for at least several decades.
To finish the gable with siding, one of the following types of material can be used:
The wooden cladding of the pediment is made using glued lining
- Vinyl. Being made of polyvinyl chloride, it is a solid monolithic single-layer lamella of a certain configuration. The material is not prone to cracking during operation and is not susceptible to biocorrosion.
- Metal. This type of plastic is characterized by high strength and durability. In addition, it can withstand quite significant temperature fluctuations.
- Wood. Glued lining is made from wood fibers, which are mixed with adhesive resins, after which they are pressed under the influence of high temperature and high pressure.
- Cement. A pattern is applied to the surface of cement slabs using the stamping method, which imitates natural wood or other natural materials.
Important! When installing cement siding, you should always use respiratory protection. In this way, you can protect your lungs from silica dust, which can cause serious illness.
Continuing the topic of how to sew up pediments, special attention should be paid to the ceramic option, the peculiarity of which is that it can be used to decorate the facade in a unique design. At the same time, it seems that the structure was built from natural material.
Metal cladding is characterized by high strength and durability
Pediment decoration
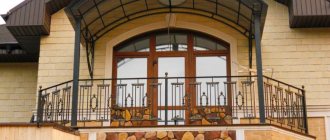
If the home owner has the necessary financial resources and wants to decorate his home using classic architectural orders and styles, he can choose any suitable gable configuration. For example, it can be made open, that is, without bringing the frontal boards to the ridge, they can be completed with volutes - twisting snails.
Between them, install a rectangular or round pedestal, on which, in turn, place a flowerpot, an urn, and sometimes a bust of the owner or a particularly revered ancestor. The dormer window in the gable field can be decorated with a molded wreath with floral patterns. Below, under the eaves, in a special rectangular field, a saying or motto that suits the owner’s spirit or mood is sometimes placed in Latin.
This will be interesting to you: REVIEW: Modular houses for permanent residence: What to consider and in what style to decorate? (200+Photos of Projects)
Types and design features of dormer windows
So, we already know that the pediment can be a continuation of the facade wall, that is, made of the same wall material, but more often it is a separate structural element of the roof, mounted using a wooden frame, which is an integral part of the rafter system.
In the first case, during masonry, window openings are formed in the same way as for a regular wall. Taking into account the fact that a non-standard window shape on the pediment is much more common - it can be triangular, semicircular or round, with a wooden or plastic frame, factory-made or made by hand, fixed or with opening sashes.
The dimensions of the opening should exceed the outline of the box by several centimeters on all sides. The frame is attached using anchor bolts, usually driven directly into the wall, sometimes using an intermediate layer of antiseptic-treated cork. After fastening the frame, the installation gaps are filled with a special rope impregnated with bitumen and blown in with foam.
In the case of using frame technology for arranging a pediment, there is much more space for the implementation of windows of a non-standard configuration. In any case, for this purpose, a support frame is made, attached to the pediment frame in the most suitable and reliable way.
Pediment - do it yourself
Making a pediment with your own hands is no more difficult than the construction of other vertical enclosing parts of the building. But this is only the case when there is certain construction experience and qualifications. In their absence, it is better to start self-training in construction by setting up a barn or garage.
You will also need to remember the school course in Euclidean geometry. This will be required in order to correctly mark at least two identical parts of a house of a triangular or more complex shape. They are usually spaced from one another at a distance of 10 meters or more. And all this needs to be done using a cord, a plumb line, bubble and water levels. Otherwise, if there are errors in the markings, you will end up with a curve shifted to one side, a roof with a ridge skewed in the vertical and horizontal plane.
Classic style
Advice It is not recommended to carry out work on the installation of gables alone. It is better to invite one or two assistants. Adult relatives, acquaintances or neighbors can be used in this capacity.
If difficulties arise during marking, call a surveyor. He, having at his disposal geodetic instruments - a level and a theodolite and others, will be able to correctly carry out the breakdown, but will ask for some money for it.
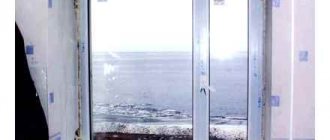
How to make a window on the pediment
Both the attic and dormer windows do not experience loads equal in value to their ordinary counterparts. From above, only a small part of the pediment, the roofing pie and snow press on them. If the roof slope is less than 45º, the snow mass is taken into account; if less, it is neglected. When constructing roof windows, this characteristic is always included in the calculations.
The pediment belongs to the category of load-bearing walls, because obliged to support the load, albeit less than ordinary floor windows. In order for the opening not to weaken the structure, it must be strengthened and part of the vertically directed load must be redistributed to nearby vertical posts.
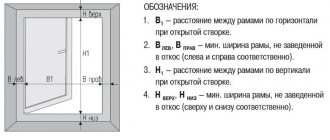
Window box device
Redistribution is carried out in the simplest way, which consists in installing horizontal jumpers at the level of the top and bottom of the opening. It, as already mentioned, should be 2 - 3 cm wider and higher than the window frame if it is made of laminated wood or plastic. For a homemade wooden frame, you will need to leave 5 cm in height and 2 - 3 cm in width for the linear expansion of the binding.
After fixing the frame in the opening, the voids around the perimeter are filled with polyurethane foam. The specified technological gaps between the window frame and the opening frame should be approximately the same. If, of course, the opening was constructed without significant deviations. Only on the top trim of a homemade window you need to leave a larger margin, about 3 cm. It is insulated and covered with a platband on the outside and inside.
The simplest way to install a window opening in a frame is to simply attach two horizontal ties to adjacent posts. The upper horizontal connection is duplicated by a jumper. The size of the lintel is determined according to the table, based on the standard snow load corresponding to the construction region.
If there is not enough thickness of the pediment frame posts to support the lintel with the cross section determined from the table, they will need to be strengthened by installing a paired element. Simply put, if the lintel turns out to be wider than the rack, it will need to be hemmed with timber or a board of a similar size.
Usually there is one dormer window in the center on the pediment, but there can be two or more attic windows. To form an opening for the first, as a rule, it is necessary to cut the central support post of the layered rafter system.
Sawing is carried out after the installation of the row posts of the pediment, which take on the weight of the outer truss. The central support then no longer has such a decisive importance, and one can safely assign its responsibilities to the ordinary posts of the gable wall frame.
It is much easier to arrange window openings if the roof is constructed using hanging technology. In this case, the pitch between the posts of the pediment frame can be chosen equal to the width of the window frame with centimeters allowed for expansion. If for some reason it is significantly larger than the frame, then additional drains are installed on the sides of the window being constructed.
Openings on the gables of the attic are made according to the described rules, but in a complex: i.e. with cutting the frame posts, strengthening them and then installing jumpers corresponding to the load.
Jumpers are most often made from 48×198 mm or 48×148 mm boards sewn in pairs. The double parts are connected with nails. The prefabricated element is installed on the edge, because the support area of the stitched element cannot be less than 90 mm. Instead of a paired board, you can use a beam of a suitable size.
The jumper is installed above the upper horizontal connection. Between these elements it is necessary to leave a gap of 1.0 - 1.5 cm, required for the permissible deflection of this part. The lintel is placed flush with the gable wall, the boundaries of which are determined by the frame at the construction stage. To do this, grooves are selected in the drain (or racks).
Installation and fastening of the window unit
We will assume that we have successfully completed the construction of the window frame intended for fastening the window frame in the opening. Now it needs to be equipped with the required design, either factory-made or home-made.
The window structure is mounted in the opening provided for it:
- Flush with gable wall for unused attics.
- With a recess of 10 - 15 cm into the window frame for thermally insulated structures.
Both options must be accompanied by a low tide fixed outside the window. There is no need to install window sill boards and slopes for the first case; in the second they are mandatory.
In most cases, window units are installed in boxes with the sashes removed. However, according to the rules for fixing a number of plastic structures, the sashes are not initially removed, but fitting is carried out to install the frame together with them.
Mounting wedges in the amount of two or three pieces are placed at the bottom of the window frame. In the middle part, the thickness of the wedge should be approximately equal to the width of the gap. The same wedges should be placed around the entire perimeter of the window. A frame for fitting with sashes, if any, is placed on the lower ones, and the side and upper wedges are gradually inserted into the gap.
Having aligned the position of the plastic frame in two traditional directions, it is removed, freed from the sashes and returned to its place for final installation. There is much less manipulation with homemade wooden frames and blind bindings. After alignment in the opening, it is simply fixed with nails or screws, and the gap between the frame and the box is foamed.
Opening framing options
There are a lot of different methods for framing a window structure, which are performed both before, during or after wall cladding. In use are shaped lumber, window casings, and regular timber.
A dormer and dormer window, when covering the pediment with planks, wood or cement-fiber siding, can be simply sheathed using four pieces of timber with a thickness equal to the height of the relief protrusion of the cladding.
The bottom trim is installed first with a segment equal in length to the width of the window block. Then the side frame parts are installed, which should cover the ends of the lower trim. Finally, the top trim is fixed, covering both side bars. Its width for cutting is found by adding the same size window and two ribs of the beam.
It is recommended to protect the top trim with a tin ebb strip, which will remove atmospheric water from the wooden parts of the cladding and will not let it into the body of the frame structure. Structures both with and without insulation suffer from moisture. In addition, when wet, thermal insulation retains heat less well.
The work of those who decide to use vinyl siding for gable cladding will be greatly facilitated by additional elements produced for all types of this material. It is important to remember that you should buy extensions of the same brand as the facing panels. To frame windows on the gable, you will need platbands or J-profiles of increased size.
If the window frame is flush with the gable wall, the sheathing is done using only the J-profile. If the frame is recessed into the opening of an insulated structure, then in addition to the J profiles, you will also need a vinyl shelf to arrange the slope.
To prevent the wood from “steaming” and getting wet under the polymer coating, it is necessary to lay an insulating material between it and the vinyl parts. Standard bitumen waterproofing in rolls or aluminum foil produced in tape format are suitable.
Before work, it is necessary to cut out the platband blanks, because All vinyl cladding extensions are supplied in the form of profiled and perforated strips 3050 mm long, for example. From these you need to cut two vertical and horizontal parts of the window trim.
The size of the elements should take into account their overlap. This is calculated by adding the length or height of the opening with the two heights of the profiles selected for arrangement.
Algorithm for arranging an opening when covering it with siding:
- We cut the top part on both sides exactly to the depth of the profile. We bend the cut parts down so that we end up with peculiar “tongues”. This must be done to drain atmospheric water into the side parts of the casing.
- We insert the side parts of the opening lining into the “tongues” so that these bent parts are inside the profiles. In order for the bent parts to fit in, you need to cut off a little from the side parts at the top.
- We cut the side parts from below in order to insert the lower casing into them according to the same pattern.
- We cut holes in the lower profile that repeat the outline of the side parts connected to it.
- We bend the “tongues” of the side parts and assemble the lower part of the casing so that they cover the cuts.
At the end, the assembled platband must be pressed against the pediment. In roof window cladding without insulation, the tongues are bent inside the trim parts or cut off.
A slightly different method of finishing the opening involves making cuts at 45º. It looks more interesting, but requires precise measurements and care in making blanks. The sequence of work is similar.
The arrangement of windows on insulated facades is carried out using a near-window profile - a modernized J-version. It allows you to veneer the slopes of the opening simultaneously with the installation of platbands. To do this, the wide shelves of the near-window profile must be trimmed according to the actual dimensions of the slopes being constructed.
Before installing them, regular vinyl siding finishing profiles are installed around the perimeter of the window opening. Then the system of near-window platbands is inserted into the niche, and secured along the outer edges with a finishing profile. The same method is used to cover doorways if they are on the pediment.
The platband profiles are fastened to the wall in increments of approximately 20–30 cm through the holes provided on the mounting side. Screws with wide heads are screwed in the middle of the hole so that when the polymer profile linearly expands/contracts, it has the ability to move without destroying the structure.
After fixing the trim, vinyl panels for the gable cladding are installed. They must be inserted into the corresponding grooves of ordinary trim or finishing strips used when installing window trim installed in a niche. If necessary, panels are cut to actual dimensions.
Advantages and disadvantages
Brick pediment. The most reliable method of building strong and durable fences. There are practically no disadvantages.
Stone finishing option
Wooden pediment. With all its advantages - ease of installation and processing, environmental properties (does not emit substances or fumes harmful to humans) it has a disadvantage - increased flammability and fire hazard
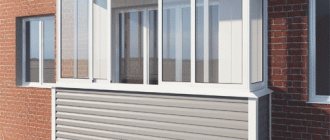
Pediment made of corrugated board. Disadvantages: unpresentable appearance, risk of corrosion at the fastening points.
Pediments lined with plastic panels or siding. Advantages – they cope well with protective properties. Disadvantages: warping, color fading, low resistance to solar ultraviolet radiation.
VIDEO: How to mark the pediment correctly?
Pediment marking
Detailed visual aid
Requirements for roof windows
Dormer windows are part of the roof structure, so their task is not limited to lighting. They must provide good thermal insulation, prevent precipitation from entering the room and resist negative environmental influences.
Conventional double-glazed windows are not suitable for roof installation ; installation of special roof windows is required. The design must have the following mandatory characteristics:
- thermal efficiency - models with a thermal insulation coefficient of about 2-2.6 W/sq. m;
- noise absorption – high-quality products suppress up to 35 dB;
- strength - window panels must withstand direct impacts from hail and snow deposits, so they are covered with a special film or made of tempered glass;
- exceptional tightness - the design includes sealing linings.
Dormer windows should be easy to open, have roller shutters for shading and be easy to clean.
Installation of a roof window
Due to special operating conditions, roof windows have a more complex structure than conventional wall models. The delivery set, in addition to the traditional double-glazed window, frame and fittings, includes additional elements:
- insulating protective flashing - responsible for sealing the gap between the roofing and the window frame; the profile of the lower part is selected taking into account the topography of the roof surface;
- waterproofing sealant; the flashing redirects moisture to the drain;
- drainage gutter to protect against leaks;
- insulating insert;
- internal slopes.
Some models have built-in blinds or a roller blind.
When to build a gable - before or after building a roof?
For materials like brick, cinder block, etc. the most successful option is to build a gable wall before erecting the roof . Working with such materials in a cramped attic is difficult and causes a lot of inconvenience.
IMPORTANT!
At the same time, it is important to correctly calculate the area and shape of the future pediment so as not to go beyond the design calculations. However, it is quite possible to erect a pediment after the roof has been installed.
This situation may arise if it is necessary to quickly protect the building from rain, or in the absence of a clear plan for constructing the roof: sometimes the angle of inclination of the slopes is determined by eye and the selection criteria become purely aesthetic preferences of the owner.
This option has its advantages : the pediment is immediately connected to the rafter system and has support, while the pediment, which is erected first, is a section of the wall that is not reinforced by any means and needs support in case of strong winds.
Most of the decorations on the pediments play the role of an additional reinforcing element, which, along with the decorative function, performs mechanical reinforcement. The final choice of the order of construction of the rafter system and the pediment is determined mainly by the materials used for the pediment and the circumstances of construction - weather conditions, the urgent need for interior decoration, etc.
The opinions of experts on this issue differ diametrically - some argue that a finished pediment is needed first, others clearly advise building the roof first. Therefore, we can definitely consider both options to be equivalent.
You can learn about the types of rafter system here.
The procedure for installing gables
Video description
This video was shot specifically so that you have an idea about installing the panels on the frame:
Two ways to install PVC panels
In order to cut slabs of the desired shape, special templates are used, which are made based on the angles of inclination of the roof and its shape. The material for them can be thick paper or cardboard.
This picture shows the most convenient way to cut siding panels Source yandex.kz
When cutting panels according to templates, always maintain the temperature reserve, and do not adjust them flush with the edges of the pediment. At the very top row of panels, the entire nail strip is cut off, and holes are drilled at the top of the slab for installation.
The point for drilling is determined after applying the segment to the seat. But the hole should be located no closer than 3cm from the cut edge of the plate.
The installation of the panels itself proceeds in a vertical direction from bottom to top. Installation begins with fixing the starting profile and continues with the systematic fixation of slabs and connecting elements.
Types and characteristics
When choosing a roof window, pay attention to the type of construction, the method of opening the sashes and the material of the frame.
Variety of design types
Depending on the placement on the roof and the design idea, the following types are distinguished:
- inclined systems;
- "cuckoos";
- balcony;
- light tunnel;
- extensions.
Oblique . Standard systems mounted on roof slopes. Such windows provide excellent illumination, are easy to install and practical to use. A variation of this type is inclined systems with a lower insert. The top of the structure opens, and the bottom profile is blind. In this case, one part can be placed at an angle, and the second – vertically.
"Cuckoos" or "birdhouses". Vertical windows are installed in remote structures, on slopes or in gables. “Cuckoos” look original, but have some disadvantages: poor lighting, labor-intensive installation, difficult snow removal.
Balcony. A combination of inclined and vertical glazing. The lower part of the window in the attic serves as a balcony parapet.
Light tunnel . An original solution for small attics, if there is also an attic on top. The reflective tunnel conducts light - lampshades are installed at the exits.
Extensions. Compact inserts of different shapes: semicircular, round, triangular window. As a rule, they are used as an addition and decoration to the attic space.
Types by opening method
Based on the opening mechanism, the following types of windows are distinguished:
- Central axis. The opening mechanism is located in the middle of the sash, which makes it possible to turn the window in both directions. The most popular model, practical to use. A variation of the system is a version with a raised axle.
- Combined mechanism. The design combines the central and upper opening axes. The first provides two-way swinging, and thanks to the second, you can set the window to ventilation mode (maximum opening angle is 45°).
- Lateral axis. A simple option is that the attic hatch swings open only in one direction.
- Remote control. Semi-automatic system controlled by remote control. Indispensable for high window locations.
Expensive models are equipped with rain and smoke sensors. When water drops on the outer glass, the window closes automatically. The same effect occurs when the room is smoky - the sash swings open for ventilation.
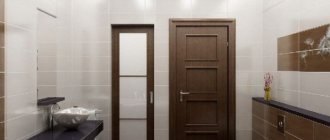
Classification by materials
Dormer window frames are made of PVC, aluminum or wood. Any option is suitable for “dry” rooms, but when arranging a bathroom it is better to avoid wood. Universal type - metal-plastic profiles.
Useful: How to cheaply build a house with your own hands
Features of different types:
- Wooden: environmentally friendly, attractive, creating an optimal microclimate. Disadvantage - they are susceptible to moisture and require treatment with antiseptic compounds.
- Plastic: practicality, availability, resistance to weather conditions. Minus - absolute tightness blocks natural ventilation.
- Metal: high strength characteristics. The downside is the high cost.
Attic windows and their size ↑
The size and shape of attic windows are determined based on the design features of the roof, and their functionality is largely determined by their location. They should not be too small - through such a small window in the attic in case of emergency, say, in a fire, it will be impossible to get out.
There is a certain relationship between the size of the window structure and the distance between the rafters. For example, for a flat roof with a slope of up to 30˚, the length should start from 1.4 m, and the width should be 40–50 mm less than the distance between the load-bearing elements of the rafter system.
On a note
When installing a tiled roof, the width of the window is chosen as a multiple of the width of the tile.
Installation ↑
- The simplest design is considered to be a hatch, which is placed between adjacent elements of the rafter system. At the same time, the load-bearing system of the roof remains unchanged: the facade pillars are rested with the lower end on the rafters, and the upper end is nailed to the frames. The side walls are laid on short racks. The width of the structure is limited by the pitch of the rafters and is usually equal to either 60 cm or 90 cm.
- If you need to increase the width of the hatch, the rafters will be reinforced.
- if necessary, cut through one or two rafter legs, and double the outer rafters that frame the contours of the attic window;
- Between the outer rafter legs, beams are placed at random, which connect the cut ends of the rafter legs in the lower and upper parts. Otherwise, the installation repeats the design of the previous type.
We recommend
This installation method is justified in cases where the width of the structure fits into triple the pitch of the rafters.
- If the expected width is even greater, the best solution would be a self-supporting structure. It is also valuable because it does not create additional load on the roof.
Let's consider the technology of constructing a more complex attic window
Where is the best place to install a window?
The installation location of roof windows largely determines the aesthetics of the exterior, the durability of the entire roof and interior decoration. It is highly undesirable to equip the opening:
- on the walls of the valley - sediment can accumulate in the inner corners;
- near chimneys and ventilation ducts that can cause condensation;
- near the junctions with the walls - shading and accumulation of precipitation are likely.
Experts advise avoiding placing any components of the roofing system close to each other.
When choosing a location, take into account the following parameters:
- Roof type. Soft roll material can be cut anywhere. When installing on tiles, it is necessary that the lower window line borders on a “solid” row of roofing.
- Rafter pitch. The optimal location of the window structure is between two adjacent rafters, the margin for laying insulation is 7-10 cm. If there is not enough space, then it is better to install two or three small models instead of one window.
- Handle location. Window systems with a top handle are mounted at a height of 1.10 cm. If the handle is built in from below, the frame can be raised up to 1.7 m.
- When installing a mechanism with remote control, care should be taken to route the cable.
A heating radiator should be placed under the glazed structure - this will protect the windows from condensation in the winter.