Doorway, Miscellaneous
Many of us have encountered redevelopment. It happens during a major renovation, when the owners of an apartment decide that it’s time to change something in it. At such moments, the transfer of doorways from one place to another occurs. In this case, the question appears on the agenda - how to seal the doorway? In this case, several options for the development of events will certainly be considered.
How and with what can you block a doorway in a wall?
If you do not want to radically change the appearance of your apartment, then you can modify the doorway itself. For example, do it not in the usual rectangular shape. The option with an arch looks great.
If you decide to remove the doorway and seal the old passage, then you should consider sealing options. It could be brick, drywall.
To have an idea of what we are talking about, let’s look at each of the doorway sealing options in more detail.
It is worth considering that no matter which sealing option you choose, the goal will be to completely eliminate the passage. After completing the work, nothing will remind you of the old doorway.
How to close a hole in a wall using drywall. Step-by-step instructions with video
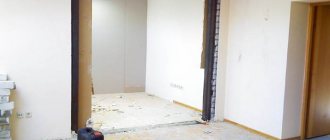
Indoor construction or renovation work often involves major changes.
Redevelopment of structures should be approached very responsibly; project approval will be required. After moving the door blocks, you will need to cover the opening in the wall with plasterboard to create a single plane. The use of gypsum plaster boards in this case is more appropriate, since it ensures fast and high-quality implementation of all activities.
How to design an arch in the kitchen: highlights
When deciding to decorate a kitchen without a door, you need to remember that the arch must fit perfectly with the main design. Otherwise, it may seem ridiculous and spoil the impression of the design.
Much depends on the style of the room: for a classic kitchen it is better to choose wooden or plasterboard models with stucco.
At the same time, for a modern kitchen in a loft or high-tech style, we recommend using plastic, stone or painted drywall.
Before choosing an arch for the kitchen, we recommend that you familiarize yourself with the general recommendations:
- If you are placing an arch between the kitchen and living room, make sure that the kitchen area has a powerful enough hood. Otherwise, the smells of cooking food will pass unhindered into the room.
- For small rooms it is better to limit yourself to a semi-arch with a minimum of decorative elements.
- A decorative arch looks good in high rooms - if the ceilings are below three meters, it is still better to stick with a regular door.
- If you are placing an arch between the kitchen and the hallway, think carefully about the lighting. Often, different types of lighting fixtures are chosen for a narrow corridor and kitchen.
- Make sure that the rooms connected by the arch are made in the same style - otherwise the overall look may look ridiculous.
Complete closure of the opening
Sealing the hole is done using various materials, but do-it-yourself installation, especially if you lack experience, is recommended to be done using sheet products and metal profiles. The standard instructions include a number of sequential steps.
Preparation
You can seal the doorway according to the following diagram:
- Work begins with dismantling the box. The procedure must be carried out with extreme care. The side posts are sawed down in the middle, broken and pulled out using a pry bar. It is important to minimize damage to adjacent sections of walls, which often occurs in older houses.
- The top of the box is removed. It is taken into account that the door structure often plays a holding role and wall blocks do not always have a supporting lintel.
After restoring the damaged areas and removing all excess, the next stage begins.
Frame installation
To create a holding system, it is recommended to use a galvanized CW rack profile with a thickness of at least 0.6 mm and UW guides. If a well-reinforced opening is being sealed, then a combination of CD/UD parts can be used for the job.
- Conditional markings are applied. Depending on the width of the space, the placement of the main parts is marked. If adjacent walls are not subject to serious leveling, then the elements are installed with a depth equal to the thickness of the gypsum board slab.
- Guides are cut according to the height dimensions. For double-sided cladding you will need 4 fragments. Elements for the top and bottom are also prepared.
This technique is used when it is necessary to close a niche in the wall. To better understand the process, watch the video:
Fastening drywall
Fixation of gypsum boards is carried out in the following order:
- Markings are made on the surface of the sheet. To do this, the area to be sewn is additionally measured on each side. It is taken into account that the values are reduced by 5–6 mm along the entire perimeter, this will avoid inconsistencies.
- The required part is cut out. If a construction knife is used, the blade is repeatedly drawn along the marked line, after which the sheet is broken. It is more convenient to form the required fragment from a solid plate using an electric jigsaw or hacksaw.
When connecting several elements, a small gap is left. This will allow you to better seal the joints at the next stage.
Sealing seams
The resulting plasterboard area needs preparation before laying the decorative material.
- The solution is being prepared. It is recommended to use elastic compounds. If procedures are carried out in rooms with high humidity, the mixture must be moisture resistant.
- The surface is evenly treated with a primer without excess, special attention is paid to the seams.
- The putty composition is mixed to a viscous consistency.
- The joints are filled. It is advisable to use a small spatula to seal drywall seams.
- Reinforcing tape or mesh is glued on top exactly in the middle. The mixture is applied and leveled.
- The area or the entire wall is covered with a layer of putty. After drying, sanding and decorative finishing are carried out.
If the wall in which the opening needs to be sealed is thick enough, you can leave a recess in it. You will get a niche that can be decorated in any way you like: with the same wallpaper, fabric, decorative plaster, or with lighting.
Blinds
You can aesthetically close a doorway with the usual blinds and their fabric subtype - roller blinds.
Plastic blinds
These products will be a good solution for decorating an opening, but they should be carefully selected to match the style of the interior. Models with printed patterns look original. Plastic blinds are easy to care for because they do not fill with dust like fabric curtains. They can be easily washed or wiped clean.
To decorate the opening, you will have to order blinds, since the standard height intended for windows will not work. The colors of the blinds are also varied, which opens up the possibility of matching them to the color palette of the room.
Choice
If the room that you plan to cover with blinds has high traffic, then it is worth considering the option of vertical products - they can be moved aside by hand. If the room is not frequently visited, then horizontal blinds are also suitable.
Roller blinds
They are convenient because they fit tightly to the opening provided they are installed correctly. Roller blinds are varied in stylistic design, and the range of sizes is also impressive.
Due to the fact that they have a weighting material at the bottom, the position of the curtains when closed remains stable. Their key drawback, like blinds, is the duration of opening - you won’t be able to quickly get into the room, and this is not always convenient.
Multi-colored blinds for the opening - fresh and original
We sew up an unnecessary doorway with plasterboard
Often, when remodeling a house or apartment, there is a need to move interior doorways. In such cases, it is necessary to seal the old openings. There are several ways to close them, but the most common is sealing them using drywall. Therefore, the problem of how to sew up a doorway with plasterboard is very relevant today.
Pros and cons of using
Decorating an interior passage with fabric without doors has positive and negative sides.
| pros | Minuses |
| + cozy and unusual room design | - less strength compared to conventional doors |
| + low cost | - lets in odors and noises |
Disadvantages do not allow use everywhere. For example, in the kitchen due to the abundance of odors or in the bedroom due to noise. But lovers of cozy interiors have adapted to avoid negative features: good hoods are installed in kitchens, and soundproofing curtains in bedrooms.
Don't miss: Colors of interior doors: designer's recommendations for choice and combination with walls, floors, furniture
What you need to get started
Like any change of layout, this process requires official permission to carry out such work. If the structure of load-bearing walls is violated, this is strictly prohibited. And with simple interior partitions this is quite possible. After receiving the relevant documents, you can immediately begin work.
Before you start work, you need to make sure that all the required tools and materials are prepared in advance. Before installing the frame, the door frame is first dismantled, so you need to consider the tools that may be useful during disassembly.
So, to get started, you will need:
- hacksaw;
- crowbar or other pry bar;
- hammer drill or drill;
- scissors for cutting metal or grinder;
- construction or regular sharp knife;
- screwdriver;
- level and plumb;
- brush with metal bristles;
- putty knife.
Necessary materials that are best taken in reserve:
- several sheets of drywall;
- rack and guide profiles;
- insulating wool;
- putty;
- primer;
- dowels;
- self-tapping screws for fastening drywall;
- self-tapping screws for connecting the profile;
- polyurethane foam;
How to decorate an arch in the kitchen
However, the correct form is not everything. Much depends on how you design the arched opening. What to make an arch from, how and what to decorate it with - these issues are best resolved at the design project stage. Let's look at the most popular materials for decorating kitchen arches.
Most often, modern designers use drywall. An inexpensive material that can take on any shape and color - an ideal solution for decorating interior arches. It is quite easy to install and lasts up to fifteen years.
One of the disadvantages of drywall is its low strength. However, visual properties and low price compensate for this disadvantage.
Less commonly, arches made of stone or wood are installed. Such designs are much more expensive and require special knowledge and experience. They look impressive, but they are not suitable for every apartment - it is unlikely that masonry or an arch to the kitchen with bricks will look good in a small Khrushchev-era building.
Another fashionable material is plastic. It will cost more than drywall, but is much stronger and easier to maintain. Plastic arches are now used even in classic designs - the correct coloring allows them to be disguised as any material.
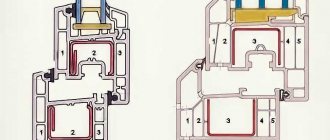
Construction of a metal frame
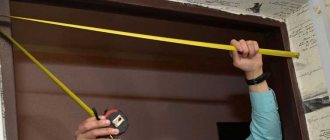
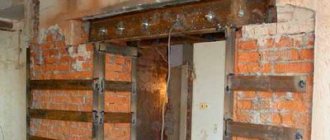
How to seal a doorway with plasterboard so that as a result it does not differ from the background of the wall? To do this, it is better to carefully measure and mark everything. GKL sheets will be attached to a frame made from a profile; therefore, you need to take into account their thickness and note their total distance from the edges of the wall on both sides.
The next task is to assemble the base of the frame, made from a guide profile. The complete design will look like two frames that cover the same wall, but in different rooms. To do this, the first thing you need to do is cut two pairs of NP blanks with a length equal to the height of the opening. Then the profile is attached to the wall using dowels and screws, using a level and plumb line.
The distance between the holes should not exceed 0.4 m, and it is important not to forget to leave space for drywall, moving the profile from the edge of the wall to the thickness of the sheet. The recommended sheet thickness for installing the partition is 12 mm.
Next, you need to cut 12-14 pieces from the rack profile equal to the width of the passage. They play the role of crossbars connecting the elements from the guide profile. On both sides of the structure, cuttings of the joint venture are attached close to the upper end, and also in relation to the floor. The distance between each element should not exceed 50 cm. To make the partition more rigid, you can strengthen it by fastening the partitions with vertical elements to the middle of the doorway to form a lattice.
Selecting the type of canvas to match the style
The selected type of curtains for the door depends on the design. The main styles for using curtains are classic, hi-tech, minimalism and ethnic. Incorporation into other styles is possible, but you will need to carefully weigh everything: find a harmonious texture and range.
Classic
For a classic style, voluminous curtains are used, complemented by tassels and bows. They should be positioned symmetrically and secured on both sides with decorative elements.
Interesting! Symmetrical hanging is used not only in a free box, but also on installed wooden doors.
Thick classic curtains will create a luxurious environment and protect from cold drafts. With a large box, you can hang several types of material: dense and light. Moreover, their flowers should differ by several tones in order to emphasize the multilayer structure. Adding a lambrequin will visually enlarge the apartment.
Palettes suitable for classic style: white, beige, blue, green, brown. Tones are selected in a rich range. Gilded patterns can be embroidered for decoration.
Minimalism, hi-tech
Modern minimalist styles should not be burdened with lambrequins and fringe. Therefore, ordinary plain fabrics, plastic blinds or thread muslin are suitable. The design does not require symmetry, so one fabric can cover the entire passage.
Don't miss: Colors of interior doors: designer's recommendations for choice and combination with walls, floors, furniture
Minimalism and hi-tech use the same basic colors: white, gray, black. For minimalism you will need matte monochromatic textures, while in high-tech you can use gray ones with a metallic shimmer.
Ethnic
Ethnic stylistics can be framed in various types. For example, luxurious curtains with lambrequins and fringe will suit the oriental theme. In addition to symmetrical placement, asymmetrical engagement with different lengths on the right and left sides is suitable.
For lovers of Japanese themes, movable panels are installed instead of doors.
It is important that the width of the box is sufficient for 2-4 panels, otherwise it will not be possible to get the Japanese atmosphere
French Provence and country welcome an abundance of textiles. Therefore, you can frame the entrance with a checkered or floral pattern.
Installation of gypsum board sheets
There is nothing complicated about installing gypsum boards. The main thing is to measure the size correctly and cut it carefully. This is done using a construction knife: first, cuts are made along the marked contour, after which the sheet is bent along the cut line. And so on along the entire cut line. There should be two such sheets. First, you need to seal the opening on one side and secure it along the entire edge with an indentation of 1.5-2 cm, as well as along the transverse elements. This is done using self-tapping screws screwed in with a screwdriver. The distance between the fastenings should be no more than 15 cm, and the heads of the screws should not stick out, but, on the contrary, should be slightly recessed deep into the gypsum board.
When the first sheet of plasterboard is installed and secured, you need to move to the adjacent room to close the second side. But before this, you need to fill the void with insulating material, and it is advisable to blow out the gap between it and the frame with polyurethane foam. Then apply the next piece and screw it with self-tapping screws. If there are small gaps between the ends of the wall and the gypsum board, they must be covered with putty.
Methods for making slopes
The outer side of the door is finished by master installers. But on the inside, everything is terrible. Before your eyes is a bare wall, bricks and a lot of possibilities for designing slopes.
The sloping part gives the doors a beautiful appearance, hides all fasteners and makes the entire structure stable.
Therefore, after the box is installed, you need to choose a finishing method, and there are not many of them:
- Finishing with platbands and additional boards;
- Plastering slopes;
- Gluing the material.
The division occurs according to different methods of forming the slope area, and choosing the material for cladding is not a problem. The most ideal option is to seal the slopes with concrete and then paint.
Finishing slopes with installation of finishing material on a special frame is beneficial when a decent amount of mortar is required for voids in the opening. Judging by the photo, using this method the slope will be flawless and even.
Finishing work
In principle, the opening in the wall is already completely closed, all that remains is to bring it into proper shape. To do this, you need to align the drywall in the wall so that they are on the same level. For these purposes, putty is used, which is used to rub over all joints, cracks and recesses at the fastening points.
A primer layer is first applied to the gypsum board sheet. When the primer layer has dried, you can begin to putty.
The prepared solution is applied in a thin layer over the entire surface of the partition, extending onto the walls. If necessary, you can apply several layers pre-treated with primer. Now you can start finishing the finished wall. It is not recommended to paint it, since after a while cracks will appear at the joints with the wall. The best option is tiling. Wallpaper is also suitable for this purpose, but this is only until the next renovation.
As it turns out, sealing a doorway with plasterboard is not a tricky business. The main thing is to prepare everything in advance and take all the measurements correctly. As the wise proverb says - measure twice, cut once! And having the necessary tools will make the whole process much easier. This design is easy to implement and does not take much time. In addition, it is distinguished by its efficiency.
But there are also significant disadvantages. It is not durable, and any stress can destroy drywall over time. In addition, he is afraid of dampness and moisture. So the construction of such partitions near bathrooms is undesirable. It is not recommended to attach heavy objects to such a wall, which could lead to its deformation. However, the wall can be blocked with some large-sized furniture. Another disadvantage is poor sound insulation.
Finishing
Leveling plaster alone cannot be used as a finishing coating. No matter how strong it is, it wears out and cracks over time. Therefore, the surface must be subject to further finishing. But before this, in any case, all defects are eliminated and a primer with a strengthening effect is applied.
The simplest solution is coloring. If the appearance of the plaster is not satisfactory, then the surface is first smoothed with putty, sanded and treated with primer. The same thing happens before finishing the opening with wallpaper.
Another option is decorative plaster. It can be different in texture and color. Puttying is not necessary here. You can immediately begin facing work. But in this case, the plaster layer must be reinforced.
Step-by-step instructions: sealing the doorway with your own hands
Redevelopment of an apartment or house is a renovation and construction event that is not uncommon today. Many people want to change the layout of rooms by adding or removing partitions. Sometimes, during the work being carried out, it is necessary to block existing doorways. This can be done using bricks, blocks or drywall. The latter material has gained great popularity today due to the simplification of operations. Therefore, the question of how to seal a doorway using drywall is currently very relevant.
Preparation for repair
You need to prepare all the necessary tools and materials in advance before starting work and starting to seal the doorway with plasterboard.
Tools you will need:
- Screwdriver.
- Hammer.
- Metal scissors.
- Sharp knife.
- Plumb and level.
- Saw and crowbar.
- Guide profile PN.
- Rack profile PS.
- Plasterboard sheets.
- Soundproofing material (stone wool).
- Self-tapping screws.
- Dowels.
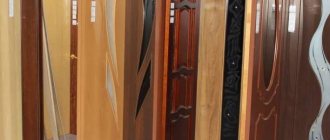
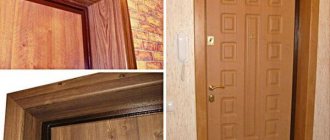
Wooden portals
Finishing doorways with natural wood is one of the most expensive and noble methods. The wood texture itself is very beautiful and aesthetically pleasing. Therefore, elements are often simply coated with clear or tinted varnish. Custom-made portals can be made to order, complemented by artistic carvings.
Of course, valuable types of wood look chic and rich, but they also cost accordingly. To make the finishing less expensive, you can choose the simplest varieties, for example, pine or birch, but at the same time polish the surface well and cover it with several layers of varnish. Also, openings with small decorative shelves or built-in lighting can be made to order. Wooden openings can be additionally decorated with stained glass. When choosing this type of finish, remember that natural wood requires careful care. As for the rest, it all depends on your financial capabilities and imagination. The color of wooden openings should be coordinated with the color of the floor or baseboards. You can also rely on the color of the furniture.
The design style also plays a role. After all, not all modern trends welcome the use of such “warm” materials. For example, loft or minimalism prefer plastic or metal.
Removing the old door
First, the door leaf is removed from the hinges. If you no longer need the door itself, then its frame can be cut into several pieces with a saw. After that, each piece is torn off from the ends of the opening using a crowbar.
Usually, during the dismantling process, the surfaces of the openings in the places where the boxes are attached deteriorate and do not meet the requirements in terms of technical condition. Therefore, it is recommended to putty the surface.
Since leveling a doorway is not at all easy, it is necessary first of all to pay special attention to the quality of assembly of the metal frame. How it all happens:
- It is necessary to assemble two frames at the edges of the doorway. That is, one will be closer to the wall of one room, the other closer to the wall of the adjacent room. In this case, both frames are usually not connected to each other. These are free-standing elements.
- It is necessary to cut four pieces from the guide profile with a length corresponding to the height of the doorway. They are secured using “quick installation” dowels along the edges of the vertical ends. To do this, each profile must be installed in place, using a plumb line and level, and holes must be made with a puncher every 30-40 cm. The dowels will be inserted there. Please note that each profile is installed slightly deeper into the opening, leaving space for installation of gypsum board sheets. That is, the distance from the wall to the profile should be equal to the thickness of the sheet. It is best to use plasterboard with a thickness of 12 mm.
- Now you need to cut several pieces from the rack profile, the length of which should be equal to the width of the doorway. They are used as crossbars that connect racks made of PN elements.
- On each side, one crossbar must be installed directly to the upper end of the opening, and one to the lower end, that is, near the floor. Intermediate elements are placed every 40-50 cm.
- If there is a need to increase the rigidity of the entire structure, then between the crossbars, right in the middle of the doorway, it is necessary to vertically install sections of the rack profile, which will connect the crossbars. The result is a cellular lattice of profiles.
The frame is ready, you can proceed to installing plasterboard sheets.
Tree
Wood is considered a very malleable material. It is not difficult to cut, but when enlarging a wooden opening, a number of rules must be followed to prevent the partition from cracking and sagging.
When expanding in height, the upper lintel is strengthened with metal corners. Vertical surfaces are reinforced with steel beams. This approach is not necessary if small trimming of a few centimeters is performed. But when removing the old lintel, you cannot do without additional strengthening measures.
To cut wood, it is recommended to use a grinder with a diamond wheel. This tool generates a lot of dust, but maintains the integrity of the wood, preventing it from cracking.
Installation of gypsum board sheets
Let's figure out how to cover a doorway with plasterboard quickly and easily. In principle, there is nothing complicated at this stage. Here it is important to accurately mark the dimensions of the opening on the sheet and cut out the required area along the contour. To do this, you only need a sharp construction knife.
Along the marked lines, cut the cardboard layer one by one, then simply bend the sheet at the place of the cut. Thus, go along the entire contour.
There should be two such blanks. First install one of them. Fastening is carried out along the entire perimeter and along the installed crossbars. Then go to another room and lay soundproofing material between the frames. For example, it could be ordinary mineral wool or foam panels. The gap between the sound insulator and the frame can be filled with polyurethane foam.
Now you can install the second workpiece and secure it with self-tapping screws. Pay attention to how the fastening is done correctly.
- The self-tapping screw should be recessed 0.5 cm deep into the sheet.
- The distance between adjacent fasteners is 10-15 cm.
- The distance from the edge of the panel to the attachment point is 1.5-2.0 cm.
If there are still small gaps on this side between the gypsum board sheet and the end of the opening, they can be foamed.
In fact, you have already sealed the opening in the wall; all that remains is to align the walls of the room with the installed plasterboard sheet. Putty is used for this. But before this, it is necessary to treat the gypsum board sheet itself with a primer and seal the places where the screws are installed with a thin layer of putty.
After drying, a layer of putty solution is applied to the entire area of the sheet, extending onto the walls of the room. If necessary, the leveling material is applied in two layers. Before the second, the surface to be treated must be primed again.
The best option for finishing is wallpaper. The whole point is that the vibration of the house, whether you like it or not, will definitely do its negative work in just two or three years. Cracks will appear at the junction with the walls. And it doesn’t matter that high quality putty was used, and the leveling process was carried out by a highly qualified master. Cracks cannot be avoided. And with the help of wallpaper they will be hidden until the next renovation.
How to get rid of large cracks?
When installing doors, gaps often form. They can be almost invisible. It is important to seal large gaps to improve the aesthetics of the doorway. To seal slopes after installing the front door from the inside, gypsum putty or polyurethane foam is often used. The selected product is used to fill the gap, and the remains are cut off after drying. Polyurethane foam is most often used. It is sold in special containers and is easily blown into the slot. Polyurethane foam takes a long time to harden. It all depends on its quantity and the level of humidity in the room. But polyurethane foam provides high-quality sealing of seams and good sealing.
Options for sealing the opening
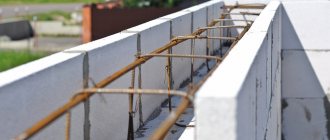
As mentioned above, you can also seal a doorway in a wall with block materials. The brick disappears here. It's heavy. But blocks made of cellular concrete will be just right. In addition, today you can choose this material to match the size of the opening; fortunately, manufacturers offer a fairly wide range in terms of dimensions. Plus high heat and sound insulation properties of the blocks.
As you can see, it’s not difficult to seal the door opening with plasterboard even with your own hands.
Perhaps one of our readers has had experience in carrying out this type of work; I would like to hear your comments on this topic. Related article: How to make a passage for a cat in a door
How and what is used to finish door slopes after installing the front door
After installing the new entrance door, all that remains is to update them with brand new slopes. They can be integrated into the interior design in different ways; plasterboard, laminate, MDF, PVC sandwich panels, as well as non-standard materials (for example, imitation natural stone) are suitable for design. In order not to spend money on the services of a specialist, you can install the slopes yourself, following the instructions.
Fake diamond
The use of artificial stone is a good solution that helps create a modern and stylish design. Compared to similar products, this option is more preferable. This is explained by the fact that it is available in a wide range of decorative designs. Let's say clinker tiles can be used, including for cladding these structures, but their choice is limited.
The use of decorative stone has a number of advantages. Here are the key advantages of the material:
- excellent appearance, giving the interior solidity;
- possibility of combination with other finishing materials;
- ability to withstand any mechanical stress;
- long service life. Artificial stone is durable, and therefore can retain all its characteristics for decades.
For finishing, you need to choose an artificial stone that is small in size and has a relief surface. Deeper textures will look somewhat cumbersome. Cladding is carried out using various technologies. Most often, installation is done in a way that allows you to arrange uneven edges. Today, special elements have been developed that are able to cope with the function of the corner pad. They are very convenient and allow you to do without trimming.
How to decorate a front door doorway using decorative stone? The algorithm of actions is as follows:
- After the areas where the artificial stone will be glued have been selected, markings are carried out. To eliminate errors as much as possible, it is better to lay out all the necessary stones on the floor in a given order in advance.
- Treat the walls with a deep-penetrating primer. This promotes better adhesion of materials. Allow the areas to dry thoroughly.
- For fixation, use special tile adhesive or liquid nails. The latter option is suitable for cases where the surface is perfectly flat.
- The composition is applied to the back side of the elements. Any excess must be removed.
- The stone is laid in ways that make it possible to form a seam or make do with a monolithic surface devoid of joints.
- The parts are placed in their places and pressed. It is important to ensure good grip.
- If joints appear, they must be rubbed. The color of the mixture should be monochromatic or contrasting.