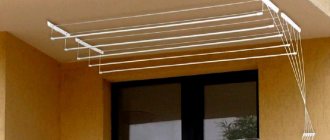
The balcony is practically the only place in the apartment that is ideal for drying clothes. In the summer months, things dry on it faster than indoors, and in winter they can be kept on the ropes longer, and they will not bother anyone. To prevent drying devices from spoiling the appearance, the balcony can be equipped with a modern ceiling dryer. The classic version of a hanger for a balcony or loggia is the “liana”. It is mounted on the ceiling, does not clutter up the balcony area and is convenient to use.
Peculiarities
"Liana" consists of ceiling brackets and a wall bracket. The ropes are passed through movable rollers on the brackets and hold the crossbar on which the laundry is hung. The free ends of the ropes are fixed in a wall holder and regulate the raising and lowering of the crossbar. Despite minor design differences, all Liana ceiling dryers operate on the same principle.
Liana ceiling dryer equipment:
- Locking bar (side bracket);
- 2 ceiling brackets;
- Set of rods;
- Ropes, 2 for each rod (short and long).
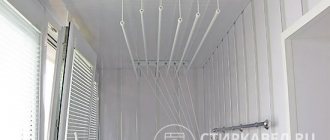
Liana can be installed not only on the balcony. If the apartment is on the ground floor, it is often installed in the bathroom and even in the hallway.
Useful videos about dryers
Installation of a Polish-made dryer in the bathroom:
Recommendations for installation on plastic lining:
Video instructions for installing the “liana” on the balcony:
The easy-to-use “liana” is a good and economical assistant for housewives. Laundry is washed on average 2-3 times a week, which means the dryer will be busy all the time. It is much more comfortable when the laundry hangs high from the ceiling and does not interfere with moving around the balcony. Ordinary ropes will not provide such convenience.
YOU MAY ALSO BE INTERESTED
Types of dryers
There are two types of dryers, differing in the structure of the ropes. In the simplest design, all the crossbars are interconnected and are lowered only at the same time. Dryers are more convenient in which you can put each rope separately, since there is not always a need to use them all. Each of the crossbars has its own suspension and lifting system, thanks to which only part of the rods can be used.
Advice. If you are doing a big wash and you need to hang the laundry on all the lines, the bars in the foreground are lowered to the lowest position, and the rest are arranged in a cascade. With this arrangement, the sun hits all the hanging things, and they will dry faster.
Dryers also differ in size and material used. The dimensions of the dryer depend on the length of the rods and their number. The shortest models are 50 cm long and are designed for a small number of things. The longest dryers are 200 cm long; they can accommodate a lot of laundry and are convenient for use in families with children.
The quality of the product mainly depends on the material from which the crossbars are made. They can be made of plastic, aluminum and stainless steel. The most reliable dryers are made of thin-walled stainless steel, since it does not bend under the weight of wet laundry, does not rust, and does not leave stains on things. Plastic tubes also do not spoil laundry and are aesthetically pleasing, but they can sag when using the dryer, so they are only suitable for small-sized vines that will not be subject to heavy loads. Aluminum rods also sag under the weight, and if the coating is rubbed off the metal, it will stain things.
Some successful models
In Russia and Belarus, good models of Liana-type drying devices are produced, which, at a price much lower than their European counterparts, have similar characteristics to them. For example, a Russian-made dryer from the Turkish brand Dogrular, model SP1505, weighs very little - a little more than 2 kg. Moreover, 5 tubes are capable of supporting clothes with a total weight of at least 10 kg. Durable rods and fasteners are made of aluminum, while the design also contains plastic parts. The width of the device is 1.5 m, the total length of the drying surface is 12 m.
Drying device Dogrular SP1505
The Belarusian Comfort Alumin dryer is produced with rods 1.5 and 2.5 m long. Both modifications are capable of drying clothes with a total weight of up to 10 kg using 5 tubes. Materials: aluminum and plastic.
Belarusian product for drying Comfort Alumin
In addition to products from the CIS countries, drying products made in Europe can be purchased in the retail chain. Their cost is significantly higher, but the dryers have very good characteristics. For example, the Italian design of the Gimi Lift trademark, having steel rods with a protective coating, can simultaneously dry up to 12 kg of things. Moreover, the maximum weight does not depend on the length of the rods, which can be of several sizes - from 1.2 to 2.4 m.
Gimi Lift Dryer Wall Mount and Rods
French products from the Luminarc Liana brand are cheaper than Italian ones, but their characteristics are no worse. Drayer tubes, like most other parts, are made of steel and can support weights of up to 12 kg. The number of rods is 5. In the retail chain you can find dryers of this brand with a tube length of 1.4 m.
Advantages
The reliability of ceiling dryers has been tested by time, since many have been using them for more than 20 years. What do housewives like about vines? First of all, compactness. Even the largest dryer in the folded position takes up virtually no space on the balcony or loggia, does not clutter it up and does not spoil the interior. The metal parts are painted white, the products have a modern design and do not stand out against the background of the ceiling. The only detail visible is the ropes assembled in the holder.
The dryer is convenient to use: to hang things, you don’t need to climb onto a chair and reach the ropes with your hands. They easily fall down, after which, together with the laundry, they rise again to the ceiling and are fixed at the desired height. Removing dried items from the crossbars is also easy.
Another advantage is that round rods are used for hanging laundry. Because they are made from metal or plastic hollow tubes, their diameter is much larger than the thickest ropes. Thanks to this, there are no traces of ropes left on things, and in some cases you can do without ironing.
Installation instructions
Installation is not difficult if you prepare everything in advance and follow the recommendations. Let's look at each step in detail.
Required Tools
For work you will need:
- tape measure or long ruler;
- pencil or marker;
- hammer drill with 6 mm drill;
- screwdriver or screwdriver;
- hammer;
- stepladder or stool.
Sometimes the fasteners that come with the kit are not very strong. Then they replace it with their own. Take screws and plastic dowels to suit your size; in most cases, universal 5x50 self-tapping screws are suitable. The quantity depends on the number of holes in the bracket.
Selecting a location
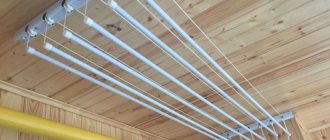
The best option would be to place the dryer on a glazed balcony or loggia. You shouldn’t install it outdoors, because in winter the laundry will freeze, and in rainy weather you won’t be able to hang it at all. When choosing a location, take into account the size of the balcony, as well as the distance to which the windows and doors open. They should not touch the “vine” in the raised position.
If there is no balcony or it is not glazed, then the dryer is hung in the bathroom. The length is selected according to the size of the room. Because clothes may drip, it is recommended to install the dryer above a sink or bathtub, but it should not interfere with showering.
If these options are not suitable, you can look for a place in the hallway or dressing room. As a last resort - in the living room or bedroom. It is advisable to choose a place so that the dryer does not attract much attention to itself and does not cause inconvenience to residents.
Important! There should be no valuables or finishing materials that are not resistant to moisture nearby, as water will drip from the clothes.
Assembly and installation
First, mark the attachment points. To do this, take the bracket and apply it to the ceiling at a distance of 10-20 cm from the wall. Place marks through the holes with a pencil or marker. The second bracket is applied parallel to the first at a distance equal to the length of the rod. The places of fastenings are also marked.
Then they drill holes in the concrete with a hammer drill and hammer in plastic dowels. Attach the brackets and screw in the screws, and close the mounting holes with plugs.
Then a holder (a plastic bracket for fixing cords) is attached to the wall perpendicular to the dryer. The approximate height is at waist level to make it comfortable to use.
The next step is to tighten the ropes and hang the crossbars. There are two cords included for each strip. Both are threaded inside the tube. Then a long piece is inserted into the rollers on the left bracket, and both parts are inserted into the rollers on the right.
By pulling the crossbars to the ceiling, adjust the length of the cords. Fixing caps are put on the ends and the rope is tied in a knot so that they do not fly off. The lower position is adjusted in the same way.
The crossbar is lowered to such a height that it is convenient to hang laundry and another fixing cap is secured at this level. Installation completed.
Advice! Before assembling the dryer, we recommend that you look at the instructions with the installation diagram included in the kit. Installation nuances may differ for different models.
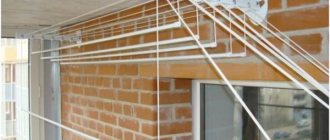
If a suspended ceiling made of PVC panels or plasterboard is installed on the balcony, the process becomes more complicated. The fact is that the sheathing will not withstand the weight of the dryer and laundry, so at the finishing stage, timber inserts are installed at the fastening points. First you need to accurately determine the location of the brackets.
If the finishing of the ceiling has already been completed, and the mortgages were not provided, then the dryer can be attached in another way. To do this, take long screws and screw the brackets through the sheathing to the concrete floor. To ensure that the dryer parts do not dangle and fit firmly to the ceiling, and the PVC panels do not sag, a piece of plastic or metal tube is placed on the self-tapping screw. It will act as a frame between the subfloor and the sheathing.
The dryer is attached to the suspended ceiling in exactly the same way. But before you make a hole, you need to strengthen the canvas. To do this, glue a small diameter thermal ring or a piece of PVC film left after installation.
Common Mistakes
During installation, it is important to do everything correctly so that defects do not interfere with operation. It is necessary to study the installation instructions, prepare tools and take accurate measurements. Consider the most common mistakes:
- If the brackets are fastened by eye or the distance is incorrectly calculated, the dryer may prevent windows or doors from opening. Accordingly, going out onto the balcony or ventilating it will be inconvenient.
- If you install the slats very close to the wall, laundry may touch them and get dirty. In addition, hanging things will not be so convenient. It is recommended to make an indent of at least 10 cm.
- If the distance between the fastenings is too large or small, the tension of the ropes will be too strong or weak.
- If not all screws are tightened or the fasteners are chosen incorrectly, the weight of wet laundry may cause the dryer to fall. To prevent this from happening, it is important to choose the correct length and diameter of the screws, in accordance with the ceiling material and the size of the mounting holes. And the plastic dowel should fit tightly into the drilled hole. Therefore, for a 6 mm drill, you need a dowel of the same diameter.
Installation of a ceiling dryer
To avoid any “surprises” during product assembly, when purchasing, you should pay attention to the integrity of the packaging and also check that all parts are included. The principle of installing the dryer is not complicated; no special tools are required for its installation.
Tools you will need for work:
- Drill with 6 mm drill bit;
- Tape measure and marker;
- Screwdriver;
- Self-tapping screws and dowels.
Since all work will be carried out at height, for convenience you should use a stepladder up to 2 m high, on the top platform of which you can put tools that will always be at hand. Installation of the dryer begins with marking the location of the ceiling brackets, which are located at a distance equal to the length of the crossbars.
The brackets are fastened in the following sequence:
- One of the brackets is applied to the ceiling and the location of the holes is marked on the slab with a marker. The same is done with the second bracket. Make sure that they are located on parallel lines;
- At the marked points, holes are drilled and dowels are inserted;
- The brackets are again applied to the ceiling one by one and secured with self-tapping screws. The caps are covered with plugs;
The next stage is the installation of a locking strip with slots designed to secure the ropes. It is installed on one of the walls at a convenient height for use (usually from 1 to 1.5 m from the floor). The main thing is that it remains conveniently accessible, and you can easily reach the ropes with your hands.
Replacing ropes
Over time, the cords wear out and fray, so you have to install new ones. To determine the required length, you need to do the following:
- Multiply the size of the bar by 2.
- Measure the distance from the clamp on the wall to the ceiling and also double it.
- Add up the numbers and add 1.5 meters to the result.
To change the rope, it is not necessary to follow the same steps as during installation. The end of the cord is tied to a piece of the old one and pulled through all the necessary holes. This makes replacing dryer ropes much easier.
Common mistakes when attaching a dryer
Due to errors made during installation, the operation of the dryer may be impaired. To avoid having to dismantle the brackets and reattach them, it is better to immediately anticipate possible shortcomings.
Errors when installing the dryer:
- When installing the brackets, incorrect measurements were taken, which resulted in distortions. Ceiling elements must be positioned strictly parallel;
- If nails are used to fasten the ceiling parts, they may not be able to withstand the weight of wet laundry, and the structure will collapse after the first wash;
- If the screws are not fixed deep enough in the wall or slab, or their diameter does not match the diameter of the hole, they will not withstand the tension of the ropes and the fastenings will be torn out of the wall. To prevent this from happening, you should select the correct diameter of the drill and screws;
- If the calculations are carried out incorrectly, the ceiling mounts are located too far or close to each other. Such an error may result in the length of the metal rods not matching the distance between the brackets
Important. Installation of the ceiling dryer is carried out only on the solid base of the slab. If the loggia has a suspended or suspended ceiling, it is better to choose a wall-mounted or floor-mounted model of a hanger for drying clothes.
Selection principles
Before you run to the store to buy a dryer, answer yourself a number of simple questions:
- How often do you plan to use the dryer?
- What size and weight of laundry do you want to dry on the structure.
- Type of construction, room dimensions and ventilation system.
- Method of drying clothes.
- The material from which the body is made.
- Construction cost.
The range offered today guarantees a worthy choice for any conditions and circumstances.
The range of dryers on the market today is wide, which allows everyone to choose a design based on their desires and needs.
Maintainability of ceiling dryer
If the Liana dryer breaks down, it can be easily repaired, thereby extending its service life. Most often, plastic or metal crossbars fail, which are subject to direct load while drying clothes. Over time, they can become deformed, and although this does not affect the functionality of the device, the appearance of the structure can be spoiled.
The crossbars can be replaced with any tubes or rods of suitable diameter and length. At the same time as the crossbars, the ropes are usually replaced, which wear out over several years of use, especially in places of direct contact with the rollers. The remaining parts of the dryer are not deformed and therefore do not need to be replaced. Having reconstructed the “liana”, it can be used again for about 10 years.
Clothes dryer "Liana": design features and advantages
In fact, this is a banal hanger, the basis of which is ropes.
Design Basics:
- Two guide axles with rollers. Allows adjustment of the drying height (up to a meter).
- Jumper strings of different sizes (you can independently select which level is needed).
- Plastic/aluminum tubes for the rigidity of the previous element and the clear shape of the entire structure.
- A clamp to maintain the desired level of drying of laundry.
There are several types of balcony dryer: wall-mounted and floor-mounted. But more on that below.
Today, different structures for drying clothes are installed on balconies. But it is “Liana” that receives increased attention from housewives.
What you should know about these types of structures
There are several options for hanging and ceiling dryers. The most used are sliding (folding) products, Liana devices and some other types.
- The sliding dryer is distinguished by (the name speaks for itself) sliding design at the required distance. This product, after installing the first fastening block, is capable of stretching, and the strings can be pulled out very easily. The process can be compared to the action of a construction tape measure. When folded, this dryer is extremely compact.
- The folding device attracts with its ability to increase its useful area in length, as well as the ability to adjust the height of the platform. When hanging laundry, it can be lowered to a convenient height and then raised to a certain level. Such dryers are supplied with detailed instructions from the manufacturer.
- The “Liana” model is a fairly popular product, suitable for small balconies. A distinctive feature of this dryer is its ease of folding, supporting a fairly large “wet” weight, and the ability to lower/raise. An interesting ceiling-mounted clothes dryer “liana” can easily diversify the interior of a balcony.
- The most attractive type for drying items that are not recommended to be dried on a crossbar or rope is a dryer supplemented with a polymer mesh. The extremely simple design consists of a spacious frame with mesh, equipped with a hook for hanging. This device is very compact, so a small space is not a hindrance for its arrangement.
- A mobile, lightweight, cute dryer for small items (handkerchiefs, socks, etc.) - a godsend for those going on vacation. The device consists of a small frame (round or square) made of plastic (light metal is possible) and is hung with a hook in any convenient place. The set includes small clothespins. It is very convenient to place small items on such a dryer.
- An ultra-modern device, the electric dryer deserves special attention. The design is equipped with a mechanism that can withstand a fairly high temperature level of the product. There are devices that include hair dryers or ion lamps. Such designs are most often used when drying clothes of infants.
Every year, the market for household appliances is replenished with a wide range of new drying designs. The consumer is provided with innovative models made from various materials. By the way, it is the material that plays a huge role in creating fairly strong and fairly durable products.
How it works
The operating principle depends on the characteristics of the device. So, there are conventional and electric models.
The usual ones are portable structures that closely resemble ordinary clotheslines. They are successfully used both in limited square meters of an apartment and on the street (on a loggia or veranda).
Conventional clothes dryers are very compact and can be used in limited apartment square meters. Electric models are ideal for use in the cold season. They have a rack heating function, so clothes dry much faster. Depending on their purpose, dryers are divided into several types.
Electric clothes dryers work due to the heating function of the slats.
Ceiling
Such models will require serious installation efforts, since the structure is attached to the ceiling using special clamps. The height of the laundry is adjusted depending on the size of the dryer.
This dryer is attached to the ceiling with special clamps. Ceiling clothes dryer Liana is one of the most popular models.
The ceiling version of “Liana” is one of the most popular models.
Wall mounted
Such models are used on balconies and even in bathrooms. The structure is attached to the wall and looks like an accordion. When free from linen, it folds up and takes up minimal space, which is very convenient for small bathrooms, and when unfolded it can withstand loads from 2.5 to 10 kg.
This dryer can withstand loads of up to 10 kg. It will perfectly cope with the role of a towel holder. A kind of multifunctional device for the bathroom.
These accordion wall dryers are very convenient for the bathroom.
Mounted
These tiny devices are designed to be hung on a radiator, door or other surface.
Such devices are very compact and take up little space. Only very light items in your wardrobe will withstand. Easy to clean after use. Only light items can be dried on such structures; they will not withstand heavy weight.
Magnetic
These models are not very practical, since they have very modest dimensions, allow you to dry only underwear and it is not always possible to find a place to attach them - a metal surface is required.
For bathroom
There are designs that are installed directly on the bathtub. For example, a triangle dryer is attached to the sides in such a way that the laundry is exactly above the bathtub. After drying the clothes, the structure is folded and put away. It is very convenient when you have to dry things without spinning, and you need to let excess moisture drain off.
These dryers are very convenient and are placed directly above the bathtub. Snake dryers or wall rods are also installed in the bathroom. They can be electric, water, or combined. Wall-mounted dryers are mounted to the wall and act as heated towel rails. The snake-shaped dryer looks very stylish in the bathroom and can serve as a heated towel rail. For electric models, it is important that there is an outlet nearby. Water models are connected to outlets from the riser and filled with hot water. Combined electric water structures are filled with water and have a heating function, which is especially appreciated during heating outages.
To install an electric dryer in the bathroom, you will need to have an outlet nearby.
Floor-standing
Such dryers are perhaps the most popular. Outwardly, they resemble ironing boards.
Floor structures are the most popular type of dryers. Mobile structures are very light, they can be placed in any room, and even, if necessary, taken outside. They are equipped with a convenient folding mechanism, so they can be put away after use and do not take up much space when stored. After use, these dryers are easy to assemble.