Wooden windows are environmentally friendly structures; they create a comfortable indoor microclimate. For these qualities, many do not want to part with them. But over time, the tightness of the frame decreases and the window becomes a conductor of cold and drafts.
The problem can be solved in different ways. How to seal a window for the winter and insulate the gaps between the frame, frame and slopes depends on how durable the repair should be and how much time and money you are willing to spend on it. Both the old methods of insulation that our grandmothers used and the modern ones produced using technological materials are effective to varying degrees.
Looking for the cause of cold windows
To ensure that the insulation work is not in vain, it is necessary to correctly determine the weak point of the window that allows cold air to pass through. The reason may lie in different parts of the structure:
- Slopes (deteriorated or missing insulation);
- Window sill (cracks or bridges of cold may form in its lower part, which, at first glance, are invisible);
- Glass (blowing occurs at the junction of the glass and the frame; the putty that covers the joint deteriorates over several seasons and requires regular updating);
- Frame and sashes (shrinkage of wood, subsidence of sashes, movement of soil under the house - all these circumstances lead to the formation of gaps between the frame and the window frame).
Defects in a wooden window frame lead to heat loss in winter. If a visual inspection fails to identify the cause, you can use some tricks.
For example, wet your hand with water and bring it to different parts of the window. An even more sensitive method is a lit candle or lighter. The flame reacts to any air vibrations, which will indicate places of heat loss. A very old window requires an integrated approach. To achieve good thermal insulation, you need to eliminate all possible cold bridges. Structures in good condition need to be insulated around the perimeter of the frame and opening sashes using any available method.
How to reduce heat loss through glass
Even double-glazed plastic windows are always cold in winter. The main heat loss occurs through this part of the structure. In the case of wooden windows, the situation is especially difficult - the glass is simply inserted into the groove and does not fit tightly.
Putty
This method of insulating windows partially solves the problem of glass fitting to the frame. But it lasts for 1-2 seasons. After which the procedure must be repeated.
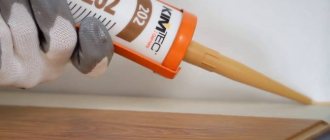
The putty ensures a tight fit of the glass to the frame
For sealing, special window putty or plasticine is suitable. These materials are equally flexible and adhere well to wood and glass. They are applied from the outside of the window to the joint between the glass and the frame. Before use, a small piece of material should be kneaded and the gap should be covered with an even layer, pressing slightly. The key disadvantage of the method is the destruction of the putty upon freezing and melting of the plasticine in the sun.
Sealant
The method of sealing a joint using silicone or acrylic sealant is more reliable and durable than the first. But at the same time more troublesome and expensive.
For work, it is recommended to purchase a transparent composition. The sealant is applied to the glass seat, that is, into the groove. Therefore, the glass will have to be removed. The composition must be squeezed out in a uniform strip along the entire perimeter and immediately install the glass in place and once again pass the sealant along the seam.
Sealing the joint between glass and frame using sealant
A small feature that should be remembered when choosing this method of insulation is that the sealant hardens, so then it will not be possible to easily remove the glass from the frame if necessary.
Film
The heat-reflecting film, according to manufacturers, can reduce heat loss through glass by 30% . It glues directly to the glass.
Thermal reflective film can be glued to glass
In order to protect windows for the winter in this way, you need to clean the surface from dirt and degrease, then cut out a piece of film with a margin of 2 cm on each side. Tear off the bottom layer and apply it to the glass. Using smoothing movements, stick it over the entire area. If folds have formed, you can warm them up a little with a hairdryer and cut off the excess with a utility knife.
How to insulate and how to seal old wooden windows for the winter with your own hands: this is useful to know
A third, or even half (depending on the glazing area) of heat loss in the house occurs through windows, so as cold weather approaches, you need to take care of thermal insulation. Let's look at effective and inexpensive ways to properly insulate old wooden windows for the winter with your own hands.
Despite the widespread replacement of wooden windows with plastic and metal-plastic ones, they retain part of the market. Despite the fact that PVC windows are more preferable from the point of view of heat-saving properties, a number of users, for various reasons, continue to use old wooden windows.
There are a number of explanations for this fact:
high cost of plastic windows (which may also require insulation);
environmental friendliness of wooden windows and their ability to maintain an optimal indoor microclimate through natural ventilation;
there is no desire to make repairs after replacing windows;
distrust of plastic structures;
accommodation in a hostel or rented apartment;
the need to insulate windows at work, in educational institutions, etc.
Despite all the advantages of wooden windows, they do not meet modern requirements for energy efficiency and heat conservation (with the exception of wooden windows with double-glazed windows). So the owner has to think about how to insulate wooden windows to prevent it from blowing.
Any insulation of old wooden windows involves plugging (sealing, putty) all cracks that could potentially be a source of heat loss.
Due to the fact that wooden windows have been in use for more than one century, and users have always been faced with a lack of tightness, they have invented a lot of ways to perform insulation and SЂРµРјРѕРЅС‚ старых РѕРєРѕРЅ. After all, heat loss through a window exceeds heat loss through a wall of the same area, which means it will be correct to find out how to insulate wooden windows for the winter.
https://youtube.com/watch?v=QspjHIt5Kg4
Where to start insulating windows
Work begins with finding out the location of the blowing. In the case of wooden windows, these include:
- slopes (external and internal), incl. beams to strengthen the opening;
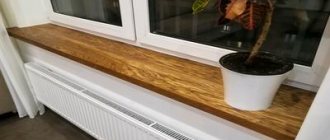
- ebbs and window sills;
- places where the sash joins the window frame;
- frame wood;
- glass.
How to insulate wooden windows for the winter with your own hands
To begin with, we note that all existing insulation methods can be divided into two directions - external and internal, which means that the technology for insulating wooden windows will be considered in two directions.
Insulation of window slopes from the outside
Thermal insulation of window slopes is a mandatory step, since insulation from the inside does not exclude the possibility of heat loss from the street. Polyurethane foam or rigid insulation is used as insulation.
Insulation of window slopes from the street
Insulation of windows with sealant (regular or tubular foam rubber)
Ordinary foam rubber is placed between the frame doors and closed. Foam rubber is distinguished by low price and availability. And also the possibility of reuse next season.
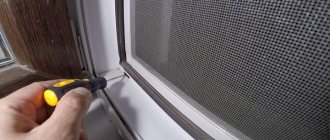
Insulation of wooden windows with foam tape
Tubular foam rubber is glued to the window frame from the inside using adhesive tape. The advantage of this method is the ability to use the window - open/close (for example, to ventilate the room). The seal holds securely on the sash and does not interfere with the operation of the window. In addition, it can be glued in several rows, which increases the tightness of the fit of the window sash to the frame.
A good option is self-adhesive window tape made of rubber, polyurethane or polyethylene foam, made in the form of tubes with an adhesive base.
Insulating old wooden windows with self-adhesive window tape
The choice of sealant depends on the temperature, quality of the material, and the size of the gaps. Learn more about window seals in the video
Basic methods of insulating window frames
There are various means for insulating windows, the distinctive characteristic of which is not only the price, but the following indicators:
- durability
; - fastening feature
; - ability to retain heat and withstand cold
.
Let's consider several different options, with a detailed description of each type of insulation. Detailed instructions will also be given on how to secure this or that type of material with your own hands. This will allow you to choose the best option for you.
Cotton wool and tape
There is a special tape for insulating windows, which is simply glued to the frame, covering the cracks.
If you can't buy it, you can use:
- regular tape;
- cotton wool
This method is quite economical. To implement it, you need to caulk the cracks with cotton wool, using a thin, sharp object with which you can tightly push the cotton wool, and seal it on top with ordinary tape.
As mentioned above, this is an economical method, but this is, in fact, the only positive characteristic.
There are also several negative aspects.
- fragility
- low aesthetics;
- poor efficiency, especially in severe frosts.
Based on foam rubber
The second most popular is foam rubber for insulating windows, the price of which is also not high, but it:
- easy to stick;
- quite effective;
- It is equally suitable for both wooden and plastic windows.
This adhesive-based material is relatively aesthetically pleasing and is guaranteed to last for one season.
Modern and airtight
Recently, insulating windows with silicone sealant has become increasingly popular.
It is especially effective if you have:
- wooden frames;
- large or even huge gaps in frames.
Silicone-based sealant is relatively inexpensive.
It must be applied exactly to the gap:
- between the frame and the box;
- between frame and glass;
- between the box and the wall.
The main, undoubted advantage of this material is its high tightness. It really protects from the wind, but there is a problem - if it is applied into the gap between the frame and the box, it will be extremely difficult to clean the surface of this material.
High quality putty
Another good sealant for insulating windows is window putty. This method of insulation was used a couple of decades ago. The putty is similar to hard, rigid plasticine, but if you squish it a little in your hands, it becomes more pliable, making it easy to apply into crevices.
Advice. With any option for insulating window frames, you must first wash their surface and let it dry. After the frames are completely dry, the surface is degreased. To do this, you need to wipe it with alcohol and let it dry again. This will subsequently allow the insulation to adhere to the surface and last as long as possible and effectively resist cold wind and frost.
The putty is applied as follows:
- Having softened it, apply it to the cracks;
- if they are too big, try pushing the putty inside a little;
- does not absorb and even repels moisture.
The only visible drawback is that it takes a relatively long time to apply the insulation.
Rubber based insulation
The modern method of insulation is a special rubberized insulation.
According to consumer reviews, this method:
- reliable;
- effective;
- durable.
Naturally, its price is slightly higher than other materials, but it is worth it.
Insulation is divided into several main categories, each of which has a specific letter index:
- category “E” - thickness from two to three and a half millimeters and is optimal for;
- category “D” is a denser material, the thickness of which ranges from three and a half to eight millimeters, and therefore it is ideal for wooden frames and boxes;
- category “P” - thickness reaches from three to five and a half millimeters, it is optimal for both wooden and plastic frames.
The material does not absorb moisture, and is also effective even in severe, severe frosts, when the air temperature drops to minus forty.
Innovative material
Today, film for window insulation is also quite in demand.
It is attached directly to the glass, which allows you to:
- let in light from the street;
- reflect infrared rays;
- keep the room warm.
You should be careful when installing it, and apply it directly to a clean surface with clean hands or gloves. The only thing that needs to be noted is that it allows you to retain the heat that “comes out” through the cold glass, but does not close the cracks.
No. 4. Plastic slopes, or PVC panels
Plastic panels allow you to complete the design of slopes literally in one day. There is no need to wait for the plaster or paint to dry. The main advantages, in addition to high speed of work, include:
- durability;
- hygiene. Plastic is easy to clean and does not grow mold;
- if the window frames are also plastic, then when the temperature changes, uniform expansion will occur, unnecessary stress will not be created, which means the slopes will last longer;
- aesthetic appearance.
By plastic panels we mean wall panels that have voids and stiffeners between the outer and inner layers of plastic. The thickness of the panels is about 1 cm, width - 25-37.5 cm, length - from 2.7 to 3 m. Such panels are softer than those equipped with an additional insulating layer (sandwich panels, more on them later), so attach them to slopes depths of more than 25 cm are not recommended - damage may occur. Under such panels it is recommended to use mineral wool or polyurethane foam as insulation. The joints must be covered with a decorative corner.
Most plastic panels are white. There are matte and glossy options. Matte products look nobler and calmer, and they don’t glare in the sun. You can find panels painted in other colors, as well as made to look like wood. Such options are appropriate if your frame is non-standard, i.e. not white.
The procedure for installing PVC panels is as follows:
- surface preparation, removal of excess polyurethane foam, cleaning of dust and dirt;
- treating slopes with a primer and antiseptic. When the surface has dried, you can proceed to the next steps;
- installation of an L-profile around the perimeter of the frame, the profile is fastened with self-tapping screws in increments of 20-25 cm;
- A wooden strip 10-12 cm wide and 10-12 mm thick is attached along the outer edge of the slope. Subsequently, a part of a special profile will be put on a wooden lath, the second part will be mounted on the panel, and then the two parts will be closed using a tongue-and-groove system. The joint between the panel and the slope can be closed with a corner mounted on self-tapping screws, but then their caps will be visible. Another option is installation with liquid nails;
- preparing panels of the required size;
- Mineral wool is attached to the wall using liquid nails, and the thickness of its layer near the frame will be maximum, and near the outer edge of the slope - minimum. Instead of mineral wool, polyurethane foam is often used, which is applied to the panel immediately before installing the panel, but this is a method for professionals, since it is very difficult to calculate the required amount of foam. Excess can disrupt the geometry of the panel, and the remaining foam is almost impossible to remove from the panel;
- in the corner between the side and top slope, a profile called the “internal corner” is fixed with liquid nails;
- the side slopes are snapped into the L‑profile; the profile can be attached to wooden slats with a stapler. Some experts even attach plastic panels to the cleaned surface of the slope using liquid nails;
- installation of the top panel in the grooves of the “internal corner” profiles;
- fixing a decorative corner;
- Now you can remove the protective film.
It is better not to decorate external slopes with plastic panels, since this material becomes too fragile at low temperatures, and in domestic conditions this means that everything will have to be redone the next season.
Winter is coming, we insulate the windows without extra effort
Before taking drastic action, let's look at the possible causes of drafts coming from windows. It would seem that wooden windows, due to their material, retain more heat, and plastic ones - a relatively new achievement of science and technology - are simply designed for heat and sound insulation. Then why can they allow a draft into our house?
- Unfortunately, poor-quality window installation is quite common. Sometimes installation company workers who call themselves professionals have a very superficial understanding of the installation of window units.
- The second reason may be partly related to the first - an attempt to save money on installing plastic windows. Companies often reduce the price by saving on insulation, foam, and the installation itself. Subsequently, low-quality windows are much more expensive due to the need to additionally insulate them.
- Even if cold air doesn't leak through the gaps, the windows themselves may be to blame, like the old "single-pane" windows that provide only a thin glass barrier between the house and the outdoors, but not cozy warmth.
- The skew of the window and the loose fit of the window frame to the wall also threaten heat loss. Sometimes this occurs due to deformation of the building, which especially often happens in old wooden houses.
Gaps in the wooden floor
Reasons for the problem
Wood is always about aesthetics, comfort, and ecology. The advantages of wood firmly hold it on the pedestal of leaders among materials for repair and construction work, as well as laying floors. But even such a strong and durable coating develops problems over time: cracks, squeaks, etc. The first thing any homeowner does in this case is determine the reason for their appearance.
The “culprits” may be different:
- The installation technology has not been maintained. Incorrect installation of boards, violation of the horizontal position of the joists, poor-quality fasteners can lead to “walking” of the flooring, its subsidence, loosening and, as a result, the appearance of gaps.
- Low room humidity. Dry indoor air causes wood to actively release its moisture and, as a result, a significant reduction in its own dimensions. Optimal conditions for wooden floors are humidity 40-65%, temperature 18-25°C.
- Quality of material. Wood that is not dried well in a vacuum chamber goes through a process of natural drying. If you lay raw lumber, a decrease in its volume is inevitable. Moreover, depending on the type of wood and humidity levels, ordinary boards can lose from 5 to 10% or more. Good, evenly dried boards have a relative humidity of 8-12%.
- Unsuitable wood varieties for a specific purpose. Each type of wood has its own structure, characteristic features, properties, but not everyone can become a floorboard. When choosing floorboards made of pear, beech, maple, ash, or cherry, be prepared not only for a beautiful appearance, but also for upcoming repairs. But tropical or coniferous trees, oak, are a reliable covering.
- Rodent pests. If there are mice or rats in the house, they will not sit quietly in one place. Small rodents will constantly multiply, expand their area of residence, move forward in search of food, and wooden floors will not become an obstacle for them. Therefore, before you start repairing the floors, you need to get rid of uninvited “guests”.
- Incorrect ventilation. Properly organized ventilation is one of the guarantees of long service life of the floor. Violation of proper air exchange in the underground space creates all the conditions for the appearance of fungus and rot. From above, the appearance of the boards can be very attractive, despite the complete destruction of the lower and middle parts.
- Active use of the coating and high loads on it. In this case, most likely, a creak will appear first, the localization of which must be established. After all, baseboards, joists, and boards can make unpleasant sounds. Later, cracks and cracks appear.
Before starting repair work, it is necessary to clarify some points:
- The source of the defect and the area of its spread.
- For what reason did the gap appear?
- Scope of proposed work.
- Labor costs.
- The time it takes to fix the problem.
- The amount that will be invested in repairs.
Types of wood floor repairs
There are three ways to troubleshoot problems:
Cosmetic. The work is carried out on the floor surface - we remove defects in various ways.
- Partial. It is done in separate areas in the presence of wide cracks. Several floorboards are removed and new ones are installed in their place with a precise fit. Usually this method is combined with the previous one.
- Full (global replacement). This method involves removing all floor boards on the assumption that some of the joists are damaged. To remove the boards you will need a nail puller, a hammer, and a crowbar. Completely unusable boards are removed to be replaced with new ones; undamaged boards undergo additional processing to become operational again. After preparation, a new dense laying of the floorboards on the joists is carried out. It may be more expedient to “go through the floors” than to repair them.
Features of sealing window seams
The need to insulate windows is always determined by climatic and weather factors, and sometimes by insufficient sound insulation of window structures. People living in an apartment with such windows suffer from drafts, cold and even dampness (since condensation can accumulate on the inner surface of the double-glazed windows and mold can form). High-quality sealing of seams provides effective protection of the room from these unpleasant phenomena.
Disadvantages of this kind can be caused by several reasons. Firstly, the problem is caused by incorrect installation of window frames. Not all installation specialists strictly adhere to the technology of working with polyurethane foam, using this composition without any additional protection. Secondly, the double-glazed windows themselves may not be of the best quality. In addition, loss of tightness is sometimes a natural process - “age-related” wear and tear of natural materials (wood).
In addition to maintaining heat and protecting from weather conditions, high-quality sealing of window seams allows you to correctly distribute mechanical loads and provide the necessary resistance to wind.
The main material used for insulating window frames is polyurethane foam. Its functional characteristics are quite sufficient for high-quality thermal and sound insulation of windows. But over time, the sealing composition is subject to partial destruction, as well as changes in volume under the influence of temperature fluctuations. These processes lead to a number of problems, including a violation of the window seal, incorrect operation of locking mechanisms, and even damage to the layer of plaster located in close proximity to the structure.
How to remove gaps between the wall and frame
If during installation the master did not apply a layer of protection to the foamed areas, then over time the foam will collapse and gaps will inevitably appear. A gap between a wall and a window, a window and a window sill is a fairly common occurrence in such cases.
To eliminate them you will need:
- Narrow spatula;
- Long screwdriver;
- Mounting gun for sealant;
- Rags or an ordinary rag;
- Newspaper or plastic film;
- Gloves.
Materials you will need:
- White Spirit;
- Polyurethane foam;
- The acrylic sealant is frost-resistant; in addition, rubber-bitumen or polymer roofing sealant can be used.
Important! Never use silicone sealant. Under the influence of temperatures, it rolls down and becomes unusable, thereby exposing foamed cracks
Having acquired everything we need, we get to work. We start with preparation, namely, eliminating the old foam. To do this we do the following:
We unscrew two or three screws at low tide, if any. We begin to clean the gutter and substitution profile. We take a screwdriver and pry out the old brown foam. It crumbles quite easily, and the remains are blown out. Using the same screwdriver, we clean out the foam in the joints of the walls and the window profile. To be on the safe side, use a brush to remove any remaining residue.
Important! At this step, you will need another person for backup so that you do not accidentally fall out of the window. Having completed the preparation, we proceed directly to sealing the cracks.
To do this you need to do the following:
Having completed the preparation, we proceed directly to sealing the cracks. To do this you need to do the following:
We take a balloon with foam and blow it into all the joints and cracks. To process narrow, inaccessible crevices, the spout of the feed tube can be flattened.
Without waiting for the foam to dry completely, we record the low tide. We leave the foam to dry for 20 four hours. Using a regular stationery knife, cut off excess foam.
We take a bottle of sealant and cut off its spout at an angle to make it more ergonomic to fill seams at different angles. Slowly squeezing out the sealant, apply it over the foam;
Important! At this step, you will need another person for backup so that you do not accidentally fall out of the window. Remove excess sealant on the spout using a rag soaked in white spirit.
This rag can also be used to remove remaining sealant from the frame.
Using a narrow spatula, level the sealant flush from the window towards the street and leave to dry. Once the sealant has dried, paint it with regular oil paint to protect it from external influences.
Increased attention should be paid to the area under low tide. This is a more awkward place, so some skill will be required
But if everything is done correctly, the gap between the window sill and the window will be eliminated once and for all.
Preparation
Window insulation, no matter how trivial it may sound, begins with washing them. Clean glass has a low level of transparency to infrared radiation. If it is dirty, this parameter increases. Therefore, in order to keep the room warm, it is necessary to thoroughly wash the windows before the onset of cold weather.
Insulation will be more effective if the frames and glass are thoroughly washed
For washing, it is recommended to use products that contain ammonia. It has two important properties:
- Removes grease stains.
- Does not leave streaks.
The glass and window sill, as well as the frame, should be washed, since it is on it that the putty will be applied and the seals will be glued. If you do this on dirt, the insulation will quickly fall off and you will have to do everything again.
External insulation technology involves the following procedure:
- First you need to take care of the slopes. Remains of putty, foam, paint and other materials must be removed from them. Then fill the window cracks with foam. Trim off the excess, install a mesh on the slope and apply plaster. Finally prime and paint. Work can only be carried out at positive temperatures.
- If the frames are wooden, it is necessary to eliminate the gaps between the window sashes, as well as on all wooden elements. To do this, they need to be painted or varnished.
After the insulation work has been carried out from the outside, you can begin work from the inside of the room. The workflow may differ depending on what material the window is made of (wood or plastic).
Window slopes
Category: Tips Published 05/25/2010 · Comments: · Reading time: 3 min · Views: Post Views: 1,547
The reason for writing this article was the questions that people I knew repeatedly approached me with, and my own observations of how craftsmen seal slopes after installing plastic windows.
How to properly and efficiently finish the external and internal window slopes is the topic of this article. The article will be useful to those who independently install a plastic window, and to those who will accept work from specialists who carry out orders for window finishing. Analysis of publications and conversations with specialists from the company installing plastic windows made it possible to identify a number of questions that first need to be answered.
1. Do external slopes need to be sealed? The gaps between the walls of the opening and the frame are foamed. Uncovered foam is quickly destroyed by ultraviolet radiation. It is capable of absorbing moisture, which leads to a significant decrease in the thermal insulation properties of the material. 2. Is it possible to seal the foam with silicone sealant in this case? Silicone sealant will prevent moisture from penetrating into the pores of the foam only at first. After some time, under the influence of external natural factors, the sealant will begin to peel off, allowing moisture to enter. 3. How justified is the use of polyurethane self-expanding sealing tape for sealing a seam? Firstly, you need to know that this material is not cheap, and secondly, sealing tape is used if the seam width is up to 15 mm. In this case, the distance between the frame and the opening should be the same along the entire perimeter, which is extremely rare. 4. PVC panels are often used when finishing external slopes. How justified is this method in our climatic conditions? PVC panels are primarily designed for indoor use, and that says it all. 5. What then is advisable to use for sealing external slopes? The slopes must be plastered with frost- and moisture-resistant glue, which is used for laying tiles in bathrooms. The glue adheres firmly to the surface and does not shrink when dry. 6. Is it possible to plaster the internal slopes in this case? When plastering internal slopes, two significant problems may subsequently arise. Firstly, plaster has low thermal insulation properties. During the cold season, condensation will appear on the slope and frame. Secondly, cracks will appear at the junction of the frame and plaster due to the different expansion coefficients of the materials. This method of finishing slopes requires a significant investment of time. 7. Which method is the most optimal for finishing internal slopes? The fastest and most inexpensive method is to use PVC honeycomb wall panels. The panel is glued to the slope using mounting foam, which not only acts as glue, but also provides additional thermal insulation. True, this method has two drawbacks: it is almost impossible to select windows and panels that match in color, and in the light the stiffening ribs are visible through the thin walls. This, you see, does not decorate the plastic slopes. 8. Sandwich panels are now available for sale in construction stores. Is their use justified for finishing internal slopes? Sandwich panels are a very easy-to-use material. This panel consists of two layers of plastic separated by a layer of polystyrene. When installing such panels, insulation of slopes is not required. You need to know that sandwich panels delaminate under the influence of moisture. Foamed PVC panels do not have this drawback. To finish the internal slope, it is enough to use a slab with a thickness of 3-4 mm. Such plates are available in a very wide range of colors. Their only drawback is that they leave dents after being hit by a hard object. 9. How can I seal narrow gaps at the junction of the frame and panels? The best way is to use PVC glue (also called liquid plastic). By evenly squeezing the glue from the tip in a narrow strip along the gap, you can make the joint invisible. The glue, partially dissolving the plastic, adheres firmly to the surface.
Post Views: 1,547 Tags: windows, slopes, panels
Sealing cords
Along with foam tape, various cord seals are used to seal the frame.
- Clothes cord is the simplest and most budget option. Using small nails or pushpins, it is fixed to the surface of the frame, closing small cracks and increasing the tightness of the sashes when closing the window.
- Plastic seals are a more modern and durable method of sealing. The cords have different shapes, which ensures their versatility for combating cracks and cracks of various sizes. For wooden windows, D-shaped and E-shaped seals are more suitable, designed for large and relatively small defects, respectively.
- Tubular rubber seals are relatively cheap and easy to use. In most cases, the cords have a self-adhesive base, but for greater reliability they require additional installation with glue or silicone sealant. The disadvantage of rubber seals is their shorter service life compared, for example, with PVC analogues. After 2-3 seasons, the rubber will dry out and begin to crumble.
No. 2. Insulation of windows with paper
The most ancient, simple and inexpensive way. Today it is rarely used, but it is suitable if the budget is very limited. There are several variations of this insulation method:
- newspapers, wallpaper, paper are torn into pieces, twisted into ropes, which clog the cracks between the sash and the window; to simplify the task, use a ruler, knife, screwdriver or other sharp tools. Some people advise pre-wetting the flagella in water;
- paper waste is shredded, soaked in water and wrung out. To the resulting mass add 1 part clay or 2 parts crushed chalk. The result is a plastic putty that penetrates well even into the smallest cracks.
The classic old-fashioned recipe involves sealing paper insulation with strips of fabric or paper. In order for them to stick well, they were moistened with a solution of laundry soap or a homemade paste was used. The latter can be obtained by mixing water and flour in equal proportions, stirring well and bringing the resulting mixture to a boil.
A more modern option is to use masking tape or special window tape. In this case, the task is simplified, but costs still remain. Windows insulated with paper cannot be opened for ventilation if it suddenly gets warmer in the middle of winter. In the spring you will have to remove the strips of paper/fabric/adhesive tape and take out the insulation. Visible marks remain on the window frames, sometimes even some of the paint is removed, so, unfortunately, you cannot do without updating the decorative coating. However, fabric and self-adhesive paper are the easiest to remove and leave minimal marks.
What else can be used for insulation?
Other materials can be used to insulate wooden windows. For example, to eliminate gaps between the frame and the sash, use:
- cotton wool twisted into bundles;
- foam strips;
- strand of fabric.
This window insulation is called the “grandmother’s” method. This is exactly what they did (and continue to do) when plastic windows had not yet been heard of. These materials are twisted into a tight bundle and, using a screwdriver or table knife, pushed into the cracks. In this regard, it is more convenient to work with foam rubber - it is pushed into any cavity.
The old method is not so elegant, but effective
Then, to completely block the access to air, a strip of paper or fabric is glued on top. Paper or cloth can be soaked in paste (dilute 1 tablespoon of flour or starch in 2 tablespoons of cold water, add a little boiling water, put on low heat, cook, stirring until transparent). The paste can be replaced with soaked laundry or cosmetic soap. You can simply put a bar of soap in warm water, rub a cloth or paper over the soaked part and stick it on the frame. After drying, the paper and fabric become much denser and almost do not allow air to pass through.
If “grandmother’s” method of insulation does not please you, you can use construction (paper) tape or paper for sealing windows with adhesive applied on one side. It turns out the same thing, but a little more expensive. But there's less fuss. But construction tape sometimes comes off poorly - with pieces of paint. But the “grandmother’s” method can be removed without problems and even paint that doesn’t adhere too well remains in place.
Insulation of windows from outside
Sometimes the glass is “set” on silicone, all the cracks are sealed, and there is a breeze from the window. This means that the insulation used to fill the gap between the wall and the window frame has become unusable. To do everything thoroughly, you need to get to the insulation and change it. This is long and difficult, as the frame can be broken in the process. It is faster and easier to use polyurethane foam. Foam, again, is better to take with weak expansion. It can be found, although it is rare. Walk and purposefully look for the balloon where it says - weak expansion. Those that are usually sold can squeeze out/distort the frame. This will not help, but will only worsen the situation.
By examining the perimeter of the frame, you can find holes. Most often, a significant gap is found under the ebb. They can be on the sides and on top, but usually there are either slopes or they are plastered. If it is clear that the plaster has fallen off or there are obvious voids under the slopes, it will be necessary to somehow provide access. It’s difficult to suggest exactly how – you have to decide locally.
If the seal under the window sill has become unusable, it is better to fill the void with polyurethane foam
Once you have access to the cavity, proceed as follows. Clean everything possible, remove everything that falls off and crumbles. Using a spray bottle, moisten the cavity with water. Carefully blow in layers of foam. If the hole is too large, do not apply too much foam at once. It is better to apply it in layers, waiting for each layer to polymerize.
When filling, do not overdo it - polyurethane foam with weak expansion should fill the void no more than 2/3 (with normal or strong expansion, several times less). Leave until polymerization (time indicated on the bottle). After the polyurethane foam has become rigid, we cut off the excess and apply paint to achieve a tight seal. Such insulation of wooden windows will allow you to avoid drafts for a long time and retain heat.
Insulation of window sill, drainage and slopes
If there are no cracks in the frame, and heat still escapes from the room, the problem may be the presence of cold bridges in the space under the window sill or inside the slopes. In this case, repair and insulation of wooden windows will be required at the same time.
Polyurethane foam
Universal insulation for windows - polyurethane foam. It can be used to seal cracks and install slopes .
To prevent heat loss from under the window sill, it is necessary to clean out from the space under it old fallen plaster, crumbling foam, caked cotton wool or other type of insulation that has become unusable. Then install the foam can into the gun and blow insulation into the gap. It is important to remember that the composition expands several times. Excess foam can be easily cut off with a knife after drying.
To seal large cracks under the window sill, it is better to use polyurethane foam.
Foam is also blown into the seam between the frame and the wall and along the edges of the slope, then any insulation is laid and a slope made of plasterboard, plastic or sandwich board is installed. Temporarily it must be fixed to the wall with masking tape. All joints must be coated with sealant.
Polyethylene film
Insulation of windows in a wooden house can be done using other methods. A new and not yet sufficiently proven method is to seal the window opening with completely transparent plastic film. The method is not entirely aesthetic, since gluing the film absolutely evenly is difficult. It can only be partially leveled with a hairdryer. But, judging by the reviews, the method allows you to reduce the heat loss of the window to the level of a blank wall, which is much more effective than sealing or sealing the cracks.
Sealing a window opening with film significantly reduces heat loss, although it does not look entirely aesthetically pleasing.
The film is fixed in different ways:
- Double-sided tape;
- Furniture stapler;
- Masking tape.
This type of cold protection is easy to install and dismantle. The same film can be used repeatedly.
Since there are different ways to insulate old wooden windows for the winter, it is best to use several at once to eliminate not only the obvious problems, but also those that may arise in cold weather.
It is recommended to do the insulation of windows yourself in the summer or autumn, because many types of work cannot be performed in the winter season.
Self-adhesive foam for windows
A more technologically advanced way to seal windows and combat drafts. This method is good because it allows you to do without sealing the cracks with paper or fabric strips. Due to the presence of adhesive (adhesive) tape on the foam rubber insulation, it can be glued to the inside of the window sashes.
Approximate cost: 60-75 rubles/roll.
Pros: the window can be used as usual.
Disadvantages: after gluing, the insulation can prevent the window from closing; foam rubber insulation is non-hygroscopic and is not protected in any way. If the sashes fit tightly to the frame, you need to either saw down (cut, adjust) part of the wood, or choose other methods of insulation. If the gaps are large, you will have to decide what can be used to seal wooden windows besides this material.
Paper tape or fabric strip
The fastest way to eliminate a draft. You can’t count on significant insulation, but the work can be done quickly and at minimal cost.
Approximate price : 100-130 rubles/roll, strips of fabric (used material).
Advantages : cheap, high speed;
Disadvantages : minimal efficiency, tape peeling off in a draft.
How to seal windows with soap and paper (toilet) - video
Types of slope finishing
- Plastering window slopes is considered a classic option in houses made of brick and concrete. After covering with a high-quality plaster solution in several layers, the surface can be painted or wallpapered. The labor-intensive process takes more than one day of work by a professional plasterer. It will take 5-6 hours for one layer to dry. The shortcomings of plaster are revealed over time. Due to temperature changes, a crack appears at the point of contact between the plastic of the window and the mortar, which then needs to be filled with sealant to prevent a draft. A professionally made slope will last for decades, but only a master will do it for the appropriate fee.
- It is much easier to install slopes made of plasterboard, but this material has a significant drawback: it becomes damp at the slightest humidity. In the off-season, during the rainy season, the slope runs the risk of becoming cracked and warped when swelling. Although the use of moisture-proof KNAUF sheets will solve this problem. The method of attaching sheets to walls does not differ from more modern plastic slopes, but to seal the junctions with the window body and the general surface of the wall, the builder will have to be creative due to the lack of standard corners - flashings.
- Plastic slopes appeared along with the technology of plastic windows. Panels are made from PVC to cover any surface. Eco-friendly plastic does not emit harmful substances, does not burn, does not absorb moisture and is easy to clean with water and household chemicals. It can have any plasticity depending on the fillers. Plastic slopes for windows are made lightweight using cellular technology. Plastic paints well, so there are a huge number of coloring options and imitations for different materials on sale. Corrugated panels are available.
Plastic slope diagram
Read with this
- How to properly insulate the slopes of plastic windows with your own hands
- Do-it-yourself insulation of plastic windows for the winter inside and outside
- Do-it-yourself installation of a plastic window sill
- Restoring the handle of a plastic window
- Dormer window on the roof
- Wooden window frames
- What should be the optimal window height?
- Insulation of wooden windows
- Foam tape for window insulation
- What to do if it's blowing from a plastic window
Recommendations for selection
How to choose a sealant for wooden windows? This question is faced when there is a need to repair or seal wooden window structures. It is necessary to pay attention to the characteristics of the material. He must:
- do not enter into a chemical reaction with the materials to which it will be applied;
- have elasticity and strength;
- be durable;
- resist exposure to direct sunlight;
- adheres well to treated surfaces.
It is important to determine the location of the seam. If it is located on the outside, it is better to pay attention to silicone or acrylic sealant for wooden windows. Before application, the surface must be treated with antifungal agents.
When choosing a sealant, pay attention to the color of the window structures. It is better to treat colored structures with transparent compounds. Then the seam is covered with paint of the desired shade.
When using sealant, you need to take the weather into account. Some materials require special conditions.
Insulation with heat-saving film
The method is innovative and consists of gluing a special double-sided film onto double-glazed windows. It lets light into the room, but does not emit radiation. One side of the film is transparent, it should be located from the inside of the room. The shiny side should be adjacent to the glass.
You can only handle the film with clean hands, preferably with gloves. The presence of greasy stains on its surface is unacceptable.
It is necessary to cut the sheets with a margin for the convenience of attaching them to the window structure. Proper gluing of the film keeps the window design neat and aesthetically pleasing. In order for the film to adhere tightly and evenly to the glass, you need to treat it with hot air with a hairdryer.