How to reuse the cylinder?
There are two types of cylinders, depending on which instrument they are connected to. This changes the way the foam container is reused.
If the cylinder is connected to a mounting gun, it is necessary to clean the tool in advance of any contamination from previous uses. To do this, the tip is cleaned with foam cleaners. After this, you can connect the container for further use.
If the container is connected to a plastic tube with a trigger, it is best to buy a new device. If this is not possible, it is necessary to cut off the part of the tube inside which the foam has frozen.
Reusing a can without a gun
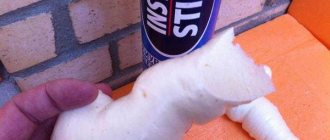
The possibility of reusing the cylinder cannot be ruled out. To do this, you need to carefully bend the tube and then secure the bend using tape or tape. To maintain pressure in the tube, press the valve.
If more than 5 months have passed since the first use of the cylinder, you cannot do without using acetone. Once the tube is removed from the valve, it should be thoroughly rinsed with acetone. It would also be a good idea to flush the valve with the same acetone. It is recommended to perform this simple procedure 2-3 times.
Rules for using polyurethane foam
There are a number of rules that must be followed when working with adhesive foam:
- Before using the adhesive, the tube must be warmed up. To do this, the container is placed in a bucket of warm water, the temperature of which should not exceed 40 degrees.
- After heating, the container needs to be shaken several times.
- Attach the cylinder to the tube or mounting gun.
- The surfaces on which the adhesive mass will be applied must be cleaned of dust, dirt, and moistened with a small amount of water.
The process of complete hardening of the foam lasts up to 12 hours. Its duration is affected by temperature and humidity levels in the premises.
Advice! There is a way to speed up the hardening process of the adhesive. To do this, after applying it, you need to spray water on the surface of the foam. After complete drying, the excess is cut off using a sharp stationery knife.
The foam container has dried up. How to open a container with foam frozen in the outlet valve
In one of the previous articles, I talked about how to preserve a container of household polyurethane foam in order to reuse it. For those who haven't read it, I recommend taking a look. Today I’ll tell you what to do if construction foam has frozen in the tube
and the cylinder valve.
Let's imagine this situation: you remembered what was left over from a previous renovation of an apartment or house.
half-used bottle when it was necessary to “seal up” an unexpectedly discovered gap.
Searches in the corners of the bathroom or closet were crowned with success: the required cylinder was found, but the polyurethane foam had dried in the plastic tube
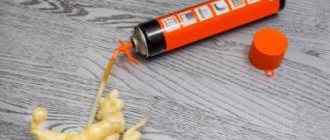
. What to do? You shouldn’t press the adapter with all your might: in the best case, you’ll break off the finger stops, in the worst case, you’ll damage the valve and end up with polyurethane sealant residue on your clothes and, possibly, the entire room. Also, do not heat the cylinder with hot water or on a gas stove - it may turn out even worse than in the photo at the beginning of the article.
We will act technically and carefully. Firstly: let's prepare a garbage bag, just in case there is a fireman. Secondly: let's wear gloves. It is better to put aside the Versace suit and wear a simple T-shirt and sweatpants. Third: prepare acetone (a solvent will also work). Let's consider possible situations, in increasing complexity, the scale of the tragedy, so to speak.
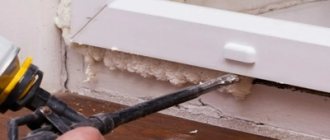
If the polyurethane foam has frozen in the supply tube
First of all, we will try to remove the adapter tube by unscrewing it along the thread of the plastic fitting; you should slightly pull the tube upward, towards you. If it doesn’t work out, then don’t be overzealous; if you rip off the valve, foam will splash everything within a meter radius. For this case, we prepared a garbage bag. But let's not be pessimists, in 99% of cases the adapter separates without difficulty.
The removed tube needs to be cleaned with a knitting needle (bicycle, moped, knitting needle) or a piece of wire. Polyurethane sealant does not stick to plastic, so there are no special difficulties. Then we inspect the nozzle of the bottle's release valve. If there is thickened but not frozen foam in the fitting, then clean it with improvised means (a match, a piece of rag, etc.) and then rinse with acetone. The cylinder is ready for use.
Polyurethane foam has dried in the outlet valve
bottle
If the cylinder valve is clogged with hardened foam
, do not try to clean it with a match or knitting needle - the situation will only worsen. You will need a self-tapping screw with a length of 35 mm, a diameter of 4 mm with a large thread and pliers. Carefully screw in the screw two or three turns so as not to pierce the valve through. Using pliers we pull out the self-tapping screw, and the frozen foam comes out with it. Now the balloon can be used.
Sometimes the sealant hardens in the valve from the inside of the cylinder. I’ll tell you why this happens and what to do in this case in the next article: “A radical way to revive an old balloon with amateur foam.”
- How should you use polyurethane foam to achieve the best results?
- At what temperature range can foam be used?
- What is the working position for applying foam and why is it necessary to shake the can beforehand?
- Is it possible to reuse the cylinder?
- Is it necessary to moisten the surface before (and after) applying foam?
- Are stops required when installing windows/doors?
- How can I remove cured/uncured foam?
- Why can foam flow off the surface?
- How long does the foam take to dry?
- Why should cured foam be protected from sunlight?
- How much finished foam can you get from one cylinder?
- What is the difference between one- and two-component formulations, what are the pros and cons of each type?
- How justified is the use of a mounting gun? How to clean it?
- How can the shelf life of the cylinder affect the yield of the product? What is the maximum shelf life of the foam?
- What is the difference between winter foam and summer foam? Why should you use winter foam in winter?
- Can foam be used to glue insulation?
To find out what to do if the foam does not come out of the container, you need to find out the reasons in advance. There may be several reasons.
Hardened foam residue in the valve stem can block the system.
This is usually caused by the cylinder being stored or transported horizontally. The chemicals in the cylinder combined with moisture that entered through the release valve and sealed it. Gently tapping the valve may help in this case as this may break the adhesive plug around the valve. Depending on storage conditions in warehouses (i.e. high relative humidity), moisture may penetrate into the cylinder over time. Due to the fact that humidity affects the contents in the cylinder: a ring of frozen foam forms at the bottom of the stem, between the black rubber valve plug, which works like a spring, and the stem. If the foam ring is still small and elastic, the valve can be activated by deflecting the stem. If the rod cannot be deflected or cannot be pressed vertically, it is better to return the cylinder to the store and replace it.
The reason may also be that all the gas has escaped due to a defective valve.
The valves used for the production of aerosols are mass products, and it is not possible to test each individually. At high temperatures, the black rubber stopper becomes elastic and easily allows not only moisture to pass through (see above), but also gas from inside the cylinder. As a result, foam cannot be used (there is no pressure to release the foam from the container).
Q: Poor/slow/little foam comes out of the container.
A: It is necessary that the foam container be kept at a temperature above +15° C for about a day before use (or at +25° C for at least 3-4 hours). The optimal temperature of the container for maximum foam yield is considered to be 23° C. Before use, any container with polyurethane foam must be shaken well for 30 seconds. If the cylinder is stored at subzero temperatures, due to an increase in the viscosity of the product, it may remain on the walls of the cylinder, and if stored sideways or upside down, the valve may stick.
Q: I heated a can of foam in a bucket of warm water and the foam started to come out well, but then again it started to come out poorly/slowly/little.
A: A bucket of water is good if the water is not very hot. Apparently, the product near the walls of the container warmed up and began to “squish”, but the bulk of the product remained in a thick state and clogged the valve upon exiting. The issue can be resolved by alternating for 15-20 minutes: shaking the bottle well and warming it up in warm water.
Q: I kept a can of foam for an hour in front of the heater, it is already hot, but the foam still comes out poorly/slowly/little.
A: It’s good that it didn’t explode, because it says: Store at a temperature of +5:+30 °C in an upright position. Do not heat over open fire, heaters, burners, etc. to temperatures above +50 °C due to the risk of explosion. Pressurized cylinder! And the foam may not come out well due to the fact that: the valve is “stuck” - part of the thick product has clogged the passages on the valve. It is recommended to release a very small part of the gas in a vertical position with the valve up; if the gas has penetrated the passages of the valve, then shake the container well and continue working. In a cylinder, when overheated, the aging process of the product is accelerated and local clots can form, which in turn lead to sticking of the valve. Perhaps due to the increase in pressure, as a result of overheating of the cylinder, a significant part of the displacing and/or dissolving gas was lost. Sometimes the holes in the valve are not symmetrically located, which makes it possible to more accurately regulate the rate of foam release through the valve. Rotate the adapter relative to the valve axis a few degrees.
Q: Why do “heavy” foam cylinders “squish” worse than “light” ones?
A: “Heavy” cylinders contain much more product, so it should be taken into account that there is less free space inside the cylinder. A good example is a liter water bottle. Fill up 1/3 of water and shake, or add more than half of water and compare the sensations. And if you replace the water with condensed milk, the process becomes even more clear. To obtain a good result, “heavy” cylinders should be given more time when shaking.
Q: I’m blowing foam into the gap between the front door jamb (window frame) and the wall. The foam grows poorly, does not hold well, and there is a lot of foam consumption.
A: It is necessary to clean the surface from dust, snow, ice, and frost. Insert pieces of foam plastic into the gap, moisten the surfaces and fix (blow out) them with foam on the inside of the door (window). This operation will avoid drafts, which most likely blew foam out of the crack, and will create more favorable conditions for the use of polyurethane foam.
Q: Why does foam crack?
A: Typically, summer foam options crack at low temperatures. However, it should be well remembered that at subzero temperatures, freshly blown foam may even “shrink” (as if drawn in) in the initial period. The expansion rate is low and the foam expansion process will take a long time. Therefore, at subzero temperatures, growing foam goes through a so-called period of fragility, from 4 to 6 hours, when any mechanical impact causes cracking of the foam shell and loss of all its qualities. In the future, it may simply crumble.
Q: Why does foam rise poorly?
A: At negative temperatures, air humidity is reduced, the course of chemical reactions is slowed down, the viscosity of the product is increased and the pressure in the foam cells is reduced. These factors lead to a decrease in foam volume and an increase in foam curing time. In winter, it is recommended to adhere to the following rules for using polyurethane foam:
1. Keep the bottle in a warm place until the bottle temperature is at least +5°C. 2. In the room where it will be used, it is necessary to turn off the heat gun in advance or place an open container of water on the heater. 3. Prepare the surface well (clean off dust, snow, ice, frost). 4. It is recommended to close cracks more than 5 cm thick from the street side with polystyrene foam, cardboard or other similar material. 5. Moisten the surface, avoiding the accumulation of water, the formation of ice or frost. 6. Shake the foam container thoroughly. 7. Blow out foam in the required amount (1/3 of the slot for the adapter version and 2/3 for the gun version). 8. Moisten the foam, avoiding the accumulation of water or the formation of ice or frost. 9. After no less than 24 hours, cut off the foam and be sure to protect it with sealant, plaster or paint.
It should be remembered that mediocre foams have rather low dimensional stability, and this leads to cracking of the plaster. Is saving a few rubles worth the possible complications? After all, when buying polyurethane foam, we pay for its unique properties, and not for the cylinder or the speed at which the foam comes out of it. It is important what kind of foam is obtained as a result. No matter how good the foam is, it still needs to be protected, since polyurethane foam is a very hygroscopic material and tends to condense moisture from the surrounding space. In the cold, water freezes and expands when it freezes (these are the properties of ice). When expanding, the foam cells are destroyed. Foam with destroyed cells loses its consumer qualities and simply begins to crumble. Therefore, high-quality foam protection is a reliable guarantee of its long-term service, and proper use will allow you to achieve the best results, even in the most difficult conditions.
In our catalog you can find a wide range at competitive prices. To obtain detailed information about products, you need to contact our managers by phone numbers listed in the “” section.
Gray Pots
13-11-2009 19:46
The valve on the foam canister for the pistol has dried out (hardened). It’s still full, but there’s nowhere to completely drain it yet (this is when a balloon is applied to a nail and a stream of foam is directed from a broken hole into a large cavity) - maybe there’s a way to revive it (the valve)?
makarkharp
13-11-2009 20:04
there is probably no way to revive... It’s better to shoot the balloon with a shotgun - it will scatter beautifully
P-Alex
13-11-2009 20:17
into the fire with the valve down... pressure will be created and then the plastic will melt... carry it out in a deserted place - with foam it should be very interesting
Spinning player34
13-11-2009 21:01
You can throw it from the roof of a multi-story building, it should also be interesting...
vallenok
13-11-2009 21:27
You can try soaking it in “foam cleaner.” It’s not a fact that it will help, but there is a chance. A bottle of this same “krass” cleaner has already revived two pistols for me that seemed to have dried to death. one of them “painted” the roof, both left doors, the left front door and half of the hood on a new car. Not counting spoilers and glass.
So put the can of foam and be sure to put the valve down. Someone will say “thank you” to you...
kaka
14-11-2009 12:14
So here I am from the outlet tube of the valve and the one that fits on it, with suitable hooks (don’t believe that the foam sticks to everything “you can’t tear it off”). It is removed from these tubes at once (at least that’s how it was for me). And after that I reused the canister. True, it was impossible to reuse more than that. But it’s better to try to use it all at once. PSBut these recommendations are not for pistol cylinders, for hand-held ones.
alchemist
14-11-2009 12:17
Damn Uncle Misha bent))) the foam doesn’t wash off))))
Pers
14-11-2009 12:22
So here I am from the outlet tube of the valve and the one that fits on it, with suitable hooks (don’t believe that the foam sticks to everything “you can’t tear it off”) PS But these recommendations are not for pistol cylinders, for hand-held ones.
I also think that it’s worth trying to pick at the valve with something similar to a thin hook, and then try to push it through.
And for the future, don’t unscrew the half-full cylinder from the gun. Another time he will “give foam” without any problems.
Father Mikhail
14-11-2009 12:26
Damn Uncle Misha bent))) the foam doesn’t wash off))))
It cannot be washed off the paint surface of the car.
We checked. alchemist
14-11-2009 12:54
Father Mikhail
14-11-2009 12:58
quote: Originally posted by alchemist: what?
The 76 doesn't take gasoline. Kerosene and white spirit are not accepted. Anything else will ruin the paintwork.
alchemist
14-11-2009 01:07
What about foam remover and repolishing with abrasive polish? isn't it cheaper? or helmet and fuck?
Father Mikhail
14-11-2009 01:47
quote: Originally posted by alchemist: what about foam remover and repolishing with abrasive polish? isn't it cheaper? or helmet and fuck?
kaka
14-11-2009 02:42
It cannot be washed off the paint surface of the car.
But religion does not allow you to polish your car with different waxes.
That's what would fly off him. P-Alex
14-11-2009 04:41
quote: Originally posted by P-Alex: spend in a deserted place
quote: Originally posted by Father Mikhail: His new Nissan Patrol, which was standing at the gate, ended up in the missile’s strike zone….
I edited the post with a specialist, I thought that they wouldn’t find fault
Yep
14-11-2009 11:00
quote: Originally posted by Father Mikhail: And the funny thing is that this foam cannot be washed off with anything. Just repainted...
and the author can help...
alchemist
14-11-2009 12:07
quote: Originally posted by Father Mikhail:
Try getting your car dirty with foam. And then wash it with remover. And when it dries, it’s a total disaster. CASCO is a good thing, but factory is factory.
Did you think before you spoke? I drove through swamps through trees on our wedge, a couple of abrasions won’t make any difference to the weather. Even Otsyton famously spoils paintwork, but polishing can solve the problem. In the end, you have to pay for stupidity. I just suggested an option. You can try evil but gentle solvents, DMSO... or DMF - these should wash everything away. And leave the enamel)))
Father Mikhail
14-11-2009 13:36
quote: Originally posted by Yep: there is a special liquid for removing foam - it removes it completely. I haven’t tried car paint with it though. and the author can help...
It won't help anymore. The car was sold in the condition in which it was hit by a missile. All experiments with washing and polishing did not lead to anything. Now there are no canisters at all on the site (when the owner says canister, Quincke’s edema begins and his navel peels off from allergies) and there’s another car at the gate
P-Alex
14-11-2009 13:40
the blade of a safety razor removes all soft dirt from a hard, smooth painted surface... just a matter of time
Yep
14-11-2009 13:41
It’s also good to fill the exhaust pipe with foam...
TAURUS
14-11-2009 15:37
in the sun the foam itself will disintegrate into dust... a matter of time....
biathlon
14-11-2009 16:57
quote: Originally posted by kaka: Well, I don’t know. When there was money... in general, the toad was strangling. The foam there hardens after the valve, but before it (inside the cylinder) you understand that it is normally liquid.
I agree with the above.
When I was renovating apartments, I had to “reanimate” more than one such cylinder (after some “careless partners”). I did it simply: I twisted the tube from the cylinder and, using a thin long nail, carefully “picked out” the dried foam from the valve nozzle. The dried foam there (as was correctly written above) is only in the nozzle (“nose”) of the cylinder, and “everything inside is liquid,” and the valve itself is “working” (if the cylinder, of course, is still “alive”; however, this is easy to check - shake it - if it “gurgles” inside, then it can still be fully “reanimated”), so it must be carefully removed from the nozzle (“spout”) of the cylinder. You can use a nail, or you can use copper wire...
Once removed, cleaning the tube is also not so difficult - take (for example) a long piece of copper wire with a diameter of 1-1.5 mm, bend a “hook” at its end with pliers (just press the tip of the “hook” closer to the very end with pliers). wire so that only its tip “sticks out”, which will “catch” the foam from the tube), then “stick” the wire into the tube and “pull” the dried foam out of it in “pieces” (algorithm the wire is 5-10 centimeters, “turned” and pulled it back - pieces of dried foam will be removed like a cork from a bottle). You can simply “push” the copper wire into the tube (without “bending the hooks at the end”), just “bending it a little like a snake” (“waves”) - if you “scrape it back and forth” (while “turning”), then the foam will again “pop out in pieces.” After you have completely cleaned the tube, screw it onto the bottle, shake it several times, turn it over and press the valve “lever” - the foam should “go down the tube.” If it doesn’t go (or “goes weakly”), it means you haven’t completely cleaned the “spout” of the valve. Repeat the “carnation” procedure again...
Basically, everything worked out for me the first time. And cleaning took a few minutes (2-3-5 no more). True, after cleaning the cylinder is best used completely...
Or, if you do not use the cylinder completely, you can do the following: 1) after finishing work, turn the cylinder upside down with the tube and “blow air through” the tube itself and the “nose” of the valve. To do this, you just need to press the valve lever and hold it in this position for several seconds. True, this “helps” if the cylinder is not full. 2) Twist the tube from the cylinder. Wait a few minutes, then take a thin, thin nail (a few centimeters longer in length than the length of the “nose” of the valve), wrap a strip of thin cotton fabric on it “in one layer” and “clean” (as far as possible) the inside the surface (inner diameter) of the valve “nose” from excess “drying” foam. You can also clean the tube itself. Although you don’t have to do this, because... when the foam “dries”, it will be very easy to remove it from the tube (with ordinary copper wire).
Popular mistakes
There are several most popular mistakes that people make without practical experience working with this fastener.
- The most popular is applying the adhesive mass without first moistening the base . Because of this, the substance will not be able to gain the required volume and reliably adhere to surfaces.
- The second of the popular mistakes is that the container was not shaken before use. All components of the adhesive mass have different densities, which is why it is important to mix them thoroughly before application. Manufacturers recommend vigorously shaking the tube about 30 times before starting application.
- The third popular mistake is working with a cylinder without preheating. Negatively affects the feed rate of the adhesive mass and its technical characteristics.
Containers with polyurethane foam can be reused if the container is not emptied at one time. It is important to properly prepare the tool through which it will be applied, to remove any remaining adhesive from previous uses.
Disadvantages of applying construction foam without a gun
If the work is done with just a tube, many people have doubts about the need to purchase a professional construction tool. But this seems to be a problem only at first glance. Professionals still advise not to abandon the use of special devices.
- Fast action regardless of the amount of work. For example, to process a two-meter seam, 10-30 seconds will be enough. In turn, the work of applying polyurethane foam without a gun takes at least 15 minutes.
- Accuracy. The gun has a very narrow nozzle and supports adjustable settings. Therefore, you can fill even the smallest gaps, which is simply necessary in some situations. The foamed surface is then difficult to distinguish from other areas. This rule applies equally to walls and floors.
- Foam consumption is very small, since the materials are supplied in doses. In the case of a tube or cylinder, you cannot do without overspending.
Polyurethane foam with a tube is great if you only have to do one-time work on a small area. Otherwise, it is better to replace it with another device. It is also necessary to take into account that installing a tube on a cylinder is not always possible.
As an option, you can use special mini-cylinders with a volume of 250-500 ml. The main thing is to purchase them in sufficient quantities in advance. It is not recommended to use the remainder of the material; in this case, the professional foam remaining inside the small-volume cylinder is disposed of along with it.
As for the pistol itself, it also has its drawbacks. For example, after use, the tool requires cleaning (see in more detail “How to clean a foam gun?”). They produce special care compositions that act in just a few seconds. Usually the manufacturer additionally writes in the instructions about how to handle the device. Tubes often remain an independent invention.
Acetone at home easily replaces special liquids, and anyone can keep it at home. When working, the composition must be poured into the nozzle of the tool, and then completely clean it using a wire or cleaning rod. All actions must be performed as carefully as possible, otherwise delicate structural elements may be damaged.
Polyurethane foam sealant: a little theory
How to work with sealant without a foam gun? Very simple. But first, let's talk a little about the main character of this article - foam. For what? And then, to understand the principle of operation of polyurethane foam. I think no one wants to ruin the substance and the home. It is so? Great. Then let's get started.
Story
The sealant was born thanks to the German chemist-technologist Otto Bayer. He invented the substance back in 1937. Or rather, he discovered polyurethane. And in 1970, specialists from an English company invented polyurethane foam sealant.
It has been tested and improved over the years. In 1980 it was used by construction workers in Sweden. The invention was to the liking of many maestros of architectural art, since it had a number of positive properties.
Making a gun with your own hands
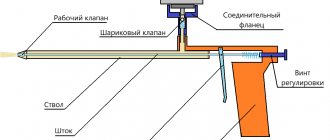
You can make a gun for polyurethane foam from a pneumatic spray gun and a broken gun . They are combined and a well-functioning device is obtained. Here's a little instruction on how to make a foam gun:
- The essence of connecting these structures is to replace the paint tank of the pneumatic spray gun. Instead, a bottle of sealant is screwed on. To do this, first attach the connector for the cylinder, removed from the broken foam gun.
- But the threads of the connections do not match, so to fix and secure the connection you should use epoxy glue , having first cleaned both threads.
- To ensure that the glue fills the threads and does not fall into the required holes, they are first plugged with hot glue. When the necessary holes are plugged, you can design further.
- Epoxy glue is diluted according to the instructions: 10 parts of resin per part of the hardener. A regular 10 ml syringe is filled with 10 ml of heated resin, and then 1 ml of hardener. Mix everything thoroughly, heating as needed. First, the resulting glue is applied to the threads of the connector so that there are no empty spaces left.
- The body of the spray gun is securely installed, and the connector is glued . All is ready.
- The final step in how to make a foam gun is to heat the joint to a temperature so that the hot-melt adhesive that plugs the holes melts and flows out.
Polyurethane foam sealant: a little practice
So, we have learned a lot about polyurethane foam sealant. It's time to figure out how to use it without a gun.
Step-by-step instruction
I’ll be honest: it’s difficult to work with foam without a gun, but it’s possible, since the household version has a special tube. So, let's start operation "X".
The process consists of the following steps:
- gloves are put on (the best option);
- the surface for work is prepared: it is cleaned of dirt and dust;
- if necessary (if the gaps are too wide or deep) they are sealed with pieces of foam plastic or its analogues;
- shake the container (1 minute) so that the foam has a uniform consistency and intensive release from the container;
- Using an ordinary household sprayer, lightly moisten the foaming area with water - (liquid should not flow or drip);
- remove the cap from the cylinder;
- put a special tube, which comes with the kit, onto the protrusion valve;
- the edge of the tube is brought to the area that needs to be filled with foam, and the valve is pressed (the seam being processed is half filled);
- important point: the working position of the cylinder is bottom up;
- after 30 minutes, the treated area is checked, if there are any “jambs” left, foam is added;
- after a day (but it can be done much earlier), the frozen excess polyurethane foam is cut off with a sharp stationery knife;
- finishing work must be carried out, since the foam is “afraid” of ultraviolet radiation (sunlight) - this is plaster, painting or other cladding.
Difficult? Difficult? No. There is absolutely nothing to be afraid of, but there is no need to relax either...
Specifications
Pena is a lady with excellent technical characteristics, for which she has gained an army of fans. So, the characteristics of polyurethane foam are as follows:
- shrinkage – 5%;
- porosity – 88%;
- output volume – 300 ml can – 20 l of foam, 500 ml – 40 l, 750 ml – 50 l, 1000 ml – 80 l;
- polymerization speed - 20 minutes - gain of useful volume, 4 hours - hardening, 24 hours - complete hardening;
- adhesion – excellent adhesion to wood, concrete, glass, metal, PVC, stone, poor adhesion to silicone and polyethylene;
- heat resistance - -45/+90°С;
- strength – 3–5 N/cm2.
Always buy extra foam. Manufacturers often deceive consumers. So, for example, they write “50 liters” on the cylinder, but in reality it is much less, well, somewhere around 25–30 liters. I think everyone understands why cunning manufacturers do this - a common marketing ploy. Therefore, play it safe.
Should there be a pistol or not?
If you can work with household foam with a tube, then why buy a professional cylinder that requires a gun? An unreasonable waste of money, and that's all. That's how it is. However, experts (including myself) still recommend using “weapons”. Why? Well, maybe because it is known for the following benefits:
- minimum consumption - the gun releases foam in doses, and the tube leads to excess consumption of the substance by 2-3 times;
- accuracy - the gun nozzle is very narrow, and is also adjustable, which allows you to fill even the tiniest cracks;
- speed - 10-30 seconds are enough to make a 2-meter seam, and you will have to work with the tube for about 15 minutes (of course, all this is figurative and depends on the specific working conditions).
Of course, if you do not have global plans for repairs, then polyurethane foam with a tube is an ideal option. But if you have a large amount of work to do, it is, of course, better to stock up on a pistol.
An anecdote on the topic: - How did your husband let you go to a nightclub? - Yes, I prepared a bath for him and filled it with foam! - And that stopped him? — Polyurethane foam will stop anyone.
Polyurethane foam sealant is a universal tool that allows you to easily deal with any cracks, gaps, cracks and voids, even in the absence of a gun. Although not as high quality, but still...
Wishing you fast and high-quality work, dear fellow builders! See you!
Wisdom Quote: Knowledge is always preceded by a sentence (Alexander Humboldt).
Polyurethane foam is an excellent method of sealing. It is used for large-scale repair work or when it is necessary to patch a small defect in the house. It is easier to work with it using a special gun, although you can do without it, saving on the purchase. But first you need to learn how to properly use sealant and understand how to use polyurethane foam without a gun.
Polyurethane foam is a difficult material. A frequent question from people who want to carry out construction work on their own is whether it is possible to use polyurethane foam if there is no gun. To do this, you need to know its properties and basic rules of use .