Home/Design and interior/Decorative items from old blinds
Not long ago, blinds were perhaps the most popular way to protect windows from sunlight and prying eyes. But today they are gradually going out of fashion and most owners still have them. You shouldn't throw them away, as they are an excellent material for creativity.
Many housewives were able to come up with hundreds of options for how old blinds could be used, and what they could make with their own hands without any complications or tricks.
Do it yourself
If you are eager to change something in your home, but don’t have enough money for renovations or buying new interior items, you have come to the right address!
We have prepared for you a delightful idea for repurposing old blinds that will delight you. After all, you can make wonderful Roman blinds from them that will please the eye!
Making blinds in 1 evening: 3 master classes for creative and resourceful people
If buying new blinds doesn’t fit into your plans or budget, but you have one free evening and a charge of creative inspiration, then we suggest you make your own blinds from available materials.
We have compiled 2 step-by-step master classes on how to make blinds with your own hands and 1 master class on how to update and beautifully decorate horizontal blinds.
Roman curtains
YOU WILL NEED
- old blinds
- fabric (meterage depends on the size of your window)
- fabric glue
- roulette
- pencil
- clothespins
- tassel
- iron
MANUFACTURING
- First you need to measure the window to figure out what piece of fabric you should cut.
- Then you need to cut the small transverse ropes so that the main longitudinal lace remains intact, since it is this that will serve as the mechanism for the future Roman blind. After this, remove most of the horizontal bars, leaving only the cornice, 7 cross bars for the frame and two ropes intact.
- Measure the height of the curtain and mark where the horizontal slats will be positioned. Remember that the distance between them should be the same.
- Then start carefully gluing the crossbars and the cornice itself to the fabric. There is no need to completely glue each crossbar, just secure the edges. Use clothespins to secure the fabric and structural parts so that they stick to each other better.
Voila! The Roman blind is ready...
To avoid mistakes, watch the detailed instructions in this video.
Roman blinds made from old blinds are the best way to change the atmosphere in your apartment, and, by the way, their creation requires a minimum of money!
Did you like the article? Subscribe to the channel to stay up to date with the most interesting materials
Cute flowerpots made from an unnecessary tin can
Probably the phrase “from trash to treasure” has caught everyone’s eye at least once. For example, from empty tin cans you can make these original and fun flower pots and watering cans.
All that remains is to plant flowers in them! Such crafts, in turn, will not only decorate your home or site, but will also make, albeit a small, contribution to the fight against pollution of our planet.
You will need:
- cans;
- self-hardening mass;
- planks;
- twine;
- paints
The first thing you need to do is prepare the jar for use: to do this, wash it well and dry it.
When the spout and handle of the kettle are ready and hardened, glue them to the tin can. It is best to do this using the same mass, so you can not only glue, but also “build” them into the jar, and then all parts of the teapot will look like a single whole.
Once the handle and spout are securely attached to the can, you can begin painting. The first layer should be painted with thick white paint - it will serve as a kind of primer that will reliably disguise the design on the tin can. Apply the next layer of paint of the selected color. Finally, the final touch is some kind of paint with glitter, you can simply apply it with your finger.
When the paint has dried, you can decorate the watering can, for example, with artificial flowers made from foamiran.
We make a hanger for the flower pots from an ordinary plank. We cut the board to the required size and paint it if desired. Then we screw special loops into the board and fasten the twine to them. We screw or glue the “watering can” to the resulting suspension. All you have to do is plant flowers in these cute flower pots!
And below you can watch a video on how to make a flowerpot in the shape of a watering can from a tin can.
Did you like the article? Subscribe to the channel to stay up to date with the most interesting materials
Blinds as a finishing material
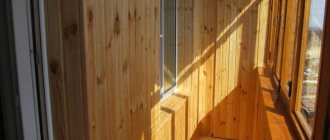
If the blinds have a special frame, then this is an excellent finishing material. Of course, blinds come in different sizes and colors, but this is exactly what we need. In order to create a unique living room design, you can use old blinds.
They can be used to decorate a wall, and you can assemble different pieces according to color and size, like a mosaic. The result will be a unique wall that will be difficult to recreate even with all the desire. There can be a lot of fastening options, but the easiest way is to use construction glue or liquid nails. With them, the installation process will be as fast and simple as possible, and the installation process will be similar to assembling a fascinating puzzle. Due to the fact that the weight of the blinds is not so large, even a fragile girl can cope with such important work.
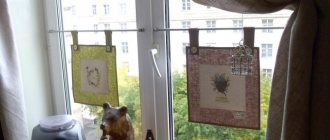
What are the advantages of tulle lace?
Such tulle is not inferior in its properties to blinds or reflective film, but at the same time does not require mandatory drilling of walls or window frames. In addition, this is one of the most budget-friendly curtain options that do not require maintenance. They are always perfectly smooth, and the window takes on a festive pattern.
Lace on windows is loved by many housewives for its originality and ease of use. Let's consider the advantages of this design:
- simple implementation of the idea;
- minimum financial and time costs;
- availability of materials;
- ability to keep curtains open;
- no traces and easy dismantling if necessary;
- no need to use a cornice;
- perfectly hides what is happening in the room.
Among the disadvantages, perhaps, one can name one - the complexity of installation in winter, but this can be easily mitigated by using a heat gun at home.
Jewelry stand
There are options for bamboo blinds that are simply folded at the top of the window, like a mat for making rolls. If there are old blinds of this type left, they can be used as a unique stand for decorations. If a girl loves not only gold and silver, but also costume jewelry, then such a stand will allow her to quickly select certain earrings and necklaces for a specific outfit, rather than spending several hours searching and trying on. The stand can be made in sizes that will fit into the dimensions and interior of the room. You can shorten the blinds using the most ordinary kitchen scissors.
It would be best to hang the stand near the mirror so that the girl can immediately choose jewelry not only for her outfits, but also for her upcoming makeup.
Important Tips
Blinds made of wood and bamboo are not something to be washed; they cannot be wet.
Wipe them regularly with a dry cloth or slightly damp cloth. Vacuum gently occasionally. Plastic blinds are less demanding to maintain. All you need to do is wipe with a cloth soaked in soapy foam. To avoid streaks, wipe the plastic slats dry. When cleaning the thin slats of aluminum vertical blinds, do not press too hard, as this can easily leave a dent. Avoid getting water on the metal parts of the cornice. If you doubt your abilities, if you don’t really understand what material the slats are made of or if there is a stain that cannot be removed with ordinary means, the most correct decision would be to take the blinds to the dry cleaner. Ultrasonic cleaning works well to get rid of dust, but is ineffective against stubborn dirt. With careful handling and competent, timely maintenance, vertical blinds will delight you with their beauty and reliably protect the room from intense sunlight for many years. You might be interested in an article about how to shorten vertical blinds.
Screen for a photo shoot
But the most valuable are long blinds, which are equipped with a decorative frame. You definitely shouldn't throw them away. The thing is that you can use them to create a unique screen for a photo shoot or just for dressing up. Surely you have repeatedly seen in old films how there are screens in rooms, behind which a girl can calmly change clothes, without prying eyes on her figure. This is exactly the option you can do yourself.
To make it, you only need four frames and six small hinges. We fasten each frame to the next ones using two loops. One should be located at a distance of ten centimeters from the bottom, and the other loop should be at the same distance, only from the top. Once the entire structure is assembled, it can be installed vertically. Due to the hinges, you can adjust the rotation angle of each individual door.
You can additionally decorate such a screen with floral arrangements or any other options that can succinctly fit into the finished interior.
What can be made from old curtains: get acquainted with the ideas of homemade blinds
Blinds have found their place not only in offices, but also in modern apartments of ordinary people. However, store-bought options are quite expensive, and many of them look too formal. If you want to become the owner of practical and inexpensive curtains, the design of which will suit your interior, then the best option for you would be to make your own blinds.
When we mention blinds, many people imagine a design consisting of plastic or metal slats. However, in fact, such curtains can be made from a variety of materials and have a varied structure.
Blinds can be vertical and horizontal. In the first case, the curtains are folded into a vertical strip located on the side of the window, and in the second, into a vertical strip located above the window frame.
To the surprise of many ordinary people, blinds include a wide variety of types of curtains. The main feature of such structures is the ability to regulate the penetration of light into the room.
Types of blinds:
- Vertical blinds consist of long, vertical slats. Such elements change their position due to the influence of the rotating mechanism. In different positions, curtains can let in more or less light.
- Horizontal blinds are often called ladder blinds. They consist of horizontal ladders. When the slats are raised, such curtains allow sunlight to pass through, but when they are lowered, they do not.
- Roller blinds are also classified as blinds. They consist of a single piece of fabric, which is wound onto a special shaft using a chain.
- Pleated blinds consist of a single piece of canvas folded like an accordion. These curtains are adjustable using threads or ropes.
- Roman blinds are also classified as blinds. By pulling the mechanism, you can raise or lower such a structure.
These types of curtains have their advantages. Today we will learn how to make pleated blinds from paper, Roman blinds from old blinds and roller blinds from impractical curtains with our own hands.
DIY paper curtains and blinds
It's easy to make blinds from wallpaper. Even if you are far from needlework, following our master class, you will cope with such work without any problems.
Materials for such crafts can be found in every home. You will need scissors, wallpaper, double-sided tape, an awl, a measuring tape, regular tape, tape, a clamp, a ruler, a pencil and a meter.
Master class on making blinds from wallpaper:
- Measure the length and width of the glass part of the window frame. Divide the length of the glass by 0.25. You should get a number that is 25% larger than the original length of the window - this will be the length of the curtain.
- Carefully cut out a rectangle from the wallpaper equal to the width of the window and the length you found.
- Fold the rectangle into an accordion shape. The width of one fold can vary between 3-5 cm. The lower edge of the folded curtain should face the window.
- On the reverse side, a hole is pierced in the center of all protruding corners.
- A rope or cord is inserted into the resulting hole. The curtain is moved to the open position. A knot is tied and the excess part of the rope is cut off.
- A retainer is glued to the end of the cord. A large bead can act as a retainer.
- Double-sided tape is glued to the top strip of the curtain. Also, if desired, you can stick such tape on half of the bottom strip, gluing the bottom of the blinds with a fan.
- The product is glued to the window frame using double-sided tape and brought into the desired position.
These wallpaper curtains look quite aesthetically pleasing. With proper care, they can last for several years. However, you need to understand that paper curtains will have to be changed from time to time.
LiveInternetLiveInternet
-Always at hand
–Applications
- Cheap flights
Favorable prices, easy search, no commission, 24 hours. Book now - pay later! - I am a photographer
Plugin for publishing photos in the user's diary. Minimum system requirements: Internet Explorer 6, Fire Fox 1.5, Opera 9.5, Safari 3.1.1 with JavaScript enabled. Maybe it will work - Postcards
Reborn catalog of postcards for all occasions - always no analogues at hand
^_^ Allows you to insert a panel with an arbitrary Html code into your profile. You can place banners, counters, etc. there - Rating buttons "Yandex.blogs"
Adds Yandex rating buttons to the profile. Plus, graphs of rating changes per month will appear soon
-Music
–Tags
–Categories
- HTML (4)
- Nero (3)
- YouTube (6)
- ANIMATIONS (87)
- Batik (1)
- BAKERY (336)
- Cookies (20)
- Pies (28)
- Puff pastry (3)
- Dough (16)
- Cakes (167)
- EMBROIDERY (120)
- RIBBON EMBROIDERY (38)
- KNITTING (1059)
- Plus sizes (6)
- Translations (4)
- knitted shoes, socks (4)
- Knitting for children (248)
- Knitting for animals (7)
- Knitting for men (8)
- Knitting on a fork (17)
- Knitting by machine (40)
- Jackets (156)
- Berets, hats (50)
- Bolero (45)
- Vests (12)
- Border (32)
- Coat (5)
- Blankets, bedspreads (22)
- Useful things (6)
- Poncho (12)
- Pullovers (94)
- Top (66)
- Tunics,Dresses (95)
- Shawls (55)
- stoles (37)
- CROCHET (664)
- Bruges lace (4)
- Jackets (37)
- Irish lace (71)
- Ribbon lace (1)
- Dresses, tunics (49)
- Blankets (22)
- Pullovers (8)
- Top (47)
- patterns (144)
- Freeform (17)
- Shawls, Stoles, Scarves (22)
- KNITTING (473)
- ABC of knitting (9)
- Jacquard (8)
- Patterns (50)
- Knitted toys (37)
- Ganutel (2)
- generators (9)
- Decor (2)
- DECOUPAGE (25)
- Desserts (50)
- for diary (91)
- for daughters (24)
- for Katyushka (72)
- for men (4)
- for yourself (58)
- PAINTING (47)
- KNITTING MAGAZINES (867)
- Magazines without translation (69)
- Japanese and Chinese magazines (57)
- FELICE,Punto & Moda,Filati (39)
- Norah Gaughan (3)
- Adjumu pasaule (3)
- Kim Hargreaves (2)
- Knitting for children (13)
- DOUBLET (27)
- Fashion magazine (3)
- BURDA MODEN (4)
- DROPS DESIGN (knitting) (25)
- Kartopu,Katia (3)
- Magic Crochet (10)
- Phildar, Ondori (6)
- Verena (15)
- Valya Valentina,Barrados (13)
- All by myself (5)
- We knit ourselves (22)
- Knitted fashion, Knitted creative (4)
- Knitting for children, Fun loops (13)
- Knitting for adults (knitting needles, crochet hook) (19)
- Knitting is your hobby (26)
- Knitting: Fashionable and simple (55)
- Fashion Magazine (25)
- Cinderella knits (7)
- IREN (8)
- Ksyusha (6)
- Favorite knitting (6)
- Little Diana (35)
- Mom knits (5)
- Craftswoman (3)
- Fashion and model (3)
- Natalia (6)
- Sabrina,Susanna (66)
- Sabrina Baby (13)
- Sandra (15)
- Wonderful hook (13)
- cooking magazines (38)
- spells (2)
- HEALTH (150)
- Diets (28)
- toys (26)
- games for children (3)
- INTERIOR (82)
- for the holiday (37)
- PICTURES (45)
- diary pictures (10)
- CLIPART (522)
- inscriptions (2)
- Alphabet (1)
- Girls (66)
- Children (13)
- Animals (19)
- interior (2)
- Men (2)
- Couples (2)
- Holidays (38)
- Nature (32)
- Jewelry (19)
- Flowers (13)
- COLLAGES (60)
- COMPUTER (37)
- candies, sweets (22)
- catmatrix (27)
- BEAUTY (92)
- Makeup (5)
- Manicure (13)
- Masks (11)
- COOKING (366)
- Eggplant (3)
- pancakes (5)
- Chicken dishes (19)
- Meat dishes (21)
- Pumpkin and zucchini dishes (8)
- Main courses (41)
- PREPARATIONS FOR WINTER (12)
- Snacks (59)
- Cooking Tricks (20)
- Lavash (27)
- Microwave (15)
- Pizza (16)
- Fish (30)
- Salads (75)
- Sauces (5)
- dish decoration (12)
- Shish kebab (1)
- Magic, horoscopes, astrology, money (21)
- MASTER CLASS (63)
- My frames (30)
- music, video (49)
- LETTERING IN THE COMMENT (90)
- emoticons (13)
- drinks (9)
- New Year (72)
- carnival costumes (2)
- POSTCARDS (83)
- diary design (5)
- Parks, Gardens of the World (23)
- congratulations (15)
- Useful things for your diary (65)
- Useful tips (13)
- Hairstyles (11)
- Programs (15)
- patchwork (16)
- dividers (25)
- frames (63)
- recipes, food (121)
- glass painting (3)
- HANDCRAFTS (214)
- Beads (18)
- Quilling (13)
- Origami (9)
- Napkins (18)
- Bags (39)
- GARDEN (374)
- Grapes (3)
- Country decor (33)
- Garden design (38)
- Green pharmacy (7)
- strawberries (2)
- Potatoes (6)
- Lunar calendar, signs (7)
- Cucumbers (10)
- Pepper (4)
- useful tips (113)
- Tomatoes, Eggplants (21)
- Flowers (73)
- Berry bushes (5)
- WITH YOUR OWN HANDS (225)
- Soap (31)
- Salt dough (13)
- Crafts from bottles (8)
- SCRAP KIT (238)
- links (18)
- poems (32)
- tenerife (0)
- textbook Li ru. (46)
- feng shui (7)
- flash cards (9)
- flash drives (5)
- BACKGROUND (183)
- Glitters (4)
- PHOTO (72)
- FS (129)
- Brushes (7)
- Masks (9)
- plugins (1)
- Styles (1)
- Fonts (6)
- Action (6)
- FS PNG (24)
- FS-LESSONS (327)
- GIMP (27)
- FS-walker (1)
- Paint (6)
- braggarts (4)
- flowers (37)
- READING BOOKS (147)
- Knitting (29)
- crochet (40)
- DIY toys (10)
- Macrame (1)
- About needlework (63)
- SEWING (158)
- Diana Moden (3)
- BURDA MODEN magazine (4)
- Dress (22)
- sewing for children (11)
- curtains (20)
- this is interesting (85)
- humor (33)
– Quote book
Jumper Frambuesa. The jumper is knitted in the round, without seams, from Drops Nepal yarn.
Date Night Dress. Date Night Dress by Drops Design Knitted dress in progress.
Magazine “Lets knit series” 7 2002 Magazine on knitting. Book of the popular series on relief.
Magazine “Interweave Knits” Fall 2015 In each issue of the magazine you will find modern knitwear.
Magazine “Magia della Lana” No. 39 2017/2018 Autumn/Winter Italian knitting magazine. IN.
–Search by diary
–Subscription by e-mail
–Interests
– Regular readers
–Communities
-Statistics
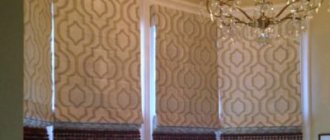
DIY Roman blind based on blinds
Repurposing old curtains into new designs is always interesting. In addition, such a transformation is very profitable, since for a completely new product you will have to purchase a minimum of material.
To make Roman blinds based on blinds, you will need: the blinds themselves, a piece of fabric of a suitable color, a sewing machine, scissors, liquid nails, fabric glue.
How to make new Roman blinds using old blinds:
- The fabric is cut into a rectangle to fit the window. In this case, you need to add 10 cm to the width of the segment for allowances, and 20 to the length.
- The edges of the curtains need to be folded twice and sewn on a sewing machine.
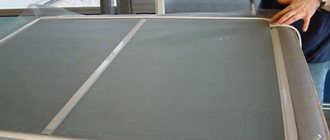
- Next, we take the old blinds and carefully cut off all the crossbars and the lower limiter. The upper limiter and threads should remain intact.
- We glue the blinds slats to the back side of the fabric, at the same distance. The lamellas are the basis of the folds. For curtains on an average window, 7 folds are usually enough. A lower limiter is glued to the lower edge of the canvas.
- An upper limiter is glued to the upper edge of the canvas, on the front part. The threads hanging from it are passed through holes in the lamellas. The hanging ends are glued to the fabric.
- The upper limiter is decorated with fabric, and the curtains are attached to the window.
By following a series of very simple steps, you can make new Roman blinds from old curtains. Such curtains can be raised using a special mechanism, folding the fabric like an accordion, and lowered, straightening the fabric.
You can also sew airy French curtains yourself. Read about this: https://homeli.ru/dekor/shtory/frantsuzskie-shtory
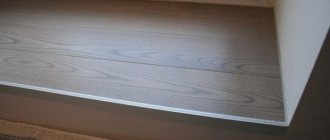
Decoration stages
- Take measurements of the blinds slats.
- Transfer to sections of wallpaper, outline and carefully cut with scissors.
- Using glue, firmly fix the wallpaper on the slats and let it dry. Literally one hour will be enough, and your new stylish blinds will be ready!
To give finished products a more original and interesting appearance, use lace and satin ribbons in contrasting colors.
To give finished products a more original and interesting appearance, use satin ribbons in contrasting colors.
Decorative lace is an excellent option for uniqueness.
For an office or study, it would be a great idea to decorate the blinds with old newspapers. You will need strong tea leaves, cotton wool and an iron. Using tea leaves, you can give newspapers an antique look. It is necessary to carefully wet each sheet with a cotton pad soaked in tea leaves, after which it must be ironed. You should place some unnecessary fabric on the ironing board to prevent it from getting dirty. Better yet, leave the newspapers to dry naturally.
You will need strong tea leaves.
Using glue, we attach the newspaper strips to the slats and let them dry for a couple of hours. It is better to leave the products for a day in a warm place where there are no drafts so that the sheets do not move away from the plates. After drying, hang it on the windows using double-sided tape. Maintenance of such structures is minimal. The main thing is not to let it get too dusty and brush off any debris using a special brush.
Roller blinds from old curtains
Even an old-fashioned French curtain can be turned into a stylish and laconic roller curtain. Remaking an old curtain into such a design will amaze you with its simplicity and speed of execution.
Such a curtain can be made not only from an old curtain, but also simply from two pieces of fabric.
In order to sew such a curtain, you need to cut the material into two rectangles, which will be two cm larger than the window in width and length. These rectangles are sewn on three sides like a bag on the back side. The bag is turned inside out, and a bar is inserted into its horizontal seam, which is fixed by stitching the material above it.
On the back and outside of the curtain, ribbons are attached at the same level. On each side you should have two ribbons located vertically along the edges of the curtains.
Using tapes, you can fix the rolled fabric in the desired position. To attach the structure to the window, you can use a construction stapler or liquid nails.
Tube Bonding Process
Products prepared from part of a magazine sheet are attached as follows:
- Draw a special line on the surface of the tubes from magazines, on the basis of which the structure will subsequently be woven.
- Each tubular product is braided with a rope. You should work tightly, it is better to lay each ring on the previous one.
- When the last tube is braided, it is recommended to weave in the opposite direction. This helps produce two parallel lines.
A very inexpensive way to quickly fix broken blinds
Receive one of the most read articles by email once a day. Join us on Facebook and VKontakte.
How fragile everything is in this world. You’re sitting there, not bothering anyone, and suddenly the blinds fall on your head. It's a shame, he's a good man! Jokes aside, blinds are fragile things. Especially models with a vertical design. And in order not to regret once again giving up “traditional” curtains, it’s worth mastering ways to quickly fix broken blinds with literally what’s at hand.
Each type of blinds has its own advantages and disadvantages. As sales results show, “horizontal” blinds are more often chosen for small apartments and kitchens in particular. While blinds with a vertical design are a popular choice for offices, educational institutions and homes with a larger area. And if you also chose the second modification, then with a 90% probability you will encounter a typical problem: “dropped” fragments.
The material of the blinds is quite fragile and the holes for fastenings often simply cannot withstand the load or additional tension. And if you don’t have time to call a specialist, here are 3 emergency ways to quickly fix a typical breakdown.
Main types of breakdowns
In addition to violations of the integrity and evenness of the slats, blinds can be subject to the following types of damage:
Most often, repairs involve replacing damaged elements with new parts . It won’t be much work and won’t take much time.
You will find more information about possible breakdowns of horizontal blinds in this material, and we talked about possible problems with vertical blinds here.
Method number 1: make a new hole
This method is more suitable for “home” blinds. Because you will need two things: a screwdriver and a gas stove.
Fold the damaged part in half so that the two edges of the blind (with and without the broken hole) match.
Now arm yourself with a screwdriver and hold it over the switched on burner so that the iron becomes hot.
Poke straight through the broken hole into both halves of the blind with a hot screwdriver.
Now the broken part has two holes: top and bottom.
All that remains is to hang the broken part back, but now “upside down”, that is, by the new hole.
The blinds are intact again and everything works great.
Method number 2: budget and simple
You only need two things that are definitely found in every office: a paper clip and tape.
Use a paper clip to connect the torn edges of the hole for the cornice, secure it on top with a piece of tape and you’re done. You can hang it. It's quick, but it works.