Hello readers of my blog! Today we will talk about replacing windows with plastic ones with your own hands. It would seem that this is not a tricky matter, but when you are faced with this problem, you have to think about how to do it correctly, what preparation to do, what materials to choose. Thus, I decided that this article would be useful to someone, and I am devoting my efforts to this topic. In it I will answer a number of questions that will arise immediately before replacing windows with plastic ones with your own hands, and some even after that. This topic is quite broad, because before work, thorough preparation is necessary, but how to do this? And this is a separate topic. You can learn about all this in great detail in the article below. Replacing windows with plastic ones yourself
One of the five components of a good window is its installation. The quality of the entire window structure depends on how professionally it is carried out.
After all, even the best window can be ruined by installation errors. Installation is not level, frame deformation, blowing and freezing, the formation of fungus and mold - these are not all possible problems. Therefore, turning to professional installation teams is the best decision that will save you from disappointment and additional expenses for repairing a new plastic window.
If you are confident in your abilities and still decide to install PVC windows yourself, you will need patience, accuracy and some advice from the professionals of Window Factory LLC.
Stages of self-installation of PVC windows
There are two ways to install a plastic window:
The choice of window installation technology depends primarily on the material of the walls and the size of the structure being installed.
A more reliable and universal way is to install windows on anchors. Let's consider the stages of self-installation of PVC windows using this technology in more detail.
We begin dismantling old windows by removing the sashes and removing the glass. After which we proceed to dismantling the window sill and slopes.
We cut the old frame and take it out of the opening in parts. Before we begin installing a new plastic window, we clean the opening from all construction debris and dust, and seal all uneven areas and cracks with plaster mortar.
To attach a PVC window using anchors, remove the sashes and carefully remove the double-glazed windows. To avoid confusion when reassembling the window, mark the glazing beads, as their sizes may differ from each other. In the remaining frame with imposts we make through holes for anchors.
Fastenings must be placed in the corners of the structure, as well as in the locations of the impost.
It is recommended to keep the installation step at 50 cm, but not more than 70 cm. We place the frame of the new plastic window in the opening and, using wooden blocks or special plastic substrates, align it horizontally and vertically.
Once the window is aligned with all planes, you can begin securing it with anchors. Using a hammer drill, we drill holes in the wall through pre-prepared holes in the frame.
You need to start attaching the frame from its bottom.
We insert anchors into the holes and partially secure them. After that, we once again check the verticality of the window being installed and secure the upper and middle parts of the structure.
The anchors need to be fully tightened only after they are all inserted into the holes and the window level is finally checked. But don't overdo it! Tightening the anchors too tightly can lead to deformation of the frame. We install a flashing on the outside of the window.
We fasten it with self-tapping screws to the frame support profile. We carefully treat the joints with sealant to prevent moisture from penetrating into the structure.
.At low tide, it is recommended to install soundproofing tape or make a cushion of polyurethane foam to reduce the noise from the sound of rain. The gap between the window and the wall is filled with polyurethane foam, which provides sealing and thermal insulation in the house. For better adhesion of the foam, the surface of the wall is pre-moistened with water. As is known, under the influence of external factors and sunlight, the foam loses its properties and is destroyed.
To protect it, we install special mounting tapes: on the outside - PSUL, on the inside - vapor barrier tape. Next, we assemble the window: insert double-glazed windows and secure them with glazing beads, hang the sashes, check and adjust the fittings.
We install the window sill in the support profile indoors, moving it 2 cm under the frame. Along the edges it should extend onto the wall by 5–10 cm.
The width of the window sill should not cover more than half of the battery. We install the window sill on wooden blocks and check its horizontal position with a building level.
After the window sill is level, we fill the space under it with mounting foam, and seal the seam between it and the frame with sealant. The final stage of installing PVC windows is finishing the internal slopes. They can be plaster, plasterboard or plastic.
The most practical, convenient and popular are plastic slopes.
They are universal, durable, do not deform or crack, are easy to install and do not require special care.
To install plastic slopes around the perimeter of the window, we install a starting U-profile into which we insert a plastic panel. We fix the slope along the edge with self-tapping screws to the wall and cover it with an F-profile, which gives the window a finished look. The joint between the PVC panel and the window frame is treated with sealant.
Installation of PVC windows seems to be a simple and straightforward process. But only strict adherence to technology and attention to detail will protect you from mistakes and unpleasant consequences of poor installation.
By entrusting all the work to professionals, you will not only save yourself from unnecessary hassle, but also maintain a guarantee, both for the window structure itself and for all installation work.
DIY plastic windows2. Today I will tell you how to install 8 plastic windows and an entrance door with your own hands in one day. To perform this work you will not need special skills or expensive equipment. But, of course, there are many nuances that are definitely worth paying attention to. And of course, there are several secrets on how to save money when ordering. I used windows with optimal thermal characteristics with a four-chamber window profile and double-glazed windows, as well as a reinforced entrance door. By the way, it was the door that made up almost half of the cost of the order. And the total costs amounted to 40 thousand rubles for the set and another 4.5 thousand rubles for delivery. How to buy windows at the same price is at the end of the article. Let's get started! We have a newly built aerated concrete house in which we need to install 8 windows and one entrance door. First of all, we take all dimensions from the openings. As you remember, I made overhead quarters around the perimeter of the openings on three sides (a quarter is not needed at the bottom - the window sill will be there). For the quarters, I used standard 5 cm thick aerated concrete blocks, which were installed, like the rest of the masonry, on polyurethane foam. The recess of windows during installation should be at least 1/3 of the wall thickness. It is also worth noting that you should not try to make openings to fit standard window sizes - the technology for their production is automated and there is no difference in cost between a standard size or a custom-made window. We calculate the final window dimensions taking into account the following factors. On the side and top from the frame to the wall there should be a gap of 1 to 2 centimeters on each side, which will be filled with polyurethane foam. At the bottom of all windows from the factory there is a 3-centimeter high stand profile, which is needed for convenient installation of the window sill. Plus, under the delivery profile there should also be a gap of about 1 centimeter for the mounting foam. In total, roughly speaking, you need to subtract 4 centimeters horizontally and 6 centimeters vertically from the internal dimensions of the opening. You shouldn’t get too carried away and push the frame into the opening without a gap, because... It will be extremely inconvenient to pour polyurethane foam into a gap of less than 5 mm.
3. It is important to know that opening sections greatly increase the cost of the construction of any window.
Therefore, if the goal is to save money, you need to make the most of fixed, non-opening windows.
In the case of a country one-story house, there is no problem going outside to wash the windows, and for ventilation you can make an opening transom (due to the design features, it is several times cheaper than a tilt-and-turn mechanism, but its width should be significantly greater than its height, or rather, its height cannot exceed 50 centimeters).
The advantage of the blind section is also that you do not lose any useful glazing area.
In my case, there are 5 blind windows measuring 60x60 cm, two blind panoramic windows 1.4x1.7 meters, one tilt-and-turn window 0.6x1.3 meters and an entrance door with partial glazing 0.9x2.3 meters.
The above price includes the windows and door only (including hinges, handles and locks). Separately, I needed to purchase anchor plates, dowels, self-tapping screws, PSUL sealing tape, polyurethane foam, window sills and ebbs for a total of 3.5 thousand rubles.
4. We will need: a screwdriver with a drill for concrete, foam with a gun, PSUL tape, fastening plates, dowels for aerated concrete and self-tapping screws. Also, the bubble level was not included in the frame. Once again I want to draw your attention to the fact that you cannot skimp on measuring instruments.
5. There are two ways to secure the window frame: through fastening with unpacking of double-glazed windows and using anchor plates.
The first method requires more time and skills. In particular, you will need to carefully remove the glass unit from the frame and then install it in place. The glazing beads that hold it are usually fixed very firmly and in order not to scratch the edges you will need a special spatula and patience.
Plus, if we are talking about installation with two hands, then with large windows the problem will be that the removed glass unit cannot be tilted, unlike the frame in which it is installed. In addition, through-mounting requires precise fixation when drilling and an assistant will definitely be required. Installation is much easier using mounting plates.
Each such plate costs 10 rubles. They need to be installed at the rate of 1 plate for every 50 centimeters. The plate is installed by turning it in the groove of the frame and fixed using a self-tapping screw with a drill (to drill the metal frame inside the frame).
6.After this, PSUL tape is glued to the outside of the frame on all sides except the base - a pre-compressed sealing tape. It is used when installing a window in an opening with quarters. The purpose of the tape is to protect the polyurethane foam from ultraviolet radiation and, consequently, destruction.
In the cold season, it is easier to install windows, because the tape expands very slowly in the cold.
7. A six-meter roll of PSUL tape costs 140 rubles. When fixing the tape on the outside of the frame, it is preferable to step back 1-1.5 cm from the edge, especially if you have deep quarters. This should be done so that when pouring polyurethane foam between the frame and the wall, it does not get on the PSUL tape.
8.Now we move on to the window opening. Its geometric dimensions are ideal, and its base perfectly matches the horizon. This happens naturally when building with aerated concrete if you follow the technology and level each next row of masonry to zero.
I started the installation with small blind windows and they differ from the others in that they will not have window sills. Therefore, we will not use the stand profile. To support the frame on the base of the opening I use a piece of laminate 7 mm thick.
9. Place the window and mark the location for the mounting holes.
We drill and install special screw dowels for aerated concrete. It is worth paying special attention that you should not try to hammer them in with one blow, especially if they are located close to the edge of the block - there is a risk of breaking off a piece of the block. After this, we insert self-tapping screws through the mounting plates.
10. Our next task is to install the window strictly vertically.
In the case of small windows, this will not be difficult, since there will be no skewing of the window diagonally and it is enough to take measurements at any point of the frame.
After this, we tighten the screws on the fastening plates and remove the piece of laminate at the base. Any window must be fixed so firmly that it can be held in the opening solely by the mounting plates. Polyurethane foam is used primarily for filling voids and thermal insulation, and not for mechanically fixing the frame in the opening.
11. You will have to tinker with large windows. Each one weighs more than 80 kilograms and will not be easy to lift into the opening alone.
I built a staircase from blocks and gradually raised the window 5 centimeters upward. I used 9 mounting plates for each window. 3 on each side, except the bottom.
Here you need to pay closer attention to the verticality of the frame and apply a level in all corners. On large windows, there is a support profile at the bottom into which the window sill will be installed. Directly below the support profile I also placed a laminate plate, which was removed immediately after fixing the anchor plates to the wall.
12. The tilt-and-turn window is 2 times smaller in size, but for it I decided to use 8 anchor plates, because an open sash will add load to the frame. On average, it takes about 30 minutes to install one window.
And a very serious mistake that most people make is that the protective film from the frame must be removed immediately after installation. Even if you installed the windows at the beginning of the renovation, the film must be removed immediately. If this is not done, then it will be more difficult to tear it off, and the plastic will burn out unevenly (this is important for the outside of the frame).
13. Move to the front door.
This is a reinforced door with 3 hinges with a full frame around the perimeter. Opening inward is much more convenient than opening outward. But most people have a stereotype that the door should be opened outwards.
When installing a door frame, the most important thing is to ensure an even fit around the perimeter. I used 10 anchor plates to secure the door. Particular attention should be paid to the verticality of the side walls of the door frame in two planes.
For reliability, the fixation of each anchor plate can be supplemented with a second self-tapping screw. As with windows, the door should be fully functional when held in place only by anchor plates. It should not warp when opened and it should fit snugly around the perimeter when closed.
14.Now we take a gun with polyurethane foam. The presence of a pistol is mandatory because...
it allows you to regulate the volume of foam output. There are nuances with foam that you definitely need to know. First, the foam is afraid of ultraviolet radiation and must be protected from sunlight.
For this purpose, there is PSUL tape on the outside of the window; on the inside, you need to plaster the slopes or, as an option, paint over it. As for applying foam, it absolutely cannot be trimmed. The shell that has formed on it protects the internal open cellular structure from moisture absorption and subsequent destruction.
Therefore, the seam between the frame and the wall should be filled exactly to the extent that the excess does not protrude outward. It is important not to overdo it with deepening the gun nozzle, because...
do not forget that on the outside we have PSUL tape and it should not come into contact with fresh foam. Approximately 5-10 minutes after filling the seams with foam, you should visually check its condition and, if necessary, carefully compact it (before it hardens, this is easy to do). If work is carried out at temperatures below +5 degrees, it is imperative to use special winter foam.
15. Next, install the fittings and check how the windows open.
If the window opens poorly or jams, this is a sign that errors were made when installing the window. Most likely, the frame is not strictly vertical in all corners. This can be corrected by adjusting the hinges and lock.
16. Done! The windows and door should be left for a day until the foam completely hardens. And we move on to the finishing stage.
17. Take plastic window sills 20 centimeters deep.
In total, I need 3 window sills: two 140 cm and one 70 cm. A finished window sill 150 cm long cost me only 200 rubles. We cut off the excess using a jigsaw and install it under the frame in the stand profile.
It is worth keeping in mind that the depth of the window sills into the frame is 2 centimeters; this is important when choosing the depth. Before installation, do not forget to remove the protective film around the perimeter. We install the window sill either strictly horizontally or with a slight (1 degree) slope from the window.
18. We cover the edges with special plates, which should be glued with superglue. As a support when setting the level, you can use a trim from the window sill itself or a wooden block. After this, we weigh the window sill from above so that the mounting foam does not lift it up.
And fill the entire plane of the base with foam from below. Just as with window frames, you should control the expansion of the foam and prevent it from having to be cut with a knife. Just tamp it down until it hardens.
19. The final chord is the installation of low tides. We cut it to length, fix it to the window frame using self-tapping screws (after having coated the joint with silicone sealant), fill the base with polyurethane foam and load it.
20.Done! Don’t forget to remove the protective film from the frames, window sills and ebbs. There is nothing complicated about installing windows and you can handle this amount of work alone. By doing this work with my own hands, I saved more than 15 thousand rubles on installation.
Now comes the fun part. The Chertanovsky office decided that there should be a discount on windows not only for me, but for all readers of my blog. Therefore, we made an exclusive promotion for ordering plastic windows. The minimum discount of 33% is relevant for everyone who is ready to independently measure and install plastic windows.
Do-it-yourself installation of plastic windows
Before starting an excursion about preparing windows for installation, how to correctly measure openings and ultimately install these same windows, I would like to say that there is a standard for plastic windows. This standard contains section D (recommendatory), which provides the procedure for installing plastic windows.
You can get acquainted with this section in more detail by studying GOST 30674-99 - in fact, a document regulating the production and installation of plastic windows. Unfortunately, this document does not contain step-by-step instructions from start to finish on how to install windows in accordance with GOST, but only the end result. Our article was created to tell you step by step how to install a plastic window and the possible features when installing it.
Pros and cons of wood
Wood has a number of advantages and disadvantages. Its numerous advantages are quite significant.
- Beautiful material. Natural solid wood has such an attractive textured relief that it cannot be compared with any other building material.
- Strength, durability. Timely care and the use of special processing compounds extend the service life of products.
- The simplicity of wood processing allows you to create structures of non-standard geometric shapes (in the form of an arch or a circle).
- Ease of repair and replacement of failed parts of the window unit.
- High thermal insulation rate. The natural porosity of wood, the presence of air in the capillaries, allows wooden frames and shutters to dampen sound vibrations. They retain heat better, unlike a plastic profile of equal thickness. This is an important quality for those living in harsh climatic conditions.
The disadvantages of wood products include several features.
- Sensitivity to moisture. When exposed to water, the properties of wood deteriorate. This leads to a change in the shape of the structure.
- Use of chemicals for processing. This reduces the environmental friendliness of the material.
- High price.
- The need for periodic staining.
Wood, even treated with special mixtures, is characterized by high flammability.
When deciding which window is better to install, wooden or plastic, it is worth considering all the factors.
The time of year favorable for installing a plastic window
You have already guessed what will be discussed in this paragraph.
No, we don’t want to say that construction stops in winter and everyone is waiting for warmer weather. But, it is during the warm period that you can comfortably install a window, restore slopes using wet work (use of cement mortars), polyurethane foam has the highest yield, and so on. Of course, it is better to install windows in the warm season.
And let’s say more, according to technology, it is generally impossible to install plastic windows in frosty conditions! (below -10 degrees Celsius). As a result, incorrect installation can affect the quality of work, and therefore the quality of window performance. In this case, it makes sense to wait for a warm period in order to install the windows as expected and not have to suffer later with distortions, cracks, and adjustments.
General recommendations
To conclude the review, here are a few general recommendations that will help you avoid wasting time and money:
- Installation of plastic windows should be carried out at an ambient temperature of at least -100C;
- The strength of the plastic window frame is not sufficient for installation without a frame (this statement is true for any PVC window design);
- The windows are constructed with special fastening materials, so to work with them you will need a special hex key.
accepts orders for any type of work necessary to bring a wooden frame to full readiness for finishing, including installation of windows and doors. You can find out more about the terms of cooperation by any means of communication from those published in the “Contacts” section.
Calculate the cost of painting and insulating your home right now
Select types of work:
Select materials:
Measuring openings for installing a plastic window
To measure you will need a tape measure. Correct measurement is the first step to successful installation of PVC windows. If the measurement is made in a panel house, then everything is simple here; the measurement is made from the lines of intersection of the slope planes and the walls.
Measuring the opening for a plastic window for panel houses.
The peculiarity of the openings of panel houses is the L-shaped section that holds the window in the wall.
When taking measurements in panel houses, it is necessary to pay special attention to the size of the opening on the apartment side. Inside, we measure the distance between the side slopes at the top and bottom, as well as the height from the window sill to the upper slope on the right and left. The window sill must have a width = wall thickness – window profile width (60mm) – distance from the outer wall to the L-shaped step in the wall + protrusion (5-100mm).
Measuring the opening for a plastic window in a brick house
When measuring for the installation of windows in a brick house, it is important to determine the boundary of the load-bearing wall, that is, the beginning of the brickwork.
Here, the plaster on the slopes can be of considerable thickness, it is for this thickness that an adjustment should be made, about 1-2 cm plus the size. Inside, we measure the distance between the side slopes at the top and bottom, as well as the height from the window sill to the upper slope on the right and left. From the outside, we measure the width of the opening from wall to wall from top and bottom, as well as the height from low tide to the top of the opening on the left and right.
Measurements from the outside and inside are necessary to determine the possible angle of non-prependicular slope of the window relative to the wall. The window sill must have a width = wall thickness - 50 mm. 50 mm is left for finishing the external slopes.
Measuring the opening for a plastic window in a wooden house
In a wooden house, the window opening has parallel slopes and is actually measured in the same way as for a brick house.
It is also worth noting that when old wooden windows are replaced with new ones, the openings in secondary wooden housing are often widened, since plastic windows are “warmer”. In this case, when installing the window, you will need a gas or electric saw to change the geometry of the opening. The window sill should have a width = the thickness of the wall.
Advantages of PVC structures over wooden windows
The advantages of plastic double-glazed windows include the following:
- First, many companies provide a complete solution. You don't have to do anything yourself. A representative of a trade organization will come to your home, take accurate measurements, and use them to make a design for you. After a short period of time, the products will be delivered to your home, where the craftsmen will dismantle the old window and install a new one. You can use the installed new frame within a day;
- secondly, plastic structures are relatively inexpensive;
- thirdly, the noise level is significantly reduced;
- fourthly, the density of joints in a plastic window allows you to obtain high thermal insulation;
- Another advantage of the PVC structure is its functionality. You can easily fix the window sash in a horizontal or vertical position.
Plastic windows have high thermal insulation properties
Dimensions of the window and its components after taking measurements
In most cases, after comparing measurements from top and bottom, from right and left, there is a discrepancy in the results. This is due to the skew of the existing opening, especially in panel houses.
To calculate the window size, a regular rectangle with identical opposite sides equal to the smaller value of the measured opening from the outside is used; a smaller size will ensure that the window can pass through the opening without destroying the strength elements of the wall.
As a result, taking into account the existing factors, plaster, old frames, etc., it is necessary to strive for the following indicators:
– the width of the window should be 30-40 mm less than the width of the opening relative to the “power” slopes; - the height of the window should provide a gap between the lower slope and the window equal to the thickness of the window sill (a standard plastic window sill has a width of 20 mm) + a gap for installing a base block (30 -40 mm) + guaranteed clearance as for width (30 mm). Total about 80-90 mm.
After these measurements, you can order the window, window sill and fasteners. On average, the production and delivery of a plastic window takes 8-10 days, in large cities - 3-4 days.
Replacing seals
Over time, the sealing contours wear out, which leads to a gradual weakening of the pressure of the active flaps.
This entails inevitable depressurization of the windows. Moreover, even slight and imperceptible blowing of the sashes is the cause of serious heat loss and the entry of street dust into the rooms. Timely replacement of window seals helps to avoid all these unwanted processes. Elastic contours come in several types:
- rubber;
- rubber (EPDM);
- thermoplastic (TPE);
- silicone.
Most often, windows are blown out when the seal gets jammed at the corners. In these places, the contours become thicker and harder, which prevents uniform pressure along the entire perimeter of the valves. To avoid this during further operation, replacing the seal on plastic windows should be done using non-crease profiles. New generation polymer EPDM or TPE seals have these qualities. Their use ensures uniform pressure at all points, including corner areas.
The clamping force is also affected by the fittings, so you should not neglect the recommendations for the operation and care of these mechanisms.
Removing old windows
After you have received your window, you can begin dismantling the old window and installing a new window.
It is very difficult to dismantle the old structure without destroying the frame, since it is a labor-intensive and therefore time-consuming process. Most often, after dismantling, only the sashes remain intact. I remove them from the hinges first.
They saw the old frame in the middle and knock it out of the opening. Preparing a place for a new window. We remove the sashes, dismantle the frame, old ebb and window sill.
Clean the opening from debris, old insulation, and large protrusions of wall slopes that stand out and affect the parallelism of the walls. If, on the contrary, deep depressions and peelings are found in a brick and panel house, it would be better to first restore the wall and only then continue installing the window. You don’t have to wait for the cement to completely harden, but initially ensure that it at least fills the depressions.
How much does it cost: average prices
The cost of the service depends on:
construction material;- condition of the product and the wall;
- window height;
- the presence of additional structures, for example, metal gratings;
- the number of works performed;
- professionalism of the company.
Prices for window dismantling range from 280 rubles to 1,500 rubles per unit.
The cost of replacing a window is from 500 rubles to 3000 rubles per unit.
Removal of the window after dismantling is estimated from 280 rubles to 1,500 rubles per unit, depending on the size of the structure and distance.
Installation (installation) of a plastic window
Compliance with technology is the key to proper window installation.
Based on the conditions for using professional polyurethane foam, the air temperature should be from – 10 to + 30°C; the ideal conditions for using foam are considered to be a temperature of +20°C and humidity from 60 to 80%. Depending on the size of the window, we calculate the volume of foam.
The weight of one cylinder should be 850-920g. with a foaming agent content of 750 ml. Manufacturers promise foam yield in the range of 45 - 50 liters, but it is necessary to take into account the filled volumes.
Given the condition of heterogeneity and a large number of irregularities, you can count on filling 15-20 liters with one cylinder.
At the same time, you will need a foam gun, PSUL tape (along the outer perimeter of the window), vapor barrier tape (along the inner perimeter of the mounting seam). Also: level, plumb line, hammer drill, drill and nails corresponding to the size of the dowel (more often used, 8x60)
The sashes are removed from the plastic window and the glass units are removed. For more details on how to remove double-glazed windows, see the article “Replacing double-glazed windows in plastic windows.”
Do not forget to mark all the beads of the glass unit being removed so that in the future you can put them exactly in the same place. During the production process, glazing beads are determined in place with a special ruler and a slight discrepancy (1-2mm) will be noticeable at the junction of horizontal and vertical glazing beads. The protective film is removed from the outside of the window block box and PSUL tape is glued.
This is a vapor-permeable sealing tape that looks like foam rubber impregnated with a special composition. This allows you to protect the polyurethane foam from exposure to the sun and moisture from the street. A vapor barrier tape is glued to the end of the plastic frame to protect the installation seam from the inside of the room from moisture.
Load-bearing blocks are installed in the opening; they will take the main weight of the PVC structure.
They are aligned to the level and height of the corresponding installed box. Place the box on the blocks close to the outer opening. Align the frame with a plumb line with absolute axial symmetry and a thin end (often the quality of the level does not allow you to determine the correct position). Next, using a hammer drill, drill a hole through the profile of the window block frame into the wall to the depth of the existing dowel nail.
Most often, 4 holes are made, two on the right and left sides of the box. It is necessary that the dowel and nail go into the wall through the box before pressing the head against the box. But without fanaticism, when the head is pressed against the box, it begins to imperceptibly deform under the applied efforts and turns from rectangular to oval.
There is another way to secure the box using locking plates. They are also installed, two at a time, on the edges and then fixed in the wall. Depending on the type of window system available, appropriate iron plates are purchased.
After this, the box stands on its own on the blocks and corresponds to the set level.
Please note that the condensate outlet holes should go to the drain and not to the window opening
The gaps between the wall and the frame are filled with foam. If the volume is large, it is better to foam in several approaches. This will depend on the density of the foam application, taking into account its drying.
Pay attention to the outer part of the window; if the PSUL tape somewhere does not adhere to the wall or simply comes loose, such a place must be covered with sealants. There should be no empty opening or gap between the window frame and the wall from the outside. We wait for it to dry.
The window sill is cut to fit the corresponding opening in width and length. The window sill protrudes into the room by 5-10 cm, and to the sides of the window opening by 5 cm on each side.
with a slight slope from the window, but strictly horizontal in level. When choosing the width (depth) of the window sill, you should take into account that the window sill is “recessed” under the window frame by 2 cm, so the width of the installed window sill will be 2 cm less)
...and is attached to special grooves on the box,
The ebb is screwed to the box using self-tapping screws, previously cut to fit the opening.
We begin to install the sashes and double-glazed windows, taking into account that the first glazing bead is attached from the top, in order to prevent the double-glazed window from falling.
We clean up the workplace and prepare for the next step, installing the slopes. If you need to install a plastic window in a wooden house, then you can see the features and examples of installing windows in a log house in the article “Installing plastic windows in a wooden house made of logs or timber.”
Do-it-yourself installation of plastic windows
What to pay attention to when replacing a window
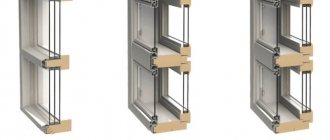
Before you replace or repair a window, you need to pay attention to several important points. Firstly, it is worth focusing on the profile system. Today, the most popular options are 3- and 4-chamber profile systems. Secondly, you need to pay attention to the design of new window structures. Plastic windows can be made in a straight or rounded design.
The fittings of a new window are also of utmost importance. The quality of opening and closing of the valves depends on it. When replacing a window with a new plastic one, you should pay attention to the type of glass unit. It may consist of several chambers, which are filled with each other with inert gas or air. The level of noise and heat insulation in the room depends on the quality of the double-glazed window and the number of cameras.
Don’t forget about the components that will give the new window a complete look. In particular, the installation of new window structures involves the installation of ebbs, window sills, canopies and other elements. Finally, when replacing a window, it is worth emphasizing the importance of dismantling work. Therefore, before ordering the installation of PVC windows, you should find a dismantling team.
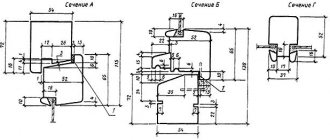
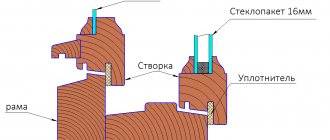
Rice. 8. Components of a plastic window.
Technology and procedure for installing plastic windows
Installation sequence:
The last point can be performed at the end of all work if you are building a private house or cottage. If you live in an apartment, then the installation of the ebb should be done after installing windows without double-glazed windows. To do this, before installing the window, remove the beadings (a screwdriver is slipped between the beading and the rubber gasket, and with light blows knocks the bead out of the groove), and then the double-glazed windows are removed. This makes it easy to level and install the ebb through the window.
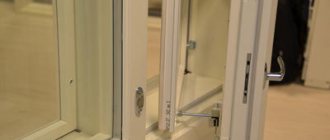
When does a glass unit need to be replaced in a window?
You can determine the need to replace a double-glazed window in a window based on the following signs.
Symptoms of “diseases” of double-glazed windows:
- Condensation has appeared inside the double-glazed window between the panes - depressurization
- Cracked glass unit - installation errors or thermal shock
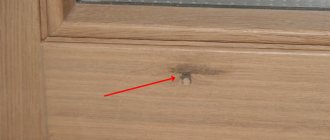
- A glass unit breaks - mechanical damage
Photo: the main reasons for replacing double-glazed windows are mechanical damage and fogging
Signs of technologically outdated double-glazed windows:
- It’s cold in the apartment or house – the glass in the double-glazed unit is technically outdated
- Noise from the highway - double-glazed windows with inadequate sound insulation
- The room is heated by the sun through the windows - the glass unit does not contain solar control or multifunctional glass
- High heating bills in a private home - the glass in a double glazing unit is technically outdated
- Curious glances from passers-by - no special mirror glass installed
- Grilles on the windows - triplex is not installed in the double-glazed window
A broken or depressurized glass unit must be urgently replaced; it cannot be repaired.
If the double-glazed window is intact, but the window was installed in the early 1990s or 2000s, then we can say that the double-glazed window is morally and technically outdated. This means that the owner of the windows does not receive the required level of comfort. Innovative technologies have made glass 50% warmer, the level of sun protection has increased by 40-60%, the glass has become safer and soundproof.
Installation of a plastic window
Before installing the window, a stand profile is installed. You lay the profile in the right place, align it horizontally and foam it. But before foaming it is better to put a window on the profile and see if it fits normally into the remaining space. If there is too much free space at the top, then something should be placed under the profile.
It is better to insert the stand profile directly into the bottom groove of the window. If the profile is not provided in the package, then you need to place blocks under the window to the height of the window sill in order to secure the window sill under the lower groove of the window.
When the installation of the stand profile is completed, we install the windows. It is recommended not to remove the protective tape until work is completed.
Tip: to increase the thermal insulation properties of the window, the space in the support profile can be foamed using an extension attachment on the mounting gun.
First, you need to attach the fastening elements to the window that will hold it in place. It is best to use flat anchor plates. They should be located perpendicular to the plane of the window at a distance of 10-20 cm from the corners of the frame on each side. Fastening to the window is done with a metal self-tapping screw about 10 cm long (1 self-tapping screw is screwed into the dowel at the end of the anchor plate into the frame from the outside, the second at the other end of the plate into the wall and also into the dowel).
If you are inserting a plastic window without double-glazed windows (with empty frames), then the fastening screws are screwed from the inside of the frame into the wall using dowels, but not completely, so as not to damage the frame structure; you first need to drill a hole for the dowel.
When the anchors are fixed in the window, we insert it into the opening and level it. After this, in the future places where the anchor fasteners are attached to the wall, we punch recesses under the entire fastener plate, so that we can then cover the entire fastener with mortar and level the wall for installing the slopes. After fixing the plastic window in the opening, check its vertical and horizontal positions again. Therefore, you should not immediately screw the screws into the opening completely.
It is better to do the leveling work together, so that one person holds the window, and the second places the bars for leveling.
We proceed to filling the space between the window opening and the plastic window with polyurethane foam. The main thing is that the foaming is one hundred percent.
Important! Always wet the surface with water before foaming (using a spray gun, for example). This is the only way the foam will adhere to the wall structure as much as possible. If you are installing a window at a temperature below 5 degrees, then use all-season or winter mounting foam. If the temperature is above 5 degrees, any foam will do.
The foam must dry for at least half a day. After this, it must be protected from the harmful effects of the sun's rays. This is done either with ordinary mortar, or with tile adhesive, or with a protective impermeable film.
Replacing a window sill or using a decorative trim
Window sills wear out the fastest when windows are used. Various objects are regularly moved across their surface, resulting in scratches and microcracks appearing on it. As a result, the plastic begins to become more dirty, covered with yellow spots and looks much worse than window frames. In such situations, replacing the window sill can help. To perform it, you need to have basic skills, so many today choose a simpler method - installing an overlay.
The window sill overlay is specially designed so that anyone can quickly update the plastic surface or change its design. It is a profiled PVC sheet, which has a small thickness. The trim exactly follows the contours of standard window sills and is suitable for updating all types of plastic windows. It can be quickly adjusted to the required dimensions and installed independently. Overlays are cheaper than PVC window sills, so they allow you to save not only on the services of a specialist, but also when purchasing materials for updating windows.
The most effective is considered to be simultaneous replacement with slopes. During this activity, you can eliminate wall defects, insulate windows and change their design. In such cases, it is advisable to select a plastic cover for the window sill to match the decor of the slope system. In this case, the entire window structure will look completely different. When installing in pairs, the overlay is first installed, and then the system of plastic slopes.
Window sill installation
Installation of the window sill requires preliminary trimming of the excess length, since it comes with a margin in size. A jigsaw or grinder is perfect for these purposes. Then you should move the window sill to the support profile (if there is one) and level it.
Don't forget to put caps on the windowsill. It is advisable to cut the window sill so that it fits clearly into the opening along with the plugs. The best way to glue the plugs to the window sill is with super glue.
After leveling the window sill, you need to check it for subsidence by pressing with your hand in several places. If everything is fine, then you can start foaming, having first pressed down the window sill with heavy objects (for example, several bottles of water) to avoid bulging upward from the polyurethane foam. The next day, excess foam under the window sill can be removed with a regular knife.
By the way, you can install a window sill with a very slight slope from the window (literally 2-3 degrees), so that possible condensation does not leak between the window and the window sill.
Wooden frames: advantages
Wooden frames used to be installed everywhere because there was no other material for this purpose. There was no choice. But wooden windows have a number of advantages that you can’t argue with:
- Environmental friendliness . There is no arguing that wood is the most natural material. There are plenty of chemical compounds in everything, but wood is wood.
- Durability . Wood is a very reliable and durable material. It can last for many decades, especially if you take care of it. The proof is the old houses that have sunk into the ground over time, but the window frames are still there, safe and sound.
- Possibility of painting . The good thing about wood is that it can be painted any color to match the color of the interior. You can choose even the boldest shades.
Wooden frames have proven their reliability over years of use. And if you monitor their condition - for example, treat them against insects, they will serve more than one generation of household members.
Installation of slopes
Before installing the slopes, you need to remove excess foam around the perimeter of the frame with a knife (this should be done very carefully so as not to damage the window material). To install slopes, PVC panels are taken and cut to the required length (two for the height of the opening, the third for the width of the opening). After vertical alignment, fastening is carried out using polyurethane foam.
And so that the foam does not push the panels away from the wall, they need to be glued to the walls with masking tape (preferably in three places).
After the foam has set, you need to make the final framing at the ends of the panels. For this, there is an F-shaped profile (thanks to this design, it is put on the end of the plank).
Necessary tools and equipment
You will need to prepare a set of tools for dismantling and installing the structure. List of equipment for work :
- A crowbar used to dismantle the sashes.
- Hammer. It will be needed when removing the window sill and ebb.
Tape measure for measuring parameters.- Pencil, construction angle.
- Knife for removing residual dried foam.
- Metal scissors for cutting castings.
- Hacksaw, jigsaw.
- Putty knife.
- Polyurethane foam.
- Wooden mortgages for fixing the frame.
- Sealant.
You will also need materials for finishing the slopes.
Installation of ebb tides
The ebb is inserted into the groove under the window, and then leveled, pressed, fastened with self-tapping screws to the stand profile and foamed.
After installing the plastic windows, the fittings are adjusted and a mosquito net is installed.
Well, now it's time to finish the article. All the material I wanted to share has been reviewed. I hope it will be useful to you, and you will use it if you need to replace your windows with plastic ones yourself. Improve your own practical skills and gain new knowledge, they say: “It’s never too late to learn!” That's all, thank you for your attention, successful and easy repair!
Why you need to change windows
There are many cases in which it is necessary to replace windows with plastic ones:
- to improve sound insulation and energy saving;
- the glass is damaged or the glass unit is cracked;
- the design of the room has changed, the old frames do not fit into the new solution;
- in new buildings, when the developer installed budget windows that are not suitable in a given climate.
To ensure greater tightness, wooden windows should be replaced with plastic ones.
Modern PVC structures are more airtight than wooden windows and provide additional opportunities and comfort.
Features of window openings and their creation
In different types of panels for the construction of residential and public buildings, window openings are arranged according to individual technological solutions :
The most common type of product is reinforced concrete panels, which are manufactured at KPD factories according to standard series.
Openings in such structural elements are made at the production stage.The return line of pallets is equipped with folding or magnetic formwork along the outer perimeter.
An opening in the form of a steel or polymer box is placed inside.
- Modern multilayer panels, which are manufactured on automated conveyors, are equipped with windows even before casting - the special design of the translucent element is equipped with a rigid box, which simultaneously plays the role of permanent formwork, as well as the future slope of the opening from the interior and facade.
To replace such windows, the frame is provided with an assembly seam with a complex mechanism for mating the frame profile. - Lightweight SIP panels, intended for low-rise construction, are manufactured by gluing insulation to oriented strand boards (OSB). In such structures, openings are cut locally, mechanically. This can also happen at the factory, subject to ordering a large batch of similar products.
The main dimensions of window openings in standard external wall panels , manufactured according to standard design documentation:
- When arranging a window in a small studio - 600 x 1500, 900 x 1500 or 600 x 600 mm.
- For kitchen spaces and living rooms whose area is less than 6 m2 - 1200 x 1500 mm.
- In residential premises with an area of up to 12 m2 - from 1200 to 1500 x 1500 mm.
- In rooms whose area exceeds 15 - 18 m2, the dimensions of the openings range from 1800 to 2400 x 1500 mm.
- When constructing business-class housing, panels are produced with an increased height of up to 3300 mm, and the window opening is 1800 mm.
- For OSB boards, the opening dimensions are not standardized.
In addition to standard panels for civil buildings, factories also produce a limited number of products for the construction of first floors, stylobates and other built-in and attached premises of the building.
Note. Window openings in such panels can reach dimensions of up to 3000 x 3000 mm.