Currently, in private construction, purchased concrete blanks used as lintels are practically not used. Today, most owners of country houses prefer to make door and window lintels with their own hands.
To make your own lintels from poured concrete, you do not need to have any special skills. All that is required of you is to pay due attention to the materials in this article and follow all the instructions given in it.
Materials and tools
Boards for making formwork
To successfully complete the task, you will need the following consumables:
- a set of edged boards of suitable thickness;
- set of metal corners;
- thin reinforcing mesh;
- polyethylene film;
- nails with a wide head;
- self-tapping screws of the required size;
- knitting wire.
Jigsaw for cutting wood
As for the tool, for work you will need to prepare:
- regular hammer;
- electric jigsaw (hacksaw);
- electric drill or screwdriver;
- installation tool (mount);
- “trowel” (trowel);
- small capacity bucket.
Key Features
Modern construction technologies provide for the possibility of using several types of lintels:
- factory reinforced concrete;
- monolithic products made directly on site;
- metal;
- brick;
- combined.
Despite the reliability of ready-made reinforced concrete products, it is much easier and cheaper to make window lintels yourself, saving time and significant money on transportation costs, materials and labor.
A lintel is a part of a wall or partition that covers the top of a door or window opening. If the weight of the ceilings or enclosing walls is transferred to the wall in which the opening is located, then it is recommended to install load-bearing lintels. In the absence of such loads, self-supporting (non-load-bearing) reinforced concrete, metal or brick lintels are used. In some cases, wedge (arched) lintels are made, which serve as an additional decoration of the exterior or interior of the building. They are also used to organize openings in rooms with vaulted ceilings (ceilings).
Note!
When planning to make window lintels, you should remember to select the correct length of the product. In load-bearing walls, the support of products on the walls must be at least 250 mm, in self-supporting structures - at least 120 mm.
Today, experts recommend giving preference to concrete lintels, finished factory products or products made on the construction site. They are more durable and reliable, take less time to install and are designed for higher loads. The production of concrete lintels can be done directly at the construction site in two ways:
- Pouring on site, with further installation of the product.
- Filling over the opening using removable, collapsible formwork.
Preparing the box
Manufacturing of formwork
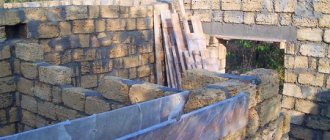
Work on arranging a lintel begins with the manufacture of a wooden frame (box) used to pour the concrete mixture and obtain a building element of a given shape. To install such a box, you will need one bottom and two side wooden panels, from which you can subsequently assemble the formwork.
The linear dimensions of the finished panels must correspond to the dimensions of the window opening, and the side panels must cover it both in height and width. The bottom shield is made exactly to the size of the opening being closed. In the sides of the formwork, holes are prepared in advance for the binding wire, through which the panels will be held in a given position. The bottom and side surfaces of the boards are then lined with polyethylene film, which is attached to the formwork using glass nails.
Installation of reinforced concrete lintels
Formwork frame
To organize concrete lintels, formwork panels should be prepared according to the dimensions of the opening. To do this, first purchase wooden boards with a thickness of at least 20 mm, which will be fastened together with screws or nails. Experts advise using self-tapping screws, which can be easily removed later using a screwdriver.
Formwork assembly diagram
The side panels of the formwork must cover the opening in width and height. The lower support panel is assembled with increased strength strictly according to the dimensions of the opening. The installation of formwork begins specifically for the lower shield, which is supported from below by two wooden posts arranged in a V-shape. The support is installed only after the lower panels have been completely installed and checked for level; they must be placed strictly horizontally.
Reinforcing mesh is laid on the lower shield and then the vertical shields are secured with self-tapping screws. For additional thermal insulation of the lintels located in the facade walls, insulation is laid on the outside of the formwork: mineral wool, penoplex or dense foam.
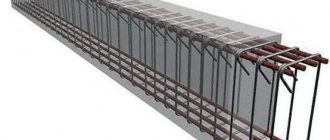
Jumper fittings
At the next stage, the structure is reinforced. The diameter of the steel reinforcement is selected taking into account the load-bearing load of the lintel, its length and width. Metal rods are laid along the lintel, fastening them together with a special knitting wire.
Note!
Experts do not recommend using welding when working with metal, only technological bonding.
To fill the lintel, prepare a concrete solution from high-quality certified cement, small crushed stone and washed sand. The solution can be prepared using an electric concrete mixer or manually in a large container, thoroughly mixing all the ingredients. It should be remembered that crushed stone is added to the finished solution last. Before pouring concrete, small chips of concrete or brick are placed under the reinforcing mesh to a height of 15-20 mm so that the metal is completely recessed in the mortar and the finished structure.
Note!
It will be possible to remove the formwork only after a few days, after waiting for the concrete composition to set. The lower formwork panels and spacers are left for at least 3-4 weeks until the concrete is completely strengthened.
Pouring lintels and dismantling formwork
Pouring a window lintel
It is recommended that two people perform the pouring of concrete mixture; in this case, an assistant will be able to give you buckets of concrete, which is usually prepared at ground or floor level. Pouring concrete should be done very carefully, ensuring that the composition is evenly distributed throughout the entire volume of the box and penetrates into all its cavities. In addition, when arranging window lintels with your own hands (in the process of leveling the concrete mixture), you must ensure that the pouring level coincides with the top cut of the brickwork.
How to reinforce lintels?
Using my door as an example, the following were prepared:
- 4 reinforcement rods with a diameter of Ø 12 mm, size 1200 mm;
- 6 wire rod quadrangles with a diameter of Ø 6 mm, size 100 by 100 mm;
- knitting wire.
The frame was knitted with a regular 100 mm nail. Since hooks must be ordered, for the convenience of tying the frame, 2 reinforcement pins, which are narrower than the size of the reinforcement, are driven into the wall.
The frame was knitted with a regular 100 mm nail. Since hooks must be ordered, for the convenience of tying the frame, 2 reinforcement pins, which are narrower than the size of the reinforcement, are driven into the wall. To start knitting, take 2 reinforcement pins and place them on the prepared pins driven into the wall, and mark a step of 200 mm with chalk or a marker. Along these marks we string prepared quadrangles from wire rod, distributing them according to the marks made with a marker, and tying the frames with knitting wire. Having tied the frames at the top, we place the remaining 2 reinforcements at the bottom and continue tying.
After our structure is ready, we immerse it in the formwork.
Let's move on to preparing the solution for the jumpers. I did this: for a bucket of cement grade 400, 3 buckets of sand and crushed stone. The mixing was carried out in a homemade trough, which was made from a galvanized standard sheet 1000x2000 mm and 4 boards, 2 boards 2.5x200x950 mm and 2 2.5x200x2000 mm. The trough was reinforced with knitting wire at the corners and boards along the bottom.
After the solution is ready, fill a couple of buckets and lift the reinforcement frame so that it does not touch the formwork from below, after which we fill it completely.
Photo
Jumper Installation Using U-Blocks
Scheme for manufacturing a monolithic lintel
Reinforcement frame for window lintel
Prepared formwork
Lintel after pouring concrete
Removing formwork
Did this article help you?
DIY window lintels
Window lintels are a mandatory element used in the construction of any residential buildings or outbuildings. Indeed, at a certain stage of construction of a summer house or country house, there is always a need to install functional lintels that provide rigidity and strength to load-bearing walls and enclosing structures.
What you need to know about jumpers?
Before you start making lintels, you need to know that they, just like walls, are divided into load-bearing and non-load-bearing. They differ, first of all, in size and thickness: the non-load-bearing structure has a minimum thickness of 12 cm, it is most often made in doorways indoors; the carrier is called a purlin and can be of considerable width. There is also a crossbar: this is a load-bearing structure with a special shelf on which other slabs can be placed.
Windows in a frame house do not have to be wooden; they can be made of plastic or aluminum. Read more about this in the article “Choosing windows for a frame house.” Have you chosen plastic windows? Read what PVC profiles are available and how to choose them correctly.
Where you can use double-glazed windows, read the link https://oknanagoda.com/okna/plastik/ispolzovanie-dvoynykh-steklopaketov.html.
i
Reinforced concrete lintels are often used in the construction of walls of private houses.
Advantages of reinforced concrete lintels PB:
- Ability to withstand high loads
- Ability to cover long openings
- Low cost of materials and labor costs for installation (installation) of jumpers
- Variety of ready-made sizes and a wide range of products
- When constructing a private house, standard PB reinforced concrete lintels make it possible to bridge openings up to five meters wide. To correctly calculate the load, the designer selects the type of reinforcement for the lintels, the class (grade) of concrete, and the section of the beam.
In common parlance among builders, reinforced concrete lintels are simply called monolithic. To obtain reinforced concrete products of the desired shape, it is necessary to construct a sealed formwork of the correct rigidity. Incorrect selection of materials for formwork and errors during its assembly can lead to its destruction during concrete laying.
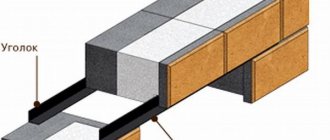
Industrial plants that produce wall blocks from cellular concrete or expanded clay concrete often prepare y-shaped elements for concrete lintels, which are also permanent formwork. This suitable method for pouring lintels speeds up and facilitates the work, since such elements only need to be installed on a flat surface, and you can pour reinforced concrete products. Steel reinforcement is placed in the installed formwork. Between the reinforcement rods and the walls of the blank elements, a gap of two centimeters is installed using plastic spacers. This allows, when pouring, to provide an insulating layer of concrete for the reinforcement, protecting it from corrosion. The most popular concrete mixture for pouring lintels is M300 concrete. Concrete laid in formwork requires further maintenance. During the hot period of the year, it is important to prevent the concrete from drying out (protection from direct sunlight), and in winter weather - to provide heating and protection from the wind. Excessively rapid drying of concrete in summer is avoided by applying water to the surface of the concrete during the first week of its curing. In the case of collapsible formwork, when concrete hardens naturally, it is recommended to remove the formwork no earlier than 14 days. Concrete will fully acquire its brand strength declared by the factory only after 28 days.
Figure 1 shows the lintel and the type of lintel reinforcement.
Work order
- A wooden shield is knocked down from the boards, which will be held on by self-tapping screws, then thick reinforcement is placed inside the wooden shield; it will be needed to give rigidity to the structure.
Installation and design of the jumper
To ensure that the wooden panel does not go anywhere when pouring the lintel, it can be screwed with wire to the masonry mesh if the building is made of brick.
- Jumpers for window openings must be insulated. It is better to lay insulation immediately, otherwise the windows may begin to freeze. For this purpose, you can use mineral wool, glass wool or other insulation that is not afraid of the environment and cannot ignite.
- After this, the resulting structure can be filled with concrete. It will need to be allowed to dry: this usually takes several days. Once the formwork has been removed and the lintel is ready, construction can continue.
Windows with lintels insulated with mineral wool may have a problem: the wool remains hanging from above, so when installing a plastic window, the foam cannot adhere well to the upper part of the structure.
In plastic windows, double-glazed windows determine their quality. Read our article “Types of double-glazed windows, their advantages, disadvantages and interchangeability.” Have you bought new plastic windows? Read how to remove protective film from new plastic windows without damaging them on our website.
Laminated windows are well suited for a wooden house. Read about them on our website at the link https://oknanagoda.com/okna/plastik/vibor-laminirovannih-okon-i-praktichnost.html
Reinforcement of formwork with supports
When installing a horizontal formwork panel, it is imperative to use supports. Some builders do not do this, not taking into account the rather significant weight of concrete, which is about 2.5 t/m3. When pouring mortar into the formwork, it can displace the shield or deform it, bending it down. This will definitely affect the shape of the jumper, and it will be very difficult to correct it. So it’s better to immediately take care of reliable formwork and its rigid structure.
When securing a support located in the center of the opening, it should be positioned closer to the window. The inner edge will not sag, since it is attached to the vertical board.
DIY lintel over window and door openings
Hello. This summer I started construction. I decided to build a small extension to the house. Naturally, with your own hands. After the construction is completed, I will describe the whole process, but for now I want to tell you how I came up with the idea of building reliable and frost-free lintels over window and door openings from improvised means.
There are a great variety of technologies for constructing lintels. Ready-made reinforced concrete lintels are sold, you can put metal corners, you can build formwork and pour it yourself from concrete, etc.
But ready-made jumpers are quite expensive, and you have to pay for delivery and unloading - you can’t bring them in a car)))). And then you can’t throw one up.
Metal corners are also not cheap (after all, you need quite powerful ones). In addition, I also encountered such a drawback - over time, rust passed through the putty and wallpaper. After all, the layer of putty above them is very thin - the plaster hides their thickness, and above them there is only putty. I do everything myself, I like to work alone, so I decided to pour concrete on site.
There are some “moments” here: The concrete lintel should not freeze, otherwise the window openings will “cry” in winter. This problem is usually solved by laying 5 cm of extruded polystyrene foam on the outside. It's not cheap either.
I build from gas silicate blocks. The manufacturer has U-shaped blocks that can be laid out on a support, and then concrete can be poured into the resulting trench. It seems to be normal, but... The cost of such blocks is not at all humane. (Exactly four times more expensive than usual), and again you have to go with a trailer for them..
So I did it easier.
So, we will need: 1. Boards for formwork. (Any ones you don’t want) 2. Gas silicate blocks. 3. Cement. 4. Sand, or ASG 5. Reinforcement.
First of all, we build the formwork:
So, I got “permanent formwork” made of porous, non-freezing material. The space remaining in the middle, measuring 100 by 250 mm, is more than enough to make a powerful reinforced concrete lintel. (Especially since 250 is the height.)
All that remains is to make the concrete. I prepared it from M500D20 cement and sand and gravel mixture. It can also be made from sand, but I had PGS.))))). By the way, when making from sand, the volumetric proportions of cement/sand should be maintained at 1/3. And when using ASG, the proportion can be increased to 1/5 without losing the concrete grade. (If there is no clay in the ASG).
Having opened the barn, I sadly realized that getting a concrete mixer was not so easy. I haven't received it since the fall.
Then again sand and again cement. It’s better to do this on a steel sheet or concrete pad, but I only had unnecessary old film on hand.
Is it necessary to insulate a concrete window lintel?
A concrete lintel is a part of a brick wall structure that spans the top of a window or doorway. This structure requires thermal insulation, since concrete has high thermal conductivity and is a “cold bridge.” If you decide to reduce your home heating costs in winter, then, first of all, you should insulate all concrete lintels.
Heat from the heated room escapes through all surfaces: walls, attic floors, floors on the first floor and window openings. The faster you insulate the facade of the house with mineral wool, the less heat loss will be through the external walls in winter. This also applies to concrete lintels in a brick wall, since they are “cold bridges” - places where maximum heat transfer occurs.
Long-term experience in using metal-plastic windows with modern double-glazed windows suggests that by installing them you can increase energy savings at home by up to 25%. If you additionally insulate the strip foundation, window sill and window slopes, energy savings will increase to 40%. Therefore, you should not think about whether it is worth insulating concrete lintels above the window, but act.
DIY window lintels
- 1 Materials and tools
- 2 Preparing the box
- 3 Pouring lintels and dismantling formwork
- 4 Videos
- 5 Photos
Currently, in private construction, purchased concrete blanks used as lintels are practically not used. Today, most owners of country houses prefer to make door and window lintels with their own hands.
To make your own lintels from poured concrete, you do not need to have any special skills. All that is required of you is to pay due attention to the materials in this article and follow all the instructions given in it.