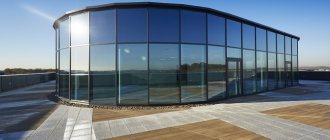
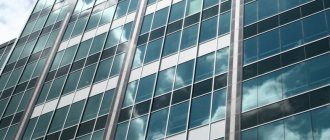
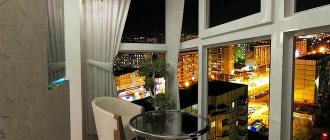
Stained glass facade glazing has taken a special place in the design of modern buildings. It gives elegance and weightlessness to high-rise buildings and emphasizes their individuality. Seemingly fragile glass structures are actually quite strong and safe, and also have many positive characteristics.
There are several technologies for glazing facades. All of them are designed to fill large openings with dimensional glass, while being convenient to use.
Return to content
What you need to know when creating stained glass paintings on glass
Any painting requires a stencil. This is done in order to simulate lead soldering. The contours of each element of the stained glass window are outlined with special pastes resembling lead or other tape.
The special difference of this method is the creation of a picture of any complexity, which is impossible with classical methods. In addition, it makes it possible to use paints of various colors and shades.
The second most important thing every aspiring artist needs to know is what dyes to use. Remember, it's up to you
But mostly it is customary to work with acrylic paints. There are also water-based and various solvent-based. If it’s easy to work with “water” ones and you can always wash it off if something doesn’t work out, then with the second ones this won’t work. Each of them has its own disadvantages:
- “Water” ones are very unstable and in order to preserve the coating, it must be protected with varnish.
- Solvent-based paints smell unpleasant and take a long time to dry. It's hard to fix a mistake.
Filling with paints inside the outline is carried out carefully so as not to get on the outline itself. The dye should spread on its own and fill the entire space.
In addition to large stained glass windows, you can make small crafts - for example, stained glass windows from fused beads, or panels where the design is laid out over the paint with beads and cutting. Schemes for the panels can be downloaded on the Internet.
Stained glass ceilings price?
Stained glass ceilings are an ultra-modern, progressive solution. This ceiling decorates the room unusually effectively. But in order to achieve this, you should choose the stained glass ceiling correctly, and for this you need to be guided when choosing a number of designer tips:
- You can decorate any room with stained glass. However, it is worth considering the size of the room; if we are talking about a very small room, it is worth choosing a stained glass window that is adapted for such a room. Reduced stained glass windows for large rooms will look awkward and “clunky” in a small room;
- Bright, futuristic stained glass windows are ideal for living rooms. An original solution could be to use stained glass as the main light source. A similar solution would also be appropriate in a room such as a children's room.
- Stained glass ceilings for bedrooms should be characterized by sophistication and sophistication. Still, this is a delicate area; creating very bright landscapes, even on the ceiling, is not recommended.
The kitchen and bathroom can be decorated as you like, but it is worth taking into account the specifics of these rooms: heat, steam, moisture. It is worth turning to stained glass windows made using a special technology. Stained glass windows that reveal a marine theme or represent a continuation of the main interior of the bathroom would be appropriate.
Buy stained glass ceilings
Our company offers a wide selection of ceiling structures, the leading place among which rightfully belongs to stained glass ceilings. Such a ceiling can transform any room, but it is worth remembering that its integrity and long service life directly depend on the correct installation. That is why you should entrust the installation of such a ceiling to professionals. Our company provides comprehensive services, which include the selection of ceiling structures, necessary accessories, installation and installation of ceilings and lamps.
Stained glass ceilings cost
In our catalog you will definitely find exactly the type of ceiling that will fully satisfy all your needs. Using this design, you can “beat” any interior, and the ease of maintenance and durability of the materials will be an additional “bonus” in favor of choosing stained glass ceilings. And if previously it was believed that only wealthy people could afford stained glass structures, today, thanks to modern production technologies, stained glass ceilings have become more than affordable for the general population.
Post-transom system
It is considered a classic or traditional facade glazing system, which is easy to install and has a low price.
Installation technology
The structure consists of an aluminum frame assembled from racks and crossbars, and is located on the inside of the wall. A glass unit or other translucent filling is installed between the frame and the clamping profile. The seals used ensure the tightness of the structure.
Glazing facades with aluminum profiles, used in a mullion-transom system, makes it lighter, stronger, more durable, fire-resistant and warmer.
Advantages of the classical system
- high thermal insulation rates. The maximum width of the glass unit is 5 cm;
- installation of translucent filling up to three meters high;
- the use of different types of structures (adjacent to a structure; surface with a fracture; construction of a pyramidal top, installation of an entrance group and a tilt-and-turn window).
Decorative overlays add attractiveness to the façade. They have different shapes (round, mendala-shaped), widths and a large palette of colors.
As for the cost, it depends on the frame material, translucent filling and painting of aluminum profiles, as well as the built-in entrance group. The average price ranges from 7 thousand rubles/m2.
Return to content
Making stained glass: step-by-step instructions
Place the glass on the prepared stencil so that their edges coincide. Thoroughly degrease the glass with alcohol, acetone or vinegar. Dry the surface with a dry, lint-free cloth. Transfer the outlines of the design from the stencil onto the glass with a special disappearing marker. If you have experience in drawing, the lines can be applied directly with a contour or contour paste.
Let the outline dry, otherwise the drawing will smudge. Now all that remains is to fill the voids of the drawing with paints. This is done with a thin brush or straight from the tube. Tubes of ready-made paints are equipped with a convenient spout.
Paint is applied from the edges to the center. It’s okay if paint gets on the outline while working—touch it up with a wooden stick or toothpick. After drying, special paints become transparent and the outline appears through them. If the design involves color transitions, lighter or darker tones are applied after the base ones. They can be mixed or shaded with the main ones using a toothpick. Bubbles formed during the work are also removed using a toothpick. Let the finished painting dry completely
Some paints require additional coating with nitro varnish, please pay attention to this. This information is indicated on the packaging. All that remains is to insert the stained glass into the frame.
Video: master class on making stained glass using poured technique
Having mastered the painted and poured techniques, you can try yourself in the English film or fusion technique. This will require a lot of expense, materials and skills, but it's worth it.
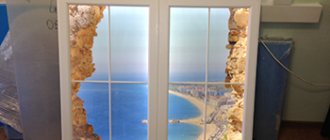
Photo gallery: several ideas for placing stained glass windows in the interior
Making stained glass is a creative and exciting activity. Even children can make the simplest stained glass windows. And let your work not be similar to the masterpieces of world painting, but they will bring originality and a piece of your individuality to your home.
Installation
Structural facades are installed either in a two-sided way or in a four-sided way. Double-sided installation is performed according to the following algorithm:
- First, the post-transom system is installed. Vertical elements are installed, securing them to the upper and lower ceilings, then the crossbars are mounted. Some systems are assembled without crossbars; in such structures there are transverse fasteners only in the places where the glass adjoins the ceiling.
- Fasteners (clamps) are inserted into the U-shaped groove on the sides of the glass unit.
- Double-glazed windows are placed on support pads and fixed with self-tapping screws through clamps to the outer end of the frame profile.
In addition to mechanical fasteners (clamps, self-tapping screws), double-glazed windows are attached to sealant - all joints are coated with it. After installing the glazing, the seams of the structure are filled with thermal insulation materials and sealed with a decorative layer.
Four-sided installation is carried out without any mechanical fasteners. The glass unit is glued on all sides to the supporting structure with sealant.
What is English technology for making stained glass?
The simplicity of making stained glass using English technology lies in the fact that it is made from self-adhesive colored film that imitates stained glass. The film pattern is glued to only one side of the glass, but it is clearly visible on both sides of the window. The joints of the fragments are sealed with self-adhesive lead strips. Lead tape is applied on both sides to mark the contours.
Film stained glass windows are made from high-quality English material, which is resistant to high humidity, temperature changes and frost-resistant. The film adheres very tightly to the surface of the glass, which distinguishes stained glass by its long service life - up to ten years or more.
To complete the pattern accurately, you will need a table with lighting.
- First, make a full-size drawing on paper, transfer the pattern to the glass and lay out the outline with lead self-adhesive tape. This is not difficult to do, it is very simple to apply - first guide it along the contour lines, pressing it with your fingers to the surface of the glass, and then smooth it with a spatula.
- Then turn the glass over and start gluing colored pieces of self-adhesive film.
- Connect the joints of the films with lead tape. The contours on the glass must match on both sides.
- All joints of the lead circuit should be soldered using a soldering iron and solder. After this, you can treat the lead with a special solution to give it a blackish tint.
Affordable sophistication or unaffordable luxury?
Anyone can buy decorative stained glass film for a window, you just need to want it, because the price range of such stained glass windows is very wide, which makes it possible to choose a product to suit your taste and budget.
The price ranges from 1,500 rubles to 12,000 rubles per roll. Films are presented from ordinary to the most sophisticated stained glass films: with imitation of stone, wood, holographic, mirror. And there are so many options for entire paintings - stained glass windows that the market offers that your eyes simply run wild, so first you need to decide on the direction and design. Although it is not at all excluded that it is the stained glass window that will give the idea for the design, set the tone and become the main accent.
General Tips
It is important to remember that the assembly of stained glass should always be done according to the first sketch, and its second copy is used as a template for the manufacture of elements. This is done to minimize the risk of inconsistencies and adjustments of fragments. If you are determined to make a stained glass masterpiece, then purchase template scissors with three blades in advance (the first two cut the sketch, and the third cuts a strip slightly less than two centimeters wide). Before you start cutting the sketch, it is better to paste it onto thin, thick cardboard to make it easier to trace the outline on soft paper in the future. When you start gluing, do not forget that the paper, wet from the glue, will stretch a little. Don't forget to check the template against the main (first) sketch. To make the work a little easier, especially if the stained glass window involves a large number of small details, it is better to number all fragments of the canvas in both sketches before the cutting stage.
How to make stained glass
Real stained glass is pieces of glass held together with lead tape. This is the oldest technology. It is very difficult to repeat it at home inside and out. You need special tools: glass cutters, lead solder and the glass itself. An ordinary window is not suitable - it is too thin. Stained glass is quite expensive. Especially the gold color - it contains real precious metals. The work process involves cutting glass according to templates. Then the craftsman fastens the pieces with lead tape and seals them. By connecting each fragment, we get a stained glass window.
As you understand, this requires time and space. To do this inside and out in an ordinary apartment requires a great feat.
But there is another, also very old technique that helps you make stained glass windows with your own hands without special tools. It involves painting glass that imitates real stained glass. Ancient false stained glass windows can still be seen in the south of Russia in small churches and on icons. The masters diligently painted the faces of saints, landscapes and ornaments with paints, renewing the faded colors from time to time.
This method is available to anyone who knows how to hold a brush in their hand. Over time, new materials came along, and stained glass painting became stronger, not inferior in capabilities to classic stained glass.
Not long ago, another technique appeared - a colored pattern on glass is created thanks to a translucent film painted in different colors. Craftsmen transfer the stencil onto film. Cut out and paste onto glass. This method has already proven its right to exist - the design is cut out and mounted quickly, lasts quite a long time, and is inexpensive. Yes, it needs to be updated from time to time. But a person without artistic abilities can buy the material and do everything on their own; a person without artistic abilities can replace the part.
We will describe in detail how to make stained glass windows on glass with your own hands using the stained glass painting technique. But first, let's look at what materials are currently used for stained glass.
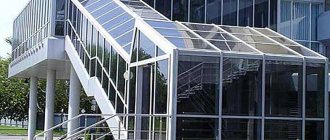
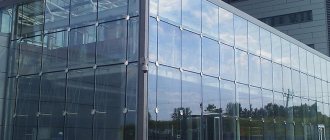
Modular facades
Mass glazing of multi-storey buildings required fast production and installation times for façade glazing systems. Mullion-transom glazing no longer meets these requirements, so modular systems were created that took into account the architectural specifics of high-rise buildings.
The differences between classical and modular systems begin with the design of stained glass. In a mullion-transom system, each stained-glass window is designed separately, and in elemental glazing, the entire facade is designed at once.
Design of a modular elemental glazing unit
This system is supplied to construction sites in ready-made blocks, which are produced under the control of the manufacturer’s quality control department, and not in individual elements, as in classic glazing.
The blocks are assembled from inside the building. They are lifted to the floors using lifting devices and installed on special brackets. It is worth noting that the height of one block is equal to the height of the floor. The joints are filled using sealants based on ethylene-propylene rubber (EPDM).
The use of a modular system in small stained glass windows is not advisable. It is used to glaze multi-storey buildings with the number of floors from 10 to 100, which are divided into blocks.
And of course, the elemental system is distinguished by installation speed and quality, which also affects its cost, which is almost twice the price of the classic one.
Return to content
Step-by-step master class
Creating a stained glass window
Making stained glass windows yourself is actually not difficult; it does not require any special skills. Film and painted techniques are best suited for creating stained glass with your own hands. We will look at them step by step and make a simple stained glass window using each of these two methods.
Painted technique
Basis for stained glass
1
In order to make such a picture, first of all it is necessary to take the dimensions of the glass, which will later turn into stained glass. Then, according to the dimensions, a template is selected or drawn by hand with a pencil or marker. If the drawing is taken from the Internet, and the glass size is larger than A4, then it must be printed on sheets of paper, and then these sheets must be joined together into a single whole. Cardboard is also suitable as a base; it is denser and the glass will slide less.
2
In this example, consider the option of creating a drawing yourself
It is important that all lines are clear
Drawing for stained glass
3
Glass with a small thickness is placed on paper with a finished design. It must be degreased with an alcohol-containing or ammonia-based product, or with simple alcohol.
Degreasing glass
4
The surface must be completely dry, so the degreaser is thoroughly wiped off with a soft cloth.
Surface drying
5
The next step is to draw the outline of the stained glass window, that is, the template is outlined on the glass. Black paint is most often used for this because it is most visible. You can also take contour paste, ready from the store or homemade, which includes PVA glue, ink and silver
Important: for creating stained glass, only stained glass or acrylic paints, which are sold in tubes, are recommended. Let the contour dry completely so as not to smear anything in the future.
Drawing an outline
6
The outline of the picture is filled with color. You need to work carefully. The dye is applied with a brush or sponge if the area is large enough and you want to create a textured image.
Filling an outline with color
7
If the drawing should be voluminous, then it is better to apply shadows and lights after the base layer has dried.
Applying shadow and light
8
After complete drying, the stained glass window is ready.
The stained glass window is ready
Film technology
Sketch on different sheets
1
Most often, the sketch is printed on a printer on different sheets and then connected, as in the previous example. If the work is being done for the first time, then you should not take too complex patterns. It is also necessary to equip the workplace with lighting so that the light of the lamp is directed at the sketch from below, otherwise it will be quite difficult to work.
2
All parts of the sketch must be glued together so that the lines match, as shown in the photo. Excess fragments, if any, are cut off with scissors.
Gluing a sketch
3
The glass is cleaned, degreased on the side in contact with the sketch and wiped thoroughly.
Glass cleaning
4
The glass is applied and fixed so that there is no distortion. To do this you will need double-sided tape.
Fixing glass
5
The glass is degreased from the outside and wiped dry.
Degreasing glass
6
In order to make stained glass using this technique, you will need a self-adhesive film. For each fragment, a suitable piece is cut out, in our case in the first step these are strips.
Film strips
7
Before gluing the film, the area is once again degreased and wiped dry.
Re-prep the surface
8
Then the backing is carefully removed from the edge of the film fragment, this edge is fixed to the glass and smoothed with a squeegee.
Removing the substrate
9
With a quick movement so that dust does not have time to get on the glass, the film is pressed and smoothed. Remains can be trimmed with a knife, if there are any.
Film application
10
The film should overlap the contour visible from under the glass.
Film over outline
11
The further process follows the same principle.
Repeating the process
12
Once all the colors are in place, lead framing tape is applied.
Frame sticker
13
The entire tape is rolled with a roller.
Roller rolling
14
At the end of the work, all joints are pressed with a special clamp, and the surface is thoroughly wiped with detergent. The stained glass picture is ready.
Ready stained glass
Spending time with children
Children are also interested in stained glass painting; there are fun sets of absolutely non-toxic paints for children that can be done on glass, ceramics and cellophane.
Not only stained glass painting on glass, but also paper appliqué will be an exciting activity for children. For a child, you can offer to make a picture for his room using a wide variety of materials from the world of papers. Stained glass is made by placing shiny films from colored paper packaging.
We make the base from cardboard. Using a marker or pencil, draw an outline according to the sketch of the drawing; you can use carbon paper. Paint the outline with black paint, and after drying, cut it out with a knife and scissors.
We turn our stencil over, place the required pieces of paper on the front side, trace and cut out the details.
We glue parts by parts to the stencil frames.
Here are more options for work done in this application.
Semi-structural glazing
A semi-structural system is a cross between conventional and structural glazing of a building façade.
The outer glass in this system is tempered or tinted; you can use a regular double-glazed window, which will reduce the cost of the structure. Clamping strips, unlike the post-transom system, are thinner and more attractive. Also included are decorative covers that are mounted on racks or crossbars.
A semi-structural system is used when they want to make the façade solid, but large glass units of structural glazing cannot be used.
Organization of the transition from an inclined part to a vertical part in a semi-structural type of glazing
Another advantage and distinctive feature of this façade glazing system is the integration of hidden sashes that can be opened from the outside.
Return to content
Other uses
Stained glass paints can also be used for other purposes. For example, they can be used to paint vases or other interior items to give them the necessary decorative and stylistic look.
Painting with stained glass paints is usually not difficult. You can entrust this process to children, turning it into fun entertainment for the whole family. It is not necessary to know how to draw, just print out the necessary stencils. The following items may be useful to you when working on stained glass:
- A permanent marker on glass.
- Contours.
- A palette or object on which to mix paints.
- Cone-shaped tip (it is needed to obtain thin and even lines in the drawing).
- Cotton swabs for correcting errors in the drawing.
- Sewing needle. It will help get rid of air bubbles if they appear. This must be done immediately, and not after the paint has hardened.
- Thinners (they will come in handy if the paint is too thick or needs to be removed from a certain area of the picture).
- Paint brushes of different thicknesses.
- Sponge, you can also use a clean rag.
Before work, prepare everything listed in advance. You shouldn’t start painting with stained glass paints right away: first, prepare a stencil. The sketch can be printed if you don't know how to draw. Using a marker, apply the design from the stencil onto the glass; you should immediately outline it. After half an hour has passed and the contour has dried, you can begin the main work. It doesn’t matter where you start in the picture, the main thing is not to accidentally touch an already painted area.
After you apply the paint, no matter what type of paint was used, the design needs at least 4 hours for the paint to set and dry. After this, you can check the quality of the staining. To do this, touch the drawing with your hand. If the dye is applied correctly, the pattern will be smooth and will not have air bubbles. Dried paint does not stick to your hands.
Materials for supporting structure
Silicone sealant is used as a supporting structure in structural glazing of facades. It protects facade elements from atmospheric and mechanical influences and makes the structure airtight.
With high-quality installation and proper design, silicone sealant prevents glass from shifting, chipping, and also resists wind, rain and other precipitation.
Silicone sealant is used for gluing glass and building frames. In addition to glass, metal, stone, ceramic or composite panels can be glued with sealant. The sealant can be the color of the facade or colorless.
Silicone sealants for structural glazing are produced by Dow Corning, Tremco illbruck, UltraGlaze, Sikasil and many others. Silicone sealants of these brands have excellent characteristics and can easily withstand temperature changes from -30 to +40 C.
Method for creating paints from PVA
You can make stained glass materials yourself, and the cost of their production will be minimal. The easiest way is to make paints from PVA glue. Its texture is ideal for application to any surface, since it is thick and not prone to spreading, and lays down in an even layer.
To prepare coloring agents, you will need PVA glue and a pigment of the selected color. You can take several dyes and spread the glue into disposable cups, Kinder Surprise eggs or other small dishes. Add 2-3 teaspoons of glue to each container, then add the required amount of pigment and mix thoroughly. If the shade turns out to be too bright, you can dilute the paint with an additional portion of PVA glue.
The following are used as pigments:
- construction colors;
- watercolor;
- gouache;
- fabric paints;
- gel pen refills;
- paints for Easter eggs;
- food colorings.
In the future, you can mix the finished paints with each other, getting different interesting shades. To increase the thickness of the product, loose eye shadow is introduced into it. Pearlescent shadows will help give stained glass paint a beautiful shine. The result of applying the materials will be very interesting: the fact is that, if desired, the design can be completely removed from the glass and re-glued like a sticker. If you want to get this effect, you need to apply the paint in a thick layer.
It is also permissible to make a drawing on a file (multifold), inside of which it is very convenient to insert a stencil. It is clearly visible through the base and allows you to carefully draw the details of the future stained glass window. Using the file, you can make stained glass paintings even without artistic skills.
It is important to leave the design applied with homemade paints until completely dry (about 10-12 hours), and only then glue it to the window or door. To do this, you just need to attach the picture to the glass and smooth it with your hand.
We analyze the detailed characteristics of the finished stained glass film
It can be used to cover glass not only for decorative purposes, but also as a protective layer for the surface of the glass, protecting it from accidental impacts and damage. If you hit glass or a mirror protected by film, it will not shatter, but the fragments will hang on the film, which to some extent will protect others from injury.
The film coating allows sunlight to pass through well and does not fade due to temperature changes. The film comes in different light transmittance, from a completely transparent tone to a matte shade. It also pleases with a range of colors or a variety of patterns.
The film can be glued in rooms with high humidity, it is moisture resistant and is not afraid of high temperatures.
Cleaning stained glass is as easy as regular glass; it is easy to clean with detergents. The film adheres to the glass very tightly and will serve you for many years.
Film stained glass can be used not only to decorate window glass, but also to create a unique interior design for your apartment.
Niches decorated with stained glass will be a good decoration. If a stained glass window is created not on a through niche, but as wall decor, then local lighting will be needed on the reverse side.
Such partitions can be made either stationary or sliding. Their beauty is that they allow you to visually increase the space.
If you decorate the ceiling with stained glass, it will act as a large lampshade and fill the space with multi-colored diffused light.
In the same way, you can use stained glass on the floor, making it on thick glass and choosing an unusual plot, it will look very original.
If you have a frameless mirror hanging in your hallway, you can make it using the film stained glass technique. You can also decorate small areas of the mirror.
On interior doors or on the mirrors of wardrobes, stained glass will also look very original.
Cable glazing
This type of translucent facades appeared quite recently, but quickly became prestigious. It is a type of spider glazing system.
The fastening technology eliminates the connection of double-glazed windows using frames and partitions. They are mounted point by point using tension structures.
Scheme of attachment to the cable-stayed system
In frameless glazing of facades, glass is subject to special requirements, because it bears the bulk of the load. In addition to good light transmission, it must be durable. Therefore, tempered glass or triplex is used.
As in the spider system, cable-stayed glazing of building facades has different geometric shapes and sizes. The surface of the walls can be flat or curved smooth.
Their scope of application: glazing of architectural monuments, regular and double facades, office partitions, production of glass canopies, canopies and roofs.
Return to content
How to make stained glass
This production is based on the assembled version of pieces of multi-colored glass. This technology has not changed since its inception. This is done by holding glass pieces together with lead tape. It is simply unrealistic to do this at home:
- firstly, stained glass itself is very expensive;
- secondly, you need to have special tools;
- thirdly, you need to be able to cut glass parts according to templates;
- fourthly, the person must have experience in connecting parts with lead - soldering.
Even if you manage to assemble the panel, it’s not a fact that next time it will be as easy. This method is considered classic and can only be done by experienced craftsmen.
The classic method has its origins in glass mosaics. They have a lot in common, for example, the word “smalt”. In mosaic, this is the name given to the fragments from which the entire panel is assembled. Later, this word began to denote parts of a stained glass pattern.
So, work begins by applying a pattern to the glass surface.
- A second similar picture will be needed to make fragments.
- Each smalt or fragment is framed with a U-shaped lead tape. Instead of lead, copper, brass or tin can be used.
- The framed pieces are laid out on the first sketch and connected to each other with solder.
- A brass corner is placed on top of the finished glass picture around the perimeter. The corner is also soldered to complete the composition.
- The finished stained glass window is inserted into the window or door frame.
If the panel will be backlit and hang on the wall, the smalts should be matte on the other side.
Modern technologies make it possible to create any patterns using sandblasting. A stencil is fixed to the surface and exposed areas are sanded under pressure. Then the template is removed and a monochromatic design remains. This method is also not suitable for home creativity.
The next production method is to melt glass parts. It's called fusing, which translates as alloy. The mosaic is assembled and sent to the oven. In the oven, all this is fused with each other and then cooled. Then the process is repeated. Such stained glass canvases are stronger than classic ones and have no seams. The melting temperature is 800 degrees. Stained glass doors have become so popular that some homeowners began to replace part of the bathroom wall, or even window glass, with stained glass or frosted glass - it is not possible to look from the outside through such glass, but such windows do not block light, thereby adding a special charm to the interior.
But now we come to what you can create with your own hands. The easiest way available to everyone is to stick a transparent color film. The necessary parts are cut out of this film and glued to the glass surface. Lead tape is glued along the joint. If the composition will take up space in interior doors, then the tape is glued on both sides.
The second technology is also within the capabilities of any beginner. The method involves painting glass with paints. Anyone can do this method, as well as gluing it with their own hands.
Structural glazing
In addition to a seamless, attractive appearance, structural glazing has great technical advantages.
Peculiarities
The structural system is similar to the traditional one, but has some features:
1. The process of attaching the translucent filling occurs without visible clamping elements. The facade looks stylish because the overhead strips are not visible from the outside.
2. Installation of structural glazing is no different from mullion and transom glazing, only the system is less cumbersome. A glass unit is inserted into the cells of the metal frame and glued with adhesive-sealant. The seams are sealed with silicone sealant, colorless or matched to the tone of the glass unit.
3. Structural glazing differs in the size of the glass. The inner glass is smaller than the outer glass. Thus, the facade elements are installed tightly to each other and create small technological gaps.
The structural system is used in the construction of administrative buildings and offices of large companies, shopping and entertainment centers, hotels, hotels. It is also used in the reconstruction of old buildings.
Advantages
Continuous glazing of facades eliminates the presence of cracks in which dirt and dust accumulate, so it lasts a long time and has the following advantages:
- waterproof;
- high thermal protection;
- high level of sound insulation;
- durability. This system uses a durable, deformation-resistant frame and tempered glass. During the shrinkage of the building, the glass will not crack;
- aesthetic appearance;
- ease of repair.
The cost of the structural system is not much higher than the classical one. One square meter of glazing will cost 8.5 thousand rubles. The amount already includes installation, design work, double-glazed windows and frame.
Return to content
"Jellied"
Filled stained glass is performed in the following sequence:
- We are preparing an assembly table: a flat panel covered with white calico, felt, flannel or flannel.
- We put a stencil on it - a numbered primary sketch.
- We degrease the glass base and place it on the stencil. We take the ends with our hands wearing new textile gloves; You cannot use a suction cup or leave your fingers on your face.
- We bend, straighten and flatten the contours, one at a time, from the left (for left-handers - right) upper corner.
- We adjust it as needed and glue it with PVA. We dry it for a day.
- Fill with paint (see below). Adjacent cells of one color are poured one by one as the previous ones dry out: if it leaks, the dried drip can be easily removed with a safety razor blade.
- Let it dry for another day after filling the last cell, insert it into a metal frame - ready for installation!
For the preparation of paints, see the following, but for now let’s focus on pouring; This is the most responsible procedure. We pour the paint with a generously soaked brush or syringe from the inside along the contour, but under no circumstances touching the curb (see figure)! The paint should naturally flow into the meniscus! If the color comes out a bit runny, after drying, pour it again in the same way.
Filling stained glass cells with paint
Pouring/topping up paint in the middle is unacceptable. If you need a thicker stain there, you need to outline it and pour more there. In this case, two fillings into the frame (along the outer and inner contours) are done without delay, one after the other.
The fact is that the “blyamba” in the middle will disrupt light refraction. The “bokeh effect” known to photographers will appear, and a single such element will disrupt the integrity of the perception of the composition. And if there are a lot of them, then the entire stained glass window will turn out sloppy.
Paints
There are four types of homemade stained glass paints:
- PVA and aniline are the easiest to prepare and the most unstable;
- Soviet-rare ones - on BF-2 glue and ballpoint pen paste;
- Gelatin-aniline - fragile and fade in direct sunlight, but give an ideal meniscus;
- Nitro-oil ones are the most expensive, but have all the advantages without the disadvantages.
First. PVA-aniline paints are prepared simply: dilute 50-100 ml of tableware PVA two or three times with distilled water. Then, in the hot distillate, add aniline dye for fabric according to the instructions for the tablet, and filter through calico, gas or thin women's tights. Drop a few drops into the PVA emulsion, stir, drop a drop on the glass and check the color. Lightened – add a pigment solution; over-darkened – emulsions.
Second. BF-2 is diluted twice with acetone and a hand paste is added dropwise to the solution with stirring. The color is checked with a test drop, as indicated above. It gives an excellent meniscus, the stand is bright, but - alas! – circulation of pure acetone is limited, because it is used in artisanal illegal drug production. But it cannot be replaced with nitro solvent or alcohol.
Third. 6 gr. Edible gelatin is diluted in 200 ml. distillate at 40-50 degrees. A solution of aniline dye, the same as for the first paint, is added drop by drop after cooling to the same temperature and the color is checked in the same way. Strength and resistance to fading can be increased somewhat by covering it with clear acrylic varnish after drying. Aniline with PVA is not possible, it will float.
Fourth. We are preparing a composition of 60% by volume transparent furniture nitro varnish and 40% 647 solvent. Squeeze out artistic oil paint directly from the tube into pea-sized balls, stir, and check the color for a drop. Suitable for acrylic coating; At the same time, the strength is acrylic, and the durability is almost unlimited.
Benefits and price
Compared to traditional glazing methods, structural facades have a number of strengths:
- A large area of translucent filling provides better penetration of sunlight into the room.
- Structural facades are characterized by a high degree of safety, resistance to ultraviolet radiation, climatic conditions and mechanical stress.
- These are easy to operate and maintain designs. In the seamless joints of double-glazed windows there is no place for dust and dirt to accumulate, so the facade rarely requires cleaning.
Cost of structural glazing
The installation price is calculated depending on the size of the floor and the complexity of the supporting structure. The price includes the profile, assembly of the mullion-transom frame, double-glazed windows, fittings, fasteners and sealing materials. The facade of the middle price segment will cost approximately 8,000 rubles per square meter.
Glazing: 2500x4600 mm Products: 50,000 rubles Installation: 23,000 rubles Total: 73,000 rubles
Subscribe
Designer technique
American designer Tiffany Louis revived the art of medieval artists and introduced a very important element into it - copper tape. Previously, lead was used, which emitted toxic fumes that negatively affected the health of the master. He not only improved the technique of creating adhesive stained glass, but also created his own style, starting with the production of decorative indoor lamps.
Stained glass using the Tiffany technique will be considered real and will be approved by real masters. But don’t rush to rejoice, because you have to make serious expenses, such as: purchasing opal or iridescent glass, tools for breaking and cutting glass, a grinder, soldering iron, tin, flux, patina, glass cutter, brass or steel profile for the frame. Horrified by what's shown here? As we remember from the beginning of the article, making stained glass is not a cheap pleasure.
The process of making stained glass using this technique is much more complex than those described above. For example, this creates two instances of the sketch. We will cut one of them and place it on glass of different colors, outline the details with a thin marker and cut them out with a diamond glass cutter. Then we wrap it with foil, smoothing the folds with a wooden spatula.
It's time for the second sketch, on which we will lay out our details, gluing them with tape or glue. We will frame the sketch itself so that the mosaic does not move during work. There should be a small gap between the parts; we need it when soldering. We treat the seams with flux and come to soldering; after completing this stage of work, we again go over the seams with a brush with flux to avoid oxidation.
Manufacturing of stained glass paints
If you make stained glass together with your child, it will be even more interesting for him when the process starts from the very beginning. Namely, from the production of stained glass paints. Vintage paints can be prepared in several ways. Each of the recipes is simple to prepare and also very economical. The material at home will be completely safe and of high quality.
The basis for the manufacture of paints can be:
- PVA glue.
- Gelatin.
- Solvent.
All cooking methods are very simple.
Base PVA glue
Before starting production, you need to prepare suitable utensils. Any small container, for example, an empty gouache jar, is suitable for this purpose. You should take as many containers as you plan to prepare shades for the composition. Pour 2 tbsp into each empty container. l. PVA glue. Next, you need to add a coloring pigment, that is, dye, to the glue. You can choose any coloring substance as a pigment.
Possible coloring pigment:
- fabric or batik paint;
- gel rod;
- construction color;
- gouache or watercolor;
- food coloring for confectionery or eggs;
- watercolor paints.
Any pigment is suitable for production. It must be added to the glue gradually, stirring thoroughly. If the paint becomes pale, you need to add pigment. If the shade turns out to be very bright, this can be corrected by adding a little glue. For a decorative effect and gloss of the future painting, you can add loose shadows or sparkles to the PVA.
Gelatin paint
Gelatin-based paint is completely safe. It is perfect for working with children. It is very simple to prepare. For it you need to take 6 g of edible gelatin and dilute it with a small amount of water. After the gelatin has cooled, you need to add the coloring pigment. It is very convenient to work with, it is quite thick and does not spread at all, and it dries very quickly. Gelatin can be used to paint a vase, glasses or plates. But it has one drawback. It is not water resistant. Therefore, gelatin should be fixed with varnish.
Solvent and glue
Solvent-based paint is not recommended for use by children. Its components are: BF-2 glue, acetone, coloring pigment.